前言
前面一篇博客主要从大致流程的角度说了下client和server建立连接的流程,这篇和下一篇博客会详细的把上一篇不是很细致的地方展开和补充。
初始化阶段
初始化阶段主要就是把Zookeeper类中比较重要的功能类实例化,前面对这个过程说的已经比较详细了。这里主要补充几点:
ClientCnxn初始化
cnxn = new ClientCnxn(connectStringParser.getChrootPath(),
        hostProvider, sessionTimeout, this, watchManager,
        getClientCnxnSocket(), canBeReadOnly);
public ClientCnxn(String chrootPath, HostProvider hostProvider, int sessionTimeout, ZooKeeper zooKeeper,
ClientWatchManager watcher, ClientCnxnSocket clientCnxnSocket,
long sessionId, byte[] sessionPasswd, boolean canBeReadOnly) {可以看到ClientCnxn的构造器中有一个非常重要的参数是ClientCnxnSocket,这也是client和server建立连接的功能类,这里看下如何获得的。
private static ClientCnxnSocket getClientCnxnSocket() throws IOException {
    //获取系统配置
    String clientCnxnSocketName = System
            .getProperty(ZOOKEEPER_CLIENT_CNXN_SOCKET);
    //如果没有特别设置,那么采用NIO的实现为默认实现
    if (clientCnxnSocketName == null) {
        clientCnxnSocketName = ClientCnxnSocketNIO.class.getName();
    }
    try {
        //反射来获取对象实例
        return (ClientCnxnSocket) Class.forName(clientCnxnSocketName).getDeclaredConstructor()
                .newInstance();
    } catch (Exception e) {
        IOException ioe = new IOException("Couldn't instantiate "
                + clientCnxnSocketName);
        ioe.initCause(e);
        throw ioe;
    }
}
可以看到,clientCnxn的对象是通过反射获得的。
如果还记得的话,之前watcher发送的时候就是clientCnxn来发送的,当然,其实client端和server的连接都是通过这个类来做的,具体的方法涉及到doTransport, doIO等,具体使用了NIO的一些方法,之后把NIO和Netty弄得比较清楚后再来把这部分补上。
StaticHostProvider里的等待
public InetSocketAddress next(long spinDelay) {
    //每尝试一次currentindex加一
    ++currentIndex;
    //试了所有的server
    if (currentIndex == serverAddresses.size()) {
        currentIndex = 0;
    }
    //试了一圈就会有currentIndex == lastIndex
    if (currentIndex == lastIndex && spinDelay > 0) {
        try {
            Thread.sleep(spinDelay);
        } catch (InterruptedException e) {
            LOG.warn("Unexpected exception", e);
        }
    } else if (lastIndex == -1) {
        // We don't want to sleep on the first ever connect attempt.
        lastIndex = 0;
    }

    return serverAddresses.get(currentIndex);
}
刚开始看到这个方法的时候很奇怪,一般next方法基本都没有参数的,这里很奇怪的加了个delay的时间,仔细看了看才发现有特殊的考虑,如果所有server都试过了且连不上,就会sleep spinDelay时间再尝试。
创建阶段
如前篇博客所说,当zookeeper构造器中clientCnxn的start方法调用也就是sendthread和eventthread开始run起来时,创建过程便开始了。
public void start() {
sendThread.start();
eventThread.start();
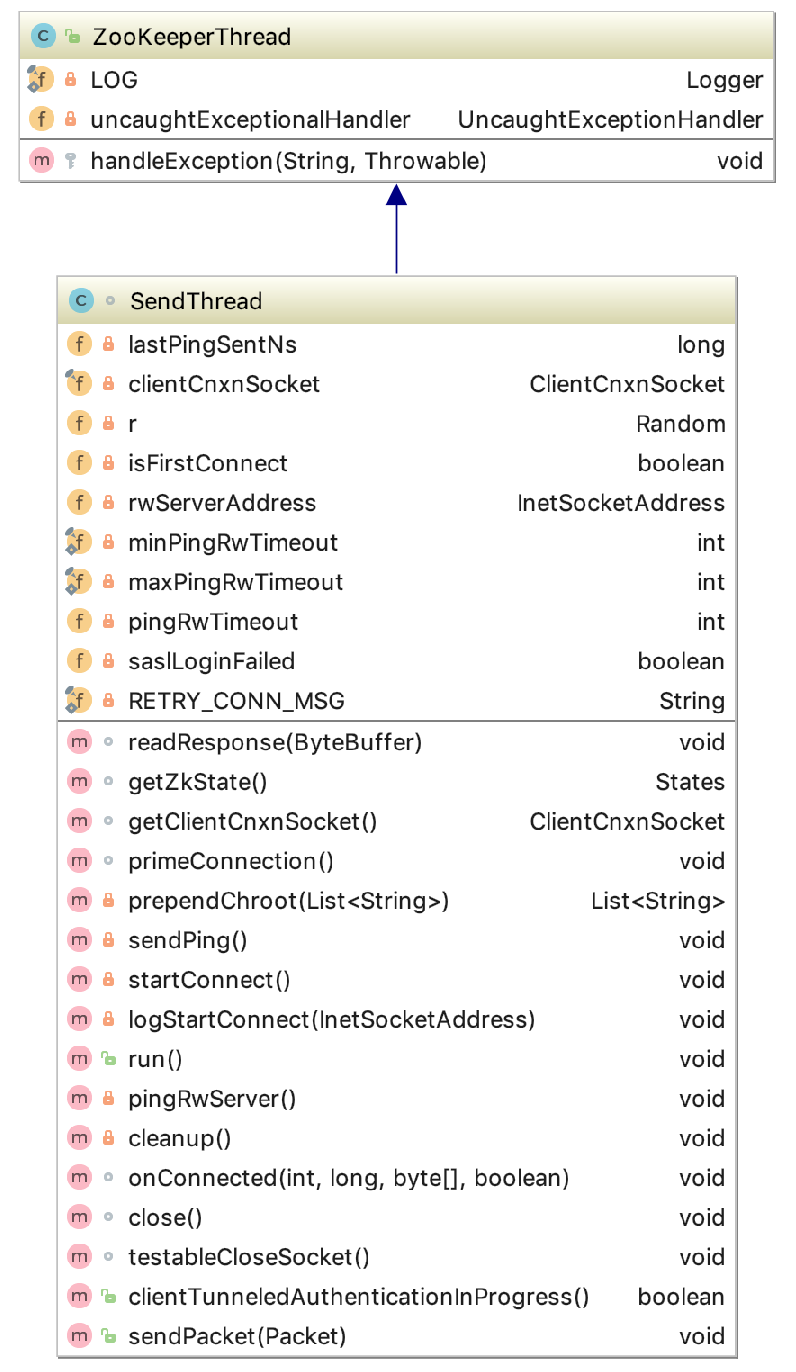
}创建连接的过程主要是sendthread做的,启动了start()方法实际上就是调用了sendthread的run方法,但是这个方法比较复杂,我们从sendThread的别的方法开始,最后再过run方法这样清晰一点。而sendthread的功能之前有说过,这里引用一份别人的总结,下面看方法功能的时候也可以对照:
- 维护了客户端与服务端之间的会话生命周期(通过一定周期频率内向服务端发送PING包检测心跳),如果会话周期内客户端与服务端出现TCP连接断开,那么就会自动且透明地完成重连操作。
- 管理了客户端所有的请求发送和响应接收操作,其将上层客户端API操作转换成相应的请求协议并发送到服务端,并完成对同步调用的返回和异步调用的回调。
- 将来自服务端的事件传递给EventThread去处理。
下面过一下几个比较重要的方法:
sendPing
这是sendthread功能第一点的方法,保证了和server之间的ping连接,也就是心跳。

private void sendPing() {
    lastPingSentNs = System.nanoTime();//lastPingSentNs是上一次ping的时间(nano time)
    RequestHeader h = new RequestHeader(-2, OpCode.ping);//生成ping的特殊请求头
    queuePacket(h, null, null, null, null, null, null, null, null);//把packet加入到outgoingqueue中
}
这里有一点需要注意:
if (p.requestHeader != null
        && p.requestHeader.getType() != OpCode.ping
        && p.requestHeader.getType() != OpCode.auth) {
    synchronized (pendingQueue) {
        pendingQueue.add(p);
    }
}
这是ClientCnxnSocketNIO的doIO方法里的一段,这里想说明的是如果header是ping, auth或空,那么在发送完之后不会加入Pendingqueue中。
在sendthread的readresponse中,对ping和auth的请求都有特别的处理,在第八篇里有分析过这个方法。
if (replyHdr.getXid() == -2) {
    // -2 is the xid for pings
if (replyHdr.getXid() == -4) {
// -4 is the xid for AuthPacket pingRwServer
这个方法是client连接了只读的server时会尝试连接hostprovider里的读写server。
private void pingRwServer() throws RWServerFoundException {
    String result = null;
    InetSocketAddress addr = hostProvider.next(0);//下一个server地址
    LOG.info("Checking server " + addr + " for being r/w." +
            " Timeout " + pingRwTimeout);

    Socket sock = null;
    BufferedReader br = null;
    try {
        //socket变量初始化
        sock = new Socket(addr.getHostName(), addr.getPort());
        sock.setSoLinger(false, -1);
        sock.setSoTimeout(1000);
        sock.setTcpNoDelay(true);
        sock.getOutputStream().write("isro".getBytes());
        sock.getOutputStream().flush();
        sock.shutdownOutput();
        br = new BufferedReader(
                new InputStreamReader(sock.getInputStream()));//获得连接的回复
        result = br.readLine();//读回复
    } catch (ConnectException e) {
        // ignore, this just means server is not up
    } catch (IOException e) {
        // some unexpected error, warn about it
        LOG.warn("Exception while seeking for r/w server " +
                e.getMessage(), e);
    } finally {
        //保护语句
        if (sock != null) {
            try {
                sock.close();
            } catch (IOException e) {
                LOG.warn("Unexpected exception", e);
            }
        }
        if (br != null) {
            try {
                br.close();
            } catch (IOException e) {
                LOG.warn("Unexpected exception", e);
            }
        }
    }

    //如果发现是读写server
    if ("rw".equals(result)) {
        pingRwTimeout = minPingRwTimeout;
        // save the found address so that it's used during the next
        // connection attempt
        rwServerAddress = addr;//保存此server地址,更新rwServerAddress
        throw new RWServerFoundException("Majority server found at "
                + addr.getHostName() + ":" + addr.getPort());//找到读写server,run方法抛异常,client重连到rwServerAddress
    }
}
对异常的catch和处理部分如下:
else if (e instanceof RWServerFoundException) {
    LOG.info(e.getMessage());
} else {
    LOG.warn(
            "Session 0x"
                    + Long.toHexString(getSessionId())
                    + " for server "
                    + clientCnxnSocket.getRemoteSocketAddress()
                    + ", unexpected error"
                    + RETRY_CONN_MSG, e);
}
cleanup();
if (state.isAlive()) {
    eventThread.queueEvent(new WatchedEvent(
            Event.EventType.None,
            Event.KeeperState.Disconnected,
            null));//waitingevent队列中加入断开连接的event,会导致重连
}
可以看到这里把一个断开连接的event加入了队列后,eventthread处理的时候就会重连,而重连的server就是先前设置好的rwServerAddress。
startConnect
从方法名很容易知道,这个方法是用来建立连接的。
private void startConnect() throws IOException {
    // initializing it for new connection
    //初始化变量
    saslLoginFailed = false;
    state = States.CONNECTING;

    InetSocketAddress addr;//socket链接地址
    if (rwServerAddress != null) {
        addr = rwServerAddress;//设置为读写server的地址
        rwServerAddress = null;//这里设为空为了连接断开的时候下次连接可以换一个server
    } else {
        addr = hostProvider.next(1000);//如果读写server地址为空就换hostProvider里的下一个
    }

    setName(getName().replaceAll("\\(.*\\)",
            "(" + addr.getHostName() + ":" + addr.getPort() + ")"));//设置线程的名字
    if (ZooKeeperSaslClient.isEnabled()) {//sasl开启了,sasl有时间再去仔细看看
        try {
            //相应的username和client的初始化
            String principalUserName = System.getProperty(
                    ZK_SASL_CLIENT_USERNAME, "zookeeper");
            zooKeeperSaslClient =
                new ZooKeeperSaslClient(
                        principalUserName+"/"+addr.getHostName());
        } catch (LoginException e) {
            // An authentication error occurred when the SASL client tried to initialize:
            // for Kerberos this means that the client failed to authenticate with the KDC.
            // This is different from an authentication error that occurs during communication
            // with the Zookeeper server, which is handled below.
            LOG.warn("SASL configuration failed: " + e + " Will continue connection to Zookeeper server without "
              + "SASL authentication, if Zookeeper server allows it.");
            eventThread.queueEvent(new WatchedEvent(
              Watcher.Event.EventType.None,
              Watcher.Event.KeeperState.AuthFailed, null));
            saslLoginFailed = true;
        }
    }
    logStartConnect(addr);//打log

    clientCnxnSocket.connect(addr);//开始socket连接
}
总结可以看到主要有下面几步:
- 相关变量初始化;
- 找到对应的server地址;
- sasl的处理及变量初始化、异常处理;
- 打log;
- 连接。
primeConnection
先简单看下代码:
void primeConnection() throws IOException {
    LOG.info("Socket connection established to "
             + clientCnxnSocket.getRemoteSocketAddress()
             + ", initiating session");
    isFirstConnect = false;
    //seenRwServerBefore会在第一次连接上R/Wserver时设置为true
    long sessId = (seenRwServerBefore) ? sessionId : 0;//之前如果连接过rw的server会把sessionid设置成原来的,否则是0
    ConnectRequest conReq = new ConnectRequest(0, lastZxid,
            sessionTimeout, sessId, sessionPasswd);//构建connectRequest
    synchronized (outgoingQueue) {
        // We add backwards since we are pushing into the front
        // Only send if there's a pending watch
        // TODO: here we have the only remaining use of zooKeeper in
        // this class. It's to be eliminated!
        //重连rw server后,把所有watch的信息,auth的信息都放入outgoingqueue发送给server同步
        if (!disableAutoWatchReset) {//是否设置了自动重置watch的选项
            List<String> dataWatches = zooKeeper.getDataWatches();
            List<String> existWatches = zooKeeper.getExistWatches();
            List<String> childWatches = zooKeeper.getChildWatches();
            if (!dataWatches.isEmpty()
                        || !existWatches.isEmpty() || !childWatches.isEmpty()) {

                Iterator<String> dataWatchesIter = prependChroot(dataWatches).iterator();
                Iterator<String> existWatchesIter = prependChroot(existWatches).iterator();
                Iterator<String> childWatchesIter = prependChroot(childWatches).iterator();
                long setWatchesLastZxid = lastZxid;

                //遍历watch集合
                while (dataWatchesIter.hasNext()
                               || existWatchesIter.hasNext() || childWatchesIter.hasNext()) {
                    List<String> dataWatchesBatch = new ArrayList<String>();
                    List<String> existWatchesBatch = new ArrayList<String>();
                    List<String> childWatchesBatch = new ArrayList<String>();
                    int batchLength = 0;

                    // Note, we may exceed our max length by a bit when we add the last
                    // watch in the batch. This isn't ideal, but it makes the code simpler.
                    //最长只能是128kB
                    while (batchLength < SET_WATCHES_MAX_LENGTH) {
                        final String watch;
                        if (dataWatchesIter.hasNext()) {
                            watch = dataWatchesIter.next();
                            dataWatchesBatch.add(watch);
                        } else if (existWatchesIter.hasNext()) {
                            watch = existWatchesIter.next();
                            existWatchesBatch.add(watch);
                        } else if (childWatchesIter.hasNext()) {
                            watch = childWatchesIter.next();
                            childWatchesBatch.add(watch);
                        } else {
                            break;
                        }
                        batchLength += watch.length();
                    }

                    //构件watchset
                    SetWatches sw = new SetWatches(setWatchesLastZxid,
                            dataWatchesBatch,
                            existWatchesBatch,
                            childWatchesBatch);
                    RequestHeader h = new RequestHeader();
                    h.setType(ZooDefs.OpCode.setWatches);//设置请求类型
                    h.setXid(-8);
                    Packet packet = new Packet(h, new ReplyHeader(), sw, null, null);
                    outgoingQueue.addFirst(packet);//加入outgoingqueue
                }
            }
        }

        //auth信息加入outgoingqueue
        for (AuthData id : authInfo) {
            outgoingQueue.addFirst(new Packet(new RequestHeader(-4,
                    OpCode.auth), null, new AuthPacket(0, id.scheme,
                    id.data), null, null));
        }
        outgoingQueue.addFirst(new Packet(null, null, conReq,
                    null, null, readOnly));
    }
    //发送(开始读写)
    clientCnxnSocket.enableReadWriteOnly();
    if (LOG.isDebugEnabled()) {
        LOG.debug("Session establishment request sent on "
                + clientCnxnSocket.getRemoteSocketAddress());//打log
    }
}
可以看到,primeConnection的功能主要就是重连rw server后同步watch和auth的信息。主要有三步:1. 设置sessionid;2. 构建同步的数据并加入outgoingqueue;3. 开启读写。
特别要强调的是:
outgoingQueue.addFirst(new Packet(null, null, conReq, null, null, readOnly));在上面auth数据处理之后,会把带有连接数据的packet放到队列第一位。确保最先发出去的是连接请求(保证了第一个response是被ClientCnxnSocket#readConnectResult处理)。——这里参考博客,但我有点疑问,怎么就保证了收到的第一个一定是这个链接的packet呢?
startConnect和primeConnection的关系(引用):
两者的区别在于NIO的SelectionKey
前者限于connect和accept
后者已经连接完成,开始了write和read,准备开始和zk server完成socket io
有一篇博客讲大致创建过程比较好,引用下:
- 启动SendThread
- 连接服务器(见SendThread.startConnect)
- 产生真正的socket,见ClientCnxnSocketNIO.createSock
- 向select注册一个OP_CONNECT事件并连接服务器,由于是非阻塞连接,此时有可能并不会立即连上,如果连上就会调用SendThread.primeConnection初始化连接来注册读写事件,否则会在接下来的轮询select获取连接事件中处理
- 复位socket的incomingBuffer
- 连接成功后会产生一个connect型的请求发给服务,用于获取本次连接的sessionid
- 进入循环等待来自应用的请求,如果没有就根据时间来ping 服务器
为什么要引用这个是因为比较能说明startconnect和primeconnection的区别,在第二步中调用了startconnect建立了连接后调用primeConnection,在startconnect中可以连接和接收消息,在primeConnection()方法中主要初始化Session、Watch和权限信息,同时注册ClientCnxnSocketNIO对读时间和写时间的监听。
Onconnected
从注释和函数名很容易看出是socket连接的callback。
/**
 * Callback invoked by the ClientCnxnSocket once a connection has been
 * established.//连接建立后的callback
 *
 * @param _negotiatedSessionTimeout
 * @param _sessionId
 * @param _sessionPasswd
 * @param isRO
 * @throws IOException
 */
void onConnected(int _negotiatedSessionTimeout, long _sessionId,
        byte[] _sessionPasswd, boolean isRO) throws IOException {
    negotiatedSessionTimeout = _negotiatedSessionTimeout;//为连接timeout赋值
    if (negotiatedSessionTimeout <= 0) {//没连上
        state = States.CLOSED;//state->closed

        eventThread.queueEvent(new WatchedEvent(
                Watcher.Event.EventType.None,
                Watcher.Event.KeeperState.Expired, null));
        eventThread.queueEventOfDeath();//建立连接失效的event并把代表death的event加入waitingevent的等待队列

        String warnInfo;
        warnInfo = "Unable to reconnect to ZooKeeper service, session 0x"
            + Long.toHexString(sessionId) + " has expired";
        LOG.warn(warnInfo);
        throw new SessionExpiredException(warnInfo);//打log,抛异常
    }
    if (!readOnly && isRO) {
        LOG.error("Read/write client got connected to read-only server");
    }
    readTimeout = negotiatedSessionTimeout * 2 / 3; //read的timeout为啥设置成真实timeout的2/3,
    connectTimeout = negotiatedSessionTimeout / hostProvider.size();//均分timeout时间
    hostProvider.onConnected();//更改hostprovider里的状态
    sessionId = _sessionId;
    sessionPasswd = _sessionPasswd;
    state = (isRO) ?
            States.CONNECTEDREADONLY : States.CONNECTED;//设置连接状态和session信息
    seenRwServerBefore |= !isRO;
    LOG.info("Session establishment complete on server "
            + clientCnxnSocket.getRemoteSocketAddress()
            + ", sessionid = 0x" + Long.toHexString(sessionId)
            + ", negotiated timeout = " + negotiatedSessionTimeout
            + (isRO ? " (READ-ONLY mode)" : ""));//打log
    KeeperState eventState = (isRO) ?
            KeeperState.ConnectedReadOnly : KeeperState.SyncConnected;//是否是readonly的连接
    eventThread.queueEvent(new WatchedEvent(
            Watcher.Event.EventType.None,
            eventState, null));//吧连接成功的event加入队列
}
readResponse
这个方法比较长,一段一段来分析。
ByteBufferInputStream bbis = new ByteBufferInputStream(
        incomingBuffer);
BinaryInputArchive bbia = BinaryInputArchive.getArchive(bbis);//生成反序列化的archive
ReplyHeader replyHdr = new ReplyHeader();

replyHdr.deserialize(bbia, "header");//解析出header
解析出回复头后开始处理逻辑。
if (replyHdr.getXid() == -2) {//如果是ping的回复
    // -2 is the xid for pings
    if (LOG.isDebugEnabled()) {
        LOG.debug("Got ping response for sessionid: 0x"
                + Long.toHexString(sessionId)
                + " after "
                + ((System.nanoTime() - lastPingSentNs) / 1000000)
                + "ms");//打log
    }
    return;
}
if (replyHdr.getXid() == -4) {//如果是auth的回复
    // -4 is the xid for AuthPacket
    if(replyHdr.getErr() == KeeperException.Code.AUTHFAILED.intValue()) {//如果验证失败
        state = States.AUTH_FAILED;//状态设置
        eventThread.queueEvent( new WatchedEvent(Watcher.Event.EventType.None,
            Watcher.Event.KeeperState.AuthFailed, null) );//把验证失败加入waitingEvents队列
    }
    if (LOG.isDebugEnabled()) {
        LOG.debug("Got auth sessionid:0x"
                + Long.toHexString(sessionId));//打log
    }
    return;
}
if (replyHdr.getXid() == -1) {//如果是通知
    // -1 means notification
    if (LOG.isDebugEnabled()) {
        LOG.debug("Got notification sessionid:0x"
                  + Long.toHexString(sessionId));//打log
    }
    WatcherEvent event = new WatcherEvent();
    event.deserialize(bbia, "response");

    // convert from a server path to a client path
    //把server端的path转换成client端的path
    if (chrootPath != null) {
        String serverPath = event.getPath();
        if(serverPath.compareTo(chrootPath)==0)
            event.setPath("/");//把server端地址为chrootPath作为根节点
        else if (serverPath.length() > chrootPath.length())
            event.setPath(serverPath.substring(chrootPath.length()));//获取地址
        else {
            LOG.warn("Got server path " + event.getPath()
                     + " which is too short for chroot path "
                     + chrootPath);//server端地址比chrootPath.length()不正常,打log
        }
    }

    WatchedEvent we = new WatchedEvent(event);//WatcherEvent生成WatchedEvent
    if (LOG.isDebugEnabled()) {
        LOG.debug("Got " + we + " for sessionid 0x"
                  + Long.toHexString(sessionId));
    }

    eventThread.queueEvent( we );//加入waitingEvents队列
    return;
}
// If SASL authentication is currently in progress, construct and
// send a response packet immediately, rather than queuing a
// response as with other packets.
//sasl验证失败或者验证在进行中就发送一个请求(不排队)
if (clientTunneledAuthenticationInProgress()) {
GetSASLRequest request = new GetSASLRequest();
request.deserialize(bbia,"token");
zooKeeperSaslClient.respondToServer(request.getToken(),
ClientCnxn.this);
return;
}Packet packet;
synchronized (pendingQueue) {//处理pendingqueue
//从前面代码的分析可知,auth和ping以及正在处理的sasl不在pendingqueue中(不会走到这一步),而触发的watch也不pendingqueue中,是server发过来去watchmanager里去找的,但是异步的AsyncCallBack在
if (pendingQueue.size() == 0) {
throw new IOException("Nothing in the queue, but got "
+ replyHdr.getXid());//没有元素
}
packet = pendingQueue.remove();//获取元素
}
/*
* Since requests are processed in order, we better get a response
* to the first request!
*/
try {
if (packet.requestHeader.getXid() != replyHdr.getXid()) {//顺序错误
packet.replyHeader.setErr(
KeeperException.Code.CONNECTIONLOSS.intValue());
throw new IOException("Xid out of order. Got Xid "
+ replyHdr.getXid() + " with err " +
+ replyHdr.getErr() +
" expected Xid "
+ packet.requestHeader.getXid()
+ " for a packet with details: "
+ packet );
}
//属性设置
packet.replyHeader.setXid(replyHdr.getXid());
packet.replyHeader.setErr(replyHdr.getErr());
packet.replyHeader.setZxid(replyHdr.getZxid());
if (replyHdr.getZxid() > 0) {
lastZxid = replyHdr.getZxid();
}
if (packet.response != null && replyHdr.getErr() == 0) {
packet.response.deserialize(bbia, "response");//反序列化response
}
if (LOG.isDebugEnabled()) {
LOG.debug("Reading reply sessionid:0x"
+ Long.toHexString(sessionId) + ", packet:: " + packet);//打log
}
} finally {
finishPacket(packet);//加入waitingevents队列,之前watcher工作机制时讲到watcher注册后会把packet加入队列中
}总结:
- 反序列化response;
- 根据回复头来处理,如果是ping,auth和sasl直接处理后返回,不会加入waitingevent队列;
- 如果是server的通知表示是event,加入队列
- 处理pendingqueue里已经发送的packet。
run
run方法是sendthread乃至建立连接最核心的方法,内容也比较长,我们一节一节来看。
@Override
public void run() {
    clientCnxnSocket.introduce(this,sessionId);
    clientCnxnSocket.updateNow();
    clientCnxnSocket.updateLastSendAndHeard();
    int to;
    long lastPingRwServer = Time.currentElapsedTime();
    final int MAX_SEND_PING_INTERVAL = 10000; //10 seconds
很明显,这一段最开始的代码就是clientCnxnSocket相关的初始化工作。
while (state.isAlive()) {
    try {
        if (!clientCnxnSocket.isConnected()) {//未连接
            if(!isFirstConnect){
                try {
                    Thread.sleep(r.nextInt(1000));
                } catch (InterruptedException e) {
                    LOG.warn("Unexpected exception", e);
                }
            }
            // don't re-establish connection if we are closing
            if (closing || !state.isAlive()) {//这里最后有用到
                break;
            }
            startConnect();//连接
            clientCnxnSocket.updateLastSendAndHeard();
        }
然后开始检查和服务器的连接状态,如果没有连接就会调用startConnect()去连接server;如果已经连接上了那么就会定期发送ping来维持心跳检测。
if (state.isConnected()) {
    // determine whether we need to send an AuthFailed event.
    if (zooKeeperSaslClient != null) {
        boolean sendAuthEvent = false;
        if (zooKeeperSaslClient.getSaslState() == ZooKeeperSaslClient.SaslState.INITIAL) {//sasl状态
            try {
                zooKeeperSaslClient.initialize(ClientCnxn.this);//sasl初始化,后面再研究
            } catch (SaslException e) {
               LOG.error("SASL authentication with Zookeeper Quorum member failed: " + e);
                state = States.AUTH_FAILED;
                sendAuthEvent = true;
            }
        }
        KeeperState authState = zooKeeperSaslClient.getKeeperState();//连接状态
        if (authState != null) {
            if (authState == KeeperState.AuthFailed) {//验证失败
                // An authentication error occurred during authentication with the Zookeeper Server.
                state = States.AUTH_FAILED;
                sendAuthEvent = true;
            } else {
                if (authState == KeeperState.SaslAuthenticated) {
                    sendAuthEvent = true;
                }
            }
        }

        if (sendAuthEvent == true) {
            eventThread.queueEvent(new WatchedEvent(
                  Watcher.Event.EventType.None,
                  authState,null));
        }
    }
    //readTimeout = 2/3的sessiontimeout
    to = readTimeout - clientCnxnSocket.getIdleRecv();//如果已经连接上,预计读超时时间 - 距离上次读已经过去的时间
} else {
    to = connectTimeout - clientCnxnSocket.getIdleRecv();//如果没连接上,预计连接时间 - 上次读已经过去的时间,这两次获得的就是是否超过了预计的timeout时间
}

if (to <= 0) {//超时
    String warnInfo;
    warnInfo = "Client session timed out, have not heard from server in "
        + clientCnxnSocket.getIdleRecv()
        + "ms"
        + " for sessionid 0x"
        + Long.toHexString(sessionId);
    LOG.warn(warnInfo);
    throw new SessionTimeoutException(warnInfo);//打log,抛异常
}
if (state.isConnected()) {//如果是连接状态
   //1000(1 second) is to prevent race condition missing to send the second ping
   //also make sure not to send too many pings when readTimeout is small
//计算到下次ping的时间,这里做了优化,如果设置的时间过小会有个调节机制
    int timeToNextPing = readTimeout / 2 - clientCnxnSocket.getIdleSend() -
          ((clientCnxnSocket.getIdleSend() > 1000) ? 1000 : 0);
    //send a ping request either time is due or no packet sent out within MAX_SEND_PING_INTERVAL
    if (timeToNextPing <= 0 || clientCnxnSocket.getIdleSend() > MAX_SEND_PING_INTERVAL) {//如果已经过了一半的readtimeout时间或者超过十秒没有ping
        sendPing();//发送ping
        clientCnxnSocket.updateLastSend();
    } else {
        if (timeToNextPing < to) {//如果预计下次ping的时间 < 实际距离下次ping的时间
            to = timeToNextPing;
        }
    }
}
接下来是根据连接到的server的状态来决策,如果是只读的server,会自动去寻找读写的server。
// If we are in read-only mode, seek for read/write server
if (state == States.CONNECTEDREADONLY) {//连接是CONNECTEDREADONLY,那么连接到的server就是read-only的
    long now = Time.currentElapsedTime();
    int idlePingRwServer = (int) (now - lastPingRwServer);//离上次ping读写server的时间
    if (idlePingRwServer >= pingRwTimeout) {
        lastPingRwServer = now;//更新连接读写server的时间
        idlePingRwServer = 0;
        pingRwTimeout =
            Math.min(2*pingRwTimeout, maxPingRwTimeout);
        pingRwServer();//尝试去连接读写server
    }
    to = Math.min(to, pingRwTimeout - idlePingRwServer);
}
然后会把发送outgoingqueue中的请求数据并读取server的回复。
clientCnxnSocket.doTransport(to, pendingQueue, outgoingQueue, ClientCnxn.this);最后是一些清理工作和对连接断开的处理。这里已经跳出了上面的循环,有几个地方需要注意:
cleanup();//连接和几个queue的清理
clientCnxnSocket.close();//关闭连接
if (state.isAlive()) {//1️⃣
    eventThread.queueEvent(new WatchedEvent(Event.EventType.None,
            Event.KeeperState.Disconnected, null));//加入一个断开连接的event
}
ZooTrace.logTraceMessage(LOG, ZooTrace.getTextTraceLevel(),
        "SendThread exited loop for session: 0x"
               + Long.toHexString(getSessionId()));//打log
1️⃣上面循环的条件就是while(state.isAlive()),之所以跳出了循环这里还要判断state状态的原因是
// don't re-establish connection if we are closing
if (closing || !state.isAlive()) {
    break;
}
在run方法最开始的代码中会去判断closing的状态,closing是在client主动发送断开连接的消息后closing才会设置成为false,而run方法中的while循环跳出来且state是alive的状态只有可能是client端主动发送了断开连接的消息,这时就给eventthread增加一个断开连接的事件去处理。
总结,run方法主要做了下面几个工作:
- clientCnxnSocket及相关参数的初始化;
- 如果client端没有连接上server就会去尝试连接;
- 无论是否连接上会去检测连接是否超时;
- 如果已经连接上了那么会定期去发送心跳检测和server的连接状态;
- 如果连接到了readonly的server,会主动去连接读写的server;
- 发送outgoingqueue里的请求并接受server的回复;
- 包含连接断开的相关清理工作。
到这里创建阶段基本就结束了,感觉这个过程主要的流程和一些处理大致明白了,但是过程中有非常多的细节,这可能需要以后如果有用到的地方再仔细看看。
思考
primeConnection关于request和response的顺序问题
如前面所说,怎么保证顺序
RW和readonly模式
server的这两种模式各自条件是?
session的工作机制
sessId, sessionId
其实sessId就是sessionId,seenRwServerBefore在第一次连接时会被设置为true,sessId在未连接时为0,第一次建立连接时构建的ConnectRequest中会设置sessionId为0。
不在pendingqueue里的请求
auth和ping以及正在处理的sasl没有加入pendingQueue,触发的watch也没有在pendingQueue中。根据上一篇的参考第一篇中notification event的介绍可以知道触发的watch是server的主动通知,不会存在pendingqueue中。针对auth和ping的处理,在第八篇里当时对replyHdr的xid不是很清楚,当时思考里也提了这个问题,现在可以知道是针对auth和ping的。
sendping和pingRwServer
前者是心跳验证,后者是连接到readonly的server后尝试连接读写server。
大致连接过程
首先与ZooKeeper服务器建立连接,有两层连接要建立。
客户端与服务器端的TCP连接
- 在TCP连接的基础上建立session关联 建立TCP连接之后,客户端发送ConnectRequest请求,申请建立session关联,此时服务器端会为该客户端分配sessionId和密码,同时开启对该session是否超时的检测。
- 当在sessionTimeout时间内,即还未超时,此时TCP连接断开,服务器端仍然认为该sessionId处于存活状态。 此时,客户端会选择下一个ZooKeeper服务器地址进行TCP连接建立,TCP连接建立完成后,拿着之前的sessionId和密码发送ConnectRequest请求,如果还未到该sessionId的超时时间,则表示自动重连成功。 对客户端用户是透明的,一切都在背后默默执行,ZooKeeper对象是有效的。
如果重新建立TCP连接后,已经达到该sessionId的超时时间了(服务器端就会清理与该sessionId相关的数据),则返回给客户端的sessionTimeout时间为0,sessionid为0,密码为空字节数组。 客户端接收到该数据后,会判断协商后的sessionTimeout时间是否小于等于0,如果小于等于0,则使用eventThread线程先发出一个KeeperState.Expired事件,通知相应的Watcher。 然后结束EventThread线程的循环,开始走向结束。此时ZooKeeper对象就是无效的了,必须要重新new一个新的ZooKeeper对象,分配新的sessionId了。
参考
https://www.jianshu.com/p/f69e6de5f169
http://www.cnblogs.com/leesf456/p/6098255.html
https://my.oschina.net/pingpangkuangmo/blog/486780
https://blog.csdn.net/cnh294141800/article/details/53039482
https://www.cnblogs.com/shangxiaofei/p/7171882.html
《从Paxos到Zookeeper》