前言
内容主要参考自《Spring源码深度解析》一书,算是读书笔记或是原书的补充。进入正文后可能会引来各种不适,毕竟阅读源码是件极其痛苦的事情。
本文主要涉及书中第九章的部分,依照书中内容以及个人理解对Spring源码进行了注释,详见Github仓库:https://github.com/MrSorrow/spring-framework
MyBatis是一个数据库的框架,相信读者对其不会陌生,这里就不多做介绍了。本文主要研究Spring如何整合MyBatis,以及其整合原理,从Spring+MyBatis的整合方式感受其他框架整合Spring的思路是如何实现的。
I. MyBatis使用示例
MyBatis有着自己独立使用方法,了解其独立使用的方法对分析Spring整合MyBatis非常有帮助,因为Spring无非就是将这些功能进行封装以简化我们的开发流程,至于MyBatis如何实现数据库的增删改查,包装JDBC就需要研究MyBatis的源码了。
我们来看一下 MyBatis独立使用。
添加MyBatis相关依赖
在 gradle 配置文件中,添加上MyBatis的 jar 包,由于本人习惯将 mapper 接口和 mapper 配置文件放在一起,所以需要设置程序打包时不能忽略 src/main/java 下的 mapper 配置文件。
dependencies {
    compile(project(":spring-beans"))
    compile(project(":spring-context"))
    compile(project(":spring-aop"))
    compile(project(":spring-jdbc"))
    compile group: 'org.springframework', name: 'spring-aspects', version: '5.0.7.RELEASE'
    compile group: 'org.apache.commons', name: 'commons-dbcp2', version: '2.5.0'
    compile group: 'mysql', name: 'mysql-connector-java', version: '5.1.18'

    compile group: 'org.mybatis', name: 'mybatis', version: '3.4.6'

    testCompile group: 'junit', name: 'junit', version: '4.12'
}

sourceSets.main.resources.srcDirs = ["src/main/java","src/main/resources"]
新建实体类
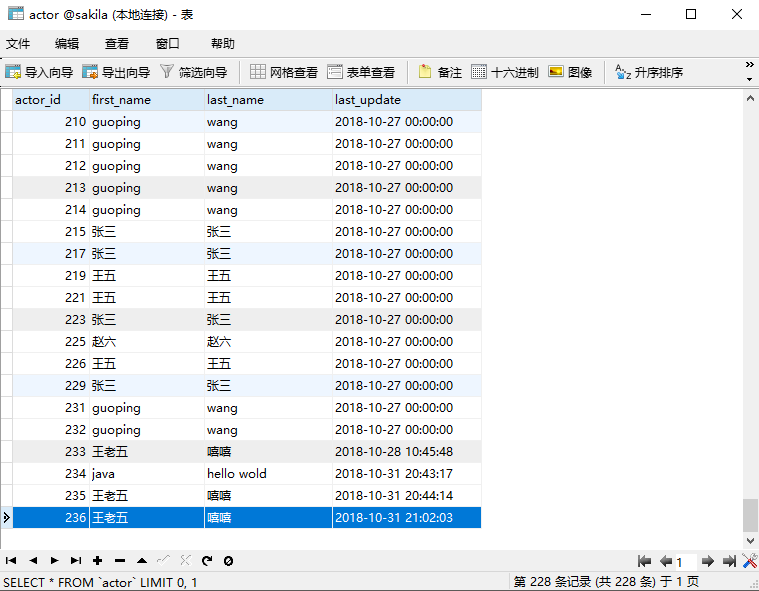
我们继续使用上一篇文章使用的数据库表 actor,创建对应的表的实体类 Actor。
package guo.ping.mybatis;

import java.sql.Timestamp;

/**
 * @description: 测试Mybatis使用
 * @author: guoping wang
 * @date: 2018/10/21 18:47
 * @project: spring
 */
public class Actor {

   private Integer id;
   private String firstName;
   private String lastName;
   private Timestamp lastUpdate;

   // Constuctor,setter,getter and toString
}
创建Mapper接口
Mapper 接口是指数据库操作的映射接口文件,也就是我们常常说的 DAO,用于映射数据库的操作,可以通过配置文件来指定接口定义的方法所对应的 SQL 语句或者直接使用Java提供的注解方式进行 SQL 语句的指定。
public interface IActorMapper {
   void insertActor(Actor actor);
   Actor getActorById(Integer id);
}
我们定义了两个基本数据库操作方法,一个是插入一条 Actor 记录,还有一个是根据 actor_id 获取查询 Actor。
Mapper配置文件
这里我们没有采用注解的方式指定 Mapper 接口对应方法的 SQL 语句,而是以配置文件的方式。MyBatis会将这里设定的 SQL 与对应的 Java接口相关联,以保证在MyBatis中调用接口的时候会到数据库中执行相应的 SQL 来简化开发。
<?xml version='1.0' encoding='UTF-8' ?>
<!DOCTYPE mapper PUBLIC "-//mybatis.org//DTD Mapper 3.0//EN" "http://mybatis.org/dtd/mybatis-3-mapper.dtd">
<!--namespace是mapper接口的全限定类名,否则运行时报错"is not known to the MapperRegistry"-->
<mapper namespace="guo.ping.mybatis.IActorMapper">
   <insert id="insertActor" parameterType="Actor">
      insert into actor(first_name, last_name, last_update) values (#{firstName}, #{lastName}, #{lastUpdate})
   </insert>
   <select id="getActorById" parameterType="java.lang.Integer" resultType="Actor">
      select * from actor where actor_id = #{id}
   </select>
</mapper>
MyBatis配置文件
配置文件主要用于配置程序中可变性高的设置,一个偏大的程序一定会存在一些经常会变化的变量,如果每次变化都需要改变源码那会是非常糟糕的设计。所以,我们看到各种各样的框架或者应用的时候都免不了要编写配置文件。MyBatis中的配置文件主要封装在 Configuration 标签中,配置文件的基本结构如下所示。
<configuration>                    <!-- 根元素 -->
    <properties/>                  <!-- 定义配置外在化 -->
    <settings/>                    <!-- 一些全局性的配置 -->
    <typeAliases/>                 <!-- 为一些类定义别名 -->
    <typeHandles/>                 <!-- 定义Java类型与数据库中的数据类型之间的转换关系 -->
    <objectFactory/>               <!-- 指定结果集对象的实例是如何创建的 -->
    <plugins/>                     <!-- MyBatis的插件,插件可以修改MyBatis内部的运行规则 -->

    <environments>                 <!-- 环境 -->
        <environment>              <!-- 配置MyBatis的环境 -->
            <transanctionManager/> <!-- 配置事务管理器 -->
            <dataSource/>          <!-- 配置数据源 -->
        </environment>
    </environments>

    <databaseIdProvider/>          <!-- 数据库厂商标识 -->
    <mappers/>                     <!-- 映射器 -->
</configuration>
这里我们的MyBatis配置文件如下,主要配置了 Actor 类的别名、数据源以及 mapper 文件地址等。
<?xml version='1.0' encoding='UTF-8' ?>
<!DOCTYPE configuration PUBLIC "-//mybatis.org//DTD Config 3.0//EN" "http://mybatis.org/dtd/mybatis-3-config.dtd">
<configuration>
   <settings>
      <setting name="cacheEnabled" value="false"/>
      <setting name="useGeneratedKeys" value="true"/>
      <setting name="defaultExecutorType" value="REUSE"/>
   </settings>
   <!--定义guo.ping.mybatis.Actor的别名,mapper文件中发挥作用-->
   <typeAliases>
      <typeAlias type="guo.ping.mybatis.Actor" alias="Actor" />
   </typeAliases>
   <environments default="development">
      <environment id="development">
         <transactionManager type="jdbc"/>
         <dataSource type="POOLED">
            <property name="driver" value="com.mysql.jdbc.Driver" />
            <property name="url" value="jdbc:mysql://127.0.0.1:3306/sakila" />
            <property name="username" value="root" />
            <property name="password" value="1234" />
         </dataSource>
      </environment>
   </environments>
   <!--定义mapper文件路径-->
   <mappers>
      <mapper resource="guo/ping/mybatis/ActorMapper.xml" />
   </mappers>
</configuration>
测试
编写一个用于获取单例的 SqlSessionFactory 的工具类,可以清晰的看到创建方式,利用 SqlSessionFactoryBuilder 读取MyBatis配置文件创建出单例的 SqlSessionFactory。
public class MyBatisUtil {
   private static final SqlSessionFactory sqlSessionFactory;
   static {
      String resouce = "single-mybatis-config.xml";
      Reader reader = null;

      try {
         reader = Resources.getResourceAsReader(resouce);
      } catch (IOException e) {
         e.printStackTrace();
      }
      sqlSessionFactory = new SqlSessionFactoryBuilder().build(reader);
   }

   public static SqlSessionFactory getSqlSessionFactory() {
      return sqlSessionFactory;
   }
}
新建测试类:
public class TestMapper {

   static SqlSessionFactory sqlSessionFactory = null;
   static {
      sqlSessionFactory = MyBatisUtil.getSqlSessionFactory();
   }

   @Test
   public void testInsertActor() {
      SqlSession sqlSession = sqlSessionFactory.openSession();
      try {
         IActorMapper actorMapper = sqlSession.getMapper(IActorMapper.class);
         actorMapper.insertActor(new Actor(null,"王老五", "嘻嘻", new Timestamp(System.currentTimeMillis())));
         sqlSession.commit();
      } finally {
         sqlSession.close();
      }
   }

   @Test
   public void getActorById() {
      SqlSession sqlSession = sqlSessionFactory.openSession();
      try {
         IActorMapper actorMapper = sqlSession.getMapper(IActorMapper.class);
         Actor actor = actorMapper.getActorById(100);
         System.out.println(actor);
      } finally {
         sqlSession.close();
      }
   }
}
测试结果:

II. Spring+MyBatis
了解了MyBatis的独立使用过程后,我们再看看它与Spring整合的使用方式,比对之前的示例来找出 Spring究竟为我们做了哪些操作来简化使用MyBatis。
使用之前,我们需要带入Spring整合MyBatis的整合包。
dependencies {
    compile(project(":spring-beans"))
    compile(project(":spring-context"))
    compile(project(":spring-aop"))
    compile(project(":spring-jdbc"))
    compile group: 'org.springframework', name: 'spring-aspects', version: '5.0.7.RELEASE'
    compile group: 'org.apache.commons', name: 'commons-dbcp2', version: '2.5.0'
    compile group: 'mysql', name: 'mysql-connector-java', version: '5.1.18'
    compile group: 'org.mybatis', name: 'mybatis', version: '3.4.6'

    compile group: 'org.mybatis', name: 'mybatis-spring', version: '1.3.2'

    testCompile group: 'junit', name: 'junit', version: '4.12'
}
对于实体类、Mapper 接口、Mapper 配置文件我们可以保持不变,需要重新编写MyBatis配置文件以及Spring配置文件等。
MyBatis配置文件
对比独立使用MyBatis时的配置文件,整合的配置文件除了移除 environments 配置外并没有太多的变化。
<?xml version='1.0' encoding='UTF-8' ?>
<!DOCTYPE configuration PUBLIC "-//mybatis.org//DTD Config 3.0//EN" "http://mybatis.org/dtd/mybatis-3-config.dtd">
<configuration>
   <!--定义guo.ping.mybatis.Actor的别名,mapper文件中发挥作用-->
   <typeAliases>
      <typeAlias type="guo.ping.mybatis.Actor" alias="Actor" />
   </typeAliases>
   <!--定义mapper文件路径-->
   <mappers>
      <mapper resource="guo/ping/mybatis/ActorMapper.xml" />
   </mappers>
</configuration>
其实内容已经很少了,那么如果我们不使用别名,mapper 文件我们使用扫描包的方式,其实就只剩一个 configuration 空标签,这和我们平时在使用 SSM 框架时配置MyBatis配置文件时一模一样。下文也会详细提及扫描包方式获取所有 mapper 配置文件方式的原理。
Spring配置文件
配置文件是Spring的核心,Spring的所有操作也都是由配置文件开始的。所以,我们的示例也首先从配置文件开始。
<?xml version='1.0' encoding='UTF-8' ?>
<beans xmlns="http://www.springframework.org/schema/beans"
xmlns:xsi="http://www.w3.org/2001/XMLSchema-instance"
xsi:schemaLocation="http://www.springframework.org/schema/beans http://www.springframework.org/schema/beans/spring-beans.xsd">
<bean id="dataSource" class="org.apache.commons.dbcp2.BasicDataSource">
<property name="driverClassName" value="com.mysql.jdbc.Driver" />
<property name="url" value="jdbc:mysql://127.0.0.1:3306/sakila?useUnicode=true&characterEncoding=UTF-8&zeroDateTimeBehavior=convertToNull" />
<property name="username" value="root" />
<property name="password" value="1234" />
<!--连接池启动时的初始值-->
<property name="initialSize" value="1" />
<!--连接池的最大活动连接数-->
<property name="maxTotal" value="5" />
<!--最大空闲值,当经过一个高峰时间后,连接池可以慢慢将已经用不到的连接慢慢释放掉一部分,一致减少到maxIdel为止-->
<property name="maxIdle" value="2" />
<!--最小空闲值,当空闲的连接数少于阈值时,连接池就会预申请取一些连接,以免洪峰来时来不及申请-->
<property name="minIdle" value="1" />
<property name="defaultAutoCommit" value="true" />
</bean>
<bean id="sqlSessionFactory" class="org.mybatis.spring.SqlSessionFactoryBean" >
<property name="configLocation" value="classpath:spring-mybatis-config.xml" />
<property name="dataSource" ref="dataSource" />
</bean>
<bean id="actorMapper" class="org.mybatis.spring.mapper.MapperFactoryBean">
<property name="mapperInterface" value="guo.ping.mybatis.IActorMapper"/>
<property name="sqlSessionFactory" ref="sqlSessionFactory"/>
</bean>
</beans>
我们一共配置了三个 bean 的定义,分别是连接池,SqlSessionFactory 和 MapperFactoryBean。对比之前独立使用MyBatis的配置文件,我们发现,之前在 environments 中设置的 dataSource 被转移到了Spring的核心配置文件中管理。而且,针对于 MyBatis,注册了 org.mybatis.Spring.SqlSessionFactoryBean 类型 bean,以及用于映射接口的 org.mybatis.Spring. mapper.MapperFactoryBean,这两个 bean 的作用我们后面会详细分析。
之前我们了解到,MyBatis提供的配置文件包含了诸多属性,虽然大多数情况我们都会保持MyBatis原有的风格,将MyBatis的配置文件独立出来,并在Spring中的 org.mybatis.Spring. SqlSessionFactoryBean 类型的bean中通过 configLocation 属性引入,但是,这并不代表Spring不支持直接配置。也就是说,利用Spring与MyBatis整合,之前MyBatis配置文件中的配置,都是可以直接用Spring配置文件配置的,只是我们不想这样做而已。
以上面示例为例,完全可以省去 spring-mybatis-config.xml 文件,将其中的配置以属性的方式注入到 SqlSessionFactoryBean 中,至于每个属性名称以及用法,我们会在下文进行详细的分析。
测试
至此,我们已经完成了Spring与MyBatis的整合,我们发现,对于MyBatis方面的配置文件,除了将 dataSource 配置移到Spring配置文件中管理外,并没有太多变化,而在Spring的配置文件中又增加了用于处理MyBatis的两个 bean。
Spring整合MyBatis的优势主要在于使用上,我们来看看Spring中使用MyBatis的用法。在Spring中使用MyBatis非常方便,用户甚至无法察觉自己正在使用MyBatis,而这一切相对于独立使用MyBatis时必须要做的各种冗余操作来说无非是大大简化了我们的工作量。
public class TestSpringMybatis {
   @Test
   public void testSpringAndMybatis() {
      ApplicationContext context = new ClassPathXmlApplicationContext("mybatisSpring-Test.xml");
      IActorMapper actorMapper = (IActorMapper) context.getBean("IActorMapper");
      Actor actor = actorMapper.getActorById(200);
      System.out.println(actor);

      Actor newActor = new Actor(null, "java", "hello wold", new Timestamp(System.currentTimeMillis()));
      actorMapper.insertActor(newActor);
   }
}
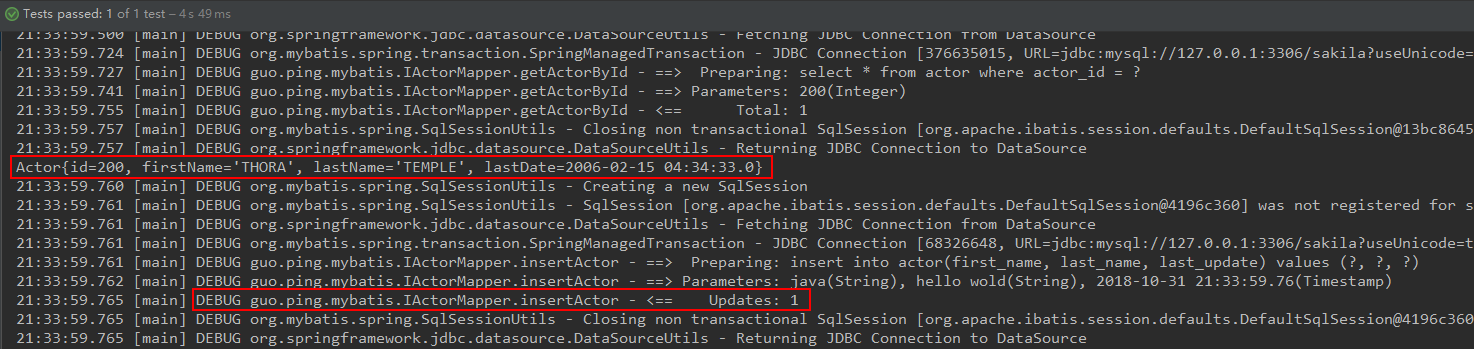
测试结果如下:
思考
我们通过对比两种方式下使用MyBatis的不同,简单的揣摩Spring框架为我们使用MyBatis做了哪些工作。首先,我们不需要自己去创建单例的 SqlSessionFactory,Spring应该会帮我们维护这个单例 bean;其次,事务的管理、session的开启关闭也不需要我们亲力亲为,Spring应该用 AOP 帮助我们搞定了套路代码;Spring包装了MyBatis获取 mapper 接口实例的 sqlSession.getMapper(xxx.class) 方法,而是直接使用Spring的 getBean 方式,让用户毫无察觉。
III. 源码分析
下面我们就对思考中的三个点进行详细的源码分析。通过查看整合示例中的Spring配置文件,我们可以知道配置的 bean 其实是成树状结构的,而在树的最顶层是类型为 org.mybatis.spring.SqlSessionFactoryBean 的 bean,它将其他相关 bean 组装在了一起,那么,我们的分析就从此类开始。
sqlSessionFactory的创建
数据源 bean 我们就不用研究了,直接查看 SqlSessionFactoryBean 的定义。可以看到该 bean 的 id 为 sqlSessionFactory,和 class 的 SqlSessionFactoryBean 不一致,关于这一点,其实 FactoryBean 的作用。之前我们在 bean加载 的时候提及过它的相关作用,后面我们会详细解释。
<bean id="sqlSessionFactory" class="org.mybatis.spring.SqlSessionFactoryBean" >
   <property name="configLocation" value="classpath:spring-mybatis-config.xml" />
   <property name="dataSource" ref="dataSource" />
</bean>
Spring应该通过 org.mybatis.spring.SqlSessionFactoryBean 封装了MyBatis中的实现,查看这个类一探究竟。首先这个类的层次结构如下,它实现了两个重要的接口 FactoryBean 和 InitializingBean。

- InitializingBean:实现此接口的 bean 会在初始化时调用其
afterPropertiesSet()方法来进行 bean 的逻辑初始化。 - FactoryBean:一旦某个 bean 实现该接口,那么通过
getBean()方法获取 bean 时其实是获取此类的getObject()返回的实例。
① InitializingBean
这两个接口在分析 bean加载 时我们都已经接触过,可能对于 FactoryBean 印象较为深刻,对于 InitializingBean 接口可能不是那么的在意,其 afterPropertiesSet() 方法究竟在何时调用也模糊不清。我们重新回顾一下 bean 的加载流程。进入 AbstractAutowireCapableBeanFactory 类中,查看真正创建常规 bean 的 doCreateBean() 方法。
/**
 * 真正创建常规bean的地方
 * Actually create the specified bean. Pre-creation processing has already happened
 * at this point, e.g. checking {@code postProcessBeforeInstantiation} callbacks.
 * <p>Differentiates between default bean instantiation, use of a
 * factory method, and autowiring a constructor.
 * @param beanName the name of the bean
 * @param mbd the merged bean definition for the bean
 * @param args explicit arguments to use for constructor or factory method invocation
 * @return a new instance of the bean
 * @throws BeanCreationException if the bean could not be created
 * @see #instantiateBean
 * @see #instantiateUsingFactoryMethod
 * @see #autowireConstructor
 */
protected Object doCreateBean(final String beanName, final RootBeanDefinition mbd, final @Nullable Object[] args)
      throws BeanCreationException {

   // Instantiate the bean.
   BeanWrapper instanceWrapper = null;
   // 如果是单例,先清除缓存
   if (mbd.isSingleton()) {
      instanceWrapper = this.factoryBeanInstanceCache.remove(beanName);
   }
   // 如果factoryBeanInstanceCache没有缓存对应的BeanWrapper,需要重新创建BeanWrapper
   if (instanceWrapper == null) {
      // 将BeanDefinition转换为BeanWrapper
      // 根据指定bean使用对应的策略创建新的实例,如:工厂方法、构造函数自动注入、简单初始化
      instanceWrapper = createBeanInstance(beanName, mbd, args);
   }
   final Object bean = instanceWrapper.getWrappedInstance();
   Class<?> beanType = instanceWrapper.getWrappedClass();
   if (beanType != NullBean.class) {
      mbd.resolvedTargetType = beanType;
   }

   // Allow post-processors to modify the merged bean definition.
   synchronized (mbd.postProcessingLock) {
      if (!mbd.postProcessed) {
         // 应用MergedBeanDefinitionPostProcessors
         try {
            applyMergedBeanDefinitionPostProcessors(mbd, beanType, beanName);
         }
         catch (Throwable ex) {
            throw new BeanCreationException(mbd.getResourceDescription(), beanName,
                  "Post-processing of merged bean definition failed", ex);
         }
         mbd.postProcessed = true;
      }
   }

   // Eagerly cache singletons to be able to resolve circular references
   // even when triggered by lifecycle interfaces like BeanFactoryAware.
   // 是否需要提早曝光:单例&允许循环依赖&当前bean正在创建中,检测循环依赖
   boolean earlySingletonExposure = (mbd.isSingleton() && this.allowCircularReferences &&
         isSingletonCurrentlyInCreation(beanName));
   if (earlySingletonExposure) {
      if (logger.isDebugEnabled()) {
         logger.debug("Eagerly caching bean '" + beanName +
               "' to allow for resolving potential circular references");
      }
      // 为避免后期循环依赖,可以在bean初始化完成之前将创建实例的ObjectFactory加入工厂
      addSingletonFactory(beanName,
            // 对bean再一次依赖引用,主要应用SmartInstantiationAware BeanPostProcessor
            // 其中我们熟知的AOP就是这样将advice动态织入bean中,若没有则直接返回bean,不做任何处理
            () -> getEarlyBeanReference(beanName, mbd, bean));
   }

   // Initialize the bean instance.
   Object exposedObject = bean;
   try {
      // 对bean进行填充,将各个属性值注入,其中,可能存在依赖于其他bean的属性,则会递归初始依赖bean
      populateBean(beanName, mbd, instanceWrapper);
      // 调用初始化方法,比如init-method
      exposedObject = initializeBean(beanName, exposedObject, mbd);
   }
   catch (Throwable ex) {
      if (ex instanceof BeanCreationException && beanName.equals(((BeanCreationException) ex).getBeanName())) {
         throw (BeanCreationException) ex;
      }
      else {
         throw new BeanCreationException(
               mbd.getResourceDescription(), beanName, "Initialization of bean failed", ex);
      }
   }

   ··········

   return exposedObject;
}
前半段主要是在创建 bean,也就是实例化 instanceWrapper。创建完之后对 bean 利用 populateBean(beanName, mbd, instanceWrapper) 进行属性填充,填充完属性之后又调用了 initializeBean(beanName, exposedObject, mbd) 初始化方法。
/**
 * 初始化bean-->用户配置的init-method
 */
protected Object initializeBean(final String beanName, final Object bean, @Nullable RootBeanDefinition mbd) {
   if (System.getSecurityManager() != null) {
      AccessController.doPrivileged((PrivilegedAction<Object>) () -> {
         invokeAwareMethods(beanName, bean);
         return null;
      }, getAccessControlContext());
   }
   else {
      // 对特殊的bean的处理:BeanNameAware、BeanClassLoaderAware、BeanFactoryAware
      invokeAwareMethods(beanName, bean);
   }

   Object wrappedBean = bean;
   if (mbd == null || !mbd.isSynthetic()) {
      // 应用后处理器
      wrappedBean = applyBeanPostProcessorsBeforeInitialization(wrappedBean, beanName);
   }

   try {
      // 激活用户自定义的init方法
      invokeInitMethods(beanName, wrappedBean, mbd);
   }
   catch (Throwable ex) {
      throw new BeanCreationException(
            (mbd != null ? mbd.getResourceDescription() : null),
            beanName, "Invocation of init method failed", ex);
   }
   if (mbd == null || !mbd.isSynthetic()) {
      // 后处理应用
      wrappedBean = applyBeanPostProcessorsAfterInitialization(wrappedBean, beanName);
   }

   return wrappedBean;
}
应用 BeanPostProcessor 接口的初始化前后方法之间调用了用户自定义的 init 方法 invokeInitMethods(beanName, wrappedBean, mbd),我们继续深入。
/**
 * 激活用户自定义初始化方法
 * Give a bean a chance to react now all its properties are set,
 * and a chance to know about its owning bean factory (this object).
 * This means checking whether the bean implements InitializingBean or defines
 * a custom init method, and invoking the necessary callback(s) if it does.
 * @param beanName the bean name in the factory (for debugging purposes)
 * @param bean the new bean instance we may need to initialize
 * @param mbd the merged bean definition that the bean was created with
 * (can also be {@code null}, if given an existing bean instance)
 * @throws Throwable if thrown by init methods or by the invocation process
 * @see #invokeCustomInitMethod
 */
protected void invokeInitMethods(String beanName, final Object bean, @Nullable RootBeanDefinition mbd)
      throws Throwable {

   // 首先检查bean是否是InitializingBean实例,是的话需要先调用afterPropertiesSet方法
   boolean isInitializingBean = (bean instanceof InitializingBean);
   if (isInitializingBean && (mbd == null || !mbd.isExternallyManagedInitMethod("afterPropertiesSet"))) {
      if (logger.isDebugEnabled()) {
         logger.debug("Invoking afterPropertiesSet() on bean with name '" + beanName + "'");
      }
      if (System.getSecurityManager() != null) {
         try {
            AccessController.doPrivileged((PrivilegedExceptionAction<Object>) () -> {
               ((InitializingBean) bean).afterPropertiesSet();
               return null;
            }, getAccessControlContext());
         }
         catch (PrivilegedActionException pae) {
            throw pae.getException();
         }
      }
      else {
         // 属性初始化后的处理
         ((InitializingBean) bean).afterPropertiesSet();
      }
   }

   if (mbd != null && bean.getClass() != NullBean.class) {
      String initMethodName = mbd.getInitMethodName();
      if (StringUtils.hasLength(initMethodName) &&
            !(isInitializingBean && "afterPropertiesSet".equals(initMethodName)) &&
            !mbd.isExternallyManagedInitMethod(initMethodName)) {
         // 调用自定义初始化方法
         invokeCustomInitMethod(beanName, bean, mbd);
      }
   }
}
可以看到,invokeInitMethods() 检查当前 bean 是否是 InitializingBean 实例,是的话需要先调用 afterPropertiesSet() 方法。这样我们就清楚了大概 InitializingBean 接口方法的大致调用时期。
② 初始化SqlSessionFactoryBean
我们先来解决这个 id 和 class 不一样的困惑,由于 SqlSessionFactoryBean 实现了 FactoryBean 的接口,我们进入重写的 getObject() 方法查看。可以看到最终返回的是 this.sqlSessionFactory 对象,通过之前使用MyBatis示例我们可以知道,SqlSessionFactory 是非常重要的,是所有MyBatis功能的基础。
/**
 * 实现FactoryBean的getObject()获取到的是SqlSessionFactory实例
 * {@inheritDoc} 拷贝父类的注释
 */
@Override
public SqlSessionFactory getObject() throws Exception {
    if (this.sqlSessionFactory == null) {
        afterPropertiesSet();
    }

    return this.sqlSessionFactory;
}
这里是直接返回 this.sqlSessionFactory 对象的,那么该对象何时被初始化的呢?在 getObject() 方法中已经有了一些提示,如果没有初始化就调用 afterPropertiesSet() 方法,说明方法中必然有初始化 this.sqlSessionFactory 对象的逻辑。当然,并不一定只是这里调用了 afterPropertiesSet() 方法,毕竟在Spring创建 bean 初始化时候也调用了。我们进入实现 InitializingBean 接口的 afterPropertiesSet() 方法。
/**
 * 实现InitializingBean接口方法,在SqlSessionFactoryBean类型的bean初始化时调用
 * {@inheritDoc}
 */
@Override
public void afterPropertiesSet() throws Exception {
  notNull(dataSource, "Property 'dataSource' is required");
  notNull(sqlSessionFactoryBuilder, "Property 'sqlSessionFactoryBuilder' is required");
  state((configuration == null && configLocation == null) || !(configuration != null && configLocation != null),
            "Property 'configuration' and 'configLocation' can not specified with together");

  this.sqlSessionFactory = buildSqlSessionFactory();
}
很显然,此函数除了校验 dataSource 属性和 sqlSessionFactoryBuilder 不能为空之外,主要目的就是对于 sqlSessionFactory 的初始化。详细查看 buildSqlSessionFactory() 方法。
/**
 * 创建一个SqlSessionFactory实例
 * Build a {@code SqlSessionFactory} instance.
 * The default implementation uses the standard MyBatis {@code XMLConfigBuilder} API to build a
 * {@code SqlSessionFactory} instance based on an Reader.
 * Since 1.3.0, it can be specified a {@link Configuration} instance directly(without config file).
 * @return SqlSessionFactory
 * @throws IOException if loading the config file failed
 */
protected SqlSessionFactory buildSqlSessionFactory() throws IOException {

    Configuration configuration;

    XMLConfigBuilder xmlConfigBuilder = null;

    // 获取configuration
    if (this.configuration != null) {
        configuration = this.configuration;
        if (configuration.getVariables() == null) {
            configuration.setVariables(this.configurationProperties);
        } else if (this.configurationProperties != null) {
            configuration.getVariables().putAll(this.configurationProperties);
        }
    }
    // 如果this.configuration为空,则利用XMLConfigBuilder读取Mybatis配置文件获得Configuration
    else if (this.configLocation != null) {
        xmlConfigBuilder = new XMLConfigBuilder(this.configLocation.getInputStream(), null, this.configurationProperties);
        configuration = xmlConfigBuilder.getConfiguration();
    }
    // 如果没有指定Mybatis配置文件,则使用MyBatis默认的配置Configuration
    else {
        if (LOGGER.isDebugEnabled()) {
            LOGGER.debug("Property 'configuration' or 'configLocation' not specified, using default MyBatis Configuration");
        }
        configuration = new Configuration();
        if (this.configurationProperties != null) {
            configuration.setVariables(this.configurationProperties);
        }
    }

    // =====================================================================
    // ====将SqlSessionFactoryBean类型的bean中的相关属性设置给configuration====
    if (this.objectFactory != null) {
        configuration.setObjectFactory(this.objectFactory);
    }

    if (this.objectWrapperFactory != null) {
        configuration.setObjectWrapperFactory(this.objectWrapperFactory);
    }

    if (this.vfs != null) {
        configuration.setVfsImpl(this.vfs);
    }

    if (hasLength(this.typeAliasesPackage)) {
        String[] typeAliasPackageArray = tokenizeToStringArray(this.typeAliasesPackage,
                                                               ConfigurableApplicationContext.CONFIG_LOCATION_DELIMITERS);
        for (String packageToScan : typeAliasPackageArray) {
            configuration.getTypeAliasRegistry().registerAliases(packageToScan,
                                                                 typeAliasesSuperType == null ? Object.class : typeAliasesSuperType);
            if (LOGGER.isDebugEnabled()) {
                LOGGER.debug("Scanned package: '" + packageToScan + "' for aliases");
            }
        }
    }

    if (!isEmpty(this.typeAliases)) {
        for (Class<?> typeAlias : this.typeAliases) {
            configuration.getTypeAliasRegistry().registerAlias(typeAlias);
            if (LOGGER.isDebugEnabled()) {
                LOGGER.debug("Registered type alias: '" + typeAlias + "'");
            }
        }
    }

    if (!isEmpty(this.plugins)) {
        for (Interceptor plugin : this.plugins) {
            configuration.addInterceptor(plugin);
            if (LOGGER.isDebugEnabled()) {
                LOGGER.debug("Registered plugin: '" + plugin + "'");
            }
        }
    }

    if (hasLength(this.typeHandlersPackage)) {
        String[] typeHandlersPackageArray = tokenizeToStringArray(this.typeHandlersPackage,
                                                                  ConfigurableApplicationContext.CONFIG_LOCATION_DELIMITERS);
        for (String packageToScan : typeHandlersPackageArray) {
            configuration.getTypeHandlerRegistry().register(packageToScan);
            if (LOGGER.isDebugEnabled()) {
                LOGGER.debug("Scanned package: '" + packageToScan + "' for type handlers");
            }
        }
    }

    if (!isEmpty(this.typeHandlers)) {
        for (TypeHandler<?> typeHandler : this.typeHandlers) {
            configuration.getTypeHandlerRegistry().register(typeHandler);
            if (LOGGER.isDebugEnabled()) {
                LOGGER.debug("Registered type handler: '" + typeHandler + "'");
            }
        }
    }

    if (this.databaseIdProvider != null) {//fix #64 set databaseId before parse mapper xmls
        try {
            configuration.setDatabaseId(this.databaseIdProvider.getDatabaseId(this.dataSource));
        } catch (SQLException e) {
            throw new NestedIOException("Failed getting a databaseId", e);
        }
    }

    if (this.cache != null) {
        configuration.addCache(this.cache);
    }
    // =======================设置configuration属性结束======================
    // =====================================================================

    if (xmlConfigBuilder != null) {
        try {
            // 解析Mybatis配置文件
            xmlConfigBuilder.parse();

            if (LOGGER.isDebugEnabled()) {
                LOGGER.debug("Parsed configuration file: '" + this.configLocation + "'");
            }
        } catch (Exception ex) {
            throw new NestedIOException("Failed to parse config resource: " + this.configLocation, ex);
        } finally {
            ErrorContext.instance().reset();
        }
    }

    // 创建事务工厂transactionFactory
    if (this.transactionFactory == null) {
        this.transactionFactory = new SpringManagedTransactionFactory();
    }

    configuration.setEnvironment(new Environment(this.environment, this.transactionFactory, this.dataSource));

    // 如果mapper文件路径不为空
    if (!isEmpty(this.mapperLocations)) {
        for (Resource mapperLocation : this.mapperLocations) {
            if (mapperLocation == null) {
                continue;
            }

            try {
                // 利用XMLMapperBuilder解析mapper文件
                XMLMapperBuilder xmlMapperBuilder = new XMLMapperBuilder(mapperLocation.getInputStream(), configuration, mapperLocation.toString(), configuration.getSqlFragments());
                xmlMapperBuilder.parse();
            } catch (Exception e) {
                throw new NestedIOException("Failed to parse mapping resource: '" + mapperLocation + "'", e);
            } finally {
                ErrorContext.instance().reset();
            }

            if (LOGGER.isDebugEnabled()) {
                LOGGER.debug("Parsed mapper file: '" + mapperLocation + "'");
            }
        }
    } else {
        if (LOGGER.isDebugEnabled()) {
            LOGGER.debug("Property 'mapperLocations' was not specified or no matching resources found");
        }
    }

    return this.sqlSessionFactoryBuilder.build(configuration);
}
MyBatis的配置文件主要转化为 org.apache.ibatis.session.Configuration 对象,从配置文件的根节点也能看出。那么这段代码主要就是将配置文件配置信息转换为 Configuration 对象,利用我们熟知的 sqlSessionFactoryBuilder.build(configuration) 代码去创建 session 工厂。之前我们已经提及我们一般都是将MyBatis配置文件独立出来,但其实可以将所有的配置项全部写在Spring配置文件 sqlSessionFactory 的 bean 中。可以看到 SqlSessionFactoryBean 中可配置的属性如下。
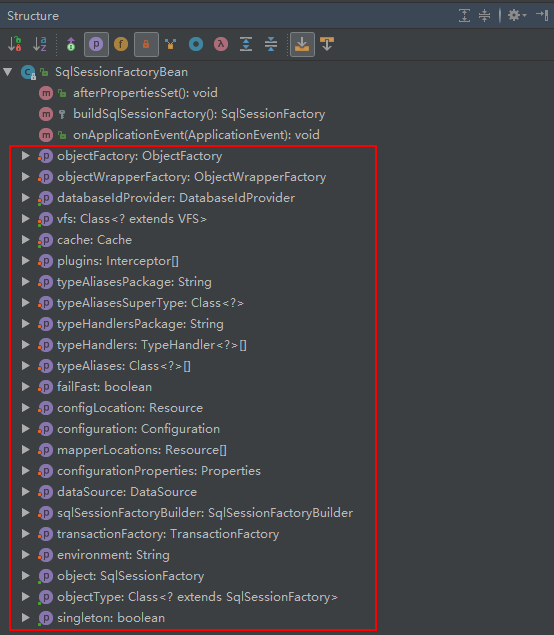
所以 buildSqlSessionFactory() 方法中首先先创建 Configuration 对象,随后对其进行属性赋值。set 属性时先将Spring配置文件中配置的项进行一一设置到 Configuration 对象中,然后才会读取MyBatis的配置文件,再进行解析读取并设置到 Configuration 对象中。
其实,如果单独使用MyBatis配置文件的方式,那么我们只需要在函数最开始利用 XMLConfigBuilder 按如下代码方式对配置文件进行解析。
XMLConfigBuilder xmlConfigBuilder = null;
xmlConfigBuilder = new XMLConfigBuilder(this.configLocation.getInputStream(), null, this.configurationProperties);
// 解析配置文件
xmlConfigBuilder.parse();
configuration = xmlConfigBuilder.getConfiguration();
其中,XMLConfigBuilder 封装了配置文件的解析器、 Configuration 对象等信息,它提供 parse() 方法用于解析配置文件并将信息设置给 Configuration 对象并返回。
private XMLConfigBuilder(XPathParser parser, String environment, Properties props) {
  	super(new Configuration());
  	ErrorContext.instance().resource("SQL Mapper Configuration");
  	this.configuration.setVariables(props);
  	this.parsed = false;
  	this.environment = environment;
  	this.parser = parser;
}

public Configuration parse() {
    if (parsed) {
        throw new BuilderException("Each XMLConfigBuilder can only be used once.");
    }
    parsed = true;
    parseConfiguration(parser.evalNode("/configuration"));
    return configuration;
}
这样,单例的 sqlSessionFactory 就被创建出并交由Spring容器进行了管理。回顾一下,也就是本来是 SqlSessionFactoryBean 这个类型 bean 在初始化的时候会创建出 sqlSessionFactory 实例,并且通过 FactoryBean 的作用,Spring在 getBean() 时只会返回 sqlSessionFactory 实例。
创建MapperFactoryBean
分析完Spring配置文件的两个 bean 配制后,接下来自然分析还剩下的一个。
<bean id="actorMapper" class="org.mybatis.spring.mapper.MapperFactoryBean">
   <property name="mapperInterface" value="guo.ping.mybatis.IActorMapper"/>
   <property name="sqlSessionFactory" ref="sqlSessionFactory"/>
</bean>
这个 bean 的 id 和 class 也不对应,而且是十万八千里的感觉,毕竟 actorMapper 的 class 应该是我们自己定义的 mapper 接口。那么我们自然想到 FactoryBean 掺和其中。除此以外,单独使用MyBatis的时候我们调用数据库接口的方式是:
IActorMapper actorMapper = sqlSession.getMapper(IActorMapper.class);
在这一过程中,MyBatis的 sqlSession.getMapper() 方法必然创建了代理类对象进行返回,因为我们仅定义了 mapper 接口,那么实现类必然是MyBatis帮我们做的。那么,使用Spring整合方式,我们用的是普通 getBean 的方法获取到代理类对象,这其中Spring必然对MyBatis的 sqlSession.getMapper() 方法进行了包装。
有了上述的猜测,我们进入 org.mybatis.spring.mapper.MapperFactoryBean 类中寻找答案。首先,查看其类的继承结构。发现其依然实现了 FactoryBean 和 InitializingBean 两个接口。我们依然按照上面的套路展开分析。
① 初始化MapperFactoryBean
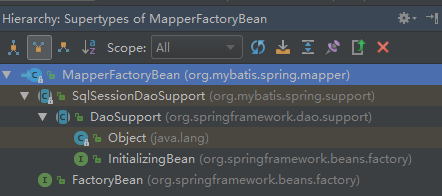
因为 MapperFactoryBean 实现了 InitializingBean 接口,Spring会保证在 bean 初始化时首先调用 afterPropertiesSet() 方法来完成其初始化逻辑。寻找 afterPropertiesSet() 方法,发现是在其父类 DaoSupport (Spring中的,非MyBatis) 中定义的。
/**
 * 实现InitializingBean的接口,调用子类实现的checkDaoConfig()和initDao()
 * @throws IllegalArgumentException
 * @throws BeanInitializationException
 */
@Override
public final void afterPropertiesSet() throws IllegalArgumentException, BeanInitializationException {
   // Let abstract subclasses check their configuration.
   checkDaoConfig();

   // Let concrete implementations initialize themselves.
   try {
      initDao();
   }
   catch (Exception ex) {
      throw new BeanInitializationException("Initialization of DAO failed", ex);
   }
}
从内容来看,就是需要调用两个方法。两个方法在 DaoSupport 中进行了定义,其中 checkDaoConfig() 是抽象方法,子类需要实现,而 initDao() 方法内容为空,是一个模板方法,供子类覆盖。
/**
 * Abstract subclasses must override this to check their configuration.
 * <p>Implementors should be marked as {@code final} if concrete subclasses
 * are not supposed to override this template method themselves.
 * @throws IllegalArgumentException in case of illegal configuration
 */
protected abstract void checkDaoConfig() throws IllegalArgumentException;

/**
 * Concrete subclasses can override this for custom initialization behavior.
 * Gets called after population of this instance's bean properties.
 * @throws Exception if DAO initialization fails
 * (will be rethrown as a BeanInitializationException)
 * @see org.springframework.beans.factory.BeanInitializationException
 */
protected void initDao() throws Exception {
}
我们在子类中去寻找这两个方法的具体覆盖实现。
Spring中的 SqlSessionDaoSupport 类对 checkDaoConfig() 进行了覆盖,提供了一个默认实现,主要功能其实就是对 this.sqlSession 对象是否为空的检查。
/**
 * Mybatis中SqlSessionDaoSupport继承Spring中DaoSupport类并重写了checkDaoConfig(),主要检查是否存在this.sqlSession
 * {@inheritDoc}
 */
@Override
protected void checkDaoConfig() {
    notNull(this.sqlSession, "Property 'sqlSessionFactory' or 'sqlSessionTemplate' are required");
}
之前我们已经获得了 sqlSessionFactory,好像没有看到哪里对 this.sqlSession 对象进行赋值,其实在 SqlSessionDaoSupport 类中 setSqlSessionFactory() 就已经初始化了。
/**
 * SqlSessionDaoSupport中设置SqlSessionFactory时已经创建了this.sqlSession
 */
public void setSqlSessionFactory(SqlSessionFactory sqlSessionFactory) {
    if (!this.externalSqlSession) {
        this.sqlSession = new SqlSessionTemplate(sqlSessionFactory);
    }
}
我们在Spring配置文件中关于 MapperFactoryBean 的 bean 定义时,有一个 setter 注入属性的配置。
<property name="sqlSessionFactory" ref="sqlSessionFactory"/>
这一过程其实就是利用 sqlSessionFactory 创建出 sqlSession,如果配置文件中忽略了这一行,那么通过 checkDaoConfig() 方法就能检测出来。
回到主线,继续看MyBatis中继承 SqlSessionDaoSupport 类的子类,也就是我们要分析的 MapperFactoryBean 如何重写 checkDaoConfig() 方法的。
/**
 * 重写方法,除了检查this.sqlSession,还对mapper接口、mapper文件进行验证
 * {@inheritDoc}
 */
@Override
protected void checkDaoConfig() {
    super.checkDaoConfig();

    notNull(this.mapperInterface, "Property 'mapperInterface' is required");

    // 获取Configuration
    Configuration configuration = getSqlSession().getConfiguration();
    if (this.addToConfig && !configuration.hasMapper(this.mapperInterface)) {
        try {
            // 向Configuration中添加mapper接口,this.mapperInterface是Class类型
            configuration.addMapper(this.mapperInterface);
        } catch (Exception e) {
            logger.error("Error while adding the mapper '" + this.mapperInterface + "' to configuration.", e);
            throw new IllegalArgumentException(e);
        } finally {
            ErrorContext.instance().reset();
        }
    }
}
首先先调用了父类 SqlSessionDaoSupport 中的方法对 this.sqlSession 进行检查,然后确认 this.mapperInterface 是否为空。this.mapperInterface 是我们通过配置文件设置的,存储我们的 mapper 接口 Class 类型。最后一段代码主要是对 mapper 文件存在性的验证。
在MyBatis实现过程中并没有手动调用 configuration.addMapper() 方法,而是在 mapper 文件读取过程中一旦解析到如 <mapper namespace=“xxx.xxx.XxxMapper”> ,便会自动进行类型映射的注册。那么,Spring 中为什么会把这个功能单独拿出来放在验证里呢?
在上面的函数中,configuration.addMapper() 其实就是将 XxxMapper 注册到映射类型中,如果你可以保证这个接口一定存在对应的映射文件,那么其实这个验证并没有必要。但是,由于这个是我们自行决定的配置,无法保证这里配置的接口一定存在对应的映射文件,所以这里非常有必要进行验证。在执行此代码的时候,MyBatis 会检查嵌入的映射接口是否存在对应的映射文件,如果没有回抛出异常,Spring正是在用这种方式来完成接口对应的映射文件存在性验证。
② 获取MapperFactoryBean实例
MapperFactoryBean 实现了 FactoryBean 接口,重写的 getObject() 方法如下:
/**
 * 获取MapperFactoryBean的实例
 * {@inheritDoc}
 */
@Override
public T getObject() throws Exception {
    return getSqlSession().getMapper(this.mapperInterface);
}
可以看到和我们单独使用MyBatis获取 mapper 接口实例相似,Spring正是通过 FactoryBean 接口进行了封装,所以我们通过配置 class 为 MapperFactoryBean 的 bean 获取到的则是 mapper 接口代理类对象。至于代理类如何产生则是MyBatis帮助我们做的。
IV. 自动扫描Mapper接口
我们在Spring配置文件中配置了 actorMapper 供需要时使用,但如果需要用到的 mapper 接口较多的话,采用这种配置方式就显得低效繁琐。当然MyBatis扩展了Spring的扫描包的方式,实现了能够扫描指定包结构下所有 mapper 接口并创建 bean 放入容器。
将Spring配置文件内容进行替换,将单独配置的 actorMapper 进行注释,替换成扫描包的配置。
<?xml version='1.0' encoding='UTF-8' ?>
<beans xmlns="http://www.springframework.org/schema/beans"
      xmlns:xsi="http://www.w3.org/2001/XMLSchema-instance"
      xsi:schemaLocation="http://www.springframework.org/schema/beans    http://www.springframework.org/schema/beans/spring-beans.xsd">

   ·······

   <!--<bean id="actorMapper" class="org.mybatis.spring.mapper.MapperFactoryBean">-->
      <!--<property name="mapperInterface" value="guo.ping.mybatis.IActorMapper"/>-->
      <!--<property name="sqlSessionFactory" ref="sqlSessionFactory"/>-->
   <!--</bean>-->

   <bean class="org.mybatis.spring.mapper.MapperScannerConfigurer">
      <property name="basePackage" value="guo.ping.mybatis" />
   </bean>
</beans>
在上面的配置中,我们增加了 MapperScannerConfigurer 的配置,basePackage 属性是指定 mapper 接口文件的基本包路径,可以使用分号或逗号作为分隔符设置多个包路径。每个 mapper 接口将会在指定的包路径中递归地被搜索到。被发现的 mapper 接口将会使用Spring对自动侦测组件默认的命名策略来命名。也就是说,如果没有发现注解,它就会使用 mapper 接口的非大写的非完全限定类名。但是如果发现了 @Component 或 JSR-330 @Named 注解,它会获取注解指定的名称作为 bean 的名称。除此以外,Spring默认名称设置规则对类的名字是以两个或以上的大写字母开头的,bean的名字会与类名保持一致。
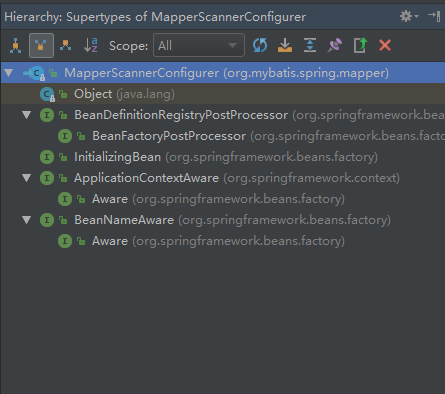
我们探究一下,配置 org.mybatis.spring.mapper.MapperScannerConfigurer 类型的 bean 是如何起作用的。先查看该类的结构。我们看到了熟悉的 InitializingBean 接口,同时还有之前 bean 加载的时候分析的 BeanDefinitionRegistryPostProcessor 接口。
查看 MapperScannerConfigurer 接口的实现的 afterPropertiesSet() 方法。
/**
 * 校验basePackage属性不为空
 * {@inheritDoc}
 */
@Override
public void afterPropertiesSet() throws Exception {
    notNull(this.basePackage, "Property 'basePackage' is required");
}
其中仅仅只是校验了 basePackage 属性不能为空,并没有扫描包的逻辑,但也算做准备工作了。我们继续查看其实现 BeanDefinitionRegistryPostProcessor 接口与 BeanFactoryPostProcessor 接口的方法,Spring在初始化的过程中同样会保证这两个接口的调用。
先来看看 BeanFactoryPostProcesser 的 postProcessBeanFactory 方法实现,可以看到这是一个空实现,没有做任何事。继续找别的方法。
/**
 * 重写BeanFactoryPostProcesser的方法,空实现
 * {@inheritDoc}
 */
@Override
public void postProcessBeanFactory(ConfigurableListableBeanFactory beanFactory) {
  // left intentionally blank
}
很自然的我们过渡到 BeanDefinitionRegistryPostProcessor 接口的 postProcessBeanDefinitionRegistry 方法。Spring扫描包下的所有 mapper 接口功能就在这里实现了。
/**
 * 重写BeanDefinitionRegistryPostProcesser的方法
 * {@inheritDoc}
 * @since 1.0.2
 */
@Override
public void postProcessBeanDefinitionRegistry(BeanDefinitionRegistry registry) {
    if (this.processPropertyPlaceHolders) {
        // processPropertyPlaceHolders属性的处理
        processPropertyPlaceHolders();
    }

    // 创建ClassPathMapperScanner扫描器,并配置属性
    ClassPathMapperScanner scanner = new ClassPathMapperScanner(registry);
    scanner.setAddToConfig(this.addToConfig);
    scanner.setAnnotationClass(this.annotationClass);
    scanner.setMarkerInterface(this.markerInterface);
    scanner.setSqlSessionFactory(this.sqlSessionFactory);
    scanner.setSqlSessionTemplate(this.sqlSessionTemplate);
    scanner.setSqlSessionFactoryBeanName(this.sqlSessionFactoryBeanName);
    scanner.setSqlSessionTemplateBeanName(this.sqlSessionTemplateBeanName);
    scanner.setResourceLoader(this.applicationContext);
    scanner.setBeanNameGenerator(this.nameGenerator);

    // 根据配置属性生成过滤器
    scanner.registerFilters();
    // 扫描java文件
    scanner.scan(StringUtils.tokenizeToStringArray(this.basePackage, ConfigurableApplicationContext.CONFIG_LOCATION_DELIMITERS));
}
代码中主要委托了 ClassPathMapperScanner 这个类进行扫描并注册 bean。为了后面更好的说清代码逻辑,我们先查看一下 ClassPathMapperScanner 的继承结构。

可以看到MyBatis中的 ClassPathMapperScanner 这个类扩展了Spring中的扫描组件的类,后面我们将详细分析其中的调用逻辑。回到 postProcessBeanDefinitionRegistry() 方法,其中实现的步骤主要如下:
- 对
processPropertyPlaceHolders属性的处理。主要是防止配置文件中出现属性值是PropertyPlaceholderConfigurer,引用了其他配置文件中的内容; - 设置一些过滤规则,滤除或滤出对应的 mapper 接口。
- 进行包路径下扫描,获得所有的 mapper 接口并注册到Spring容器中。
下面我们分这三个步骤分别进行探究。
processPropertyPlaceHolders属性的处理
在正式委托 ClassPathMapperScanner 类去扫描包的时候,我们先要对 processPropertyPlaceHolders 属性进行处理。为什么会要处理这个呢?其实这个我们属性之前有说过,具体见 解析ApplicationContext 中 BeanFactory的后处理 部分。有人配置 basePackage 非不直接写包名字,偏偏通过表达式 ${basePackage} 进行配置,然后额外再定义一个 .properties 配置文件设置上 basePackage=xxx.xxx.xxx。然后还得再加上一段配置,让Spring找到该 .properties 配置文件的位置。你就说麻不麻烦???
<bean id="mesHandler" class="org.springframework.beans.factory.config.PropertyPlaceholderConfigurer" >
   <property name="locations">
      <list>
         <value>bean.properties</value>
      </list>
   </property>
</bean>
当然,Spring和MyBatis肯定考虑特殊需求的人嘛,所以正式扫描之前,去帮他们解析一下表达式,找到真正的 basePackage 值。我们查看 processPropertyPlaceHolders() 方法。
/*
 * BeanDefinitionRegistries are called early in application startup, before
 * BeanFactoryPostProcessors. This means that PropertyResourceConfigurers will not have been
 * loaded and any property substitution of this class' properties will fail. To avoid this, find
 * any PropertyResourceConfigurers defined in the context and run them on this class' bean
 * definition. Then update the values.
 */
private void processPropertyPlaceHolders() {
    // 找到所有已经注册的PropertyResourceConfigure类型的bean
    Map<String, PropertyResourceConfigurer> prcs = applicationContext.getBeansOfType(PropertyResourceConfigurer.class);

    if (!prcs.isEmpty() && applicationContext instanceof ConfigurableApplicationContext) {
        // 获取到MapperScannerConfigure类型bean的BeanDefinition
        BeanDefinition mapperScannerBean = ((ConfigurableApplicationContext) applicationContext).getBeanFactory().getBeanDefinition(beanName);

        // new一个容器模拟Spring中的环境来调用处理器
        // PropertyResourceConfigurer does not expose any methods to explicitly perform
        // property placeholder substitution. Instead, create a BeanFactory that just
        // contains this mapper scanner and post process the factory.
        DefaultListableBeanFactory factory = new DefaultListableBeanFactory();
        factory.registerBeanDefinition(beanName, mapperScannerBean);

        // 进行后处理器的调用,调用完后,模拟环境中模拟的MapperScannerConfigurer类型的bean
        // 如果有引入属性文件,那么属性也已经被替换了。
        for (PropertyResourceConfigurer prc : prcs.values()) {
            prc.postProcessBeanFactory(factory);
        }

        PropertyValues values = mapperScannerBean.getPropertyValues();

        // 此时,再将模拟bean中的相关属性提取应用到真实bean
        this.basePackage = updatePropertyValue("basePackage", values);
        this.sqlSessionFactoryBeanName = updatePropertyValue("sqlSessionFactoryBeanName", values);
        this.sqlSessionTemplateBeanName = updatePropertyValue("sqlSessionTemplateBeanName", values);
    }
}
官方注释对这段代码的解释翻译为:BeanDefinitionRegistries 会在应用启动的时候调用,并且会早于 BeanFactoryPostProcessors 的调用,这就意味着 PropertyResourceConfigurers 还没有被加载,所有对于属性文件的引用将会失效。为避免此种情况发生,此方法手动地找出定义的 PropertyResourceConfigurers 并进行提前调用以保证对于属性的引用可以正常工作。
如果官方的解释没有读懂,建议回顾一下 PropertyPlaceholderConfigurer 关于配置文件中表达式解析的源码过程。简要的解释一下,因为我们现在分析的扫描包逻辑是在 BeanDefinitionRegistryPostProcessor 的后处理方法中调用的,它会先于 BeanFactoryPostProcessor 中的后处理方法调用。但是, PropertyPlaceholderConfigurer 的处理时机是在 BeanFactoryPostProcessor 后处理方法。也就是说,还没解析表达式就开始扫描包,那肯定是不行的,所以这里就是需要手动提前进行解析处理,好让我们扫描。
当然,也不是这样就直接OK,Spring能够解析的,因为调用 processPropertyPlaceHolders() 方法前还有一个判断:
if (this.processPropertyPlaceHolders) {
    // processPropertyPlaceHolders属性的处理
    processPropertyPlaceHolders();
}
这个 this.processPropertyPlaceHolders 默认为 false,需要在Spring配置文件中配置:
<bean class="org.mybatis.Spring.mapper.MapperScannerConfigurer">
  	<property name="basePackage" value="xxx.xxx.xxx" />
  	<property name="processPropertyPlaceHolders" value="true" />
</bean>
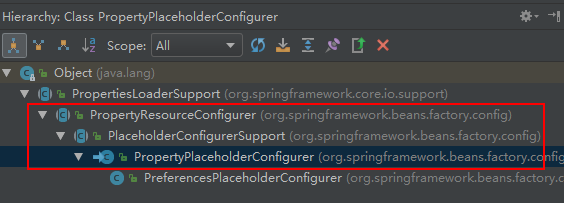
说完这些,我们仔细看看 processPropertyPlaceHolders() 方法的实现逻辑。首先,找到所有已经注册的 PropertyResourceConfigurer 类型的 bean。我们之前说的 PropertyPlaceholderConfigurer 正是继承自 PropertyResourceConfigurer。
然后模拟Spring中的环境来提前调用后处理器方法。这里通过使用 new DefaultListableBeanFactory() 来模拟 Spring 中的环境(完成后处理器的调用后便失效),将我们配置的映射 bean,也就是 MapperScannerConfigurer 类型 bean 再注册到模拟环境中来进行后处理器的调用,处理器 PropertyPlaceholderConfigurer 调用完成后即可找出所有 bean 中应用属性文件的变量并替换。也就是说,在后处理器调用后,模拟环境中模拟的 MapperScannerConfigurer 类型的 bean 如果有引入属性文件中的属性那么已经被替换了,这时,再将模拟 bean 中相关的属性提取出来应用给真实的 bean 中。
其实说到底,就是单独再创建一个Spring容器然后预先调用一下本来滞后调用的 BeanFactoryPostProcessors 后处理器方法,获得到值后再传到真实环境中,仔细想想应该就能理解了。
根据配置属性生成过滤器
确认获取到真正的 basePackage 后,便可以委托 ClassPathMapperScanner 进行扫描。首先需要创建一个 ClassPathMapperScanner 扫描类实例,并设置一些基本属性。配置中支持很多属性的设定,但是我们感兴趣的或者说影响扫描结果的并不多,属性设置后通过在 scanner.registerFilters() 代码中生成对应的过滤器来控制扫描结果。进入 scanner.registerFilters() 的方法:
/**
 * 根据配置属性生成过滤器
 * Configures parent scanner to search for the right interfaces. It can search
 * for all interfaces or just for those that extends a markerInterface or/and
 * those annotated with the annotationClass
 */
public void registerFilters() {
    boolean acceptAllInterfaces = true;

    // if specified, use the given annotation and / or marker interface

    // 对于annotationClass属性的处理,设置过滤出标识特定注解java类
    if (this.annotationClass != null) {
        addIncludeFilter(new AnnotationTypeFilter(this.annotationClass));
        acceptAllInterfaces = false;
    }

    // override AssignableTypeFilter to ignore matches on the actual marker interface
    // 对于markerInterface属性的处理,只有实现markerInterface接口才行
    if (this.markerInterface != null) {
        addIncludeFilter(new AssignableTypeFilter(this.markerInterface) {
            @Override
            protected boolean matchClassName(String className) {
                return false;
            }
        });
        acceptAllInterfaces = false;
    }

    // 全局默认处理,默认接受所有类型的接口文件
    if (acceptAllInterfaces) {
        // default include filter that accepts all classes
        addIncludeFilter(new TypeFilter() {
            @Override
            public boolean match(MetadataReader metadataReader, MetadataReaderFactory metadataReaderFactory) throws IOException {
                return true;
            }
        });
    }

    // exclude package-info.java 不扫描package-info.java文件
    addExcludeFilter(new TypeFilter() {
        @Override
        public boolean match(MetadataReader metadataReader, MetadataReaderFactory metadataReaderFactory) throws IOException {
            String className = metadataReader.getClassMetadata().getClassName();
            return className.endsWith("package-info");
        }
    });
}
过滤器设置逻辑可以看出,就是根据之前属性的配置生成了对应的过滤器。
① annotationClass属性处理
如果 this.annotationClass 属性不为空,则表示用户设置了此属性,那么就要根据此属性生成过滤器以保证达到用户想要的效果,而封装此属性的过滤器就是 AnnotationTypeFilter。Annotation TypeFilter 保证在扫描对应Java文件时只接受标记有注解为 annotationClass 的接口。
② markerInterface属性处理
如果 this.markerInterface 不为空,那么就要根据此属性生成过滤器,而封装此属性的过滤器就是实现 AssignableTypeFilter 接口的局部类。表示扫描过程中只有实现 markerInterface 接口的接口文件才会被接受。
③ 全局默认处理
在上面两个属性中如果存在其中任何属性,acceptAllInterfaces 的值将会被改变,Spring认为用户考虑了过滤规则,就不开启全局默认处理规则了。但是如果用户没有设定以上两个属性,那么Spring会为我们增加一个默认的过滤器实现 TypeFilter 接口的局部类,旨在接受所有接口文件。
④ package-info.java处理
对于命名为 package-info.java 文件,默认不作为逻辑实现接口,将其排除掉,使用 TypeFilter 接口的局部类实现 match() 方法进行排除。
上面四个步骤展示了过滤规则的设置,前三个调用 addIncludeFilter() 方法,后一个用了排除 addExcludeFilter() 方法。这些定义的过滤器记录在了 includeFilters 和 excludeFilters 属性中。
private final List<TypeFilter> includeFilters = new LinkedList<>();
private final List<TypeFilter> excludeFilters = new LinkedList<>();

/**
 * Add an include type filter to the <i>end</i> of the inclusion list.
 */
public void addIncludeFilter(TypeFilter includeFilter) {
    this.includeFilters.add(includeFilter);
}

/**
 * Add an exclude type filter to the <i>front</i> of the exclusion list.
 */
public void addExcludeFilter(TypeFilter excludeFilter) {
    this.excludeFilters.add(0, excludeFilter);
}
扫描接口文件
设置完过滤规则可以正式开始扫描了,调用 scanner.scan() 方法。scan() 方法定义在 ClassPathBeanDefinitionScanner 类中,之前的类结构我们已经贴出了,这是Spring自身的类,非MyBatis的。
/**
 * 扫描包,注册
 * Perform a scan within the specified base packages.
 * @param basePackages the packages to check for annotated classes
 * @return number of beans registered
 */
public int scan(String... basePackages) {
   int beanCountAtScanStart = this.registry.getBeanDefinitionCount();

   doScan(basePackages);

   // 如果配置了includeAnnotationConfig,则注册对应注解的处理器以保证注解功能的正常使用
   if (this.includeAnnotationConfig) {
      AnnotationConfigUtils.registerAnnotationConfigProcessors(this.registry);
   }

   return (this.registry.getBeanDefinitionCount() - beanCountAtScanStart);
}
scan() 方法是个全局方法,扫描工作通过 doScan(basePackages) 委托给了 doScan() 方法。同时,还包括了 includeAnnotationConfig 属性的处理,AnnotationConfigUtils.registerAnnotationConfigProcessors (this.registry) 代码主要是完成对于注解处理器的简单注册,比如 AutowiredAnnotationBeanPostProcessor、RequiredAnnotationBeanPostProcessor 等,这里不再赘述,我们重点研究文件扫描功能的实现。
scan() 方法传入的 basePackages 数组经过了 tokenizeToStringArray() 方法的解析,将多个包名分割成数组,每一个包名的 . 符号都转换为路径符号 /。
/**
 * Tokenize the given {@code String} into a {@code String} array via a
 * {@link StringTokenizer}.
 * <p>Trims tokens and omits empty tokens.
 * <p>The given {@code delimiters} string can consist of any number of
 * delimiter characters. Each of those characters can be used to separate
 * tokens. A delimiter is always a single character; for multi-character
 * delimiters, consider using {@link #delimitedListToStringArray}.
 * @param str the {@code String} to tokenize
 * @param delimiters the delimiter characters, assembled as a {@code String}
 * (each of the characters is individually considered as a delimiter)
 * @return an array of the tokens
 * @see java.util.StringTokenizer
 * @see String#trim()
 * @see #delimitedListToStringArray
 */
public static String[] tokenizeToStringArray(@Nullable String str, String delimiters) {
   return tokenizeToStringArray(str, delimiters, true, true);
}
接下来,我们重点分析 doScan 方法如何实现的。先来看 ClassPathMapperScanner 类中的方法。
/**
 * Calls the parent search that will search and register all the candidates.
 * Then the registered objects are post processed to set them as
 * MapperFactoryBeans
 */
@Override
public Set<BeanDefinitionHolder> doScan(String... basePackages) {
    // 调用父类ClassPathBeanDefinitionScanner的doScan方法
    Set<BeanDefinitionHolder> beanDefinitions = super.doScan(basePackages);

    // 如果没有扫描到任何文件发出警告,打印日志
    if (beanDefinitions.isEmpty()) {
        logger.warn("No MyBatis mapper was found in '" + Arrays.toString(basePackages) + "' package. Please check your configuration.");
    } else {
        processBeanDefinitions(beanDefinitions);
    }

    return beanDefinitions;
}
可以看到主要两个步骤:
- 调用父类(ClassPathBeanDefinitionScanner)的方法,应用过滤规则筛选;
- 对筛选出的 beanDefinition 进行必要的加工。
① 扫描包
父类 ClassPathBeanDefinitionScanner 中的扫描方法是Spring默认提供的,代码如下:
/**
 * 扫描basePackages下的类文件,并通过编码的方式注册到容器中
 * Perform a scan within the specified base packages,
 * returning the registered bean definitions.
 * <p>This method does <i>not</i> register an annotation config processor
 * but rather leaves this up to the caller.
 * @param basePackages the packages to check for annotated classes
 * @return set of beans registered if any for tooling registration purposes (never {@code null})
 */
protected Set<BeanDefinitionHolder> doScan(String... basePackages) {
   Assert.notEmpty(basePackages, "At least one base package must be specified");
   // 用于存储返回结果的集合
   Set<BeanDefinitionHolder> beanDefinitions = new LinkedHashSet<>();

   // 遍历所有的basePackage
   for (String basePackage : basePackages) {
      // 扫描basePackage路径下的java文件获得所有候选的BeanDefinition
      Set<BeanDefinition> candidates = findCandidateComponents(basePackage);
      // 遍历筛选所有候选的BeanDefinition
      for (BeanDefinition candidate : candidates) {
         ScopeMetadata scopeMetadata = this.scopeMetadataResolver.resolveScopeMetadata(candidate);
         candidate.setScope(scopeMetadata.getScopeName());
         // 生成beanName的名字
         String beanName = this.beanNameGenerator.generateBeanName(candidate, this.registry);
         if (candidate instanceof AbstractBeanDefinition) {
            postProcessBeanDefinition((AbstractBeanDefinition) candidate, beanName);
         }
         if (candidate instanceof AnnotatedBeanDefinition) {
            // 如果是AnnotatedBeanDefinition类型的bean,需要检测下常用注解如:Primary、Lazy等
            AnnotationConfigUtils.processCommonDefinitionAnnotations((AnnotatedBeanDefinition) candidate);
         }
         // 检测当前bean是否已经被注册
         if (checkCandidate(beanName, candidate)) {
            BeanDefinitionHolder definitionHolder = new BeanDefinitionHolder(candidate, beanName);
            // 如果当前bean是用于生成代理的bean那么需要进一步处理
            definitionHolder =
                  AnnotationConfigUtils.applyScopedProxyMode(scopeMetadata, definitionHolder, this.registry);
            beanDefinitions.add(definitionHolder);
            registerBeanDefinition(definitionHolder, this.registry);
         }
      }
   }
   return beanDefinitions;
}
可以看到整个逻辑无非就是对所有的包路径进行挨个的遍历,寻找包下所有的 class 类,然后通过过滤规则寻找到所有合适的,最后进行返回。这些实现主要是靠 findCandidateComponents(basePackage) 函数完成的。进入 ClassPathScanningCandidateComponentProvider 类(这个类是另外两个的父类)中进行查看。
/**
 * 从basePackage中获取候选的BeanDefinition
 * Scan the class path for candidate components.
 * @param basePackage the package to check for annotated classes
 * @return a corresponding Set of autodetected bean definitions
 */
public Set<BeanDefinition> findCandidateComponents(String basePackage) {
   if (this.componentsIndex != null && indexSupportsIncludeFilters()) {
      return addCandidateComponentsFromIndex(this.componentsIndex, basePackage);
   }
   else {
      return scanCandidateComponents(basePackage);
   }
}
进入 scanCandidateComponents(basePackage) 方法:
/**
 * 扫描basePackage下所有的class文件,筛选出符合条件的,创建成ScannedGenericBeanDefinition返回
 * @param basePackage
 * @return
 */
private Set<BeanDefinition> scanCandidateComponents(String basePackage) {
   Set<BeanDefinition> candidates = new LinkedHashSet<>();

   try {
      // packageSearchPath = classpath*:+base/package+/ **/*.class = classpath*:base/package/**/*.class
      String packageSearchPath = ResourcePatternResolver.CLASSPATH_ALL_URL_PREFIX +
            resolveBasePackage(basePackage) + '/' + this.resourcePattern;
      // 获取packageSearchPath路径下所有的类文件资源
      Resource[] resources = getResourcePatternResolver().getResources(packageSearchPath);

      boolean traceEnabled = logger.isTraceEnabled();
      boolean debugEnabled = logger.isDebugEnabled();
      for (Resource resource : resources) {
         if (traceEnabled) {
            logger.trace("Scanning " + resource);
         }
         if (resource.isReadable()) {
            try {
               MetadataReader metadataReader = getMetadataReaderFactory().getMetadataReader(resource);
               // isCandidateComponent根据我们之前设置的过滤条件判断是否符合条件,符合创建BeanDefinition
               if (isCandidateComponent(metadataReader)) {
                  ScannedGenericBeanDefinition sbd = new ScannedGenericBeanDefinition(metadataReader);
                  sbd.setResource(resource);
                  sbd.setSource(resource);
                  // isCandidateComponent判断是否符合条件,符合才添加结果集合
                  if (isCandidateComponent(sbd)) {
                     if (debugEnabled) {
                        logger.debug("Identified candidate component class: " + resource);
                     }
                     candidates.add(sbd);
                  }
                  else {
                     if (debugEnabled) {
                        logger.debug("Ignored because not a concrete top-level class: " + resource);
                     }
                  }
               }
               else {
                  if (traceEnabled) {
                     logger.trace("Ignored because not matching any filter: " + resource);
                  }
               }
            }
            catch (Throwable ex) {
               throw new BeanDefinitionStoreException(
                     "Failed to read candidate component class: " + resource, ex);
            }
         }
         else {
            if (traceEnabled) {
               logger.trace("Ignored because not readable: " + resource);
            }
         }
      }
   }
   catch (IOException ex) {
      throw new BeanDefinitionStoreException("I/O failure during classpath scanning", ex);
   }
   return candidates;
}
代码逻辑还是较为清晰的,先获取到路径(根据传入的包路径信息并结合类文件路径拼接成文件的绝对路径),然后在路径下查找所有的 class 文件,同一读取为类文件资源,这里附上 resources debug的结果。
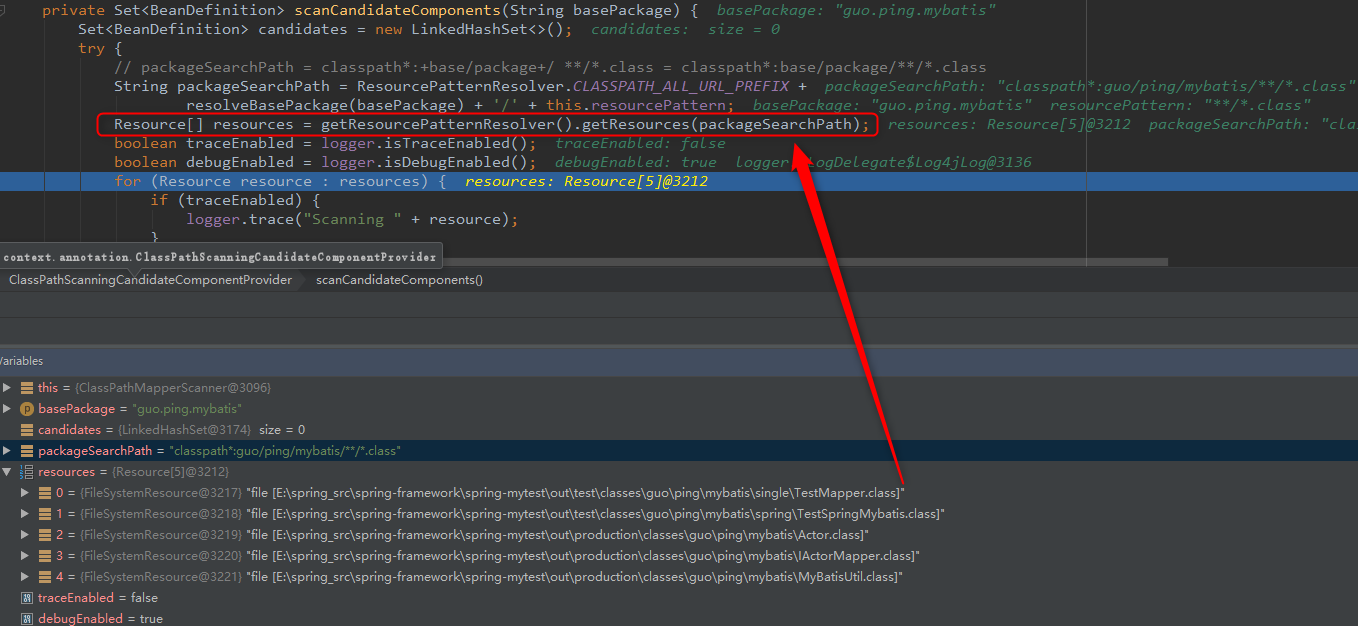
获取完便开始筛选,应用过滤规则。通过两个 isCandidateComponent() 重载方法判断。首先先进行过滤规则进行筛选,然后对筛选出来的结果进一步判断是否是接口类等。可以看到应用筛选规则其实就是遍历之前的 excludeFilters 和 includeFilters 两个 list 集合,根据过滤器中的 match() 方法所返回的信息来判断的。当然用户可以实现并注册满足自己业务逻辑的过滤器来控制扫描的结果,metadataReader 中有过滤所需要的全部文件信息。
/**
 * 判断给定的class是否符合条件
 * Determine whether the given class does not match any exclude filter
 * and does match at least one include filter.
 * @param metadataReader the ASM ClassReader for the class
 * @return whether the class qualifies as a candidate component
 */
protected boolean isCandidateComponent(MetadataReader metadataReader) throws IOException {
   // 如果是我们之前设置的excludeFilters中的一个,则不符合
   for (TypeFilter tf : this.excludeFilters) {
      if (tf.match(metadataReader, getMetadataReaderFactory())) {
         return false;
      }
   }
   // 如果是我们includeFilters中的,才符合
   for (TypeFilter tf : this.includeFilters) {
      if (tf.match(metadataReader, getMetadataReaderFactory())) {
         return isConditionMatch(metadataReader);
      }
   }
   return false;
}

/**
 * 判断是否是接口和独立的
 * Determine whether the given bean definition qualifies as candidate.
 * <p>The default implementation checks whether the class is not an interface
 * and not dependent on an enclosing class.
 * <p>Can be overridden in subclasses.
 * @param beanDefinition the bean definition to check
 * @return whether the bean definition qualifies as a candidate component
 */
protected boolean isCandidateComponent(AnnotatedBeanDefinition beanDefinition) {
    AnnotationMetadata metadata = beanDefinition.getMetadata();
    return (metadata.isIndependent() && (metadata.isConcrete() ||
                                         (metadata.isAbstract() && metadata.hasAnnotatedMethods(Lookup.class.getName()))));
}
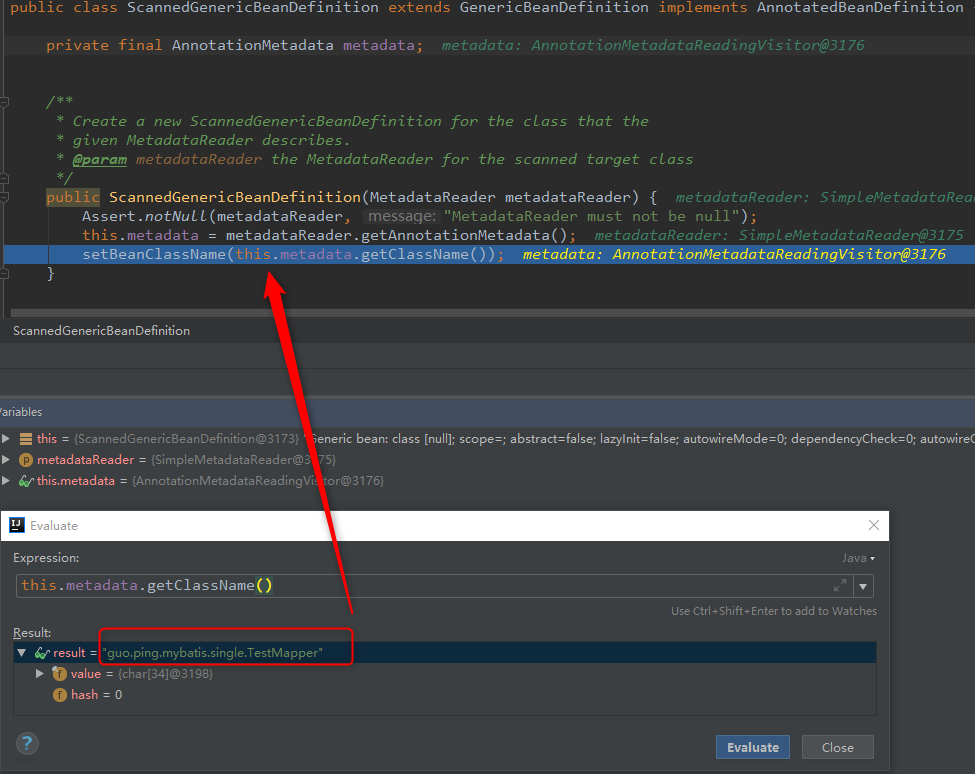
对满足过滤规则的类,我们统一用 ScannedGenericBeanDefinition 进行封装成 beanDefinition 的形式。当然如果扫描到符合过滤规则等等限制的 beanDefinition 有可能已经在容器中注册过了,那么需要对这些情况再进行额外的处理。beanDefinition 的 class 设置就是 mapper 接口的全限定类名。
/**
 * Create a new ScannedGenericBeanDefinition for the class that the
 * given MetadataReader describes.
 * @param metadataReader the MetadataReader for the scanned target class
 */
public ScannedGenericBeanDefinition(MetadataReader metadataReader) {
   Assert.notNull(metadataReader, "MetadataReader must not be null");
   this.metadata = metadataReader.getAnnotationMetadata();
   setBeanClassName(this.metadata.getClassName());
}
② 加工beanDefinitions
获取到所有合适的 mapper 接口的 beanDefinition 集合后,还要对其进行一些加工操作。Spring中对于自动扫描的注册,不需要我们对于每个接口都注册一个 MapperFactoryBean 类型的对应的 bean,但是,不在配置文件中注册并不代表这个 bean 不存在,而是在扫描的过程中通过编码的方式动态注册。那么上一步得到的 beanDefinition 集合都不是 MapperFactoryBean 类型的,所以我们要全部进行遍历解析然后重新设置 class 值,再填充上其他的属性值。具体实现看 processBeanDefinitions(Set<BeanDefinitionHolder> beanDefinitions) 逻辑。
// 处理BeanDefinitions
private void processBeanDefinitions(Set<BeanDefinitionHolder> beanDefinitions) {
    GenericBeanDefinition definition;
    for (BeanDefinitionHolder holder : beanDefinitions) {
        definition = (GenericBeanDefinition) holder.getBeanDefinition();

        if (logger.isDebugEnabled()) {
            logger.debug("Creating MapperFactoryBean with name '" + holder.getBeanName()
                         + "' and '" + definition.getBeanClassName() + "' mapperInterface");
        }

        // the mapper interface is the original class of the bean
        // but, the actual class of the bean is MapperFactoryBean
        // 开始构造MapperFactoryBean类型的bean
        definition.getConstructorArgumentValues().addGenericArgumentValue(definition.getBeanClassName()); // issue #59
        // 设置mapperFactoryBean class
        definition.setBeanClass(this.mapperFactoryBean.getClass());

        definition.getPropertyValues().add("addToConfig", this.addToConfig);

        boolean explicitFactoryUsed = false;
        if (StringUtils.hasText(this.sqlSessionFactoryBeanName)) {
            definition.getPropertyValues().add("sqlSessionFactory", new RuntimeBeanReference(this.sqlSessionFactoryBeanName));
            explicitFactoryUsed = true;
        } else if (this.sqlSessionFactory != null) {
            definition.getPropertyValues().add("sqlSessionFactory", this.sqlSessionFactory);
            explicitFactoryUsed = true;
        }

        if (StringUtils.hasText(this.sqlSessionTemplateBeanName)) {
            if (explicitFactoryUsed) {
                logger.warn("Cannot use both: sqlSessionTemplate and sqlSessionFactory together. sqlSessionFactory is ignored.");
            }
            definition.getPropertyValues().add("sqlSessionTemplate", new RuntimeBeanReference(this.sqlSessionTemplateBeanName));
            explicitFactoryUsed = true;
        } else if (this.sqlSessionTemplate != null) {
            if (explicitFactoryUsed) {
                logger.warn("Cannot use both: sqlSessionTemplate and sqlSessionFactory together. sqlSessionFactory is ignored.");
            }
            definition.getPropertyValues().add("sqlSessionTemplate", this.sqlSessionTemplate);
            explicitFactoryUsed = true;
        }

        if (!explicitFactoryUsed) {
            if (logger.isDebugEnabled()) {
                logger.debug("Enabling autowire by type for MapperFactoryBean with name '" + holder.getBeanName() + "'.");
            }
            definition.setAutowireMode(AbstractBeanDefinition.AUTOWIRE_BY_TYPE);
        }
    }
}
通过 debug,我们可以清晰的发现对于 mapper 接口的 class 属性值的变化。
设置前:
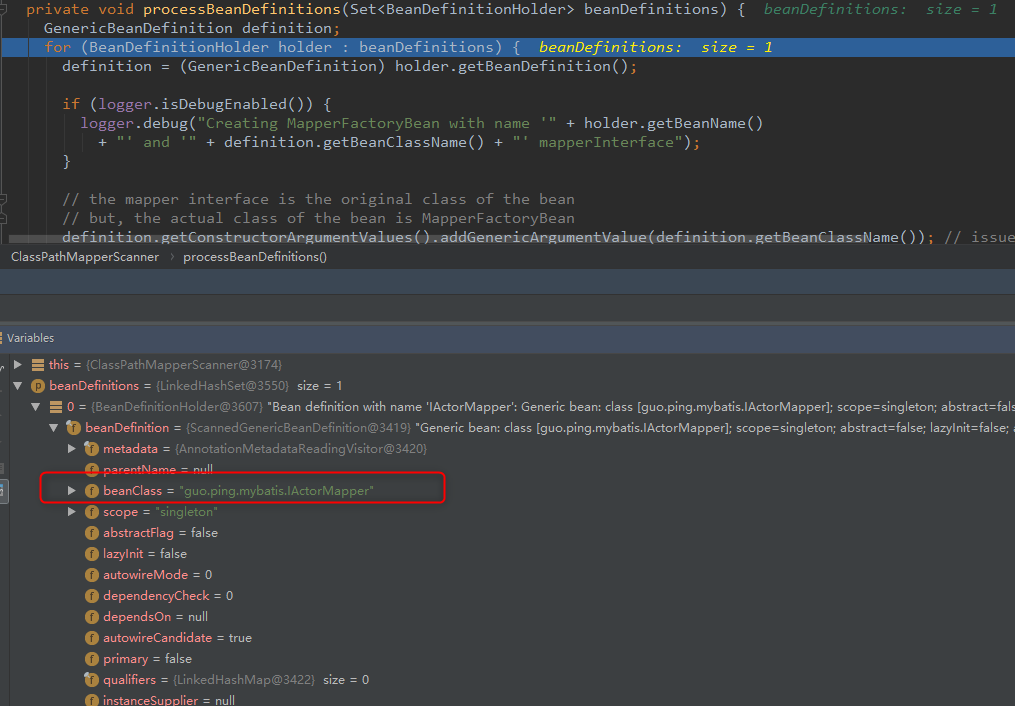
设置后:
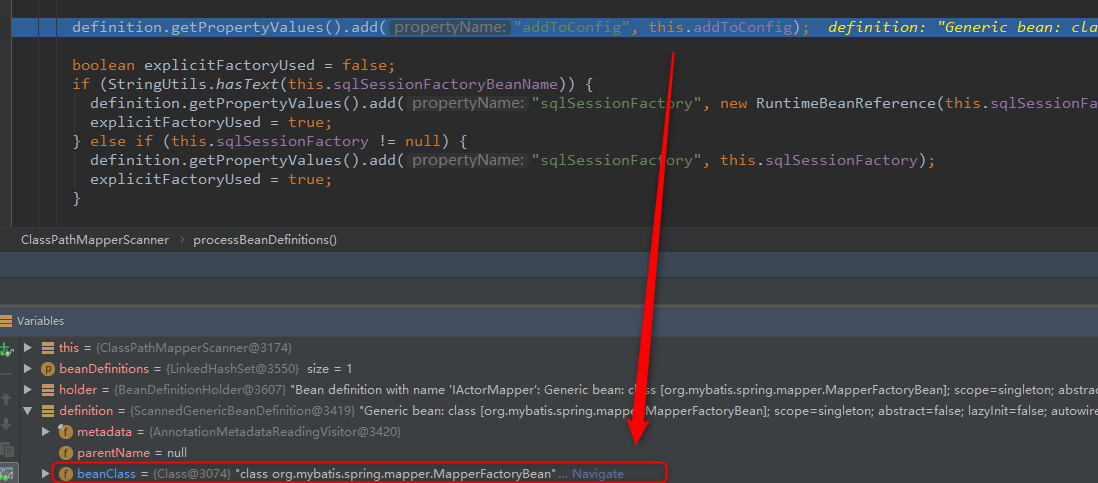
这样我们的扫描包,并通过编码方式注册所有的 mapper 接口就实现了。
V. 总结
Spring和MyBatis的整合,主要就是将MyBatis需要使用到的 session 工厂、mapper 接口实例等对象交由Spring容器管理,而这些对象实例的创建几乎全部是MyBatis自己Api创建的,Spring只是对其进行了封装。在封装的过程中,最常用的是 InitializingBean 接口、FactoryBean 接口以及各种后处理器,从中可看出其他框架想要整合Spring的思路,一般从何入手。
JDBC和MyBatis的分析中,其实包含了很多事务相关的内容我们都没有分析,那么下一篇文章主要研究Spring的事务相关源码,这在平时的使用中非常重要。