一. 安装node
Node 官网已经把 linux 下载版本更改为已编译好的版本了,我们可以直接下载解压后使用:
# wget https://nodejs.org/dist/v10.9.0/node-v10.9.0-linux-x64.tar.xz    // 下载
# tar xf  node-v10.9.0-linux-x64.tar.xz       // 解压
# cd node-v10.9.0-linux-x64/                  // 进入解压目录
# ./bin/node -v                               // 执行node命令 查看版本
v10.9.0
重命名文件夹:

解压文件的 bin 目录底下包含了 node、npm 等命令,我们可以使用 ln 命令来设置软连接:
ln -s /usr/software/nodejs/bin/npm   /usr/local/bin/
ln -s /usr/software/nodejs/bin/node   /usr/local/bin/
检查版本:

二. 安装nginx
1. 基于APT源安装
通过以下方式安装目前的版本是: 1.10.3(16年的版本, 最新版1.14.2)
sudo apt-get install nginx
如果出现以下错误:
Reading package lists... Done
Building dependency tree
Reading state information... Done
E: Unable to locate package nginx
则同步 /etc/apt/sources.list 和 /etc/apt/sources.list.d 中列出的源的索引,这样才能获取到最新的软件包。
apt-get update
查看安装路径:
whereis nginx
nginx: /usr/sbin/nginx /etc/nginx /usr/share/nginx
安装好的文件位置:
/usr/sbin/nginx:主程序
/etc/nginx:存放配置文件
/usr/share/nginx:存放静态文件
/var/log/nginx:存放日志
其实从上面的根目录文件夹可以知道,Linux系统的配置文件一般放在/etc,日志一般放在/var/log,运行的程序一般放在/usr/sbin或者/usr/bin。
当然,如果要更清楚Nginx的配置项放在什么地方,可以打开/etc/nginx/nginx.conf
我猜测,Nginx如果指定默认加载/etc/nginx/nginx.conf的配置文件。如果要查看加载的是哪个配置文件,可以用这个命令 sudo nginx -t 或者 ps -ef | grep nginx
然后通过这种方式安装的,会自动创建服务,会自动在/etc/init.d/nginx新建服务脚本,然后就可以使用sudo service nginx {start|stop|restart|reload|force-reload|status|configtest|rotate|upgrade}的命令启动
还有一个好处,创建好的文件由于放在/usr/sbin目录下,所以能直接在终端中使用nginx命令而无需指定路径。
2. 通过源码包编译安装
这种方式可以自定安装指定的模块以及最新的版本。方式更灵活。
官方下载页面:http://nginx.org/en/download.html
configure配置文件详解:http://nginx.org/en/docs/configure.html
安装gcc g++的依赖库
sudo apt-get install build-essential
sudo apt-get install libtool
安装pcre依赖库(http://www.pcre.org/)
sudo apt-get update
sudo apt-get install libpcre3 libpcre3-dev
安装zlib依赖库(http://www.zlib.net)
sudo apt-get install zlib1g-dev
安装SSL依赖库(16.04默认已经安装了)
sudo apt-get install openssl
安装Nginx

#下载最新版本:
wget http://nginx.org/download/nginx-1.14.2.tar.gz
#解压:
tar -zxvf nginx-1.14.2.tar.gz
#进入解压目录:
cd nginx-1.14.2
#配置:
./configure --prefix=/usr/local/nginx
#编译:
make
#安装:
sudo make install
#启动:
sudo /usr/local/nginx/sbin/nginx -c /usr/local/nginx/conf/nginx.conf
注意:-c 指定配置文件的路径,不加的话,nginx会自动加载默认路径的配置文件,可以通过-h查看帮助命令。
#查看进程:
ps -ef | grep nginx
配置软链接
sudo ln -s /usr/local/nginx/sbin/nginx /usr/bin/nginx
现在就可以不用路径直接输入nginx启动。
配置开机启动服务
在/etc/init.d/下创建nginx文件,sudo vim /etc/init.d/nginx,内容如下:


#!/bin/sh

### BEGIN INIT INFO
# Provides:      nginx
# Required-Start:    $local_fs $remote_fs $network $syslog $named
# Required-Stop:     $local_fs $remote_fs $network $syslog $named
# Default-Start:     2 3 4 5
# Default-Stop:      0 1 6
# Short-Description: starts the nginx web server
# Description:       starts nginx using start-stop-daemon
### END INIT INFO

PATH=/usr/local/sbin:/usr/local/bin:/sbin:/bin:/usr/sbin:/usr/bin
DAEMON=/usr/local/nginx/sbin/nginx
NAME=nginx
DESC=nginx

# Include nginx defaults if available
if [ -r /etc/default/nginx ]; then
    . /etc/default/nginx
fi

STOP_SCHEDULE="${STOP_SCHEDULE:-QUIT/5/TERM/5/KILL/5}"

test -x $DAEMON || exit 0

. /lib/init/vars.sh
. /lib/lsb/init-functions

# Try to extract nginx pidfile
PID=$(cat /usr/local/nginx/conf/nginx.conf | grep -Ev '^\s*#' | awk 'BEGIN { RS="[;{}]" } { if ($1 == "pid") print $2 }' | head -n1)
if [ -z "$PID" ]; then
    PID=/run/nginx.pid
fi

if [ -n "$ULIMIT" ]; then
    # Set ulimit if it is set in /etc/default/nginx
    ulimit $ULIMIT
fi

start_nginx() {
    # Start the daemon/service
    #
    # Returns:
    #   0 if daemon has been started
    #   1 if daemon was already running
    #   2 if daemon could not be started
    start-stop-daemon --start --quiet --pidfile $PID --exec $DAEMON --test > /dev/null \
        || return 1
    start-stop-daemon --start --quiet --pidfile $PID --exec $DAEMON -- \
        $DAEMON_OPTS 2>/dev/null \
        || return 2
}

test_config() {
    # Test the nginx configuration
    $DAEMON -t $DAEMON_OPTS >/dev/null 2>&1
}

stop_nginx() {
    # Stops the daemon/service
    #
    # Return
    #   0 if daemon has been stopped
    #   1 if daemon was already stopped
    #   2 if daemon could not be stopped
    #   other if a failure occurred
    start-stop-daemon --stop --quiet --retry=$STOP_SCHEDULE --pidfile $PID --name $NAME
    RETVAL="$?"
    sleep 1
    return "$RETVAL"
}

reload_nginx() {
    # Function that sends a SIGHUP to the daemon/service
    start-stop-daemon --stop --signal HUP --quiet --pidfile $PID --name $NAME
    return 0
}

rotate_logs() {
    # Rotate log files
    start-stop-daemon --stop --signal USR1 --quiet --pidfile $PID --name $NAME
    return 0
}

upgrade_nginx() {
    # Online upgrade nginx executable
    # http://nginx.org/en/docs/control.html
    #
    # Return
    #   0 if nginx has been successfully upgraded
    #   1 if nginx is not running
    #   2 if the pid files were not created on time
    #   3 if the old master could not be killed
    if start-stop-daemon --stop --signal USR2 --quiet --pidfile $PID --name $NAME; then
        # Wait for both old and new master to write their pid file
        while [ ! -s "${PID}.oldbin" ] || [ ! -s "${PID}" ]; do
            cnt=`expr $cnt + 1`
            if [ $cnt -gt 10 ]; then
                return 2
            fi
            sleep 1
        done
        # Everything is ready, gracefully stop the old master
        if start-stop-daemon --stop --signal QUIT --quiet --pidfile "${PID}.oldbin" --name $NAME; then
            return 0
        else
            return 3
        fi
    else
        return 1
    fi
}

case "$1" in
    start)
        log_daemon_msg "Starting $DESC" "$NAME"
        start_nginx
        case "$?" in
            0|1) log_end_msg 0 ;;
            2)   log_end_msg 1 ;;
        esac
        ;;
    stop)
        log_daemon_msg "Stopping $DESC" "$NAME"
        stop_nginx
        case "$?" in
            0|1) log_end_msg 0 ;;
            2)   log_end_msg 1 ;;
        esac
        ;;
    restart)
        log_daemon_msg "Restarting $DESC" "$NAME"

        # Check configuration before stopping nginx
        if ! test_config; then
            log_end_msg 1 # Configuration error
            exit $?
        fi

        stop_nginx
        case "$?" in
            0|1)
                start_nginx
                case "$?" in
                    0) log_end_msg 0 ;;
                    1) log_end_msg 1 ;; # Old process is still running
                    *) log_end_msg 1 ;; # Failed to start
                esac
                ;;
            *)
                # Failed to stop
                log_end_msg 1
                ;;
        esac
        ;;
    reload|force-reload)
        log_daemon_msg "Reloading $DESC configuration" "$NAME"

        # Check configuration before stopping nginx
        #
        # This is not entirely correct since the on-disk nginx binary
        # may differ from the in-memory one, but that's not common.
        # We prefer to check the configuration and return an error
        # to the administrator.
        if ! test_config; then
            log_end_msg 1 # Configuration error
            exit $?
        fi

        reload_nginx
        log_end_msg $?
        ;;
    configtest|testconfig)
        log_daemon_msg "Testing $DESC configuration"
        test_config
        log_end_msg $?
        ;;
    status)
        status_of_proc -p $PID "$DAEMON" "$NAME" && exit 0 || exit $?
        ;;
    upgrade)
        log_daemon_msg "Upgrading binary" "$NAME"
        upgrade_nginx
        log_end_msg $?
        ;;
    rotate)
        log_daemon_msg "Re-opening $DESC log files" "$NAME"
        rotate_logs
        log_end_msg $?
        ;;
    *)
        echo "Usage: $NAME {start|stop|restart|reload|force-reload|status|configtest|rotate|upgrade}" >&2
        exit 3
        ;;
esac
#设置服务脚本有执行权限
sudo chmod +x /etc/init.d/nginx
#注册服务
cd /etc/init.d/
sudo update-rc.d nginx defaults
现在基本上就可以开机启动了,常用的命令如下:
sudo service nginx {start|stop|restart|reload|force-reload|status|configtest|rotate|upgrade}
我就是使用的这种方式,安装了最新版的nginx
安装nginx 成功后查看版本

查看nginx是否启动:

如果没有启动,到目录 /usr/local/nginx/sbin 运行 ./nginx
常用命令:
./nginx -s stop
./nginx -s reload
三. 解析域名
我使用的是阿里云,这里简介下阿里云的解析方式:

到域名目录
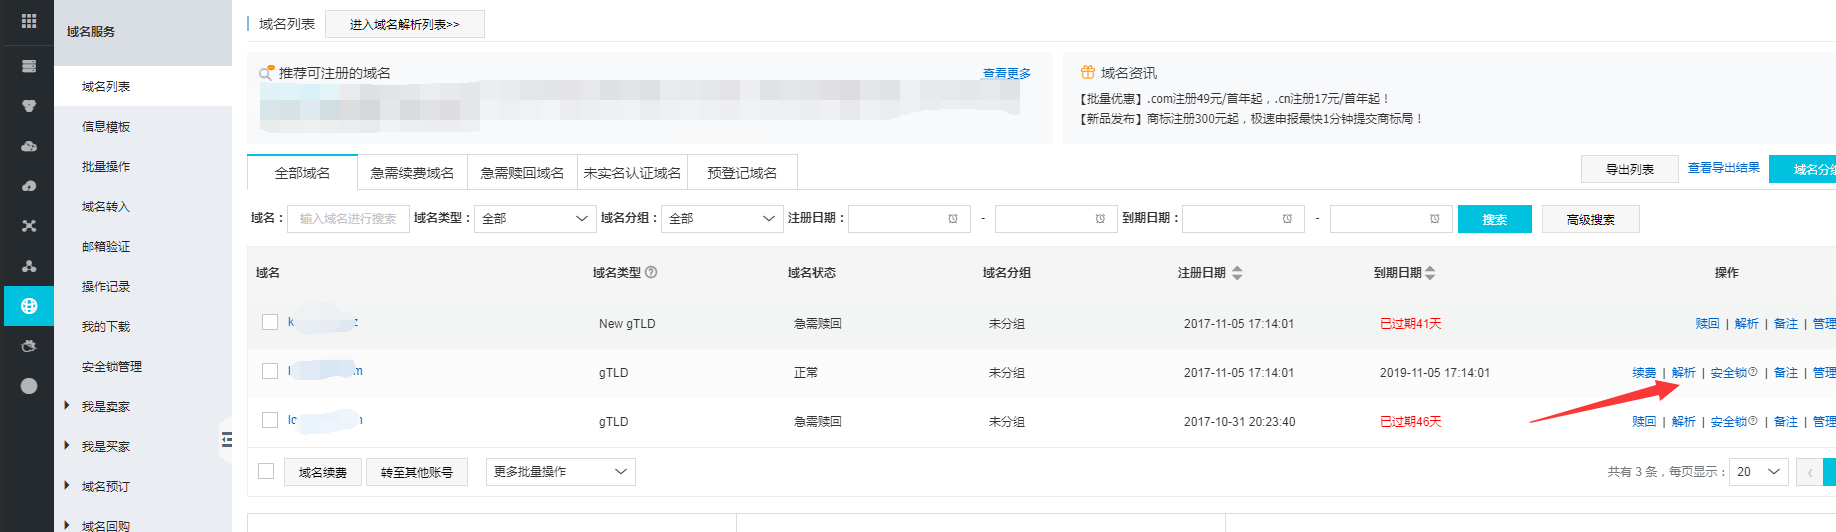
选择要解析的域名,解析
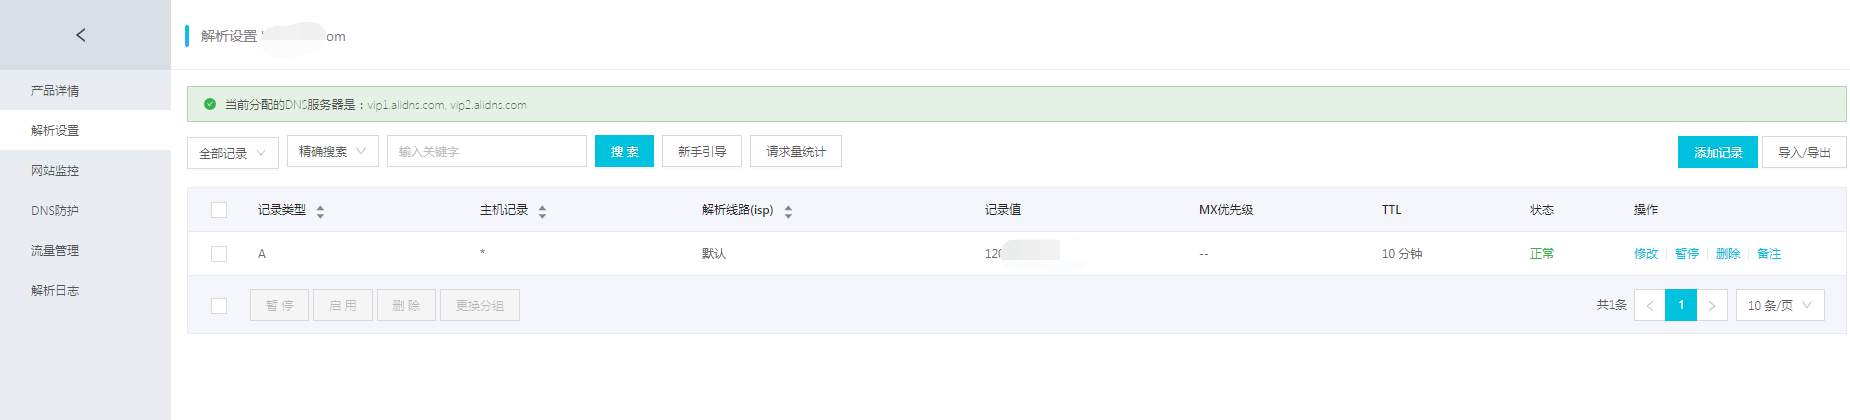
主机记录可以选择*,这样www和子域的都可以访问。
解析成功后,等几分钟既可以访问域名。
四. 配置阿里云安全组
如果配置了以上信息后,访问不了网站,ping域名又是正确的,那可以优先考虑配置阿里云的安全组,把要访问的端口放开

增加一个80端口的配置,开放80端口即可

再次访问应该就正常了。
参考:
https://www.cnblogs.com/EasonJim/p/7806879.html