可以指定cpu等的利用率,采用计划的方式。

12 Managing Database Resources
您可以使用EM Express中的Oracle数据库资源管理器(Resource Manager)特性来有效地管理数据库资源。
本章假设您熟悉资源计划的概念和术语。重点讨论了如何使用EM Express管理资源计划。
您可以使用EM Express为非多租户容器数据库(非CDBs)、CDBs和可插入数据库(PDBs)创建和管理资源计划。
本章包括以下几节:
See Also:
If you are not familiar with resource plan concepts and terminology, read the following information in addition to reading this chapter:
-
Oracle Database Administrator’s Guide for information on using Resource Manager for non-CDBs
-
Oracle Multitenant Administrator's Guide for information on using Resource Manager for CDBs and PDBs
12.1 About Resource Management
EM Express中的资源管理器特性使您能够管理数据库中争夺系统和数据库资源的多个工作负载。
从EM Express中针对非CDB、CDB或PDB的资源管理页面,可以导航到资源管理器特性。
See Also:
-
Oracle Database Administrator’s Guide for information on using Resource Manager for non-CDBs
-
Oracle Multitenant Administrator's Guide for information on using Resource Manager for CDBs and PDBs
12.1.1 关于非cdb的资源管理器解决方案
在非cdb中,当数据库资源分配决策留给操作系统时,您可能会遇到工作负载管理方面的问题。
这些问题包括:
-
过度的开销:
当服务器进程的数量很高时,Oracle数据库服务器进程之间的操作系统上下文切换导致了过多的开销。 -
低效的调度
操作系统在数据库服务器持有锁存器时调度规则,这是低效的。 -
资源分配不当
操作系统在所有活动进程之间平均分配资源,并且不能将一个任务优先于另一个任务。 -
无法管理特定于数据库的资源,如并行执行服务器和活动会话
通过允许数据库更多地控制硬件资源的分配,使用资源管理器有助于克服这些问题。在具有多个并发用户会话的环境中,这些用户会话以不同的优先级运行作业,不应该平等对待所有会话。 资源管理器允许您根据会话属性将会话分类为组,然后以优化应用程序环境的硬件利用率的方式将资源分配给这些组。
使用EM Express中的资源管理器功能,您可以:
-
创建资源使用者组(使用者组),这些资源使用者组根据处理需求将用户会话一起收集到资源使用者组(使用者组)中。
-
通过将CPU的共享分配给不同的消费组来设置分配可用CPU的CPU指令。例如,在数据仓库中,可以向ROLAP(关系在线分析处理)应用程序提供比批处理作业更多的共享。
-
设置限制使用者组成员执行的任何操作的并行度的并行服务器指令。
-
设置管理并行语句队列中并行语句顺序的并行服务器指令。来自关键应用程序的并行语句可以排在来自低优先级用户组的并行语句之前。
-
设置限制一组用户可以使用的并行执行服务器数量的并行服务器指令。这确保所有可用的并行执行服务器不会只分配给一组用户。
-
失控的查询命令集探测会话或调用时消耗超过指定数量的CPU,物理I / O,逻辑I / O,或运行时间,然后自动终止会话或调用,或者切换到一个消费者组织资源分配或限制较低的CPU百分比组可以使用。逻辑I/O,也称为缓冲区I/O,是指对缓冲区缓存中的缓冲区进行读写. 当在内存中找不到请求的缓冲区时,数据库执行物理I/O将缓冲区从磁盘或闪存缓存复制到内存中,然后执行逻辑I/O读取缓存的缓冲区。
See Also:
12.1.2关于CDB的资源管理器解决方案
资源管理器可以为CDB提供更有效的资源使用。
当为CDB分配资源的决策留给操作系统时,您可能会在工作负载管理方面遇到以下问题:
-
pdb之间资源分配不当
操作系统在所有活动进程之间平均分配资源,并且不能将一个任务优先于另一个任务。因此,一个或多个pdb可能会使用过多的系统资源,导致其他pdb资源匮乏。 -
在单个PDB中不适当的资源分配
连接到单个PDB的一个或多个会话可能会使用过多的系统资源,导致连接到相同PDB的其他会话对资源极度缺乏。 -
PDBs的性能不一致
当其他PDB在不同时间竞争更多的系统资源或更少的系统资源时,单个PDB可能会执行不一致 -
缺乏用于PDBs的资源使用数据
资源使用数据对于监视和优化PDBs至关重要。如果非cdb是系统上唯一运行的数据库,那么可以使用操作系统监视工具来收集非cdb的资源使用数据。但是,在CDB中,操作系统监视工具不再那么有用,因为系统上运行着多个pdb。
资源管理器通过允许CDB更多地控制如何在PDBs之间和PDBs内部分配硬件资源来帮助克服这些问题。
在具有多个pdb的CDB中,一些pdb通常比其他pdb更重要。资源管理器使您能够对特定PDBs的资源使用进行优先级排序和限制。
使用资源管理器,您可以:
-
指定不同的pdb应该接收不同的系统资源共享,以便将更多的资源分配给更重要的pdb
限制特定PDB的CPU使用
限制特定PDB可以使用的并行执行服务器的数量
限制特定PDB的内存使用
指定特定PDB所需的最小内存量
限制连接到单个PDB的不同会话的资源使用
限制特定PDBs生成的I/O
监控PDBs的资源使用情况
See Also:
12.1.3 About Consumer Groups
资源使用者组(使用者组)是一组用户会话,它们根据处理需求分组在一起。创建会话时,它将根据您设置的映射规则自动映射到使用者组。
由于资源管理器将资源(如CPU)分配给使用者组,当会话成为使用者组的成员时,其资源分配由使用者组的分配决定。
数据字典中总是存在一些特殊的消费群体。它们不能被修改或删除。它们是:
-
SYS_GROUPThis is the initial consumer group for all sessions created by user accounts
SYSorSYSTEM. This initial consumer group can be overridden by session-to–consumer group mapping rules. -
OTHER_GROUPSThis consumer group contains all sessions that have not been assigned to a consumer group. Every resource plan (plan) must contain a directive to
OTHER_GROUPS.
任何活动的消费群体不得超过28个 non-CDB plan, 在任何活跃的PDB计划中,最多只能有8个消费群体。
See Also:
-
Oracle Database Administrator’s Guide for more information about consumer groups.
12.1.4 About Plans
资源计划(plan)是计划指令(directive)的容器,这些指令指定了如何分配资源。
除了为每个Oracle数据库预定义的计划之外,您还可以创建任意数量的计划。
您可以为非CDBs、CDBs和PDBs创建计划。但是,在特定的非CDB、CDB或PDB中,一次只有一个计划是活动的。当计划处于活动状态时,它的每个指令都控制资源分配。
在非cdb计划或PDB计划中,指示指定如何将资源分配给非cdb或PDB中的使用者组。
在CDB计划中,指示指定如何将资源分配给CDB中的PDBs。
See Also:
12.1.5 About Directives关于指令
资源计划指令(指令)指定如何分配资源。
非cdb计划或PDB计划中的指令将使用者组与该计划关联起来,并指定如何将资源分配给该使用者组。资源根据属于计划的指令集分配给使用者组。计划和它的指示之间有一种父子关系。每个指令引用一个消费者组,计划中的任何两个指令都不能引用同一个消费者组。
非cdb计划或PDB计划中的指令可以通过几种方式限制对某个消费群体的资源分配。例如,它可以控制消费组获得的CPU占总CPU的百分比。
资源是根据非cdb计划或PDB计划中的指令集分配给使用者组的。计划和它的指示之间有一种父子关系。每个指令引用一个消费者组,而同一计划的任何两个指令都不能引用相同的消费者组。
CDB计划中的指令指定如何将资源分配给CDB中的PDBs。在CDB计划中,可以显式地为CDB中的所有、部分或所有pdb定义指令。每个CDB计划也有一个针对PDBs的默认指令。当CDB计划是活动计划时,默认指令用于没有为其显式定义指令的任何PDB。
下表总结了不同类型计划的指示如何分配资源:
| Plan Type | Directives Allocate Resources To |
|---|---|
| Non-CDB plan |
Consumer groups |
| CDB plan |
PDBs |
| PDB plan |
Consumer groups |
See Also:
12.1.6 About Non-CDB Plans
非cdb计划包含一些指令,这些指令指定如何将资源分配给非cdb中的使用者组。
非cdb计划必须包含一个向名为OTHER_GROUPS的消费组分配资源的指令。OTHER_GROUPS适用于没有映射到计划中任何其他使用者组的所有会话。
如果您的系统只有8个或更少的服务、用户和程序,那么您可以使用EM Express中的Quick Setup特性来创建一个新的非cdb计划。
如果系统有9个或更多的服务、用户和程序,则创建一个空计划,然后向计划添加指令。
See Also:
12.1.7 About Managing CDB and PDB Workloads
在一个CDB中,您可以使用EM Express中的资源管理器特性来管理多个pdb中争夺系统和CDB资源的多个工作负载。
在国开行中,您可以在两个基本层次上管理资源:
-
CDB级别:可以为争夺系统和CDB资源的多个pdb管理工作负载。您可以指定如何将资源分配给PDBs,并且可以限制特定PDBs的资源利用率。
PDB级别:您可以管理每个PDB中的工作负载
资源管理器将资源分配分为两个步骤:
-
它将系统资源的一部分分配给每个PDB。
在特定的PDB中,它将步骤1中分配的系统资源的一部分分配给连接到PDB的每个会话。
Note:
根目录中的所有活动都由资源管理器自动管理。
See Also:
12.1.7.1 About CDB Plans
在cdb中,PDBs可能具有不同的优先级。您可以创建CDB计划,根据这些优先级将资源分配给CDB中的不同PDBs。
CDB计划中的指令集指定如何将资源分配给CDB中的PDBs。
在CDB计划及其指令之间存在父子关系。
每个指令引用一个PDB。
指令控制向PDBs分配下列资源:
-
CPU
-
Parallel execution servers
-
Memory
指令可以根据为每个PDB指定的共享值控制对PDBs的资源分配。更高的股票价值会带来更多的资源。例如,通过将第一个PDB的共享值设置为第二个PDB的共享值的两倍,可以指定分配给第二个PDB的资源是分配给第二个PDB的资源的两倍。
您还可以为PDBs指定利用率限制,利用率限制将资源分配给PDB。例如,它可以控制PDB获得的CPU数量占CDB可用CPU总量的百分比。
您可以同时使用共享和利用率限制来精确控制分配给CDB中的每个PDB的资源。
Note:
Oracle recommends that you do not use the parallel_server_limit directive in a CDB resource plan.
See Also:
12.1.7.1.1 About Shares for Allocating Resources to PDBs
要在PDB之间分配资源,需要为CDB计划中的每个PDB分配一个共享值。更高的共享价值会为PDB带来更多有保证的资源。
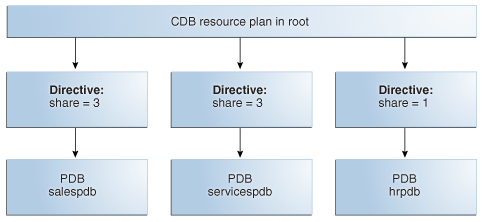
例如,如果您的CDB有三个pdb,那么CDB计划可以为这三个pdb中的每一个指定共享值,如下所示 in Figure 12-1:
Figure 12-1 Shares in a CDB Plan
Description of "Figure 12-1 Shares in a CDB Plan"
在本例中,分配的股份总数为7 (3 + 3 + 1),salespdb和servicespdb PDB分别保证了资源的3/7,hrpdb PDB保证了资源的1/7。但是,如果没有资源争用,任何PDB都可以使用超过保证数量的资源。
如果PDBs的工作负载消耗了所有的系统资源,则:
-
salespdb和servicespdb PDBs可以消耗相同数量的CPU资源。salespdb和servicespdb PDBs都保证比hrpdb PDB多三倍的CPU资源。
来自salespdb和servicespdb PDBs的排队并行查询被同等地选择。来自salespdb和servicespdb PDBs的排队并行查询的选择频率是来自hrpdb PDB的排队并行查询的三倍。
salespdb和servicespdb PDBs可以消耗相同数量的内存资源。salespdb和servicespdb PDBs都保证比hrpdb多三倍的内存资源
See Also:
12.1.7.1.2 关于PDBs的使用限制
使用限制限制特定PDB的系统资源使用。您可以为CPU、并行执行服务器和内存指定利用率限制。
表12-1描述了PDBs的使用限制以及当PDB达到使用限制时所采取的操作。
表12-1 PDBs的利用率限制
| Resource | Resource Utilization Limit | Resource Manager Action |
|---|---|---|
| CPU |
连接到PDB的会话达到PDB的CPU利用率限制。CPU的这个利用率限制是由cpu_utilization_limit(%)指令设置的。cpu_utilization_limit(%)指令指定PDB可以使用的系统资源的百分比。该值的范围从0到100。 | 资源管理器节流PDB会话,以便PDB的CPU利用率不超过利用率限制。 |
| Parallel execution servers |
PDB使用的不仅仅是PARALLEL_SERVERS_TARGET初始化参数的值乘以parallel_server_limit(%)指令的值。 例如,如果PARALLEL_SERVERS_TARGET初始化参数设置为200,PDB的parallel_server_limit(%)指令设置为10%,那么PDB的利用率限制是20台并行执行服务器(200 X .10)。 |
如果PDB使用的并行执行服务器数量超过PARALLEL_SERVERS_TARGET初始化参数值乘以parallel_server_limit参数值所指定的限制,资源管理器将对并行查询进行排队。 |
| Memory |
The sessions connected to a PDB reach the memory limit for the PDB. This utilization limit for memory is set by the |
When the usage for a PDB exceeds the limit for the shared pool, Resource Manager frees the least recently used objects for that PDB before the cached objects of other PDBs, even if those have been in the cache longer. When the usage for a PDB exceeds the limit for the PGA, Resource Manager can interrupt queries or PL/SQL functions or kill sessions associated with any PDB, including PDBs that did not exceed the limit. |
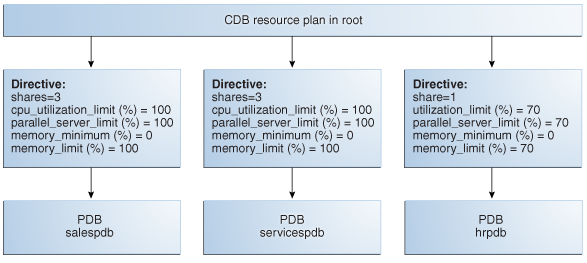
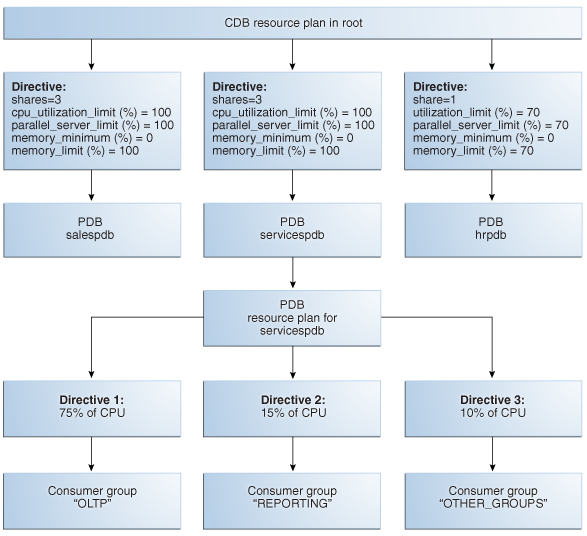
A CDB plan 的计划可以为三家pdb指定份额和利用率限制, as shown in Figure 12-2.
Figure 12-2 Shares and Utilization Limits in a CDB Plan
Description of "Figure 12-2 Shares and Utilization Limits in a CDB Plan"
Figure 12-2 说明salespdb和servicespdb PDBs没有使用限制,因为cpu_utilization_limit(%)和parallel_server_limit(%)指令都被设置为100。但是,由于cpu_utilization_limit(%)和parallel_server_limit(%)指令都被设置为70,所以hrpdb限制为70%的可用系统资源。
Note:
Oracle recommends that you do not use the parallel_server_limit directive in a CDB resource plan.
See Also:
12.1.7.1.3 关于PDBs的默认指令
当CDB计划没有显式地为PDB定义指令时,CDB计划的默认指令用于为该PDB分配资源。
Table 12-2 显示PDBs的初始默认指令的属性。
Table 12-2PDBs的初始默认指令属性
| Directive Attribute | Value |
|---|---|
| shares |
1 |
| cpu_utilization_limit (%) |
100 |
| parallel_server_limit (%) |
100 |
| memory_minimum (%) |
0 |
| memory_limit (%) |
100 |
当PDB被添加到CDB而没有为其定义任何指令时,PDB将使用PDBs的默认指令。
您可以为任何新的PDB定义一个指令。
当从CDB中拔出PDB时,PDB的指令将被保留。如果将相同的PDB插入到CDB中,那么如果没有手动删除该指令,则使用为其定义的指令。
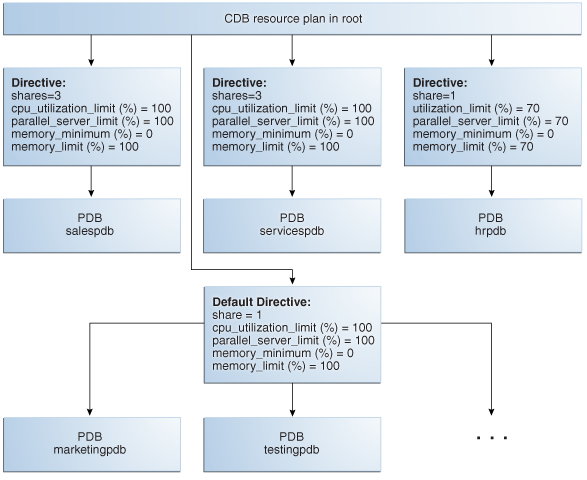
Figure 12-3 显示一个示例,其中salespdb、servicespdb和hrpdb PDBs都为它们定义了一个指令。但是,marketingpdb和testingpdb PDBs并没有为它们定义一个指令,因此使用默认的PDB指令。
Figure 12-3 Default Directive for a CDB Plan
Description of "Figure 12-3 Default Directive for a CDB Plan"
图12-3显示默认的PDB指令指定共享为1,cpu_utilization_limit为100%,parallel_server_limit为100%,memory_limit为100%。
图12-3还显示了使用默认PDB指令的PDBs marketingpdb和testingpdb,这意味着marketingpdb和testingpdb各得到1个份额和3个100%的利用率限制。
您还可以更改默认PDB指令属性值,如更改CDB计划的默认PDB指令所述。在更改默认PDB指令之后添加到CDB的任何PDB都将使用来自默认PDB指令的新属性值,除非您为PDB定义了一个PDB指令。
Note:
Oracle建议您不要在CDB资源计划中使用parallel_server_limit指令。
See Also:
12.1.7.2 About PDB Plans
CDB计划确定分配给每个PDB的资源数量。PDB计划确定如何将分配给特定PDB的资源分配给该PDB中的使用者组。
PDB计划与非cdb计划类似。与非cdb的计划在非cdb的使用者组之间分配资源一样,PDB计划在PDB的使用者组之间分配资源。
PDB计划必须包含一个向名为OTHER_GROUPS的使用者组分配资源的指令。OTHER_GROUPS适用于没有映射到计划中任何其他使用者组的所有会话。
当您创建一个或多个PDB计划时,针对PDB的CDB的CDB计划应该满足某些要求。表12-3描述了国开行计划的需求,以及未满足需求时的结果。
当您创建一个或多个PDB计划而没有CDB计划时,CDB使用Oracle数据库提供的DEFAULT_CDB_PLAN。
Table 12-3 CDB Plan 对PDB计划的要求
| Resource | CDB 计划需求 | 当需求没有得到满足时的结果 |
|---|---|---|
| CPU |
必须符合下列条件之一: 必须使用shares参数为PDB指定一个股票值。 必须使用cpu_utilization_limit(%)参数为PDB指定低于100的CPU利用率限制。 这些值可以在特定PDB的指令中设置,也可以在默认指令中设置。 |
PDB计划的CPU分配策略没有强制执行。 PDB计划中的cpu_utilization_limit(%)参数指定的CPU限制没有强制执行。 |
| Parallel execution servers |
必须符合下列条件之一: 必须使用shares参数为PDB指定一个股票值。 必须使用cpu_utilization_limit(%)参数为PDB指定低于100的CPU利用率限制。 必须使用parallel_server_limit(%)参数为PDB指定低于100的并行服务器限制。 这些值可以在特定PDB的指令中设置,也可以在默认指令中设置。 |
不强制PDB计划的并行执行服务器分配策略。 PDB计划中的parallel_server_limit(%)参数指定的并行服务器限制没有强制执行。 |
| Memory |
必须符合下列条件之一: 必须使用shares参数为PDB指定一个股票值。 必须使用memory_limit(%)参数为PDB指定低于100的内存利用率限制。 这些值可以在特定PDB的指令中设置,也可以在默认指令中设置。 |
不强制PDB计划的内存分配策略。 PDB计划中的memory_limit(%)参数指定的内存限制没有强制执行。 |
图12-4显示了CDB计划和PDB计划的示例。
图12-4 CDB计划和PDB计划
Description of "Figure 12-4 A CDB Plan and a PDB Plan"
Note:
Oracle建议您不要在CDB资源计划中使用parallel_server_limit指令。
如果您的系统的服务少于8个,用户少于8个,或者程序少于8个,那么您可以使用EM Express中的Quick Setup特性来创建一个新的PDB计划。
如果您的系统有8个或更多的服务,8个或更多的用户,或8个或更多的程序,您将创建一个空计划,然后向该计划添加指令。
See Also:
12.1.8 访问资源管理页面
从EM Express中的资源管理页面,可以导航到EM Express中可用的资源管理特性。
To access the Resource Management page in EM Express:
- Log into EM Express for the database that you want to manage.
- On any page in EM Express, choose Resource Management from the Configuration menu.
The Resource Management page appears.
资源管理页面的内容特定于数据库的类型(非CDB、CDB或PDB),以及计划是否为数据库活动。有关详情,请参阅下表:
-
表12-4显示了没有活动计划时非cdb的资源管理页面的内容。
表12-5显示了计划活动时非cdb的资源管理页面的内容。
表12-6显示了没有活动计划时,CDB根目录的资源管理页面的内容。
表12-7显示了计划活动时CDB根目录的资源管理页面的内容。
表12-8显示了没有活动计划时PDB的资源管理页面的内容。
表12-9显示了计划i时PDB的资源管理页面的内容
Note:
资源管理页面上的资源管理器仪表板图表上的数据来自自动工作负载存储库(Automatic Workload Repository, AWR)。如果在访问资源管理页面时没有收集到AWR数据,图表将不显示任何数据,并显示信息消息“没有可用的AWR数据”。
默认情况下,AWR数据是按1小时间隔收集的,因此在第一次启动数据库后1小时就可以使用。
Table 12-4 显示资源管理页面的内容 for a non-CDB when no plan is active:
Table 12-4 资源管理页面 for a Non-CDB When No Plan is Active
| Item | Description |
|---|---|
| General section |
提供有关数据库的一般信息。 |
| Host CPU chart |
此图表显示数据库实例和其他主机进程在此主机上使用的CPU数量。对于Oracle RAC数据库,该图表显示了所有数据库实例使用的累积CPU。 使用这个图表来指导设置例如笼化的限制。对于Oracle RAC数据库,还可以为所有实例启用实例控制。 |
| CPU Activity by Services chart |
此图表显示数据库实例和其他主机进程在此主机上使用的CPU数量。对于Oracle RAC数据库,该图表显示了所有数据库实例使用的累积CPU。 使用这个图表来指导设置例如笼化的限制。对于Oracle RAC数据库,还可以为所有实例启用实例控制。 |
| SQL Execution Statistics chart |
此图表显示数据库实例和其他主机进程在此主机上使用的CPU数量。对于Oracle RAC数据库,该图表显示了所有数据库实例使用的累积CPU。 使用这个图表来指导设置例如笼化的限制。对于Oracle RAC数据库,还可以为所有实例启用实例控制。 |
| Parallel and Serial Active Sessions chart |
此图表显示数据库实例和其他主机进程在此主机上使用的CPU数量。对于Oracle RAC数据库,该图表显示了所有数据库实例使用的累积CPU。 使用这个图表来指导设置例如笼化的限制。对于Oracle RAC数据库,还可以为所有实例启用实例控制。 |
| Parallel Operations Downgraded chart |
此图表显示数据库实例和其他主机进程在此主机上使用的CPU数量。对于Oracle RAC数据库,该图表显示了所有数据库实例使用的累积CPU。 使用这个图表来指导设置例如笼化的限制。对于Oracle RAC数据库,还可以为所有实例启用实例控制。 |
Table 12-5 shows the content of the Resource Management page for a non-CDB when a plan is active:
Table 12-5 Resource Management page for a Non-CDB When a Plan is Active
| Item | Description |
|---|---|
| General section |
Provides general information about the database and the resource plan. |
| Host CPU chart |
This chart shows the amount of CPU used on this host by the database instance and by other host processes. For an Oracle RAC database, the chart shows the cumulative CPU used by all database instances. Use this chart for guidance on setting a limit for instance caging. For an Oracle RAC database, instance caging can also be enabled for all instances. |
| CPU Utilization chart |
This chart shows the amount of CPU used by the top consumer groups in the currently active resource manager plan. Use this chart to determine if CPU resource limits for the consumer groups are effective. |
| Waiting Sessions chart |
This chart shows the number of waiting sessions for the top consumer groups in the currently active resource manager plan. Use this chart to determine if the resource limits set for the consumer groups are adequate or if they are causing sessions to be in the waiting state. |
| SQL Executions region |
This region shows the following two charts:
|
| Parallel Executions region |
These two charts show the number of parallel servers and parallel SQL statements that were queued by Database Resource Manager for the top consumer groups. You can use these charts to determine if the parallel server directives in a resource manager plan are effective. |
Table 12-6 shows the content of the Resource Management page for the root of a CDB when no plan is active:
Table 12-6 Resource Management Page for the Root of a CDB When No Plan is Active
| Item | Description |
|---|---|
| General section |
Provides general information about the database. |
| Host CPU chart |
This chart shows the amount of CPU used on this host by the database instance and by other host processes. For an Oracle RAC database, the chart shows the cumulative CPU used by all database instances. Use this chart for guidance on setting a limit for instance caging. For an Oracle RAC database, instance caging can also be enabled for all instances. |
| CPU Utilization by PDBs chart |
This chart shows the amount of CPU used by the top PDBs. Use this chart to determine the appropriate CPU resource limits for the PDBs in a resource manager plan. |
| Memory chart |
Use this chart to determine the top PDBs that consume the most memory. Use this chart to determine the memory limits for the PDBs. |
| Active Parallel Servers chart |
Use this chart with the Parallel Operations Downgraded chart to set parallel server directives for the PDBs in a resource manager plan. |
| Parallel Operations Downgraded chart |
This chart shows the number of parallel operations downgraded or serialized. Use this chart with the Active Parallel Servers chart to set parallel server directives for the PDBs in a resource manager plan. |
Table 12-7 shows the content of the Resource Management page for the root of a CDB when a plan is active:
Table 12-7 Resource Management Page for the Root of a CDB When a Plan is Active
| Item | Description |
|---|---|
| General section |
Provides general information about the database and the resource plan. |
| Host CPU chart |
This chart shows the amount of CPU used on this host by the database instance and by other host processes. For an Oracle RAC database, the chart shows the cumulative CPU used by all database instances. Use this chart for guidance on setting a limit for instance caging. For an Oracle RAC database, instance caging can also be enabled for all instances. |
| CPU Utilization chart |
This chart shows the amount of CPU used by the top PDBs in the currently active resource manager plan. Use this chart to determine if CPU resource limits for the PDBs are effective. |
| Memory Used chart |
Use this chart to determine the top PDBs that consume the most memory in the currently active resource manager plan. |
| SQL Executions region |
This region shows the following two charts:
|
| Parallel Executions region |
These two charts show the number of parallel servers and parallel SQL statements that were queued by Database Resource Manager for the top PDBs. Use these charts to determine if the parallel server directives in a resource manager plan are effective. |
Table 12-8 shows the Resource Management page for a PDB when no plan is active:
Table 12-8 Resource Management Page for a PDB When No Plan is Active
| Item | Description |
|---|---|
| General section |
Provides general information about the database. |
| CPU Activity by Services chart |
This chart shows CPU utilization for the top database services running on this instance. If a consumer group is created by mapping it to a database service, this chart gives guidance on how to set CPU resource limits for that consumer group. |
| SQL Execution Statistics chart |
This chart shows the maximum values of certain SQL execution statistics for which runaway query directives can be set in a resource manager plan. These values can be used to obtain guidance while setting directives for runaway queries. |
| Memory chart |
Use this chart to determine the top consumer groups that consume the most memory in the currently active plan. |
| Parallel and Serial Active Sessions chart |
Use this chart with the Parallel Operations Downgraded chart to set parallel server directives in a resource manager plan. |
| Parallel Operations Downgraded chart |
This chart shows the number of parallel operations downgraded or serialized. Use this chart with the Active Parallel Servers chart to set parallel server directives in a resource manager plan. |
Table 12-9 显示计划活动时PDB的资源管理页面:
Table 12-9 计划活动时PDB的资源管理页
| Item | Description |
|---|---|
| General section |
Provides general information about the database and the resource plan. |
| CPU Utilization chart |
This chart shows the amount of CPU used by the top consumer groups in the currently active resource manager plan. Use this chart to determine if CPU resource limits for the consumer groups are effective. |
| Waiting Sessions chart |
This chart shows the number of waiting sessions for the top consumer groups in the currently active resource manager plan. Use this chart to determine if the resource limits set for the consumer groups are adequate or if they are causing sessions to be in the waiting state. |
| SQL Executions chart |
This chart shows the maximum values of certain SQL execution statistics for which runaway query directives can be set in a resource manager plan. These values can be used to obtain guidance while setting directives for runaway queries. |
| Runaway Query Violations chart |
This chart shows the number of violations caused by runaway queries per consumer group in the currently active resource manager plan. This can provide guidance while setting directives for runaway queries. |
| Parallel Executions region |
These two charts show the number of parallel servers and parallel SQL statements that were queued by Database Resource Manager for the top consumer groups. Use these charts to determine if the parallel server directives in a resource manager plan are effective. |
See Also:
12.2 Managing Plans
本节提供有关使用EM Express管理资源计划(计划)的信息。
它包括以下主题:
12.2.1 Creating Plans

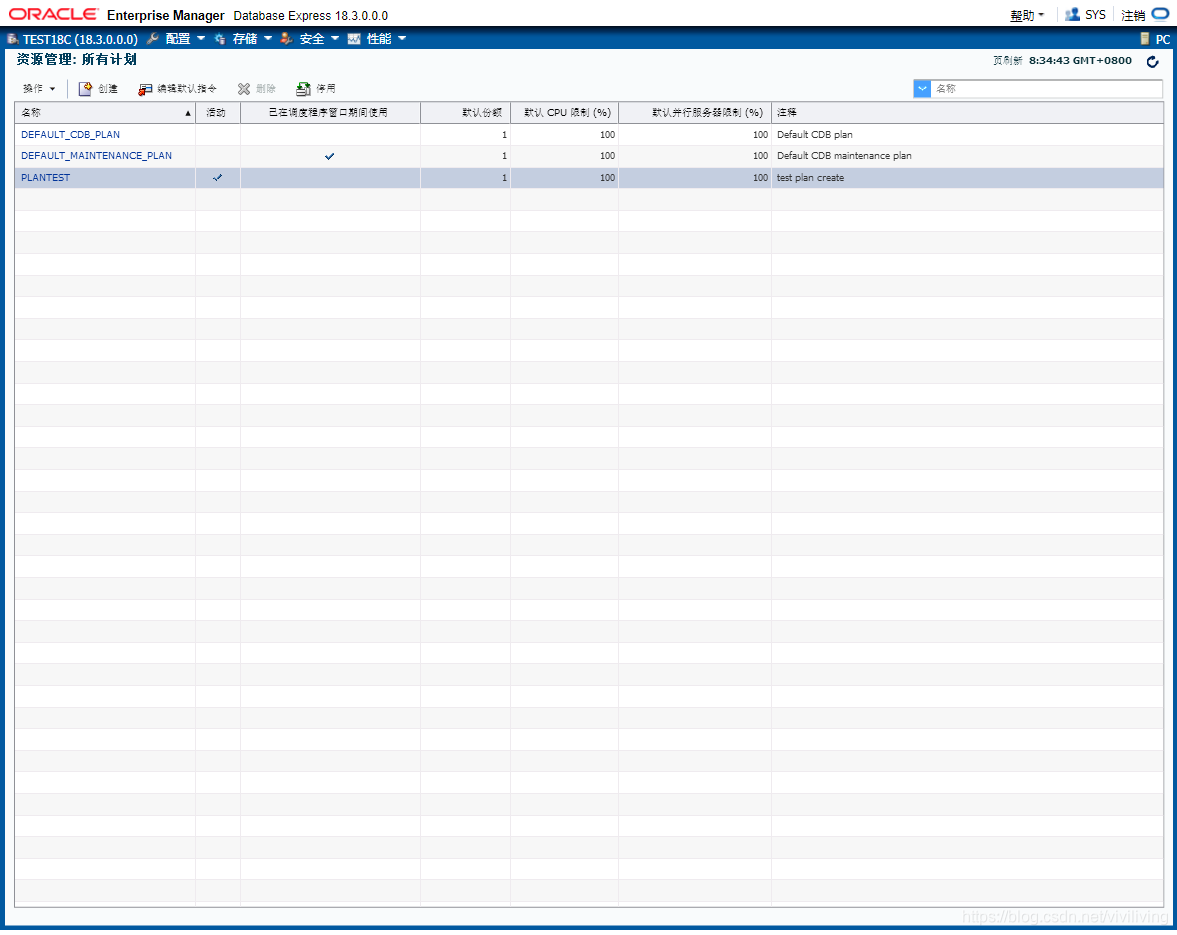
您可以使用EM Express创建资源计划。在“资源管理:所有计划”页面上创建计划。
如果系统的服务少于8个、用户少于8个或程序少于8个,则可以使用Quick Setup创建新的PDB计划。
如果您的系统有8个或更多的服务,8个或更多的用户,或8个或更多的程序,您将创建一个空计划,然后向该计划添加指令。
Note:
12.2.1.1 Creating a New Plan using Quick Setup
如果系统的服务少于8个、用户少于8个或程序少于8个,则可以使用EM Express中的Quick Setup特性为非cdb或PDB创建新的资源计划。
如果您的系统有8个或更多的服务、8个或更多的用户、8个或更多的程序,您可以使用资源管理上的create特性为非cdb或PDB创建一个新的资源计划:All Plans页面,然后向计划添加指令。有关更多信息,请参见“创建新计划”。
使用快速设置创建一个新的资源计划:
- Go to the Resource Management: All Plans page.
See "Viewing All the Plans" for more information.
- Click Quick Setup.
The Quick Setup wizard appears, with the Resource Plan tab active.
- On the Resource Plan tab, choose values for the fields on the tab:
Field Description Plan Name 输入要用于新计划的名称。 Comment Optionally, 输入注释。 Attribute 选择要用于为计划创建使用者组的属性。的选择是:
服务
用户
程序
快速设置最多可以创建7个消费组,在默认情况下,它对消费组进行一对一的服务/用户/程序映射。您可以选择将多个服务/用户/程序分组到一个消费组中。
如果服务、用户或程序超过7个,则禁用该属性的Quick Setup。例如,如果服务少于7个,则服务属性可用于选择,但如果用户和程序多于7个,则服务属性可用于选择CPU 如果希望为计划指定CPU指令,请选择此选项。 Parallel Server 如果希望为计划指定并行服务器指令,请选择此选项。 Runaway Query 如果希望为计划指定失控查询指令,请选择此选项。 - 单击右箭头按钮。
将出现“快速安装向导”的使用者组映射选项卡。 - 将服务选择到相应的消费组中。
默认情况下,Quick Setup在使用者组映射选项卡上分配的使用者组名称使用命名方案CG_service、CG_user或CG_program。您可以为消费组指定不同的名称。此外,您还可以选择将多个服务/用户/程序分组到一个消费组中。 - 单击右箭头按钮。
将出现Quick Setup向导的资源分配选项卡。在此选项卡上为计划设置资源指令。
此选项卡的内容取决于您在Quick Setup向导的第一个选项卡(资源计划选项卡)上选择的指令(CPU、并行服务器和失控查询)。
如果选择CPU指令,就会出现sharing列。在每个消费组的Shares列中,输入该消费组的适当股票数量。如果选择并行服务器指令,将出现并行服务器限制(%)列。在每个使用者组的并行服务器限制(%)列中,指定一个值,该值限制使用者组可以使用的并行执行服务器的数量。
如果选择了失控查询指令,就会出现失控查询指标列表和操作列。默认情况下,已经过的时间限制度量在失控的查询度量列表中选择,但是您可以选择列表中的任何度量。对于每个消费者组,在Action col中为所选度量值设置一个最大值 - 单击OK。
确认消息告诉您计划已经成功创建。当您在确认消息中单击OK时,新的计划将出现在Resource Management: All plans页面上的计划列表中。
See Also:
12.2.1.2 Creating a New Plan
您可以使用EM Express创建一个新的资源计划。
如果您的系统具有8个或更少的服务、用户和程序,则可以使用EM Express中的Quick Setup特性为非cdb或PDB创建新计划。有关更多信息,请参见“使用快速设置创建新计划”。
如果您的系统有9个或更多的服务、用户和程序,或者您正在为CDB创建计划,请按照以下步骤创建新计划:
- Go to the Resource Management: All Plans page.
See "Viewing All the Plans" for more information.
- Click Create.
The Create Resource Plan dialog box appears.
- In the Create Resource Plan dialog box for a non-CDB and PDB, enter a plan name and optionally a comment about the plan, and then click OK.
In the Create Resource Plan dialog box for a CDB, enter a plan name and optionally a comment about the plan. In the Default PDB Directive section, you can optionally change the values in these fields:
-
Shares: The value in this field is the number of shares that will be allocated to any PDB for which the shares directive attribute is not explicitly assigned. See "About Shares for Allocating Resources to PDBs" for more information about the shares directive attribute.
-
CPU Utilization Limit (%): The value in this field is the maximum percentage of CPU usage allowed for any PDB for which the
cpu_utilization_limit (%)directive attribute is not explicitly assigned. See "About Utilization Limits for PDBs" for more information about thecpu_utilization_limit (%)directive attribute. -
Parallel Server Limit (%): The value in this field is the maximum percentage of parallel servers allowed for any PDB for which the
parallel_server_limit (%)directive attribute is not explicitly assigned. See "About Utilization Limits for PDBs" for more information about theparallel_server_limit (%)directive attribute. -
Memory Minimum (%): The value in this field is the minimum percentage of memory allowed for any PDB for which the memory_minimum (%) directive attribute is not explicitly assigned. See "About the Default Directive for PDBs" for more information about the
memory_minimum (%)directive attribute. -
Memory Limit (%): The value in this field is the maximum percentage of memory allowed for any PDB for which the
memory_limit (%)directive attribute is not explicitly assigned. See "About Utilization Limits for PDBs" for more information about thememory_limit (%)directive attribute.
Click OK when you have specified the desired value for each field in the Create Resource Plan dialog box for the CDB.
-
- In the confirmation message that tells you that the plan was successfully created, click OK.
The new plan appears in the list of plans on the Resource Management: All Plans page.
- On the Resource Management: All Plans page, click the name of the new plan.
The Resource Plan page for the new plan appears.
For a non-CDB and PDB, the new plan includes only the
OTHER_GROUPSconsumer group. You probably will need to modify the plan to make it useful for managing resources for your system, for example, by adding other consumer groups to the plan..For a CDB, the new plan includes the containers (PDBs) for which the plan allocates resources.
- For a non-CDB and PDB, use the Actions menu on the page to modify the plan, by performing actions such as:
-
Creating a new consumer group
-
Adding an existing consumer group
-
Setting mapping rules
-
Setting mapping rule priorities
-
Setting directives
For a CDB, you can optionally select one of the PDBs and then click Set Resource Directives to change the directive attributes defined for that PDB.
-
See Also:
12.2.2 Viewing Plans
You can use EM Express to view all the resource plans (plans) for a database, or to view a single plan for a database.
See Also:
12.2.2.1 Viewing All the Plans
You can use EM Express to view all the resource plans (plans) for a database.
To view all the resource plans for a database:
- Go to the Resource Management page in EM Express.
See "Accessing the Resource Management Page" for more information.
- On the Resource Management page, click Show All Plans.
The Resource Management: All Plans page appears. It lists all the plans that are created for the database.
See Also:
12.2.2.2 Viewing a Plan
You can use EM Express to view a resource plan (plan).
To view or modify a plan for a database:
- Go to the Resource Management page in EM Express.
See "Accessing the Resource Management Page" for more information.
- On the Resource Management page, click Show All Plans.
The Resource Management: All Plans page appears. It lists all the plans that are created for the database.
- In the Name column, click the name of the plan that you are interesting in viewing or modifying.
The Resource Plan page for the plan appears.
For a non-CDB plan and a PDB plan, the Resource Plan page displays the top consumer groups for the plan.
For a CDB plan, the Resource Plan page displays the top containers (PDBs) for the plan.
See Also:
12.2.3 Modifying a Plan
You can use EM Express to modify a resource plan (plan).
The following topics provide more information about different ways that you can modify a plan:
-
"Setting Parallel Server Directives for a Consumer Group in a Plan"
-
"Setting Runaway Query Directives for a Consumer Group in a Plan"
See Also:
12.2.3.1 Adding a New Consumer Group to a Plan
You can use EM Express to add a new consumer group to a non-CDB plan or PDB plan.
To add a new consumer group to a non-CDB plan or PDB plan:
- Go to the Resource Plan page for the plan.
See "Viewing a Plan" for more information about accessing the Resource Plan page for a plan.
- Choose Create from the Actions menu.
The Create Consumer Group dialog box appears.
- In the Create Consumer Group dialog box, enter a new consumer group name and optionally a comment about the consumer group. Click OK.
The new consumer group name appears in the Top Consumer Groups section of the Resource Plan page.
- Repeat these steps to add each new consumer group to a non-CDB plan or PDB plan.
See Also:
12.2.3.2 Adding an Existing Consumer Group to a Plan
You can use EM Express to add an existing consumer group to a non-CDB plan or PDB plan.
To add a new consumer group to a resource plan:
- Go to the Resource Plan page for the non-CDB plan or PDB plan.
See "Viewing a Plan" for more information about accessing the Resource Plan page for a plan.
- Choose Add from the Actions menu.
The Add Consumer Group dialog box appears.
- In the Add Consumer Group dialog box, select an existing consumer group. Click OK.
The consumer group name appears in the Top Consumer Groups section of the Resource Plan page.
- Repeat these steps for each existing consumer group you add to a non-CDB plan or PDB plan.
See Also:
12.2.3.3 Removing a Consumer Group from a Plan
You can use EM Express to remove a consumer group from a non-CDB plan or a PDB plan.
To remove a consumer group from a non-CDB plan or a PDB plan:
- Go to the Resource Plan page for the plan.
See "Viewing a Plan" for more information about accessing the Resource Plan page for a plan.
- In the Top Consumer Groups section, select the consumer group that you want to remove from the plan. Then choose Remove from the Actions menu.
The Remove Consumer Group dialog box appears.
- The Remove Consumer Group dialog box asks you to confirm that you want to remove the selected consumer group from the current plan. It also tells you how many other plans are using the consumer group, and asks you whether you want to remove the consumer group from all the plans that use it.
Click OK to remove the consumer group from the current plan only.
To remove the consumer group from all the plans that use it, enable the Delete this consumer group completely. It is currently used in n other plan(s) option, and then click OK.
If the consumer group is mandatory in this plan, it cannot be removed. If the consumer group is not mandatory in this plan but is mandatory in other plans, it cannot be deleted, but can only be removed from this plan.
After you click OK, the selected consumer group no longer appears in the Top Consumer Groups section for the non-CDB plan or PDB plan.
If you also chose to remove the consumer group from all the plans that were using it, it is removed from all of those plans and deleted.
- Repeat these steps for each consumer group you remove from a non-CDB plan or a PDB plan.
See Also:
12.2.3.4 Setting a Comment for a Consumer Group in a Plan
You can use EM Express to set a comment for a consumer group in a non-CDB plan or PDB plan.
To set a comment for a consumer group in a non-CDB plan or PDB plan:
- Go to the Resource Plan page for the plan that includes the consumer group that you want to set a comment for.
See "Viewing a Plan" for information on accessing the Resource Plan page for a plan.
- In the Top Consumer Groups section of the Resource Plan page for the plan, select the consumer group that you would like to set a comment for. Then, from the Actions menu, choose Set Comment.
The Set Comment dialog box appears.
- In the Comment field, enter the comment that you want to set for the consumer group. Then click OK.
The Confirmation dialog box appears, with a message confirming that you successfully set the comment for the selected consumer group. When you click OK in the Confirmation dialog box, the Resource Plan page is updated and the Comment column for the consumer group now displays the comment that you set.
See Also:
12.2.3.5 为用户组设置映射规则
您可以使用EM Express为一个消费组设置映射规则。
映射规则基于会话属性,例如用户名、会话用于连接数据库的服务或客户机程序的名称。
要为一个消费群体设置映射规则:
- Go to the Resource Plan page for a plan that includes the consumer group that you want to set mapping rules for.
See "Viewing a Plan" for information on accessing the Resource Plan page for a plan.
- 在该计划的资源计划页面的Top Consumer Groups部分中,选择您希望为其设置映射规则的使用者组。然后,从Actions菜单中选择Set Mapping Rules。
出现“设置映射规则”对话框。它显示使用者组的任何现有映射规则。 - You use the Set Mapping Rules dialog box to add a mapping rule, remove a mapping rule, or modify a mapping rule.
-
To add a mapping rule:
-
In the Set Mapping Rules dialog box, click the green plus sign (+) icon.
The Select Mapping Rule dialog box appears.
-
In the Attribute field, choose the attribute you want to use for this mapping rule.
-
Use the left and right arrow buttons to move the values that you want to use in the mapping rule from the Available Value list to the Selected Value list.
When certain attributes are chosen in the previous step, you also have the option of entering one or more values that you want to use in the mapping rule in the Additional Values column. If you enter multiple values in the Additional Valuescolumn, use a comma to separate the values. Note that any values that you enter in the Additional Values field are not moved to the Selected Value list.
When you have selected all the values you want to use for the mapping rule, click OK.
-
The Set Mapping Rules dialog box appears, and it displays the new mapping rule that you created. The mapping rule includes the values that you entered in the Available Value list, as well as any values you specified in the Additional Valuesfield in the Select Mapping Rule dialog box.
-
Click OK in the Set Mapping Rules dialog box to save the mapping rule that you added to the consumer group.
-
-
To remove a mapping rule:
-
In the Set Mapping Rules dialog box, select the mapping rule that you want to remove.
-
Click the red X icon.
The mapping rule is immediately deleted from the Set Mapping Rules dialog box.
-
Click OK in the Set Mapping Rules dialog box to confirm the deletion of the mapping rule from the consumer group.
-
-
To modify a mapping rule:
-
In the Set Mapping Rules dialog box, select the mapping rule that you want to modify.
-
Click the yellow pencil icon.
The Select Mapping Rule dialog box appears.
-
Use the left and right arrow buttons to move the values that you want to use in the mapping rule from the Available Value list to the Selected Value list.
For mapping rules for certain attributes, you also have the option of entering one or more values that you want to use in the mapping rule in the Additional Valuescolumn. If you enter multiple values in the Additional Values column, use a comma to separate the values. Note that any values that you enter in the Additional Values field are not moved to the Selected Value list.
When you have selected all the values you want to use for the mapping rule, click OK.
-
The Set Mapping Rules dialog box appears, and it displays the mapping rule that you modified. The mapping rule includes the values that you entered in the Available Value list, as well as any values you specified in the Additional Valuesfield in the Select Mapping Rule dialog box.
-
Click OK in the Set Mapping Rules dialog box to save the mapping rule that you modified for the consumer group.
-
-
See Also:
-
Oracle Database Administrator’s Guide for more information about mapping rules.
12.2.3.6 Setting Mapping Rule Priorities for Consumer Groups
You can use EM Express to set mapping rule priorities for consumer groups.
To resolve conflicting mapping rules, you can establish a priority ordering of the session attributes from most important to least important.
To set mapping rule priorities for consumer groups:
- Go to the Resource Plan page for a non-CDB plan or PDB plan.
See "Viewing a Plan" for information on accessing the Resource Plan page for a plan.
- In the Top Consumer Groups section of the Resource Plan page, from the Actions menu, choose Set Mapping Rule Priorities.
The Set Mapping Rule Priorities dialog box appears. It lists the attributes for the consumer group mapping rules.
The attributes are listed in order from most important (priority 1) to least important. The first attribute listed is prioritized as the most important, and the last attribute listed is prioritized as the least important.
- In the Set Mapping Rules priority dialog box, select an attribute and move it up in the list to increase its priority, or move it down in the list to decrease its priority.
- After all the attributes are listed in the priority order that you want, click OK.
A confirmation dialog box advises you that the mapping rule priorities have been successfully set.
- The next time you view the mapping rule priorities for consumer groups, the Set Mapping Rule Priorities dialog box lists the attributes for the mapping rules in the priority order that you specified.
See Also:
12.2.3.7 Setting CPU Directives for a Consumer Group in a Plan
You can use EM Express to set CPU directives for a consumer group in a non-CDB plan or PDB plan.
To set CPU directives for a consumer group in a non-CDB plan or PDB plan:
- Go to the Resource Plan page for the non-CDB plan or PDB plan that includes the consumer group that you want to set CPU directives for.
See "Viewing a Plan" for information on accessing the Resource Plan page for a plan.
- In the Top Consumer Groups section of the Resource Plan page for the plan, select the consumer group that you would like to set CPU directives for. Then, from the Actions menu, choose Set CPU Directives.
The Set CPU Directives dialog box appears.
- In the Set CPU Directives dialog box, enter values for these fields:
-
Shares: The number of shares you enter corresponds to the ratio of CPU that you want to give to this consumer group.
-
Limit (%): The value in this field imposes an absolute upper limit on CPU utilization for this consumer group. This absolute limit overrides any redistribution of CPU within a plan. If not set, there is no limit on the amount of CPU that the consumer group can use.
-
- Click OK.
A confirmation box tells you that you have successfully set CPU directives for the consumer group.
See Also:
12.2.3.8 Setting Parallel Server Directives for a Consumer Group in a Plan
You can use EM Express to set parallel server directives for a consumer group in a non-CDB plan or PDB plan.
To set parallel server directives for a consumer group in a non-CDB plan or PDB plan:
- Go to the Resource Plan page for the non-CDB plan or PDB plan that includes the consumer group that you want to set parallel server directives for.
See "Viewing a Plan" for information on accessing the Resource Plan page for a plan.
- In the Top Consumer Groups section of the Resource Plan page for the plan, select the consumer group that you would like to set CPU directives for. Then, from the Actions menu, choose Set Parallel Server Directives.
The Set Parallel Server Directives dialog box appears.
- In the Set Parallel Server Directives dialog box, enter values for these fields:
-
Parallel Server Limit (%): The value you enter limits the number of parallel execution servers that can be used by sessions in this consumer group.
-
Max Degree of Parallelism: The value you enter limits the maximum degree of parallelism for any operation by sessions within this consumer group.
-
Parallel Statement Queue Timeout (s): The value you enter specifies the maximum number of seconds that a parallel statement can wait in the parallel statement queue before it is timed out for sessions in this consumer group.
-
Bypass Queue: When you enable this option, parallel statements from sessions in this consumer group will bypass the parallel queue and be executed immediately.
-
- Click OK.
A confirmation box tells you that you have successfully set parallel server directives for the consumer group.
See Also:
12.2.3.9 Setting Runaway Query Directives for a Consumer Group in a Plan
You can use EM Express to set runaway query directives for a consumer group in a non-CDB plan or PDB plan.
To set parallel server directives for a consumer group in a non-CDB plan or PDB plan:
- Go to the Resource Plan page for the non-CDB plan or PDB plan that includes the consumer group that you want to set runaway query directives for.
See "Viewing a Plan" for information on going to the Resource Plan page for a plan.
- In the Top Consumer Groups section of the Resource Plan page for the plan, select the consumer group that you would like to set runaway query directives for. Then, from the Actions menu, choose Set Runaway Query Directives.
The Set Runaway Query Directives dialog box appears.
- In the Set Runaway Query Directives dialog box, enter values for these fields:
-
Elapsed Time Limit (s): The value you enter specifies the maximum amount of elapsed time that a session or call from this consumer group can take before Resource Manager takes an action.
-
CPU Time Limit (s): The value you enter specifies the maximum amount of CPU time that a session or call from this consumer group can take before Resource Manager takes an action.
-
I/O Limit (MB): The value you enter specifies the maximum amount of I/O that a session or call from this consumer group can consume before Resource Manager takes an action.
-
Logical I/O Limit: A logical I/O, also known as a buffer I/O, refers to reads and writes of buffers in the buffer cache. The value you enter specifies the maximum number of logical I/O that a session or call from this consumer group can make before Resource Manager takes an action..
-
I/O Request Limit: The value you enter specifies the maximum number of I/O requests that a session or call from this consumer group can make before Resource Manager takes an action.
-
Action: The value you select determines the action that will be taken if any single session or call from this consumer group exceeds one of the limits set in this dialog box.
-
- Click OK.
A confirmation box tells you that you have successfully set runaway query directives for the consumer group.
See Also:
12.2.3.10 Setting Session Directives for a Consumer Group in a Plan
You can use EM Express to set session directives for a consumer group in a non-CDB plan or PDB plan.
To set session directives for a consumer group in a non-CDB plan or PDB plan:
- Go to the Resource Plan page for the non-CDB plan or PDB plan that includes the consumer group that you want to set session directives for.
See "Viewing a Plan" for information on going to the Resource Plan page for a plan.
- In the Top Consumer Groups section of the Resource Plan page for the plan, select the consumer group that you would like to set session directives for. Then, from the Actions menu, choose Set Session Directives.
The Set Session Directives dialog box appears.
- In the Set Session Directives dialog box, enter values for these fields:
-
PGA Limit (MB): The value you enter specifies the maximum amount of PGA that a session from this consumer group can consume before the session is terminated. The default is NULL, which implies unlimited.
-
Max Idle Time (s): The value you enter specifies the maximum session idle time for a session from this consumer group before the session is terminated. The default is NULL, which implies unlimited.
-
Max Idle Time for Blocking Sessions (s): The value you enter specifies the maximum session idle time of a blocking session from this consumer group before the session is terminated. The default is NULL, which implies unlimited.
-
- Click OK.
A confirmation box tells you that you have successfully set session directives for the consumer group.
See Also:
12.2.3.11 Setting a Plan as the Currently Active Plan
You can use EM Express to set a resource plan as the currently active plan.
To set a resource plan as the currently active plan:
- Go to the Resource Management page in EM Express.
See "Accessing the Resource Management Page" for more information.
- On the Resource Management page, click Set Active Plan.
The Change Currently Active Resource Plan dialog box appears.
- In the Plan Name field, do one of the following:
-
Select an existing plan in the Plan Name list that you want to set as the active plan, and then click OK.
The Confirmation dialog box appears, with a message confirming that you successfully changed the currently active plan. When you click OK in the Confirmation dialog box, the Resource Management page is updated and the name of the currently active plan appears in the General section.
-
Select - No Plan - in the Plan Name list if you do not want a currently active plan to be set. Then click OK.
The Confirmation dialog box appears, with a message that confirms that you successfully changed the currently active plan. When you click OK in the Confirmation dialog box, the Resource Management page is updated and No Plan appears as the name of the currently active plan in the General section.
-
See Also:
12.2.3.12 Changing the Default PDB Directive for a CDB Plan
您可以使用EM Express更改CDB计划的默认PDB指令。
更改CDB计划的默认PDB指令:
- Go to the Resource Plan page for the plan.
See "Viewing a Plan" for more information about accessing the Resource Plan page for a plan.
- Click Edit Default Directive.
The Edit Default Directive dialog box appears.
- Change one or more of the attribute values for the default directive.
Click OK to save your changes or Cancel to discard your changes.
See Also:
12.2.3.13 Changing Directives for a PDB in a CDB Plan
您可以使用EM Express更改CDB计划中PDB的指令。
要更改CDB计划中PDB的指令:
- Go the Resource Plan page for the CDB plan.
See "Viewing a Plan"for more information about accessing the Resource Plan page for a plan.
- In the Top Containers section, select the row that includes the name of the plan whose directives you want to change. Then click Set Resource Directives.
The Set Resource Directive for PDB dialog box appears.
- In the Set Resource Directive for PDB dialog box, you can change the values in these fields:
-
Shares: The value in this field is the number of shares that will be allocated to the PDB. See "About Shares for Allocating Resources to PDBs" for more information about the shares directive attribute.
-
CPU Utilization Limit (%): The value in this field is the maximum percentage of CPU usage allowed for the PDB. See "About Utilization Limits for PDBs" for more information about the
cpu_utilization_limit (%)directive attribute. -
Parallel Server Limit (%): The value in this field is the maximum percentage of parallel servers allowed for the PDB. See "About Utilization Limits for PDBs" for more information about the
parallel_server_limit (%)directive attribute. -
Memory Minimum (%): The value in this field is the minimum percentage of memory allowed for the PDB. See "About the Default Directive for PDBs" for more information about the
memory_minimum (%)directive attribute. -
Memory Limit (%): The value in this field is the maximum percentage of memory allowed for the PDB. See "About Utilization Limits for PDBs" for more information about the
memory_limit (%)directive attribute.
-
- Click OK to accept your changes or Cancel to dismiss the Set Resource Directive for PDB dialog box without making any changes.
See Also:
12.2.3.14 Setting a Comment for a PDB Directive in a CDB Plan
You can use EM Express to set a comment for a PDB directive in a CDB plan.
To set a comment for a PDB directive in a CDB plan:
- Go to the Resource Plan page for the CDB plan that includes the PDB directive that you want to set a comment for.
See "Viewing a Plan" for information on accessing the Resource Plan page for a plan.
- In the Top Containers section of the Resource Plan page for the plan, select the container (PDB) that you would like to set a comment for and click Set Comment.
The Set Comment dialog box appears.
- In the Comment field, enter the comment that you want to set for the PDB. Then click OK.
The Confirmation dialog box appears, with a message that confirms that you successfully set the comment for the selected PDB. When you click OK in the Confirmation dialog box, the Resource Plan page is updated and the Comment column for the PDB now displays the comment that you set.
See Also:
12.2.3.15 Deleting a Plan
You can use EM Express to delete a plan.
You can use EM Express to delete a plan by following these steps:
- Go to the Resource Management: All Plans page.
See "Viewing All the Plans " for information on accessing the Resource Management: All Plans page.
- In the list of plans, select the plan that you want to delete, and then click Delete.
The Delete Resource Plan dialog box appears.
- The Delete Resource Plan dialog box asks you to confirm that you want to delete the plan.
For some plans, the Delete Resource Plan dialog box may include the Cascade option.
You can optionally enable the Cascade option. When Cascade is enabled, then when you delete the plan, all the descendants of this plan, including plan directives and all non-mandatory consumer groups, are also deleted.
Click OK.
A confirmation message appears, telling you that the plan was successfully deleted.
- Click OK in the confirmation message.
The plan no longer appears in the list of plans on the Resource Management: All Plans page.
See Also:
12.3 Managing Multiple Database Instances on a Single Server
Oracle数据库提供了一种在运行多个Oracle数据库实例的多CPU服务器上管理CPU分配的方法。
这种方法称为实例控制。实例控制和EM Express中的资源管理器功能一起工作,以支持跨多个实例的所需服务级别。
See Also:
12.3.1 About Instance Caging对实例闭锁
当多个Oracle数据库实例在一个多cpu服务器上运行时,可以使用实例控制来更有效地使用硬件资源。
设置实例存储的一个典型原因是服务器整合——更有效地使用可用的硬件资源。当在一台服务器上运行多个实例时,这些实例会争夺CPU。一个资源密集型数据库实例可能会显著降低其他实例的性能。例如,在具有四个数据库实例的16 cpu系统上,操作系统可能在该实例的重载期间在大多数cpu上运行一个数据库实例。这可能会降低其他三个实例的性能。
限制每个数据库实例的CPU消耗的一种简单方法是使用实例笼。实例控制是一种使用初始化参数来限制实例可以同时使用的cpu数量的方法。
在前面的例子中,如果您使用实例控制来将4个实例的cpu数量限制为4个,那么一个实例干扰其他实例的可能性就会降低。当限制为4个cpu时,一个实例可能会成为cpu绑定的实例。这时,资源管理器开始根据为实例设置的资源计划在各个数据库会话之间分配CPU。因此,实例控制和资源管理器一起提供了一种简单、有效的方法来管理单个服务器上的多个实例。
See Also:
-
Oracle Database Administrator’s Guide for more information about instance caging.
12.3.2 Setting Instance Caging设置实例闭锁
您可以使用EM Express为单个多cpu服务器上的数据库实例设置实例笼。
要启用实例控制,请对服务器上的每个非cdb实例执行以下操作:
- 转到资源管理页面并单击Set Instance Caging。
出现“设置实例笼”对话框。
有关更多信息,请参见“访问资源管理页面”。
2.在“设置实例笼”对话框中,单击“启用实例笼”。
然后,Enable Instance Caging对话框显示CPU Count字段和Plan Namefield。
3.在CPU Count字段中,输入这个数据库实例在服务器上能够使用的最大CPU数量。
在“计划名称”字段中,选择要创建活动计划的计划的名称。
See Also:

12.4 Managing Database Resources: Oracle by Example Series
Oracle By Example (OBE) has a series on the Oracle Database 2 Day DBA guide. This OBE steps you through the tasks in this section, and includes annotated screenshots.
To view the Managing Database Resources OBE, enter the following URL in your web browser:
https://apexapps.oracle.com/pls/apex/f?p=44785:24:::NO:24:P24_CONTENT_ID:16835