用户通知
有几种情况需要你通知用户某些事件发生了,例如下面几个:
@ 当文件保存成功时,需要发一个短信提醒一下用户。
@ 一些后台运行的程序需要用户注意时,要建立一个通知来用户,并且让用户更加方便的回馈后台程序。
@ 当程序需要用户等待时,需要给用户一个进度条或者进度环来提示用户。
每一种提示任务都可以用不同的技术来实现:
@ Toast 提示:在背景上显示一个简短的提示信息。
@ Status Bar Notification:一个持续的后台提醒,来响应用户的请求。
@ Dailog提醒:和activity相关的提醒
这个文档总结了每种提示的使用技巧并且包含了大量的文档链接。
Toast 提示

一个Toast提醒会在窗口之上弹出一个消息,它只会使用合适的空间来显示信息并且用户当前的activity是可见的可交互的。提示会自动的淡入和渐渐消失,并且不会接收用户操作。因为一个toast继承自后来Service,他可以在程序不可见时出现。
Toast提示非常适合简单的文本信息比如文件保存成功,当你能确保用户正在关注屏幕时。toast不能接收用户的操作,如果你想接收用户的操作,可以考虑使用Status Bar 提示。
状态栏提示

状态栏提示会添加一个图标到系统的状态栏,并且附带一个提示信息窗口,当用户选中信息时,android会发出一个由提示信息定义好的intent,通常会启动一个activity。你可以自定义这个提示,比如添加声音、震动、或者闪动屏幕。
当你的程序作为一个后台服务工作时并且想要给用户提示信息时,状态栏提示是非常合适的一种提示方法,它给了用户提示并且让当前的activity并不是去焦点。
对话框提示

对话框是经常出现在当前activity之上的一个小窗口。底层的activity失去焦点,然后上层的dialog接受用户的操作。dialog经常用来提醒、和在原activity上的一些简短的对话。
当你想显示一个进度条或者简短的提示信息并且需要从用户哪里得到确认是使用它。你也可以使用dialog来作为程序界面的一部分,不仅仅用户通知。
响应通知
围绕通知如何跟应用程序的UI流进行交互是用户体验的核心部分。你必须正确的实现以便在应用程序中提供一直的用户体验。
由日历应用提供的两种典型的通知的例子,一个是能够对即将发生的事件发出一个通知,另一个是Email应用能够在收到新的消息时发出通知。它们代表了两种推荐的处理通知的方式:既可以启动一个跟主应用程序分离的Activity,也可以启动一个完整的用于显示对应通知的新的应用程序实例。
下面场景描述了在这两种通知流中Activity堆栈是如何工作的,首先看如何处理日历通知:
1. 用户在Calendar应用中创建一个新的事件,并确认需要把电子邮件的消息部分复制到一个事件中;
2. 用户在主窗口选择Email应用程序;
3. 在Email应用中时,它们会收到来之日历的一个要开会的通知;
4. 用户选择这个通知时,会把应用带到一个专用的显示即将开始的会议细节的日历应用程序的Activity;
5. 用户看完通知的细节后,按回退按钮可以返回Email应用程序中接受到通知的地方。
处理Email应用的通知:
1. 用户在Email应用中撰写一个消息,并且需要检查一下日历的日期;
2. 用户选择了HomeàCalendar;
3. 用户在日历应用中时,会收到一个来之Email应用程序的关于新消息的通知;
4. 用户选择这个通知时,就会被带到现实这个消息细节的Email应用程序中。这个界面取代了之前编写邮件的界面,但是那个消息依然被保留在草稿中;
5. 用户一旦按下回退按钮,就会返回到消息列表,并且再次按钮回退按钮时,才会返回到从日历应用中离开时的界面。
在Email应用程序的通知方式中,由通知启动的UI界面以通知所处的状态来显示主应用程序。例如,当Email应用程序因它的一个通知而显示在前台时,它既可以显示邮件列表,也可以依赖是否有新有邮件来显示一个特定的会话。要达到这个目的,我们要用一个代表通知状态的新的Activity堆栈来代替应用程序的当前状态。
下列代码演示了如何显示这种类型的通知,最值得关注的makeMessageIntentStack()方法,它给这种状态构造了一个代表应用程序的新的Activity堆栈的Intent对象数组。如果你使用Fragment,需要初始化Fragment和应用程序的状态,以便按回退按钮时,会把UI界面切换会它的父状态。这种通知的核心是Intent.makeRestartActivityTask()方法,它会用适当的标记来构造堆栈的根Activity,如Intent.FLAG_ACTIVITY_CLEAR_TASK。
/**
* This method creates an array of Intent objects representing the
* activity stack for the incoming message details state that the
* application should be in when launching it from a notification.
*/
staticIntent[] makeMessageIntentStack(Context context,CharSequencefrom,
CharSequence msg){
// A typical convention for notifications is to launch the user deeply
// into an application representing the data in the notification; to
// accomplish this, we can build an array of intents to insert the back
// stack stack history above the item being displayed.
Intent[] intents =newIntent[4];
// First: root activity of ApiDemos.
// This is a convenient way to make the proper Intent to launch and
// reset an application's task.
intents[0]=Intent.makeRestartActivityTask(newComponentName(context,
com.example.android.apis.ApiDemos.class));
// "App"
intents[1]=newIntent(context, com.example.android.apis.ApiDemos.class);
intents[1].putExtra("com.example.android.apis.Path","App");
// "App/Notification"
intents[2]=newIntent(context, com.example.android.apis.ApiDemos.class);
intents[2].putExtra("com.example.android.apis.Path","App/Notification");
// Now the activity to display to the user. Also fill in the data it
// should display.
intents[3]=newIntent(context,IncomingMessageView.class);
intents[3].putExtra(IncomingMessageView.KEY_FROM,from);
intents[3].putExtra(IncomingMessageView.KEY_MESSAGE, msg);
return intents;
}
/**
* The notification is the icon and associated expanded entry in the
* status bar.
*/
void showAppNotification(){
// look up the notification manager service
NotificationManager nm =(NotificationManager)getSystemService(NOTIFICATION_SERVICE);
// The details of our fake message
CharSequencefrom="Joe";
CharSequence message;
switch((newRandom().nextInt())%3){
case0: message ="r u hungry? i am starved";break;
case1: message ="im nearby u";break;
default: message ="kthx. meet u for dinner. cul8r";break;
}
// The PendingIntent to launch our activity if the user selects this
// notification. Note the use of FLAG_CANCEL_CURRENT so that, if there
// is already an active matching pending intent, cancel it and replace
// it with the new array of Intents.
PendingIntent contentIntent =PendingIntent.getActivities(this,0,
makeMessageIntentStack(this,from, message),PendingIntent.FLAG_CANCEL_CURRENT);
// The ticker text, this uses a formatted string so our message could be localized
String tickerText = getString(R.string.imcoming_message_ticker_text, message);
// construct the Notification object.
Notification notif =newNotification(R.drawable.stat_sample, tickerText,
System.currentTimeMillis());
// Set the info for the views that show in the notification panel.
notif.setLatestEventInfo(this,from, message, contentIntent);
// We'll have this notification do the default sound, vibration, and led.
// Note that if you want any of these behaviors, you should always have
// a preference for the user to turn them off.
notif.defaults =Notification.DEFAULT_ALL;
// Note that we use R.layout.incoming_message_panel as the ID for
// the notification. It could be any integer you want, but we use
// the convention of using a resource id for a string related to
// the notification. It will always be a unique number within your
// application.
nm.notify(R.string.imcoming_message_ticker_text, notif);
}
在日历应用的通知方式中,由通知启动的UI界面是一个专用的不是普通的应用程序展现流程中的Activity。例如,用户收到一个日历通知时,会选择这个通知来启动一个特殊的Activity,这个Activity显示了一个即将发生的日历事件的列表。这个窗口只对通知有效,而不是普通的用户界面。
针对发送这种类型通知的代码时非常直接的,跟上例中的代码一样,只是PendingIntent对象是针对通知专用的那个Activity。
/**
* The notification is the icon and associated expanded entry in the
* status bar.
*/
void showInterstitialNotification(){
// look up the notification manager service
NotificationManager nm =(NotificationManager)getSystemService(NOTIFICATION_SERVICE);
// The details of our fake message
CharSequencefrom="Dianne";
CharSequence message;
switch((newRandom().nextInt())%3){
case0: message ="i am ready for some dinner";break;
case1: message ="how about thai down the block?";break;
default: message ="meet u soon. dont b late!";break;
}
// The PendingIntent to launch our activity if the user selects this
// notification. Note the use of FLAG_CANCEL_CURRENT so that, if there
// is already an active matching pending intent, cancel it and replace
// it with the new Intent.
Intent intent =newIntent(this,IncomingMessageInterstitial.class);
intent.putExtra(IncomingMessageView.KEY_FROM,from);
intent.putExtra(IncomingMessageView.KEY_MESSAGE, message);
intent.addFlags(Intent.FLAG_ACTIVITY_NEW_TASK |Intent.FLAG_ACTIVITY_CLEAR_TASK);
PendingIntent contentIntent =PendingIntent.getActivity(this,0,
intent,PendingIntent.FLAG_CANCEL_CURRENT);
// The ticker text, this uses a formatted string so our message could be localized
String tickerText = getString(R.string.imcoming_message_ticker_text, message);
// construct the Notification object.
Notification notif =newNotification(R.drawable.stat_sample, tickerText,
System.currentTimeMillis());
// Set the info for the views that show in the notification panel.
notif.setLatestEventInfo(this,from, message, contentIntent);
// We'll have this notification do the default sound, vibration, and led.
// Note that if you want any of these behaviors, you should always have
// a preference for the user to turn them off.
notif.defaults =Notification.DEFAULT_ALL;
// Note that we use R.layout.incoming_message_panel as the ID for
// the notification. It could be any integer you want, but we use
// the convention of using a resource id for a string related to
// the notification. It will always be a unique number within your
// application.
nm.notify(R.string.imcoming_message_ticker_text, notif);
}
仅有以上代码是不够的,通常,Android会把应用程序的所有的Activity都看做是应用程序UI流的一部分,因此只是简单的启动这种通知Activity会导致它跟普通的应用程序回退堆栈混杂在一起。要保证它的正确的行为,在清单文件中必须给这个Activity声明属性:android:launchMode=”singleTask”、android:taskAffinity=””和android:excludeFromRecents=”true”。下例是一个完整的Activity的声明。
<activityandroid:name=".app.IncomingMessageInterstitial"
android:label="You have messages"
android:theme="@style/ThemeHoloDialog"
android:launchMode="singleTask"
android:taskAffinity=""
android:excludeFromRecents="true">
</activity>
从这个初始的Activity中启动其他的Activity时必须要小心,因为,它不是应用程序的顶层Activity,也不是最近显示的那个Activity,并且在任何要显示带有新数据的通知的时点都要重新启动。最好的方法是从通知Activity中启动的其他任何Activity都在它们自己的任务中。使用这种方法时必须确保新的任务与当前正在退出的应用程序的任务的状态进行正确的交互。这种方式本质上跟之前介绍的Email应用的通知方式一样的。下例中的代码使用之前例子中的makeMessageIntentStack()方法,然后处理点击事件,完成应用程序之间的切换:
/**
* Perform a switch to the app. A new activity stack is started, replacing
* whatever is currently running, and this activity is finished.
*/
void switchToApp(){
// We will launch the app showing what the user picked. In this simple
// example, it is just what the notification gave us.
CharSequencefrom= getIntent().getCharSequenceExtra(IncomingMessageView.KEY_FROM);
CharSequence msg = getIntent().getCharSequenceExtra(IncomingMessageView.KEY_MESSAGE);
// Build the new activity stack, launch it, and finish this UI.
Intent[] stack =IncomingMessage.makeMessageIntentStack(this,from, msg);
startActivities(stack);
finish();
}
管理通知
NotificationManager是管理所有通知的一个系统服务。必须用getSystemService()方法获取这个对象的引用,如:
String ns =Context.NOTIFICATION_SERVICE;
NotificationManager mNotificationManager =(NotificationManager) getSystemService(ns);
当你想要给状态栏发送通知时,就要使用NotificatonManager对象的notify(int, Notification)方法,第一个参数是通知的唯一ID,第二个参数是Notification对象。这ID唯一标识了从你的应用程序中发出通知,如果要更新通知或者(应用管理了不同类型的通知)通过通知中定义的Intent对象返回应用程序时,就需要这个ID。
把“FLAG_AUTO_CANCEL”标记添加给Notification对象,用户从通知窗口选择了通知后,就会清除状态栏通知。也可以用cancle(int)方法来手动的清除,或者用cancelAll()方法清除所有的通知。
创建通知
Notification对象定义了显示在状态栏和通知窗口中的通知消息的细节,以及一些提醒设置,如声音,闪烁等。
以下是状态栏通知的所有需求:
1. 一个状态栏图标;
2. 除非你定义了一个定制的通知布局,否则就需要一个标题和消息内容;
3. 在通知被选择时,要触发一个PendingIntent对象。
以下是状态栏通知的可选设置:
1. 针对状态栏的一个提醒文本消息;
2. 一个提示音;
3. 一个震动设置;
4. 一个LED的闪烁设置。
启动一个新的通知的工具包括Notification(int, CharSequence, long)构造器和setLatestEventInfo(Context, CharSequence, CharSequence,PendingIntent)方法。它们能够定义通知设置的所有需求。下列代码片段演示了基本的通知安装步骤:
int icon = R.drawable.notification_icon; // icon from resources
CharSequence tickerText ="Hello"; // ticker-text
longwhen=System.currentTimeMillis(); // notification time
Context context = getApplicationContext(); // application Context
CharSequence contentTitle ="My notification"; // message title
CharSequence contentText ="Hello World!"; // message text
Intent notificationIntent =newIntent(this,MyClass.class);
PendingIntent contentIntent =PendingIntent.getActivity(this,0, notificationIntent,0);
// the next two lines initialize the Notification, using the configurations above
Notification notification =newNotification(icon, tickerText,when);
notification.setLatestEventInfo(context, contentTitle, contentText, contentIntent);
更新通知
当应用程序中持续发生事件时,可以更新状态栏中的信息。例如,当在阅读之前的消息之前又收到了新的通知消息时,Messaging应用程序会更新既存的通知,来显示收到新消息总数。这种更新既存的通知的实践比添加一个新的通知要好,因为它避免了混乱的通知窗口。
因为每个通知是用一个唯一标识的整数ID由NotificationManager服务来管理的,你能够通过调用setLatesEventInfo()来修改通知,然后再调用notify()方法。
你能够修改通知对象成员字段的每个属性(除了Context对象和通知的标题和文本以外)。你始终应该在调用setLatestEventInfo()方法更新通知时来修改文本消息(内容标题和内容文本),然后调用notify()方法来更新通知。当然,如果你创建了一个定制的通知布局,那么更新这些标题和文本值就不会有影响。
给通知添加声音
你能够用默认的通知声音或应用程序指定的声音来提醒用户。
要使用默认的提示音,就要给Notification对象的defaults字段添加“DEFAULT_SOUND”设置,如:
notification.defaults |=Notification.DEFAULT_SOUND;
如果要使用不同的提示音,就要给Notification的sound字段设置一个声音资源的位置,下例中使用了一个已知的保存在设备的SD卡上的音频文件:
notification.sound =Uri.parse("file:///sdcard/notification/ringer.mp3");
在下面的例子中,音频文件是从内部的MediaStore的ContentProvider对象中选择音频文件:
notification.sound =Uri.withAppendedPath(Audio.Media.INTERNAL_CONTENT_URI,"6");
在这个例子中,媒体文件的准确ID(6)是已知的,如果你不知道准确的ID,就必须用ContentResolverd对象查询MediaStore中的所有有效的媒体。
如果你想要声音持续的重复的播放,直到用户响应了这个通知,或通知被取消,就要给Notification对象的flags字段添加FLAG_INSISTENT设置。
注意:如果默认的字段包含了DEFAULT_SOUND设置,那么默认的声音会覆盖指定给sound字段任何声音。
给通知添加震动
你能够用默认的震动模式或应用指定的震动模式来提醒用户。
要使用默认的模式,就要把DEFAULT_VIBRATE值添加给defaults字段:
notification.defaults |=Notification.DEFAULT_VIBRATE;
要定义自己的震动模式,就要把一个long类型数组值传递给vibrate字段:
long[] vibrate ={0,100,200,300};
notification.vibrate = vibrate;
这个数组定义了震动关停时长的交替模式(以毫秒为单位)。第一个值指定开始之前要等多长时间,第二个值指定的是第一次震动的时长,第三个参数下次停止的时长,依次类推。这种模式可以设置你希望的时长,但是不能重复设置。
注意:如果defaults字段包含了DEFAULT_VIBRATE设置,默认的震动会覆盖任何由vibragte字段指定的震动。
给通知添加闪烁
要通过LED灯的闪烁来提醒用户,你能够实现默认的闪烁模式(如果这种模式有效),或者定义自己的颜色和闪烁模式。
要使用默认的亮度设置,就要给defaults字段添加DEFAULT_LIGHTS设置:
notification.defaults |=Notification.DEFAULT_LIGHTS;
要定义自己的颜色和模式,就要给ledARGB字段定义颜色值,给ledOffMS字段定义灯关闭的时长(毫秒为单位),给ledOnMS字段定义灯打开的时长(毫秒为单位),还要给flags字段添加FLAG_SHOW_LIGHTS标记:
notification.ledARGB =0xff00ff00;
notification.ledOnMS =300;
notification.ledOffMS =1000;
notification.flags |=Notification.FLAG_SHOW_LIGHTS;
在这个例子中,绿灯代表闪烁300毫秒,并且关闭一秒。不是每张颜色都会被LEDs设备支持的,并且也不是每种设备都支持同一种颜色,因此最好要先预估一下硬件的能力。绿色是最常用的通知颜色。
更多的功能
能够使用Notificatiion对象字段和标记给通知添加更多的功能。下面列出了一些有用的功能:
FLAG_AUTO_CANCEL标记:
给flags字段添加这个标记,从通知窗口选择对应通知后会自动的取消通知。
FLAG_INSISTENT标记:
给flags字段添加这个标记,重复播放音频直到用户响应这个通知。
FLAG_ONGOING_EVENT标记:
给flags字段添加这个标记,把通知分组到通知窗口中的“Ongoing”标题下。这样就表明发送通知的应用程序正在运行---它的进程依然在后台运行,即使是应用程序不可见(如音乐播放或电话呼叫)。
FLAG_NO_CLEAR标记:
给flags字段添加这个标记,表明通知不应该通过“清除通知按钮”来清除。如果你的通知还在继续,使用这个标记就非常有用。
number字段:
这个值表明了当前通知所代表的事件的数量。对应数字被叠加在状态栏图标上。如果要使用这个字段,那么在通知首次被创建时,必须用1开始。(如果从0开始计数,那么在把改变到任意比0大的数时,这个数字将不会被显示。)
iconLevel字段:
这个值指明了当前的用于通知图标的LevelListDrawable的级别。通过改变这个值能够在状态栏中使用动画图标。这个值跟LevelListDrawable中可描画的定义相关联。相关信息可参照LevelListDrawable类定
创建定制化的通知布局
默认情况下,在通知窗口显示的通知包括标题和消息文本。这两项内容使用通过setLatestEventInfo()方法的contentTitle和contentText参数来定义的。但是,你也能够使用RemoteViews类给通知定义一个定制化的布局。如图3所示就是一个定制的通知布局的例子。它看上去与默认的通知类似,但是实际上它是用一个定制的XML布局来创建的。
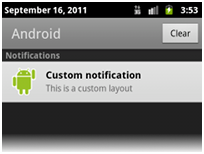
图3.带有定制化布局的通知。
要给通知创建自己的布局,就要实例化一个RemoteViews对象,用它来填充一个定制的布局文件,然后把RemoteViews对象传递给通知的contentView属性字段。
下面用一个例子来更好的理解如何创建定制化的通知:
1. 给通知创建XML布局,如以下在custom_notification.xml文件中定义的通知布局:
<RelativeLayoutxmlns:android="http://schemas.android.com/apk/res/android"
android:id="@+id/layout"
android:layout_width="fill_parent"
android:layout_height="fill_parent"
android:padding="10dp">
<ImageViewandroid:id="@+id/image"
android:layout_width="wrap_content"
android:layout_height="fill_parent"
android:layout_alignParentLeft="true"
android:layout_marginRight="10dp"/>
<TextViewandroid:id="@+id/title"
android:layout_width="wrap_content"
android:layout_height="wrap_content"
android:layout_toRightOf="@id/image"
style="@style/NotificationTitle"/>
<TextViewandroid:id="@+id/text"
android:layout_width="wrap_content"
android:layout_height="wrap_content"
android:layout_toRightOf="@id/image"
android:layout_below="@id/title"
style="@style/NotificationText"/>
</RelativeLayout>
我们注意到,两个TextView元素都包含了style属性,给定制的通知中的文本使用样式资源是至关重要的,因为通知的背景色在不同设备和平台版本中会有所差异。从Android2.3(API级别9)开始,系统给默认的通知布局所使用的文本定义了样式,这样你就应该在Android2.3或更高的版本上运行时使用样式,以便确保文本针对背景是可见的。
例如,要在比Android2.3低的版本上使用标准的文本色,应该使用下列样式(res/values/styles.xml):
<?xml version="1.0" encoding="utf-8"?>
<resources>
<stylename="NotificationText">
<itemname="android:textColor">?android:attr/textColorPrimary</item>
</style>
<stylename="NotificationTitle">
<itemname="android:textColor">?android:attr/textColorPrimary</item>
<itemname="android:textStyle">bold</item>
</style>
<!-- If you want a slightly different color for some text,
consider using ?android:attr/textColorSecondary -->
</resources>
如果要在Android2.3以上的版本上给通知应用系统默认的颜色,就要使用以下样式(res/values-v9/styles.xml):
<?xml version="1.0" encoding="utf-8"?>
<resources>
<stylename="NotificationText"parent="android:TextAppearance.StatusBar.EventContent"/>
<stylename="NotificationTitle"parent="android:TextAppearance.StatusBar.EventContent.Title"/>
</resources>
现在,在Android2.3(API级别9)或更高的版本上运行时,在自己定制的View对象中的文本会使用与系统给默认的通知相同的颜色。这是重要的,因为Android的后续版本实际上把通知的背景色改变成深色的。继承系统的样式,确保文本会高亮显示,而且,如果背景是其他的不期望的颜色,那么文本也要做适当的改变。
2. 现在,在应用程序的代码中,使用RemoveViews类的方法来定义图片和文本,然后把RemoteView对象传递给通知的contentView属性字段,如下例所示:
RemoteViews contentView =newRemoteViews(getPackageName(),R.layout.custom_notification_layout);
contentView.setImageViewResource(R.id.image, R.drawable.notification_image);
contentView.setTextViewText(R.id.title,"Custom notification");
contentView.setTextViewText(R.id.text,"This is a custom layout");
notification.contentView = contentView;
如上例所示,把应用程序的包名和布局资源ID传递给RemoteViews类的构造器,然后,使用setImageViewResource()和setTextViewText()方法,给ImageView和TextView对象定义内容。在每个语句中,都要把你设置的适当的View对象的引用ID连同设置给View对象的值一起作为参数传递给这两个方法。最后RemoteViews对象被传给Notification对象镇南关的contentView属性字段。
3. 因为在使用定制化的View对象时,不需要setLatestEventInfo()方法,就必须用contentIntent字段给通知定义Intent对象,如下例所示:
Intent notificationIntent = new Intent(this, MyClass.class);
PendingIntent contentIntent = PendingIntent.getActivity(this, 0, notificationIntent, 0);
notification.contentIntent = contentIntent;
4. 使用通常的方法发送通知:
mNotificationManager.notify(CUSTOM_VIEW_ID, notification);
Remote类还包含了容易把计时器或进度条添加到通知布局中的方法。有关给通知创建定制布局的更多信息,可参照RemoteViews类。
警告:在创建定制化的通知布局时,必须特别小心,以确保定制化的布局在不同的方向和分辨率的设备中能够正常的运行。尽管这个建议适用于在Android中创建的所有View对象布局,但是在这个场景中尤其重要,因为布局的实际空间非常受限,因此不要让定制的布局太复杂,并且要在各种配置中做好测试