目录
ASP.NET Core 2.0&Angular 4:通过本教程,您将学习如何从头开始构建用于车辆管理的Web应用程序
介绍
本文的主要目的是发现有关Angular4和.NET CORE Framework的更多功能,例如:
- 使用WebApi v2创建RestFul服务器
- 使用Entity框架进行.NET Core代码优先(code first)方法
- AutoMapper
- 使用.NET Core依赖注入
- 在.NET Core项目中使用Swagger API
- 使用Angular创建单页应用程序
- 在Angular中创建组件,服务和类
- Angular路由系统
- Angular表单验证
- 使用主题模式在组件之间进行通信
- 使用Angular-datatables
背景
为了更好地理解本文,建议您具备以下方面的良好知识:
- 用C#编程
- SQL语言
- 实体框架
- Visual Studio代码
使用代码
I)服务器端
a)先决条件
在开始实施WebApi服务项目之前,您将在下面找到所有有用的链接:
- Visual Studio代码(链接)
- DotNetCore 2.0.0(链接)
- NET核心命令行工具(链接)
- AutoMapper(链接)
- Swagger Api(链接)
b)设置项目
使用Visual Studio代码集成终端,我们运行以下命令行来创建一个新的DotNet Core MVC项目,其中demobackend文件夹中包含单独的身份验证系统。
mkdir demobackend
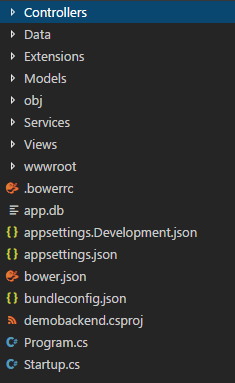
dotnet new mvc -au Individual -f netcoreapp2.0这是项目结构:
要仅将WebApi用于身份系统,您应该在项目中引入一些更改:
替换启动程序:
       public void ConfigureServices(IServiceCollection services)
       {
           services.AddDbContext<ApplicationDbContext>(options =>
           options.UseSqlServer(Configuration.GetConnectionString("DefaultConnection")))
           services.AddIdentity<applicationuser, identityrole="">()
               .AddEntityFrameworkStores<applicationdbcontext>()
               .AddDefaultTokenProviders();
           // Add application services.
           services.AddMvc();
       }
       // This method gets called by the runtime.
       // Use this method to configure the HTTP request pipeline.
       public void Configure(IApplicationBuilder app, IHostingEnvironment env)
       {
           if (env.IsDevelopment())
           {
               app.UseDeveloperExceptionPage();
           }
            // Enable middleware to serve generated Swagger as a JSON endpoint.
            app.UseMvc();
}除AccountController类外,删除所有存在于控制器文件夹中的controller类
用下面的代码替换AccountController,使其仅具有诸如login、logout和signup等仅返回http状态代码(200,400)的有用操作。
namespace demobackend.Controllers
{
    [Authorize]
    [Route("[controller]/[action]")]
    public class AccountController : Controller
    {
        private readonly UserManager<applicationuser> _userManager;
        private readonly SignInManager<applicationuser> _signInManager;
        private readonly ILogger _logger;

        public AccountController(
            UserManager<applicationuser> userManager,
            SignInManager<applicationuser> signInManager,
            ILogger<accountcontroller> logger)
        {
            _userManager = userManager;
            _signInManager = signInManager;
            _logger = logger;
        }

        [TempData]
        public string ErrorMessage { get; set; }
        [HttpPost]
        [AllowAnonymous]
        public async Task<iactionresult> Login([FromBody]LoginViewModel model)
        {
             if (ModelState.IsValid)
            {
                // This doesn't count login failures towards account lockout
                // To enable password failures to trigger account lockout, set lockoutOnFailure: true
                var result = await _signInManager.PasswordSignInAsync
                    (model.Email, model.Password, model.RememberMe, lockoutOnFailure: false);
                if (result.Succeeded)
                {
                    var msg = "User logged in.";
                    return Ok(msg);
                }
            }
            // If we got this far, something failed, redisplay form
            return BadRequest("Fail to login with this account");
        }
        [HttpPost]
        [AllowAnonymous]
        public async Task<iactionresult> Register([FromBody] RegisterViewModel model)
        {
            var msg = "Bad Request";
            if (ModelState.IsValid)
            {
                var user = new ApplicationUser { UserName = model.Email, Email = model.Email };
                var result = await _userManager.CreateAsync(user, model.Password);
                if (result.Succeeded)
                {
                    _logger.LogInformation("User created a new account with password.");

                    var code = await _userManager.GenerateEmailConfirmationTokenAsync(user);
                     //await _signInManager.SignInAsync(user, isPersistent: false);
                    _logger.LogInformation("User created a new account with password.");
                    msg = "User created a new account with password.";
                    return Ok(msg);
                }
            }
            // If we got this far, something failed, redisplay form
            return BadRequest(msg);
       }

       [HttpGet]
       [AllowAnonymous]
        public async Task<iactionresult> Logout()
        {
            await _signInManager.SignOutAsync();
          //  await HttpContext.SignOutAsync("MyCookieAuthenticationScheme");
            _logger.LogInformation("User logged out.");
            var msg = "User logged out.";
            return Ok(msg);
        }
}c)设置数据库
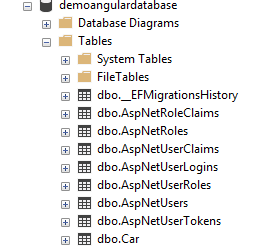
首先,您应该使用SSMS创建一个命名为demoangulardatabase 的空数据库。
接下来,您应该修改appsettings.json中的默认连接字符串:
"ConnectionStrings": {

"DefaultConnection": "Server=(LocalDb)\\MSSQLLocalDB;Database=demoangulardatabase;
                        Trusted_Connection=True;MultipleActiveResultSets=true"
},对于此示例,您只需要Car实体,为此,您需要在Data文件夹中创建Car类:
using System;
using System.Collections.Generic;
using System.ComponentModel.DataAnnotations;

namespace demobackend.Data
{
    public class Car
    {
        [Key]
        public int Id {get; set;}
        [StringLength(50),Required]
        public string Name {get; set;}
        [StringLength(50),Required]
        public string Mark {get; set;}
        [StringLength(50),Required]
        public string Model {get; set;}
        [Required]
        public DateTime Registered { get; set; }
    }
}要更新数据库架构,我们将使用Entity Framework Core迁移工具:
- 添加新的迁移脚本:
dotnet ef migrations add initialMigration -c ApplicationDbContext -v - 更新数据库架构:
dotnet ef database update -c ApplicationDbContext -v
最后,当您刷新数据库服务器时,您将获得以下结果:
d)使用AutoMapper
目的是创建从ViewModel对象到Entities对象的映射,反之亦然:
首先,在Model文件夹中创建CarViewModel类:
using System;
using System.Collections.Generic;
using System.ComponentModel.DataAnnotations;

namespace demobackend.Models
{
    public class CarViewModel
    {
        public int Id {get; set;}
        [StringLength(50),Required]
        public string Name {get; set;}
        [StringLength(50),Required]
        public string Mark {get; set;}
        [StringLength(50),Required]
        public string Model {get; set;}
        [Required]
        public DateTime Registered { get; set; }
    }
}其次,通过AutoMapper Profile Configuration文件配置映射:在AutoMapperProfile文件夹中创建此文件:
using demobackend.Data;
using demobackend.Models;
using System.Collections.Generic;
using AutoMapper;
using System;

namespace demobackend.AutoMapperProfile
{
    public class AutoMapperProfileConfiguration : Profile
    {
        public AutoMapperProfileConfiguration()
        : this("MyProfile")
        {
        }
        protected AutoMapperProfileConfiguration(string profileName)
        : base(profileName)
        {

            CreateMap<Car, CarViewModel>();
            CreateMap<CarViewModel, Car>();
        }
    }
}最后,在startup.cs中,在ConfigureServices方法中添加以下行以创建和启动IMapper服务,其将注入控制器中:
var config = new AutoMapper.MapperConfiguration(cfg =>
            {
                cfg.AddProfile(new AutoMapperProfileConfiguration());
            });

var mapper = config.CreateMapper();
services.AddSingleton(mapper);使用ASP.NET Core Web API 2.0创建Car Management API
创建一个名为ManageCarController的新控制器,它将包含每个CRUD方法的端点:
- Get():返回包含所有可用汽车的HttpResponseMessage
- Get(int id):返回由id参数标识的包含特定car对象的HttpResponseMessage。
- Post([FromBody] CarViewModel _car):它将创建一个新车,如果检查操作,其将返回一个Http ok状态代码(http 200),否则它将返回(http 400)
- Put(int id, [FromBody] CarViewModel value):它将修改特定的汽车(由id参数标识)。如果car不存在,它将返回Http未找到的代码,如果更新操作有效则返回http 200状态代码,否则返回Http错误请求。
- Delete(int id):它将删除特定的car(由id参数标识),如果操作有效,将返回Http ok状态代码(http 200)。
using System;
using System.Collections.Generic;
using System.Linq;
using AutoMapper;
using demobackend.Data;
using demobackend.Models;
using Microsoft.AspNetCore.Authorization;
using Microsoft.AspNetCore.Mvc;
using Microsoft.AspNetCore.Http;

namespace demobackend.Controllers
{
        [Authorize]
        [Route("api/[controller]")]
        public class ManageCarController : Controller
        {
            private IMapper _mapper;
            private ApplicationDbContext dbContext;
            public ManageCarController(IMapper mapper, ApplicationDbContext context)
            {
                this._mapper = mapper;
                this.dbContext = context;
            }
            // GET api/values
            [HttpGet]
            public IEnumerable<carviewmodel> Get()
            {
                IEnumerable<carviewmodel> list =
                    this._mapper.Map<ienumerable<carviewmodel>>(this.dbContext.cars.AsEnumerable());
                return list;
            }
            // GET api/values/5
            [HttpGet("{id}")]
            public  IActionResult Get(int id)
            {
                var _car = this._mapper.Map<carviewmodel>(this.dbContext.cars.Find(id));
                return Ok(_car);
            }

            // POST api/values
            [HttpPost]
            public IActionResult Post([FromBody] CarViewModel _car)
            {
               if (ModelState.IsValid)
                {
                    _car.Registered = DateTime.Now;
                    var newcar = this._mapper.Map<car>(_car);
                    this.dbContext.cars.Add(newcar);
                    this.dbContext.SaveChanges();
                    return Ok();
                }else{
                    return BadRequest();
                }
            }

            // PUT api/values/5
            [HttpPut("{id}")]
            public IActionResult Put(int id, [FromBody] CarViewModel value)
            {
                if (ModelState.IsValid)
                {
                    var existingCar = this.dbContext.cars.Find(id);
                    if(existingCar == null){
                          return NotFound();
                     }else{
                        existingCar.Name = value.Name;
                        existingCar.Mark = value.Mark;
                        existingCar.Model = value.Model;
                        this.dbContext.cars.Update(existingCar);
                        this.dbContext.SaveChanges();
                        return Ok();
                    }
                }else{
                    return BadRequest();
                }
            }

            // DELETE api/values/5
            [HttpDelete("{id}")]
            public IActionResult Delete(int id)
            {
                this.dbContext.cars.Remove(this.dbContext.cars.Find(id));
                this.dbContext.SaveChanges();
                return Ok();
            }
    }
}e)使用Swagger
要测试ManageCarWebApi中的每个操作,我们将使用swaggerAPI:
首先,我们应该安装它:
dotnet add package Swashbuckle.AspNetCore --version 1.0.0接下来,在startup.cs中:
- 在ConfigureServices部分中添加以下行:
services.AddSwaggerGen(c =>
{
c.SwaggerDoc("v1", new Info { Title = "My API", Version = "v1" });
});- 在Configure部分中添加以下行:
app.UseSwagger();
// Enable middleware to serve swagger-ui (HTML, JS, CSS, etc.), specifying the Swagger JSON endpoint.
app.UseSwaggerUI(c =>
{
c.SwaggerEndpoint("/swagger/v1/swagger.json", "My API V1");
})f)运行API
要运行项目,请执行以下命令行:
dotnet run打开浏览器并编写以下URL:
http://localhost:5000/swagger/
最后,您将获得Swagger用于测试API的UI界面:
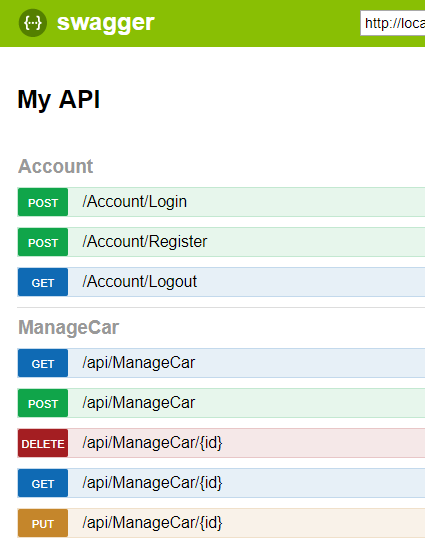
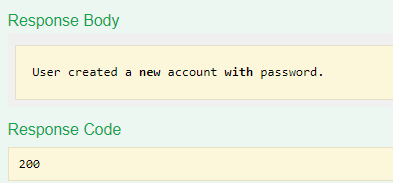
以下是如何使用Account和ManageCar服务的一些示例:
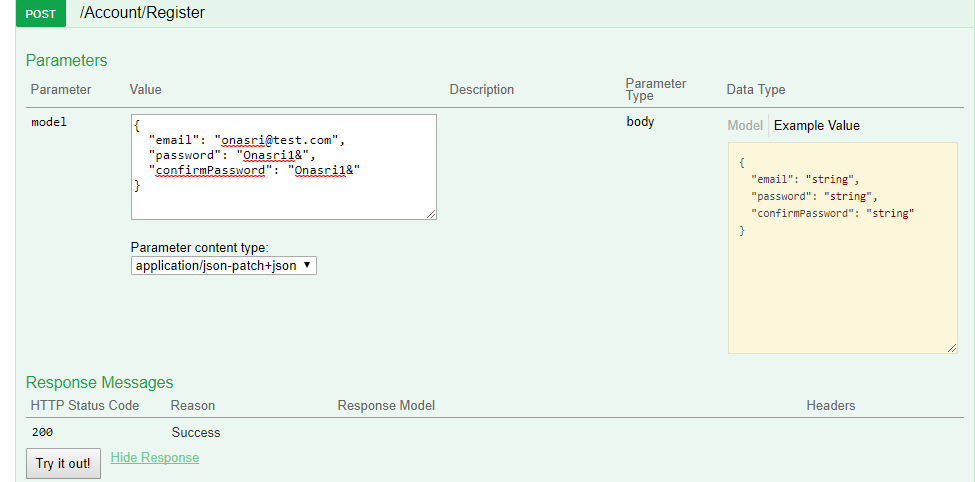
测试订阅服务
结果:
测试认证服务
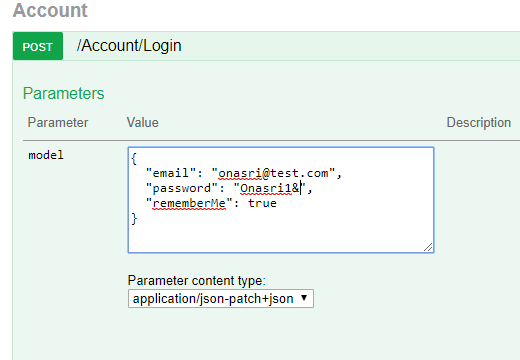
结果:

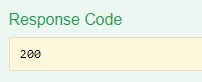
测试新车的创建
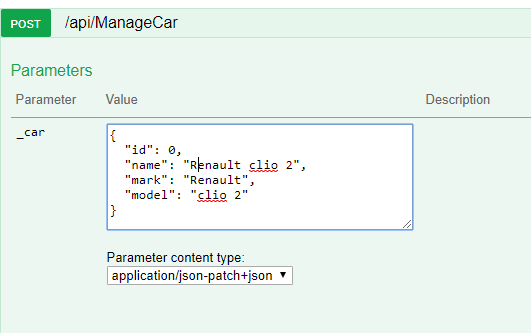
结果:
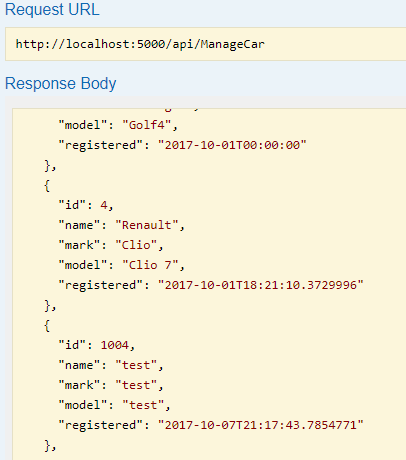
测试获取所有可用汽车
II)客户端
a)先决条件
在开始实施客户端项目之前,您将在下面找到所有有用的链接:
- 安装Visual Studio代码(链接)
- 安装nodejs + npm(链接)
- 设置开发环境(链接)
- 安装Angular-Datatables(链接)
- 安装Angular2-busy(链接)
- 角度表单验证(链接)
- 主题模式(链接)
b)设置项目
要创建新的Angular项目,请在工作区文件夹中执行以下命令行:
首先,安装Angular CLI工具:
npm install -g @angular/cli其次,使用模板生成一个新的Angular项目:
ng new demo最后,运行应用程序:
cd demo
ng serve --openc)实现服务
在开始实现服务之前,我们应该首先声明模型类:
- ICar:用于将json数据反序列化为ICar 对象。
export interface ICar {
id: number,
name: string,
mark: string,
model: string,
registered : Date
}- Message:用于保存有关抛出通知的信息:
- Type:这是一种警报类型,它可以作为价值:' Error'或' Success'
- Text:这是一个警报说明
export class Message {
 constructor(public type : string, public text: string) {
 }
}- User:用于将json数据反序列化为user 对象。
export class User {
email : string = "";
password : string = "";
rememberMe : boolean = false;
}loginService
包含管理与服务器的会话的方法:
- loginSubject:它实现Subject模式。用于跟踪会话状态,当用户创建新会话时,他将收到通知(loginSubject.next(1))以在页面顶部显示电子邮件地址,否则当他退出时,电子邮件将消失。
- login(currentUser : User):POST向Account/Login服务发送http请求以尝试与服务器的新连接。作为参数,它将传递一个User对象。
- logout():POST向Account/ Logout服务发送http请求以尝试结束当前会话。
import { Injectable } from '@angular/core';
import { Http, Headers, RequestOptions, Response, RequestMethod } from '@angular/http';
import {User} from '../models/user';
import  'rxjs/add/operator/toPromise';
import { Subject } from 'rxjs';

@Injectable()
export class LoginService {
    public loginSubject = new Subject<any>();
    _baseUrl : string = "http://localhost:5000/Account";

    options = new RequestOptions({
           withCredentials : true
    });
    constructor(private http: Http) { }

    public login(currentUser : User) {

        let _currentUser = JSON.stringify(currentUser);
        return this.http.post(this._baseUrl + '/Login', currentUser, this.options)
         .toPromise()
         .catch(this.handleError);

    }
    public logout(){
        return this.http.get( this._baseUrl + '/Logout', this.options)
        .toPromise()
        .catch(this.handleError);
    }
    private handleError(error: any): Promise<any> {
        return Promise.reject(error.message || error);
      }
}
CarService
包含将cars数据管理到数据库的方法。
- getCars():Get向/api/ManageCar服务发送http请求以获取所有可用的汽车
- getCar(id : number):Get向/api/ManageCar服务发送http请求以获取特定的汽车(由id参数标识)
- addNewCar(_car : ICar):使用_car对象作为参数向/api/ManageCar服务发送POST http请求,以在CAR表中创建新行。
- updateCar(_car : ICar):使用_car 对象作为参数向/api/ManageCar服务发送PUT http请求以更新现有汽车(标识为id)。
- deleteCar(id : number):向/api/ManageCar服务发送Delete http请求以删除特定的car(由 标识id)。
import { Injectable } from '@angular/core';
import { Observable, Subject } from 'rxjs/Rx';
import { Http, Headers, RequestOptions, Response, RequestMethod } from '@angular/http';
import { ICar } from './../models/ICar';

@Injectable()
export class CarService {
    carsList : ICar[];
    _baseUrl : string = "http://localhost:5000/api/";
    _getCarsUrl : string = "ManageCar";
    options = new RequestOptions({
        withCredentials : true
    });
    constructor(private http: Http) {

    }
    public getCars() {
        return this.http.get(this._baseUrl + this._getCarsUrl, this.options)
        .toPromise();
    }
    public getCar(id : number) {
        return this.http.get(this._baseUrl + this._getCarsUrl + "/"+ id, this.options)
        .toPromise();
    }
    public addNewCar(_car : ICar){
       return this.http.post(this._baseUrl + this._getCarsUrl, _car, this.options)
       .toPromise();
     }
    public updateCar(_car : ICar){
        return this.http.put(this._baseUrl + this._getCarsUrl + "/"+
                             _car.id, _car, this.options)
        .toPromise();
    }
    public deleteCar(id : number){
         return this.http.delete(this._baseUrl + this._getCarsUrl + "/"+ id, this.options)
        .toPromise();
    }
}
CanActivateService
其目的是通过检查用户是否被授权或者不通过该链接阅读更多关于这个服务的信息,来确保某些路由访问。
它从CanActivate接口实现canActivate方法。
import { Injectable } from '@angular/core';
import { Router, CanActivate, ActivatedRouteSnapshot, RouterStateSnapshot }
from '@angular/router';

@Injectable()
export class CanActivateService implements CanActivate {
constructor(private router: Router) { }
canActivate(route: ActivatedRouteSnapshot, state: RouterStateSnapshot) {
if (localStorage.getItem('loggedUser')) {
return true;
}else{
// not logged in so redirect to login page with the return url
this.router.navigate(['/login'], { queryParams: { returnUrl: state.url }});
return false;
}
}
}
NotifService
它实现了通知系统,它将用于在页面抛出警报对话框中显示成功和错误消息。
此服务实现Subject模式以捕获观察者的通知,以在页面上显示或隐藏消息。
import { Message } from './../models/Message';
import { Injectable } from '@angular/core';
import { Subject, Observable} from 'rxjs/Rx';
import { Router, NavigationStart, Event} from '@angular/router';

@Injectable()
export class NotifService {
subject = new Subject<any>();
constructor(private router: Router) {
router.events.subscribe( event =>
{
if(event instanceof NavigationStart) {
this.subject.next();
}
});
}
success(message: string) {
this.subject.next(new Message('alert-success', message));
}
error(message: string) {
this.subject.next(new Message('alert-danger', message));
}
getMessage(): Observable<any> {
return this.subject.asObservable();
}
}d)实现组件
登录组件
LoginComponent.ts
- login():它将通过model对象传递name和password,从LoginService调用login方法。
在成功操作的情况下,它将与服务器创建新会话并使用路由器服务导航到列表页面。否则,它将通过notifService调用错误方法显示错误消息。
import { Headers } from '@angular/http';
import { Component, NgModule, OnInit } from '@angular/core';
import { FormBuilder, Validators } from '@angular/forms';
import { Router, ActivatedRoute } from '@angular/router';
import { User } from '../../models/user';
import { LoginService } from './../../services/login-service.service';
import { NotifService } from './../../services/notif-service.service';

@Component({
selector: 'app-login',
templateUrl: './login.component.html',
styleUrls: ['./login.component.css']
})
export class LoginComponent implements OnInit {
EMAIL_REGEXP = "^[a-z0-9!#$%&'*+\/=?^_`{|}~.-]+@[a-z0-9]([a-z0-9-]*[a-z0-9])?
                   (\.[a-z0-9]([a-z0-9-]*[a-z0-9])?)*$";
model : User;
loading = false;
message = "";
busy: Promise<any>;
constructor(
private router: Router,
private notifService : NotifService,
private loginService : LoginService
) {
this.model = new User();
}

ngOnInit() {
localStorage.removeItem('loggedUser');
this.loading = false;
this.loginService.logout().then(resp => {
this.loginService.loginSubject.next(1);
});
}

ngDestroy()
{
}
login() {
//clean notifications message on page
this.notifService.subject.next();
this.loading = true;
this.busy = this.loginService.login(this.model).then(resp => {
this.loading = false;
localStorage.setItem('loggedUser', this.model.email);
this.loginService.loginSubject.next(1);
this.router.navigate(["/list"]);
}).catch(exp => {
this.notifService.error(exp._body);
this.loading = false;
}) ;
}
}
Login.component.html
此页面提供登录界面,供用户输入其凭据(电子邮件和密码)以打开与服务器的新会话并可访问应用程序。
<form [ngBusy]="busy" class="form-horizontal" (ngSubmit)="f.form.valid && login()"

        #f="ngForm" novalidate>
<div class="row">
<div class="col-md-3"></div>
<div class="col-md-6">
<h4>Please Login</h4>
<hr>
</div>
</div>
<div class="row">
<div class="col-md-3"></div>
<div class="col-md-6">
<div class="form-group">
<label class="sr-only" for="email">E-Mail Address</label>
<div class="input-group mb-2 mr-sm-2 mb-sm-0">
<div class="input-group-addon" style="width: 2.6rem">
<i class="fa fa-at"></i></div>
<input type="email" class="form-control" name="email"

[(ngModel)]="model.email" #username="ngModel" [pattern]="EMAIL_REGEXP" required />
</div>
</div>
</div>
<div class="col-md-3">
<div class="form-control-feedback" *ngIf="f.submitted && !username.valid">
<span class="text-danger align-middle">
<i class="fa fa-close"></i> Username is required
</span>
</div>
</div>
</div>
<div class="row">
<div class="col-md-3"></div>
<div class="col-md-6">
<div class="form-group">
<label class="sr-only" for="password">Password</label>
<div class="input-group mb-2 mr-sm-2 mb-sm-0">
<div class="input-group-addon" style="width: 2.6rem"><i class="fa fa-key"></i></div>
<input type="password" class="form-control" name="password"

[(ngModel)]="model.password" #password="ngModel" required />
</div>
</div>
</div>
<div class="col-md-3">
<div class="form-control-feedback" *ngIf="f.submitted && !password.valid">
<span class="text-danger align-middle">
<i class="fa fa-close"></i> Password is required
</span>
</div>
</div>
</div>
<div class="row">
<div class="col-md-3"></div>
<div class="col-md-6" style="padding-top: .35rem">
<div class="form-check mb-2 mr-sm-2 mb-sm-0">
<label class="form-check-label">
<input [(ngModel)]="model.rememberMe" class="form-check-input" name="rememberMe"

type="checkbox" >
<span style="padding-bottom: .15rem">Remember me</span>
</label>
</div>
</div>
</div>
<div class="row" style="padding-top: 1rem">
<div class="col-md-3"></div>
<div class="col-md-6">
<button [disabled]="loading" class="btn btn-primary"><i class="fa fa-sign-in"></i> Login</button>
</div>
</div>
</form>
列表组件
List.component.ts
- init():通过配置paginType和pageLength属性初始化datatable对象。然后,它将通过调用CarService中的getCars方法以加载可用的cars 。如果引发异常,则通过调用NofifService中的error方法在页面顶部显示错误消息。
- searchCar():它按id过滤显示的汽车。当用户从下拉菜单中选择汽车名称时调用它。
- deleteCar(id : number):它从数据库中删除特定项(由参数id标识)并从视图中删除它。此方法将调用CarService中的deleteCar操作。如果引发异常,则通过调用NofifService中的error方法在页面顶部显示错误消息。
import { NotifService } from './../../services/notif-service.service';
import { Component, NgModule , OnInit } from '@angular/core';
import { CarService } from '../../services/car-service.service';
import { Subscription } from 'rxjs/Subscription';
import { ICar } from './../../models/ICar';
import { Subject } from 'rxjs/Rx';
import { RouterLink, Event } from '@angular/router';

@Component({
selector: 'app-list',
templateUrl: './list.component.html',
styleUrls: ['./list.component.css']
})
export class ListComponent implements OnInit {
listCars : any = [];
filtredCars : any = [];
carName : string = "";
selectedItem : number;
dtTrigger = new Subject();
dtOptions: DataTables.Settings = {};

constructor(private _carService : CarService, private notifService : NotifService ) {
this.init();
}

private init()
{
this.dtOptions = {
pagingType: 'full_numbers',
pageLength: 10
};

this.selectedItem = -1;
this._carService.getCars() .then( response => {
this.listCars = response.json() as ICar[];
this.filtredCars = this.listCars.slice(0);
// Calling the DT trigger to manually render the table
this.dtTrigger.next();
}).catch((resp) => {
console.log(resp);
this.notifService.error("Server Exception was raised");
});
}
public searchCar ()
{
if(this.selectedItem == -1)
{
this.filtredCars = this.listCars.slice(0);
}else
{
this.filtredCars = this.listCars.filter(
car => car.id == this.selectedItem );
}
}

public deleteCar(id : number)
{
this._carService.deleteCar(id).then( response => {
this.filtredCars = this.filtredCars.filter(
(item : ICar) => {
return (item.id != id)
})
this.notifService.success("Delete was well done");
// this.dtTrigger.next();
}).catch((resp) => {
this.notifService.error("Server Exception was raised");
});
}
ngOnInit()
{
}
}
List.component.html
此页面显示所有可用的详细汽车,并允许用户使用下拉过滤器或使用datatable组件的本机搜索框按车辆ID进行过滤。
通过datatable,您可以删除,更新特定汽车或添加新汽车。
要更新或创建汽车,您将导航到专用页面。
<div class="row">
<div class="col-lg-8">
<p><b>Filter by car id :</b>
<select [(ngModel)]="selectedItem" (ngModelChange)="searchCar()" >
<option [value]="-1" selected>choose option</option>
<option *ngFor="let item of listCars" [value]="item.id" >{{item.name}}</option>
</select>
</p>
</div>
<div class="col-lg-4">
<a class="btn btn-primary btn-xs pull-right " routerLink="/newcar"

preserveQueryParams preserveFragment><b>+</b> Add new car </a>
</div>
</div>
<br>
<div class="row">
<div class="col-lg-12">
<table datatable [dtOptions]="dtOptions" [dtTrigger]="dtTrigger" class="row-border hover">
<thead>
<tr>
<th>ID</th>
<th>Name</th>
<th>Mark</th>
<th>Model</th>
<th>Registred Date</th>
<th></th>
</tr>
</thead>
<tbody>
<tr *ngFor="let car of filtredCars">
<td>{{car.id}} </td>
<td>{{car.name}}</td>
<td>{{car.mark}}</td>
<td>{{car.model}}</td>
<td>{{car.registered | date }}</td>
<td>
<button class="btn btn-link" routerLink="/updatecar/{{car.id}}"

preserveQueryParams preserveFragment>
<i class="fa fa-pencil" aria-hidden="true"></i> Update
</button>
<button class="btn btn-link" (click)="deleteCar(car.id)">
<i class="fa fa-trash" aria-hidden="true"></i> Delete
</button>
</td>
</tr>
</tbody>
</table>
</div>
</div>Notificationcar组件
Notification.component.ts
它使用notifService订阅Subject Obsevable,它将侦听从其他组件(观察者)发送的所有通知并显示相应的消息。
import { Component, OnInit } from '@angular/core';
import { NotifService } from './../../services/notif-service.service';
import { Message } from './../../models/Message';

@Component({
selector: 'notification',
templateUrl: './notification.component.html',
styleUrls: ['./notification.component.css']
})

export class NotificationComponent implements OnInit {

message : Message;
constructor(public notifService : NotifService ){}
ngOnInit() {
this.notifService.getMessage().subscribe(p =>
{
this.message = p;
});
}
}
添加新车组件
Newcar.component.ts
- complexForm:用于表单验证,在提交之前验证以下输入:name, mark 和model。
- newCar(model: ICar):将通过调用CarService中的addNewCar操作来创建一个新的汽车保存到数据库。
如果引发异常,则通过调用NofifService实例的 error方法,在页面顶部显示错误消息。
import { Component,NgModule, OnInit } from '@angular/core';
import { FormGroup, FormControl, FormBuilder, Validators } from '@angular/forms';
import { ICar} from "../../models/ICar"
import { CarService } from './../../services/car-service.service';
import { NotifService } from './../../services/notif-service.service';
@Component({
selector: 'app-newcar',
templateUrl: './newcar.component.html',
styleUrls: ['./newcar.component.css']
})
export class Newcar implements OnInit {
complexForm : FormGroup;
constructor(fb: FormBuilder, private carService : CarService
,private notifService : NotifService
){
// Here we are using the FormBuilder to build out our form.
this.complexForm = fb.group({
// We can set default values by passing in the corresponding value or leave blank
// if we wish to not set the value. For our example, we’ll default the gender to female.
'name' : [null, Validators.required],
'mark': [null, Validators.required],
'model' : [null, Validators.required],
});
}
ngOnInit() {
}
public newCar(model: ICar){
this.carService.addNewCar(model).then(resp => {
this.notifService.success("Insertion operation was well done");
}).catch(exp => {
this.notifService.error("Server Exception was raised");
}) ;
}
}
Newcar.component.html
通过此页面,用户可以输入有关新车的信息(名称,标记,型号)并将其提交给服务器。
所有输入都是实现此操作所必需的,否则他将获得验证错误消息。
<h3> New Car</h3>
<form [formGroup]="complexForm" (ngSubmit)="newCar(complexForm.value)">
<div class="form-group">
<label for=""><b>Name</b></label>
<input type="text" class="form-control" [formControl]="complexForm.controls['name']" />
<div *ngIf="complexForm.controls['name'].hasError('required')" class="has-error">
field required</div>
</div>
<div class="form-group">
<label for=""><b>Mark</b></label>
<input type="text" class="form-control" [formControl]="complexForm.controls['mark']"/>
<div *ngIf="complexForm.controls['mark'].hasError('required')" class="has-error">
field required</div>
</div>
<div class="form-group">
<label for=""><b>Model</b></label>
<input type="text" class="form-control" [formControl]="complexForm.controls['model']"/>
<div *ngIf="complexForm.controls['model'].hasError('required')" class="has-error">
field required</div>
</div>
<div class="form-group">
<button type="submit" class="btn btn-primary" [disabled]="!complexForm.valid">Submit</button>
</div>
</form>
更新汽车组件
Update.component.ts
- constructor(…):获取特定car的详细信息(使用路由url参数给出的id参数)并初始化FormGroup对象(complexForm)以填充和验证表单字段。
- updateCar(model: ICar):将通过调用CarService中的updateCar操作更新特定的汽车。
如果引发异常,则通过调用NofifService实例的错误方法,在页面顶部显示错误消息。
import { Component,NgModule, OnInit } from '@angular/core';
import { FormGroup, FormControl, FormBuilder, Validators } from '@angular/forms';
import { ICar } from "../../models/ICar"
import { CarService } from './../../services/car-service.service';
import { NotifService } from './../../services/notif-service.service';
import { ActivatedRoute } from '@angular/router';

@Component({

selector: 'app-updatecar',
templateUrl: './update.component.html',
styleUrls: ['./update.component.css']
})
export class UpdateCarComponent implements OnInit {
complexForm : FormGroup ;

constructor(private fb: FormBuilder
, private carService : CarService
, private notifService : NotifService
, private route: ActivatedRoute ){
// Here we are using the FormBuilder to build out our form.
this.route.params.subscribe(params => {

let id = +params['id']; // (+) converts string 'id' to a number
this.complexForm = fb.group({
// We can set default values by passing in the corresponding value or leave blank
// if we wish to not set the value. For our example, we’ll default the gender to female.
'id' : [""],
'name' : ["", Validators.required],
'mark': ["", Validators.required],
'model' : ["", Validators.required],
});
this.carService.getCar(id).then(resp => {
let car = resp.json() as ICar;
this.complexForm = fb.group({
// We can set default values by passing in the corresponding value or leave blank
// if we wish to not set the value. For our example, we’ll default the gender to female.
'id' : [car.id],
'name' : [car.name, Validators.required],
'mark': [car.mark, Validators.required],
'model' : [car.model, Validators.required],
});
}).catch(exp => {
this.notifService.error("Server Exception was raised");
}) ;
});
}
ngOnInit() {
}

public updateCar(model: ICar){
console.log(model);
this.carService.updateCar(model).then(resp => {
this.notifService.success("Update operation was well done");
}).catch(exp => {
this.notifService.error("Server Exception was raised");
}) ;
}
}
Update.component.html
此页面将在HTML表单中显示特定的汽车详细信息,允许用户修改某些信息,如(name, mark, model)。
应用组件
App.component.ts
用作app.html模板的代码,您将在其中实现:
- constructor:用于初始化我们的母版页(app.html),并声明根据当前会话值控制用户导航的路由器侦听器(会话由cookie管理)
- logOut:此事件用于通过清除Cookie以及将用户重定向到“登录”页面来释放当前会话。
import { Component } from '@angular/core';
import { User } from '../../models/user';
import { LoginService } from '../../services/login-service.service';

@Component({
selector: 'app-root',
templateUrl: './app.component.html',
styleUrls: ['./app.component.css']
})
export class AppComponent {
title = 'Angular 4 Demo';
userEmail : string = "";

constructor(private loginService : LoginService) {
loginService.loginSubject.asObservable().subscribe(p =>
{
this.userEmail = localStorage.getItem('loggedUser') || "";
});
}
ngOnInit() {
//Called after the constructor, initializing input properties, and the first call to ngOnChanges.
//Add 'implements OnInit' to the class.
this.userEmail = localStorage.getItem('loggedUser') || "";
}
}
App.component.html
<div class="container">
<div style="text-align:center">
<h1>
{{title}}
</h1>
</div>
<div *ngIf="userEmail">
<p><b>Welcome</b> {{userEmail}}
(<a [routerLink]="['/login']">Logout</a>) </p>
</div>
<notification></notification>
<router-outlet></router-outlet>
</div>
应用路由组件
app.routing.component.ts
用于配置路由系统。匿名用户不允许列出,更新和创建路径,这就是我们为什么在路径声明中添加canActivate属性的原因。
import { Routes, RouterModule } from '@angular/router';
import { LoginComponent } from '../login/login.component';
import { Newcar } from '../newcar/newcar.component';
import { AppComponent } from '../shared/app.component';
import { ListComponent } from '../list/list.component';
import { CanActivateService } from '../../services/canActivate.service';
import { PageNotFoundComponent } from './../pageNotFound/PageNotFound.component';
import { UpdateCarComponent } from './../updatecar/update.component';

const appRoutes: Routes = [
{ path: 'login', component: LoginComponent },
{ path: 'list', component: ListComponent, canActivate: [CanActivateService] },
{ path: 'newcar', component: Newcar , canActivate: [CanActivateService]},
{ path: 'updatecar/:id', component: UpdateCarComponent },
// otherwise redirect to home
{ path: '**', component: PageNotFoundComponent }
];

export const routing = RouterModule.forRoot(appRoutes);
App.module.ts
该文件用于:
- 使用路由器模块定义路由:“ RouterModule”
- 通过单词key导入所需的Angular模块:“ imports”
- 通过单词key声明组件:“ declarations”
- 通过单词key声明服务:“ providers”
- 通过单词key 指定要包含在index.html文件中的根组件:“ bootstrap”
import { CanActivate } from '@angular/router';
import { BrowserModule } from '@angular/platform-browser';
import { NgModule, Component } from '@angular/core';

import { FormsModule, ReactiveFormsModule } from '@angular/forms';
import { HttpModule } from '@angular/http';
import { routing } from './components/app.routing/app.routing.component';
import { CanActivateService } from './services/canActivate.service';
import { NotificationComponent } from './components/notification/notification.component';
import { NotifService } from './services/notif-service.service';
import { LoginService } from './services/login-service.service';
import { CarService } from './services/car-service.service';

import { DataTablesModule } from 'angular-datatables';
import { BusyModule, BusyConfig} from 'angular2-busy';

import { LoginComponent } from './components/login/login.component';
import { ListComponent } from './components/list/list.component';
import { Newcar } from './components/newcar/newcar.component';
import { AppComponent } from './components/shared/app.component';
import { UpdateCarComponent } from './components/updatecar/update.component';

import { PageNotFoundComponent } from './components/pageNotFound/PageNotFound.component';

export function getBusyConfig() {
return new BusyConfig({
message: 'Please wait ...',
backdrop: false,
delay: 300,
minDuration: 800,
wrapperClass: 'ng-busy'
});
}
@NgModule({
declarations: [
AppComponent,
ListComponent,
Newcar,
LoginComponent,
UpdateCarComponent,
NotificationComponent,
PageNotFoundComponent
],
imports: [
BrowserModule,
BusyModule.forRoot(getBusyConfig()),
FormsModule,
ReactiveFormsModule,
HttpModule,
routing,
DataTablesModule
],
providers: [CarService, CanActivateService, NotifService, LoginService ],
bootstrap: [AppComponent, NotificationComponent]
})
export class AppModule { }III)运行项目
要运行前端项目,您应该使用CMD编写以下命令行,但首先要确保您位于应用程序的根目录中:
- npm start:将TS文件转换为JavaScript文件并启动应用程序

当您尝试通过给定的URL(http:// localhost:4200)打开应用程序时,您将获得以下结果:

注意:从头开始创建项目时使用上述步骤,如果要使用附加项目,则应首先安装所需的软件包,为此,需要在每个项目根文件夹中执行以下命令行:
- dotnet restore 对于dotnet项目
- npm install 用于angular 项目
在运行dotnetcore项目之前:您需要使用SSMS创建数据库并通过执行以下命令行运行可用的迁移脚本:“ dotnet ef database update -c ApplicationDbContext -v”
参考
- Visual Studio Code
- DotNetCore 2.0.0
- NET Core Command Line Tools
- AutoMapper
- Swagger API
- install nodejs + npm
- Angular
- Angular-Datatables
- Angular2-busy
- Angular form validation
- Subject pattern
原文地址:https://www.codeproject.com/Articles/1210559/ASP-NET-Core-Angular-Build-from-Scratch-a-We