目录
使用ASPE.NET Core和Entity Framework Core的后端Web API开发
你好最近所有的Angular 7都出来了,让我们探讨如何使用angular创建SPA并使用.net核心和实体框架核心作为后端
Angular 7
最终,Angular 7的等待结束了!! 这个版本的Angular给我们带来了一些令人兴奋的功能,主要是Angular核心的变化,CLI和Angular材料,让我们逐一探索它 。
Angular Core变化
Angular Core中的一些新增功能可以在此处列出
- 引入了新接口——UrlSegment []到CanLoad接口
- 新接口DoBootStrap
- 添加了新元素特性——启用Shadow DOM v1和插槽
- 添加了新的路由器特性——警告在Angular区域外触发导航
- 添加了从格式错误的网址中恢复的新功能
- 在import语句中添加了一个新的编译器支持点(.),避免了ngc-wrapped崩溃
- 在提取的XMB上添加了新的“原始”占位符值
- 更新的依赖项以支持Typescript 3.1,RxJS 6.3和Node 10。
Angular CLI更改
记住Angular u的早期版本中的Angular项目设置只是输入ng new Project Name,然后输入CLI,同时我们可以看到屏幕,其中有一些输出和一些数据在屏幕上呈现,使用Angular 7即我最喜欢的一个很酷的功能是Angular CLI提示,通过这个功能,我们可以用几个Answers设置项目。让我们快速检查我们如何在下面的图像中执行此操作。
Angular材料和CDK
Angular Material和CDK推出了虚拟滚动和拖放等新特性,让我们简单地探讨它们
虚拟滚动
这允许我们使用列表的显著方面来加载和卸载页面中的DOM元素,这意味着如果我们有大量数据,并且我们想要在列表中显示它,那么我们可以使用此特性。
拖放
拖放获得CDK的支持,包括用户移动项目时自动呈现的功能,以及用于记录或传输列表中项目的帮助方法
应用程序性能
一切都围绕着应用程序进行,谷歌投入了大量的精力,并引入了一些特性,这将有助于我们提高性能,第一个特性是Bundle Budget,它允许我们设置应用程序包大小,并在超过限制时给出一些错的Bundle Budget的限制,默认大小将是2 MB,可以在以后增加。
接下来就是删除Pollyfill.ts文件,该文件仅在开发过程中自动从生产中删除。
升级到Angular 7
我们很多人都把这个项目建立在Angular的旧版本上,为了升级旧版本的Angular,这个官方网站提供了方法和详细解释如何做到这一点,你可以在这里找到它,如果我们正在从Angular 6迁移到Angular 7,以下命令将帮助我们
ng update @angular/cli @angular/core到目前为止,我们完成了angular特性和升级,现在让我们有一些实际操作并添加项目。
添加新项目
要添加angular项目,我们有一些先决条件在继续本文,
- 安装最新的Node.js,然后安装NPM(节点包管理器),后者将下载我们应用程序的所有依赖项或包。可以在此处找到最新版本的Node.js.
- 一旦我们完成了Node.js和NPM就获取Angular CLI,接下来将下载Angular CLI,它将帮助我们快速设置安装CLI的东西,我们需要按照命令npm install -g @ angular / cli进行
- 获取Visual Studio Code,这是我们将在本文中使用的IDE,为了安装它,您可以在此处找到此最新版本。
创建新项目
现在是时候用Angular 7添加新项目了,让我们按照下图中的步骤进行操作,
- 创建要保存项目的目录
- 使用命令ng New Angular7CRUDDemo
- 选择适当的选项以添加路由和CSS
注意根据您的机器和Internet速度,下载软件包可能需要一些时间,项目已准备就绪。
项目准备好后,让我们从文件菜单中打开它,我们可以看到如下的目录结构,

我们从旧版本中可以看到的一个变化是添加了app-routing文件,该文件是在设置项目时从CLI提示符选项添加的
现在问题是我们如何检查我们的项目是否与Angular 7兼容,我们需要检查package. json 文件,其具有如下结构ng update 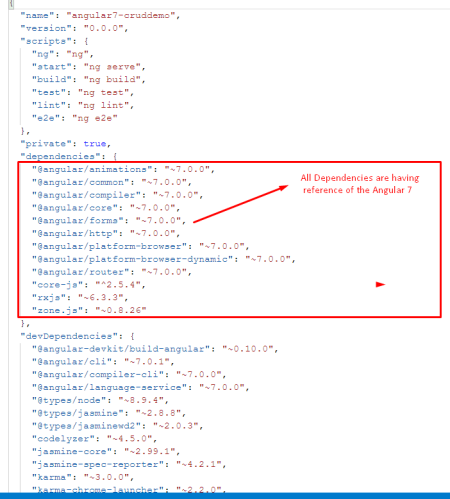
当我们看到突出显示的部分时,我们可以说当前项目被配置为使用最新版本的angular依赖项。
现在实际编码时我们将编码部分分为两部分,第一部分是Angular 7中的UI,然后.net Core和Entity Framework Core 中的Web API部分,首先看到UI部分,然后我们将看到使用.net Core和Entity Framework Core 的Web API部分。
使用Angular的前端设计和实现
众所周知,前端或任何angular应用程序都由组件组成,所以让我们先看看应用程序的结构是什么,然后才能理解我们将在本文中实现的目标。
这里我们将添加演示应用程序,该应用程序将用于列出、添加更新和删除员工,为此我们将具有以下目录结构。
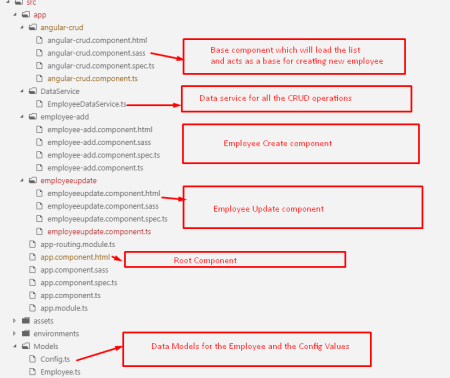
以上是Application的目录结构,这里我们有3个组件即
- Angular-crud.component.ts这将是列出所有员工并将持有其他组件的组件
- employee-add.component.ts这将是创建员工记录的组件
- app.component.ts App组件,其中所有组件将通过<router-outlet> </ router-outlet>加载
- Employeeupdate.component.ts这将负责处理Employee记录的Edit操作
- DataService.ts这将使用Angular 7中的Httpclient使用各种动词保存所有API调用
- Data Models 此文件夹包含Employee数据模型,该模型将作为所有数据的基础,config.ts文件将保存配置相关数据
- App-routing.module.ts这是在配置项目时将在应用程序中添加的路由器。
让我们一个一个地探索这些组件,
代码说明
employee-Add.component.ts

import { Component, OnInit,Input, ViewChild, ElementRef, EventEmitter, Output } from '@angular/core';
import { NgForm } from '@angular/forms';
import { Employee } from 'src/Models/Employee';
import { Router } from '@angular/router';
import {EmployeeDataService} from '../DataService/EmployeeDataService'
@Component({
  selector: 'app-employee-add',
  templateUrl: './employee-add.component.html',
  styleUrls: ['./employee-add.component.sass']
})
export class EmployeeAddComponent implements OnInit {

  @Input()  cleardata: boolean = false;
  @Output() nameEvent = new EventEmitter<string>();
  objtempemp:Employee;
  @Input() objemp :Employee=new Employee();;
  @ViewChild('closeBtn') cb: ElementRef;
constructor(private dataservice:EmployeeDataService,private route:Router) {

 }

  ngOnInit() {
  // this.ResetValues();
  }

  ResetValues(){

  }

  Register(regForm:NgForm){

    this.objtempemp=new Employee();
    this.objtempemp.email=regForm.value.email;
    this.objtempemp.firstname=regForm.value.firstname;
    this.objtempemp.lastname=regForm.value.lastname;
    this.objtempemp.gender=regForm.value.gender;

  this.dataservice.AddEmployee(this.objtempemp).subscribe(res=>{
    alert("Employee Added successfully");
    this.TakeHome();
}
  )


  }
  TakeHome(){
    this.nameEvent.emit("ccc");
    this.cb.nativeElement.click();
    this.route.navigateByUrl('');
  }

}
Employee-add.component.html
<div class="container" style="border:thin">

 <form #empadd='ngForm' (ngSubmit)="Register(empadd)" class="form-horizontal" style="width:50%"  >

  <div class="form-group" >
            <label class="control-label col-sm-2" for="fname" >First Name:</label>
            <div class="col-sm-10">
              <input  style="width:50%"    type="text" class="form-control"

               width="50%" id="fname" placeholder="Enter first name"

               name="firstname" firstname required [(ngModel)]='objemp.firstname'  #firstname="ngModel">
           <span class="help-bpx" *ngIf="firstname.touched && !firstname.valid ">Required</span>
            </div>
          </div>
          <div class="form-group" >
            <label class="control-label col-sm-2" for="email">Last Name:</label>
            <div class="col-sm-10">
              <input style="width:50%"   required type="text" class="form-control" width="50%"

              id="lastname" placeholder="Enter Last Name" name="lastname" lastname required [(ngModel)]='objemp.lastname'  #lastname="ngModel">
              <span class="help-bpx" *ngIf="lastname.touched && !lastname.valid ">Required</span>
            </div>
          </div>
          <div class="form-group" >
            <label class="control-label col-sm-2" for="Gender">Gender:</label>
            <div class="col-sm-10">
              <select name="gender" gender required [(ngModel)]='objemp.gender'  #gender="ngModel">
              <option value="0" selected disabled>Please Select</option>
              <option value="1">Male</option>
              <option value="2">Female</option>
              <span class="help-bpx" *ngIf="gender.touched && !gender.valid ">required</span>
            </select>
            </div>
          </div>
          <div class="form-group" >
            <label class="control-label col-sm-2" for="email">Email:</label>
            <div class="col-sm-10">
              <input #email="ngModel"  style="width:50%" type="email" [(ngModel)]='objemp.email' class="form-control" width="50%" id="email" placeholder="Enter email" name="email">
              <span class="help-bpx" *ngIf="email.touched && !email.valid ">**</span>
            </div>
          </div>
           <div class="form-group">
            <div class="col-sm-offset-2 col-sm-10">
              <button  id="btnsubmit"  type="submit" class="btn btn-primary">Submit</button>
            </div>
          </div>
        </form>
      </div>
<button style="display:none" type="button" #closeBtn class="btn btn-default" data-dismiss="modal">Close</button>以上是Employee Add Component的代码及其模板。
代码说明
- 以上是Employee的Add Component的代码,我们有这个应用程序所需的导入部分。
- 在Constructor中,我们注入了数据服务和Router
- 我们有一个函数Register(regForm:NgForm )在这里我们使用模板驱动的方法来添加员工,所以我们已经声明了类型的表单对象NgForm
- 在此方法中,我们在此成功订阅了Addemployee数据服务,我们将显示警报并将路由重定向到Home Component
- 我们有TakeHomeMethod,其会发出刷新父组件的方法并从那里重新加载数据。在模板中,我们添加了Form标签,并将表单命名为#empadd,在此我们调用的Form的NgSubmit事件中的Register(),它将提交表单及其值。
- 出于验证目的,我们使用基本的HTML验证
- 最后一行我们添加了关闭按钮的代码,它是一个虚拟代码,当成功添加Employee时,它将在模板中触发。
这是关于添加组件,我们可以看到更新组件的模板,该模板具有与添加组件相同的结构和描述。
employeeupdate.component.ts
import { Component, OnInit, ViewChild, Input, EventEmitter, Output, ElementRef } from '@angular/core';
import { EmployeeDataService } from '../DataService/EmployeeDataService';
import { Router } from '@angular/router';
import { NgForm } from '@angular/forms';
import { Employee } from 'src/Models/Employee';
@Component({
  selector: 'app-employeeupdate',
  templateUrl: './employeeupdate.component.html',
  styleUrls: ['./employeeupdate.component.sass']
})
export class EmployeeupdateComponent implements OnInit {

  constructor(private dataservice: EmployeeDataService, private route: Router) {

  }
  @Output() nameEvent = new EventEmitter<string>();
  @ViewChild('closeBtn') cb: ElementRef;
  ngOnInit() {
  }

  @Input() reset: boolean = false;
  @ViewChild('regForm') myForm: NgForm;
  @Input() isReset: boolean = false;
  objtempemp: Employee;
  @Input() objemp: Employee = new Employee();

  EditEmployee(regForm: NgForm) {

    this.dataservice.EditEmployee(this.objemp).subscribe(res => {
      alert("Employee updated successfully");
      this.nameEvent.emit("ccc");
      this.cb.nativeElement.click();

    },
  }

}
employeeupdate.component.html
<div class="container" style="border:thin">

  <form #EditForm='ngForm' name="editform" (ngSubmit)="EditEmployee(EditForm)" class="form-horizontal" style="width:50%">

    <div class="form-group">
      <label class="control-label col-sm-2" for="fname">First Name:</label>
      <div class="col-sm-10">
        <input style="width:50%" type="text" class="form-control" width="50%" id="fname" placeholder="Enter first name"

          name="firstname" firstname required [(ngModel)]='objemp.firstname' #firstname="ngModel">
        <span class="help-bpx" *ngIf="firstname.touched && !firstname.valid ">Required</span>
      </div>
    </div>
    <div class="form-group">
      <label class="control-label col-sm-2" for="email">Last Name:</label>
      <div class="col-sm-10">
        <input style="width:50%" required type="text" class="form-control" width="50%" id="lastname" placeholder="Enter Last Name"

          name="lastname" lastname required [(ngModel)]='objemp.lastname' #lastname="ngModel">
        <span class="help-bpx" *ngIf="lastname.touched && !lastname.valid ">Required</span>
      </div>
    </div>
    <div class="form-group">
      <label class="control-label col-sm-2" for="Gender">Gender:</label>
      <div class="col-sm-10">
        <select name="gender" gender required [(ngModel)]='objemp.gender' #gender="ngModel">
          <option value="0" selected disabled>Please Select</option>
          <option value="1">Male</option>
          <option value="2">Female</option>
          <span class="help-bpx" *ngIf="gender.touched && !gender.valid ">required</span>
        </select>
      </div>
    </div>
    <div class="form-group">
      <label class="control-label col-sm-2" for="email">Email:</label>
      <div class="col-sm-10">
        <input #email="ngModel" style="width:50%" type="email" [(ngModel)]='objemp.email' class="form-control" width="50%"

          id="email" placeholder="Enter email" name="email">
        <span class="help-bpx" *ngIf="email.touched && !email.valid ">**</span>
      </div>
    </div>
    <div class="form-group">
      <div class="col-sm-offset-2 col-sm-10">
        <button type="submit" class="btn btn-primary">Submit</button>
      </div>
    </div>
  </form>
</div>
<button style="display:none" type="button" #closeBtn class="btn btn-default" data-dismiss="modal">Close</button>以上是此组件的员工更新组件描述的代码与添加组件的相同。让我们探索List组件以获得清晰度
Employeelist.component.ts
import { Component, OnInit, ViewChild } from '@angular/core';
import { EmployeeAddComponent } from '../employee-add/employee-add.component';
import { EmployeeDataService } from '../DataService/EmployeeDataService'
import { Employee } from 'src/Models/Employee'
import { Router } from '@angular/router';
import { EmployeeupdateComponent } from '../employeeupdate/employeeupdate.component';
@Component({
  selector: 'app-angular-crud',
  templateUrl: './angular-crud.component.html',
  styleUrls: ['./angular-crud.component.sass']
})
export class AngularCRUDComponent implements OnInit {

  emplist: Employee[];
  dataavailbale: Boolean = false;
  tempemp: Employee

  constructor(private dataservce: EmployeeDataService, private route: Router) {

  }

  ngOnInit() {
    this.LoadData();

  }

  LoadData() {

    this.dataservce.getEmployee().subscribe((tempdate) => {
      this.emplist = tempdate;
      console.log(this.emplist);
      if (this.emplist.length > 0) {
        this.dataavailbale = true;
      }
      else {
        this.dataavailbale = false;
      }

    }
    )
      , err => {
        console.log(err);
      }
  }
  deleteconfirmation(id: string) {

    if (confirm("Are you sure you want to delete this ?")) {
      this.tempemp = new Employee();
      this.tempemp.id = id;
      this.dataservce.DeleteEmployee(this.tempemp).subscribe(res => {
        alert("Deleted successfully !!!");
        this.LoadData();
      })
    }
  }
  @ViewChild('empadd') addcomponent: EmployeeAddComponent
  @ViewChild('regForm') editcomponent: EmployeeupdateComponent

  loadAddnew() {

    this.addcomponent.objemp.email = ""
    this.addcomponent.objemp.firstname = ""
    this.addcomponent.objemp.lastname = ""
    this.addcomponent.objemp.id = ""
    this.addcomponent.objemp.gender = 0
  }

  loadnewForm(id: string, email: string, firstname: string, lastname: string, gender: number) {
    console.log(gender);
    this.editcomponent.objemp.email = email
    this.editcomponent.objemp.firstname = firstname
    this.editcomponent.objemp.lastname = lastname
    this.editcomponent.objemp.id = id
    this.editcomponent.objemp.gender = gender

  }

  RefreshData() {
    this.LoadData();
  }

}
EmployeeList.html
<div class="container">
<input type="button" class="btn btn-primary" (click)="loadAddnew()" data-toggle="modal" data-target="#myModal" value="Create New">
<hr>
<div *ngIf="!dataavailbale">
<h4> No Employee Data is present Click Add new to add Data.</h4>
</div>
<table class="table" *ngIf="dataavailbale">
<thead>
<tr>
<th scope="col">Sr.No</th>
<th scope="col">First name</th>
<th scope="col">Last Name</th>
<th scope="col">Email</th>
<th scope="col">Gender</th>
<th scope="col" style="align-content: center">Action</th>
</tr>
</thead>
<tbody>
<tr *ngFor="let e of emplist let i = index ">
<td scope="col">{{i+1}}</td>
<td scope="col">{{e.fname}}</td>
<td scope="col">{{e.lname}}</td>
<td scope="col">{{e.email}}</td>
<td scope="col">{{e.gender=="1"?'Male':'Female'}}</td>
<td style="display:none">{{e.id}}</td>
<td scope="col">
<button type="button" class="btn btn-default btn-primary" (click)="loadnewForm(e.id,e.email,e.fname,e.lname,e.gender)"
data-toggle="modal" data-target="#myModaledit">
<span class="glyphicon glyphicon-edit"></span> Edit
</button>
|
<button type="button" class="btn btn-default btn-danger" (click)="deleteconfirmation(e.id)">
<span class="glyphicon glyphicon-trash"></span> Delete
</button>
</td>
</tr>
</tbody>
</table>
<div id="myModal" class="modal fade" role="dialog">
<div class="modal-dialog">
<div class="modal-content">
<div class="modal-header">
<button type="button" class="close" data-dismiss="modal">×</button>
<h4 class="modal-primary">Employee Add</h4>
</div>
<div class="modal-body">
<app-employee-add #empadd (nameEvent)="RefreshData($event)"></app-employee-add>
</div>
<div class="modal-footer">
<button type="button" #closeBtn class="btn btn-danger" data-dismiss="modal">Close</button>
</div>
</div>
</div>
</div>
<div id="myModaledit" class="modal fade" role="dialog">
<div class="modal-dialog">
<div class="modal-content">
<div class="modal-header">
<button type="button" class="close" data-dismiss="modal">×</button>
<h4 class="modal-title">Edit</h4>
</div>
<div class="modal-body">
<app-employeeupdate (nameEvent)="RefreshData($event)" [isReset]="resetForm" #regForm></app-employeeupdate>
</div>
<div class="modal-footer">
<button type="button" class="btn btn-danger" data-dismiss="modal">Close</button>
</div>
</div>
</div>
</div>代码说明
- 我们正在做一些我们在组件中需要的导入包
- 根据需求在构造函数中声明的变量,我们已经导入了Data服务和Router Following,这些内容使我们获得了父组件中添加的子组件的引用,即Employee列表组件
@ViewChild('empadd') addcomponent: EmployeeAddComponent
@ViewChild('regForm') editcomponent: EmployeeupdateComponent- 为什么我们需要这个?让我们看看接下来的两个函数loadAddnew(),loadAddnewForm(),我们正在使用这两个viewChild元素来重置和设置特定表单的值
- 我们接下来要做的是LoadData(),它在数据服务中订阅get,数据服务中的方法,并将数据分配给我们拥有的员工列表对象
- 调用Delete Employee,它从上面的表中获取id,然后从Data服务调用delete服务,然后在成功从数据库中删除Employee Data时显示alert。
- 模板代码很简单显示了员工的列表,并在代码中添加了添加和编辑组件,这些组件将在Popup中呈现
这是应用程序中的组件,为此可以探索其余的UI和前端部分。
添加模型和配置文件
export class  Employee{
   firstname:string;
   lastname:string ;
   email:string;
   gender:number;
   id:string

}
这是我们将在整个应用程序中用于发送和接收数据的类
Config.ts
此类将保留配置相关数据,现在我们在类中只有App URL,但我们可以在此处获得其余数据。
添加Bootstrap弹出窗口
我们使用Popups来显示Add和Edit表单,这样我们就可以在Employee List组件模板中定义代码了。
<div id="myModal" class="modal fade" role="dialog">
    <div class="modal-dialog">
      <div class="modal-content">
        <div class="modal-header">
          <button type="button" class="close" data-dismiss="modal">×</button>
          <h4 class="modal-primary">Employee Add</h4>
        </div>
        <div class="modal-body">
<app-employee-add #empadd (nameEvent)="RefreshData($event)"></app-employee-add>
        </div>
        <div class="modal-footer">
          <button type="button" #closeBtn class="btn btn-danger" data-dismiss="modal">Close</button>
        </div>
      </div>

    </div>
</div>在这里我们使用了普通的Popup代码,在模态体内我们渲染了子组件。
添加数据服务
数据服务是我们将服务调用逻辑与应用程序的其余部分分开的层。我们的数据服务如下所示,
import { HttpClient, HttpParams, HttpHeaders } from '@angular/common/http';
import { Injectable } from '@angular/core';
import { Employee } from 'src/Models/Employee'
import { ROOT_URL } from 'src/Models/Config'
import { Observable } from 'rxjs';
@Injectable()
export class EmployeeDataService {
  employees: Observable<Employee[]>;
  newemployee: Employee;
  constructor(private http: HttpClient) {

  }

  getEmployee() {
    return this.http.get<Employee[]>(ROOT_URL + 'Employees');
  }
  AddEmployee(emp: Employee) {

    const headers = new HttpHeaders().set('content-type', 'application/json');
    var body = {
      Fname: emp.firstname, Lname: emp.lastname, Email: emp.email, gender: emp.gender
    }
    console.log(ROOT_URL);

    return this.http.post<Employee>(ROOT_URL + '/Employees', body, { headers });

  }

  ///
  EditEmployee(emp: Employee) {
    console.log(emp);
    const params = new HttpParams().set('ID', emp.id);
    const headers = new HttpHeaders().set('content-type', 'application/json');
    var body = {
      Fname: emp.firstname, Lname: emp.lastname, Email: emp.email, ID: emp.id
      , gender: emp.gender
    }
    return this.http.put<Employee>(ROOT_URL + 'Employees/' + emp.id, body, { headers, params })

  }
  DeleteEmployee(emp: Employee) {
    const params = new HttpParams().set('ID', emp.id);
    const headers = new HttpHeaders().set('content-type', 'application/json');
    var body = {
      Fname: emp.firstname, Lname: emp.lastname, Email: emp.email, ID: emp.id
    }
    return this.http.delete<Employee>(ROOT_URL + '/Employees/' + emp.id)

  }

}在这篇文章中,我们拥有所有使用Httpclient并返回基本http动词(如Get、Put、Post和delete)的可观察值的方法,我们在顶部导入了基本的Http要素,如HttpParams和HttpClient,它们是是Angular / Common / http的一部分
到目前为止,我们已经完成了前端设计和实现,让我们转移到服务器端设置,它是使用.NET Core和Entity Framework Core完成的,所以我们来看看吧
使用ASPE.NET Core和Entity Framework Core的后端Web API开发
在本节中,让我们探讨我们用于实现员工CRUD操作的API,这部分可以分为4个部分,主要是我们如何设置.NET Core项目然后设置实体框架核心,然后添加CORS(跨源资源共享)部分,以便允许angular应用程序与服务器通信。
添加.NET Core Web API项目
要添加.NET核心web api项目,请按照以下步骤操作,
完成添加项目后,让我们转向添加项目并进行必要的更改
using System;
using System.Collections.Generic;
using System.Linq;
using System.Threading.Tasks;
using Angular7DemoServices;
using Microsoft.AspNetCore.Builder;
using Microsoft.AspNetCore.Hosting;
using Microsoft.AspNetCore.Mvc;
using Microsoft.EntityFrameworkCore;
using Microsoft.Extensions.Configuration;
using Microsoft.Extensions.DependencyInjection;
using Microsoft.Extensions.Logging;
using Microsoft.Extensions.Options;

namespace Angular6DemoServices
{
    public class Startup
    {
        public Startup(IConfiguration configuration)
        {
            Configuration = configuration;
        }

        public IConfiguration Configuration { get; }

        // This method gets called by the runtime. Use this method to add services to the container.
        public void ConfigureServices(IServiceCollection services)
        {
            services.AddMvc();
            services.AddCors();
            services.AddDbContext<AppDbContext>(opt => opt.UseSqlServer(@"Your connection string"));

        }

        // This method gets called by the runtime. Use this method to configure the HTTP request pipeline.
        public void Configure(IApplicationBuilder app, IHostingEnvironment env)
        {
            if (env.IsDevelopment())
            {
                app.UseDeveloperExceptionPage();
            }
            app.UseMiddleware();
            app.UseCors();

            app.UseMvc();
        }
    }
}
这是我们的启动类,我们在其中配置服务和注册服务
首先是添加数据库上下文,我们将SQL server用作数据库
接下来我们需要做的是配置CORS选项,我们允许从Angular应用程序共享Cross origin资源。除此之外,我们还添加了中间件,它将再次帮助我们解决CORS问题。中间件代码如下所示
using System;
using System.Collections.Generic;
using System.Linq;
using System.Threading.Tasks;
using Microsoft.AspNetCore.Builder;
using Microsoft.AspNetCore.Http;

namespace Angular7DemoServices
{
    // You may need to install the Microsoft.AspNetCore.Http.Abstractions package into your project
    public class CorsMiddleware
    {
        private readonly RequestDelegate _next;

        public CorsMiddleware(RequestDelegate next)
        {
            _next = next;
        }

        public Task Invoke(HttpContext httpContext)
        {

            httpContext.Response.Headers.Add("Access-Control-Allow-Origin", "*");
            httpContext.Response.Headers.Add("Access-Control-Allow-Credentials", "true");
            httpContext.Response.Headers.Add("Access-Control-Allow-Headers", "Content-Type, Accept");
            httpContext.Response.Headers.Add("Access-Control-Allow-Methods", "POST,GET,PUT,PATCH,DELETE,OPTIONS");
            return _next(httpContext);
        }
    }

    // Extension method used to add the middleware to the HTTP request pipeline.
    public static class MiddlewareExtensions
    {
        public static IApplicationBuilder UseMiddleware(this IApplicationBuilder builder)
        {
            return builder.UseMiddleware<CorsMiddleware>();
        }
    }
}这将是中间件,它将在请求响应和API中添加所需的头。其余部分只是简单的CRUD操作,我们很熟悉,如果不熟悉,我们可以在Github上找到它,其地址将在下面共享
因此,当我们运行Web API和Angular应用程序时,我们可以看到如下输出,
源代码链接
以下是上述文章的源代码链接
参考
原文地址:https://www.codeproject.com/Articles/1267254/Angular-7-SPA-CRUD-With-ASP-NET-Core-And-Entity-Fr