-
 一直是从事棋牌游戏,平常用的东西 大多数只是使用一些javase的一些 api对spring 这方面 用到的比较少,每次学了都忘,始终记不住。为了 更轻松学习springboot,从新学习了spring,学到springmvc记录一下学习过程,先从一个简单的例子入门。
-
- 首先说下springmvc:和Struts2 都是一个mvc的框架 属于spring 的后续产品
- springmvc和Struts2的对比:个人理解,从朋友和同事的了解 目前 使用springmvc 的用户多余struts2的用户,springboot 是基于springmvc上,从技术上来说 springmvc是基于servlet 而Struts2是基于fifter 所以开飞springmvc和Struts2的配置方式有些区别。不管是springmvc和Struts2都是基于前端控制器模式dispatchServlet ,springmvc 前端控制器是基于方法级别的(单例) Struts2前端控制器模式基于类级别 (用过Struts2的都知道是Struts2的aciton 每次请求都是一个新的aciton 线程安全的) 所有对比Struts2 springmvc单例模式 对服务器的内存 开销要比使用Struts更小。传递参数:springmvc 是通过方法传递参数,而Struts2通过类的成员变量传递参数(线程不安全) 并发的时候 可能会导致数据不安全的情况。最后就是 spring 整合 Struts2和整合springmvc的复杂程度,springmvc和spring可以实现无缝整合 而 spring整合Struts2时候需要导入整合时候需要的jar包。
- 简单创建一个 springmvc的demo: 创建一个名为springmvc的项目
-
 创建一个名为:com.springmvc.controller的包
- 编写controller类
package com.springmvc.controller;

import org.springframework.stereotype.Controller;
import org.springframework.web.bind.annotation.RequestMapping;

@Controller
public class HelloSpringMvcContorller {
    @RequestMapping("hello")
    public String getUserName() {
        System.out.println("springmvc请求");
        return "您好,springmvc";
    }
}
此时返回的是一个String类型,此处可以返回一个视图 所以有兴趣的可以自己搞一个视图看看返回界面 添加一个ModelAndView 对象就可以
- springmvc是基于servlet 所以需要在web .xml中配置 serlvet一些配置
<?xml version="1.0" encoding="UTF-8"?>
<web-app xmlns:xsi="http://www.w3.org/2001/XMLSchema-instance"
    xmlns="http://java.sun.com/xml/ns/javaee"
    xsi:schemaLocation="http://java.sun.com/xml/ns/javaee http://java.sun.com/xml/ns/javaee/web-app_3_0.xsd"
    id="WebApp_ID" version="3.0">
    <display-name>springmvc</display-name>
    <welcome-file-list>
        <welcome-file>index.html</welcome-file>
        <welcome-file>index.htm</welcome-file>
        <welcome-file>index.jsp</welcome-file>
        <welcome-file>default.html</welcome-file>
        <welcome-file>default.htm</welcome-file>
        <welcome-file>default.jsp</welcome-file>
    </welcome-file-list>
    <servlet>
        <servlet-name>springmvc</servlet-name>
        <servlet-class>org.springframework.web.servlet.DispatcherServlet</servlet-class>


    </servlet>

    <servlet-mapping>
        <servlet-name>springmvc</servlet-name>
        <url-pattern>*.action</url-pattern>
    </servlet-mapping>
</web-app>
- 新建一个springmvc.xml的文件 配置 spring 的包扫描
<?xml version="1.0" encoding="UTF-8"?>
<beans xmlns="http://www.springframework.org/schema/beans"
    xmlns:xsi="http://www.w3.org/2001/XMLSchema-instance" xmlns:p="http://www.springframework.org/schema/p"
    xmlns:context="http://www.springframework.org/schema/context"
    xmlns:mvc="http://www.springframework.org/schema/mvc"
    xsi:schemaLocation="http://www.springframework.org/schema/beans http://www.springframework.org/schema/beans/spring-beans-4.0.xsd
        http://www.springframework.org/schema/mvc http://www.springframework.org/schema/mvc/spring-mvc-4.0.xsd
        http://www.springframework.org/schema/context http://www.springframework.org/schema/context/spring-context-4.0.xsd">

    <!-- 配置controller扫描包 -->
     <context:component-scan base-package="com.springmvc.controller" />
</beans>
- 在将新建的springmvc.xml配置到 web.xml中
<?xml version="1.0" encoding="UTF-8"?>
<web-app xmlns:xsi="http://www.w3.org/2001/XMLSchema-instance"
    xmlns="http://java.sun.com/xml/ns/javaee"
    xsi:schemaLocation="http://java.sun.com/xml/ns/javaee http://java.sun.com/xml/ns/javaee/web-app_3_0.xsd"
    id="WebApp_ID" version="3.0">
    <display-name>springmvc</display-name>
    <welcome-file-list>
        <welcome-file>index.html</welcome-file>
        <welcome-file>index.htm</welcome-file>
        <welcome-file>index.jsp</welcome-file>
        <welcome-file>default.html</welcome-file>
        <welcome-file>default.htm</welcome-file>
        <welcome-file>default.jsp</welcome-file>
    </welcome-file-list>
    <servlet>
        <servlet-name>springmvc</servlet-name>
        <servlet-class>org.springframework.web.servlet.DispatcherServlet</servlet-class>

        <!-- 加载springmvc核心配置文件 -->
        <init-param>
            <param-name>contextConfigLocation</param-name>
            <param-value>classpath:springmvc.xml</param-value>
        </init-param>
    </servlet>

    <servlet-mapping>
        <servlet-name>springmvc</servlet-name>
        <url-pattern>*.action</url-pattern>
    </servlet-mapping>
</web-app>
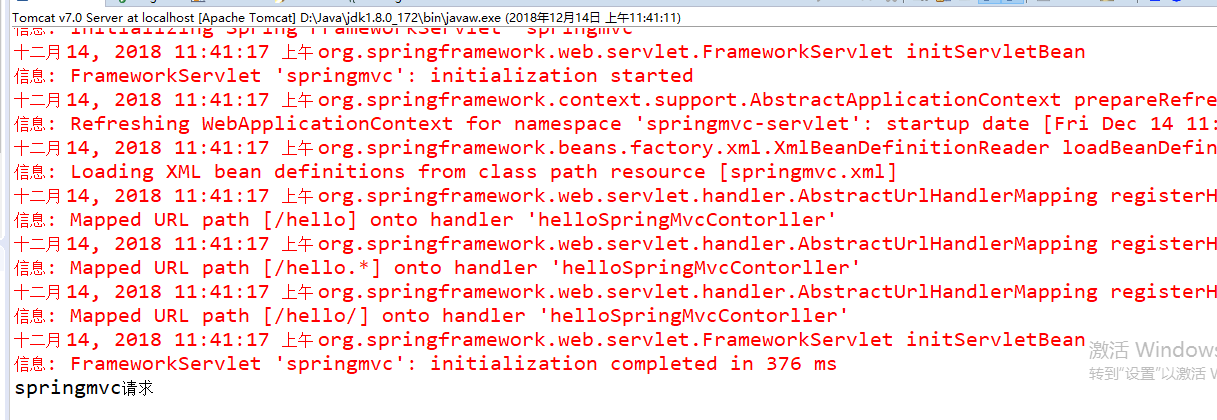
- 此时一个简单的springmvc的例子就已经搭建好了 在浏览器输入请求地址:http://localhost:8080/springmvc/hello.action

-
springmvc 执行流程分析:http://localhost:8080/springmvc/hello.action 找到 web.xml中的 过滤器 拦截路径
<!-- 拦截路径 -->
<servlet-mapping>
<servlet-name>springmvc</servlet-name>
<url-pattern>*.action</url-pattern>
</servlet-mapping>
拦截路径 之后 执行 前端控制器 加载springmvc.xml文件配置 找到 com.springmvc.contorller.HelloSpringMvc 根据请求地址中的hello.action。 hello requestMapping会将请求映射到controller中 处理的方法
注解:@RequestMapping 是 Spring Web 应用程序中最常被用到的注解之一。这个注解会将 HTTP 请求映射到 MVC 和 REST 控制器的处理方法上。第一次在博客上面写东西 很多东西 无法表达清楚,只是记录一下学习过程,如果 有哪里写的不对得 请多多指正 共同进步
扫描二维码关注公众号,回复: 4501210 查看本文章