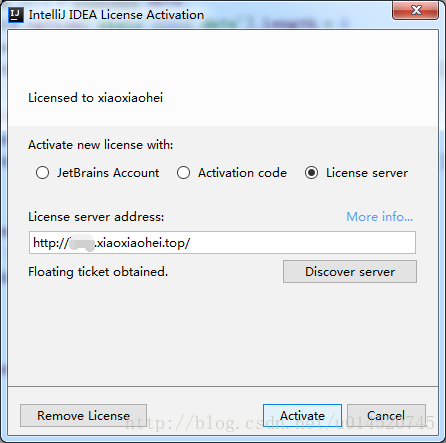
在Centos6.x中搭建idea服务器,最终实现的效果是:只需要在register中输入域名即可:
1、首先下载IntelliJIDEALicenseServer(v1.2),你也可以去官网上下载最新版,不过都大同小异(http://blog.lanyus.com/archives/231.html/comment-page-1)
链接:http://pan.baidu.com/s/1jI49Vee 密码:k0vh
解压之后,把 IntelliJIDEALicenseServer_linux_amd64 传到服务器上,如果是32位系统则选择32位的文件。
2、修改权限:
chmod +x IntelliJIDEALicenseServer_linux_amd64 - 1
3、输出重定向的方式启动:
nohup ./IntelliJIDEALicenseServer_linux_amd64 -p 9494 -u xiaoxiaohei > /dev/null 2>&1 &- 1
ps:-p后面是自定义端口,-u后面是自定义用户名
4、接下来配置nginx,使用一个二级域名方向代理到IntellijIDEAServer上。
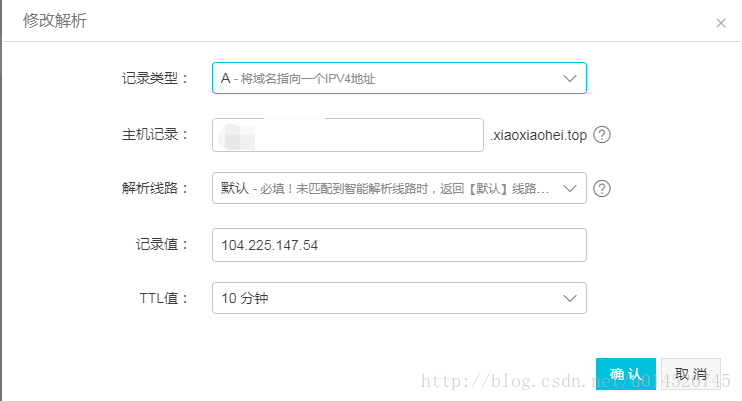
首先在阿里云上创建好二级域名:
然后再nginx上加上如下配置:
#
# The default server
#

server {
    listen       80;
    server_name  your.domain.com;

    # Load configuration files for the default server block.
    include /etc/nginx/default.d/*.conf;

    location / {
    proxy_pass   http://127.0.0.1:9494/;
    proxy_redirect  off;
    proxy_set_header  X-Real-IP $remote_addr;
    proxy_set_header  X-Forwarded-For $proxy_add_x_forwarded_for;
    }

    error_page 404 /404.html;
        location = /40x.html {
    }

    error_page 500 502 503 504 /50x.html;
        location = /50x.html {
    }

}