(三)运行流程及常用注解
这篇笔记记录JUnit测试类运行时,类中方法的运行顺序;以及JUnit中常用的注解。
1.JUnit的运行流程
1.1 新建测试类
右键被测试类,新建一个测试类。弹出框中,首先改变测试类所在的代码目录,然后勾选4个方法:

1.2 修改测试类代码
如下:
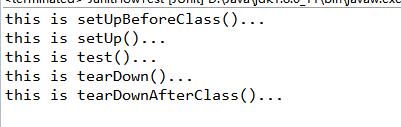
控制台输出如下:
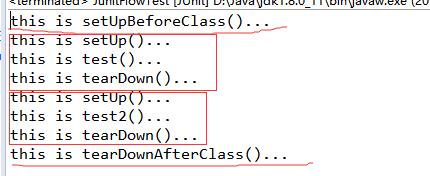
在测试类中,增加一个test2()测试方法:
再出运行,控制台输出结果如下:
1.3 总结说明
①@BeforeClass修饰的方法会在所有方法被调用前被执行,而且该方法是静态的,所以当测试类被加载后接着就会运行它,而且在内存中它只会存在一份实例,它比较适合加载配置文件,进行初始化等等
②@AfterClass所修饰的方法会在所有方法被调用后被执行,通常用来对资源的清理,如关闭数据库的连接
③@Before和@After会在 每个测试方法的前后各执行一次。
②@AfterClass所修饰的方法会在所有方法被调用后被执行,通常用来对资源的清理,如关闭数据库的连接
③@Before和@After会在 每个测试方法的前后各执行一次。
2.JUnit常用注解
* @Test:将一个普通的方法修饰成为一个测试方法
@Test(expected=XX.class)
@Test(timeout=毫秒)
* @BeforeClass:它会在所有的方法运行前被执行,static修饰
* @AfterClass:它会在所有的方法运行结束后被执行,static修饰
* @Before:会在每一个测试方法被运行前执行一次
* @After:会在每一个测试方法运行后被执行一次
* @Ignore:所修饰的测试方法会被测试运行器忽略
* @RunWith:可以更改测试运行器 org.junit.runner.Runner
@Test(expected=XX.class)
@Test(timeout=毫秒)
* @BeforeClass:它会在所有的方法运行前被执行,static修饰
* @AfterClass:它会在所有的方法运行结束后被执行,static修饰
* @Before:会在每一个测试方法被运行前执行一次
* @After:会在每一个测试方法运行后被执行一次
* @Ignore:所修饰的测试方法会被测试运行器忽略
* @RunWith:可以更改测试运行器 org.junit.runner.Runner
2.1 @Test、@Ignore的测试
例子代码:
输出结果:

说明:
①testDivide()方法中,将除数设为0,本会抛出Error,但设置了@Test(expected=ArithmeticException.class),说明我们预期它会抛出一个算术异常,所以程序结果也符合我们的预期。
②testWhile()方法是一个死循环,但设置了@Test(timeout=2000),即2秒之后,自动结束循环
③testReadFile()方法模拟读取文件操作,设置读取超时时间为3秒,等于或大于测试时间则认为不成功,而程序睡眠了2秒,没有超时。这里表示用作一些性能的测试。
④testIgnore()方法,因为使用的@Ignore注解,所以不会运行。
关于@RunWith注解,下一篇笔记记录。