最近因为公司的项目需要添加一些实用性的功能,需要添加第三方登录及分享,采用的是Mob的SDK,可以先到其官网下载对应的SDK 点击这里,为了方便后期进行数据统计和分析,所以可以先添加一个应用,添加成功后,就可以获取到对应的AppKey和App Secret,这两个东西稍后需要用到。
准备工作
打开Unity,创建一个空项目,然后把我们刚刚下载的Share SDK导入。然后在Project下就会出现Plugins文件,然后选择一个物体,点击AddComponent添加Share SDK脚本,然后将Mob官网上申请的应用的App Key及AppSecret替换组建上原有的数据。然后搭建一个简单的UI,用来实现登录及分享功能。因为要发布到移动端测试,所以我做了一个假的控制台用来输出信息,
1、首先先说最简单的QQ分享及第三方登录
进行QQ第三方登录时,需要先到QQ互联官网上申请一个自己的应用,如果只是为了测试功能,也可以不申请,直接使用Mob默认的Appid及AppSecret。接下来就是写代码了,很简单。新建一个用来测试的脚本,我这里叫Login,先在Start中获取到对应的按钮引用,QQ登录的代码如下。
/// <summary>
        /// 退出按钮
        /// </summary>
        private Button exitBtn;
        /// <summary>
        /// QQ按钮
        /// </summary>
        private Button QQBtn;
        /// <summary>
        /// 微信按钮
        /// </summary>
        private Button weixinBtn;
        /// <summary>
        /// 微博按钮
        /// </summary>
        private Button weiboBtn;
        /// <summary>
        /// 分享按钮
        /// </summary>
        private Button ShareBtn;
        /// <summary>
        /// 用户名输入框
        /// </summary>
        private InputField userName;
        /// <summary>
        /// 密码输入框
        /// </summary>
        private InputField passWord;
        /// <summary>
        /// SDK
        /// </summary>
        public ShareSDK ssdk;
        /// <summary>
        /// 控制台
        /// </summary>
        public Text text;
        /// <summary>
        /// 获取到的用户信息保存本地的文件名
        /// </summary>
        private string fileName;
        /// <summary>
        /// 获取到用户的头像保存到本地的文件名
        /// </summary>
        private string iconName;
        /// <summary>
        /// 可以分享的平台
        /// </summary>
        private PlatformType[] platforms;

public  void Start()
        {
            Debug.Log(ssdk);
            platforms = new PlatformType[] { PlatformType.WeChat,PlatformType.WeChatFavorites,PlatformType.WeChatMoments,PlatformType.WechatPlatform,
            PlatformType.QQ,PlatformType.QZone,PlatformType.SinaWeibo};
            userName = transform.Find("UserName").GetComponentInChildren<InputField>();
            passWord = transform.Find("PassWord").GetComponentInChildren<InputField>();
            exitBtn = transform.Find("ExitBtn").GetComponent<Button>();
            QQBtn = transform.Find("QQBtn").GetComponent<Button>();
            weixinBtn = transform.Find("WeiXinBtn").GetComponent<Button>();
            weiboBtn = transform.Find("WeiBoBtn").GetComponent<Button>();
            ShareBtn = transform.Find("QQShareBtn").GetComponent<Button>();

            exitBtn.onClick.AddListener(ExitButtonHandle);
            QQBtn.onClick.AddListener(QQButtonHandle);
            weixinBtn.onClick.AddListener(WeiXinButtonHandle);
            weiboBtn.onClick.AddListener(WeiBoButtonHandle);
            ShareBtn.onClick.AddListener(ShareButtonHandle);
        }
/// <summary>
        /// QQ登录
        /// </summary>
        private void QQButtonHandle()
        {
            Debug.Log("点击了QQ登录");
            fileName = "/qq.json";
            iconName = "/qqIcon.jpg";
            if (File.Exists(Application.persistentDataPath + fileName))
                return;
            //注册登录回调事件
            ssdk.authHandler = AuthHandler;
            //确定向哪个平台进行第三方验证
            ssdk.Authorize(PlatformType.QQ);
        }
/// <summary>
        /// 登录回调
        /// </summary>
        /// <param name="reqID"></param>
        /// <param name="state"></param>
        /// <param name="type"></param>
        /// <param name="data"></param>
        private void AuthHandler(int reqID, ResponseState state, PlatformType type, Hashtable data)
        {
            Debug.Log("回调函数");
            if (state == ResponseState.Success)
            {
                JsonData userData = JsonMapper.ToObject(JsonMapper.ToJson(data));
                SaveUserInfo(JsonMapper.ToJson(data));
                string icon = userData["icon"].ToString();
                StartCoroutine(DownUserIcon(icon));
                text.text += "\n userid : " + userData["userID"] + "\n username : " + userData["nickname"] + "\n icon : " + userData["icon"];
                text.text += "\n授权成功!!!";
                userName.text = userData["nickname"].ToString();

            }
            else if (state == ResponseState.Fail)
            {
                text.text += "\n授权失败!!!";
            }
        }
/// <summary>
        /// 分享
        /// </summary>
        private void ShareButtonHandle()
        {
            //分享的内容
            ShareContent content = new ShareContent();
            if (iconName != null)
                content.SetImagePath(Application.persistentDataPath + iconName);
            content.SetTitle(" 分享 ");
            content.SetTitleUrl("https://www.baidu.com/");
            content.SetText(" wecome ");
            content.SetSite("Mob-ShareSDK");
            content.SetSiteUrl("https://www.baidu.com/");
            content.SetUrl("https://www.baidu.com/");
            content.SetComment("test description");
            content.SetMusicUrl("http://fjdx.sc.chinaz.com/Files/DownLoad/sound1/201807/10300.mp3");
            content.SetShareType(ContentType.Webpage);

            Debug.Log(" ******* 001 ");
            //注册分享回调事件
            ssdk.shareHandler = ShareHandler;
            //传递需要分享的平台及分享内容
            ssdk.ShowPlatformList(platforms, content, 100, 100);
        }
/// <summary>
        /// 分享回调
        /// </summary>
        /// <param name="reqID"></param>
        /// <param name="state"></param>
        /// <param name="type"></param>
        /// <param name="data"></param>
        private void ShareHandler(int reqID, ResponseState state, PlatformType type, Hashtable data)
        {
            if (state == ResponseState.Success)
            {
                Debug.Log(" share is success ");
                Debug.Log(JsonMapper.ToJson(data));
            }
            else if(state==ResponseState.Fail)
            {
                Debug.Log(" share is fail ");
            }
        }
/// <summary>
        /// 将用户的头像下载
        /// </summary>
        /// <param name="icon"></param>
        /// <returns></returns>
        private IEnumerator DownUserIcon(string icon)
        {
            Debug.Log("开启协程进行资源下载");
            WWW www = new WWW(icon);
            yield return www;
            FileStream stream = File.Create(Application.persistentDataPath + iconName);
            Texture2D texture = new Texture2D(www.texture.width, www.texture.height);
            www.LoadImageIntoTexture(texture);
            byte[] bytes = texture.EncodeToJPG();
            stream.Write(bytes, 0, bytes.Length);
            stream.Close();
            stream.Dispose();
        }
        /// <summary>
        /// 将得到的用户信息保存
        /// </summary>
        /// <param name="jsonFile"></param>
        private void SaveUserInfo(string jsonFile)
        {
            if (File.Exists(Application.persistentDataPath + "/" + fileName))
                File.Delete(Application.persistentDataPath + "/" + fileName);
            File.WriteAllText(Application.persistentDataPath + "/"+fileName, jsonFile);
        }
实现上诉代码后,就可以进行测试了,第三方登录可以成功,且分享内容也没问题了。
2、微信第三方登录及分享
进行微信第三方登录及分享时,需要先到微信开放平台申请属于自己的应用,等待审核通过后,将获取到的Appid及App secret填入Share SDK对应的微信平台的配置信息处,还需要自己打包一个属于自己的jar包,利用eclipse打开前面从Mob官网上下载的sdk包下的Android_Jave_Demo文件,

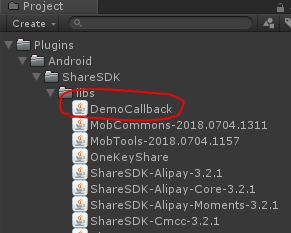
在eclipse中打开后,然后将cn.sharesdk.demo.apshare、cn.sharesdk.demo.wxapi、cn.sharesdk.demo.yxapi这三个包的包名改成自己包名,然后在src单击右键,选择导出,命名为DemoCallback.jar。

导出成功后,将Unity工程目录下的Plugins/Android/ShareSDK/libs下的Demo Callback替换为刚刚自己导出的jar。
接下来则是对微信登录及分享进行事件注册,代码和QQ的基本一样。分享和QQ采用的是同一个方法,就不重复写了
/// <summary>
        /// 微信登录
        /// </summary>
        private void WeiXinButtonHandle()
        {
            Debug.Log("点击了微信登录");
            fileName = "/wechat.json";
            iconName = "/wechatIcon.jpg";
            if (File.Exists(Application.persistentDataPath + fileName))
                return;
            ssdk.authHandler = AuthHandler;
            ssdk.Authorize(PlatformType.WeChat);
        }
微信分享及登录功能到此就结束了。
3、微博的登录及分享
微博跟微信是一样的,也需要到微博的开发者平台先进行注册及应用的申请,获取到应用的App ID及AppSecret,然后将其填写到微博对应的配置信息位置。微博登录代码如下,微博的分享功能也是直接和QQ的一样的,所以使用了同一个方法。
/// <summary>
        /// 微博登录
        /// </summary>
        private void WeiBoButtonHandle()
        {
            Debug.Log("点击了微博登录");
            fileName = "/sina.json";
            iconName = "/sinaIcon.jpg";
            if (File.Exists(Application.persistentDataPath + fileName))
                return;
            ssdk.authHandler = AuthHandler;
            ssdk.Authorize(PlatformType.SinaWeibo);
}至此利用Mob实现Unity第三方登录就结束了,如果需要源码的可以到我的Git上获取。
由于都是自己在摸索,所以难免会很多的不足及错误,如文中有BUG或者错误的地方,还望大神指出,在此写谢过了!