由于项目中用到百度云推送,这里把填坑过程整理一下,以免别人也多走弯路。参考资料:百度Push服务SDK用户手册(iOS版)
- 百度云推送SDK环境搭建
首先下载最新的SDK,下载地址
选择iOS客户端下载,这里用的版本是1.5.4,需要先注册一个百度账户才能下载的。
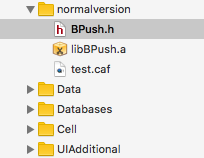
把头文件BPush.h和libBPush.a添加到工程中:
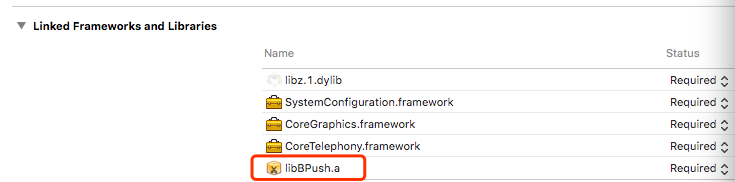
另外工程配置的General里的库链接也添加libBPush.a文件:
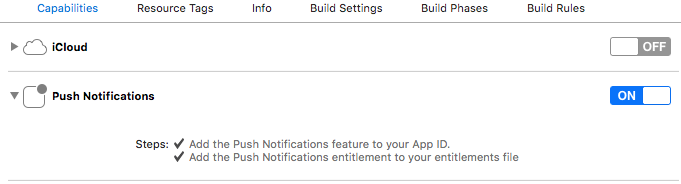
还有在工程配置的Capabilities里面开启推送功能:
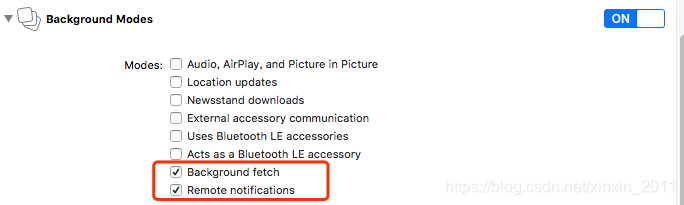
再开启后台模式:
然后在AppDelegate.m文件的didFinishLaunchingWithOptions函数中添加百度云推送的初始化代码:
- (BOOL)application:(UIApplication *)application didFinishLaunchingWithOptions:(NSDictionary *)launchOptions {
    // Override point for customization after application launch.
    self.window = [[UIWindow alloc] initWithFrame:[[UIScreen mainScreen] bounds]];
    self.window.backgroundColor = [UIColor whiteColor];
    ...
    [self initBaiduPush:application withOptions:launchOptions];
    return YES;
}
initBaiduPush函数内容如下:
-(void)initBaiduPush:(UIApplication *)application withOptions:(NSDictionary *)launchOptions{
    // iOS10 下需要使用新的 API
    if ([[[UIDevice currentDevice] systemVersion] floatValue] >= 10.0) {
#ifdef NSFoundationVersionNumber_iOS_9_x_Max
        UNUserNotificationCenter* center = [UNUserNotificationCenter currentNotificationCenter];

        [center requestAuthorizationWithOptions:(UNAuthorizationOptionAlert + UNAuthorizationOptionSound + UNAuthorizationOptionBadge)
                              completionHandler:^(BOOL granted, NSError * _Nullable error) {
                                  // Enable or disable features based on authorization.
                                  if (granted) {
                                      [application registerForRemoteNotifications];
                                  }
                              }];
#endif
    }
    else if ([[[UIDevice currentDevice] systemVersion] floatValue] >= 8.0) {
        UIUserNotificationType myTypes = UIUserNotificationTypeBadge | UIUserNotificationTypeSound | UIUserNotificationTypeAlert;

        UIUserNotificationSettings *settings = [UIUserNotificationSettings settingsForTypes:myTypes categories:nil];
        [[UIApplication sharedApplication] registerUserNotificationSettings:settings];
    }else {
        UIRemoteNotificationType myTypes = UIRemoteNotificationTypeBadge|UIRemoteNotificationTypeAlert|UIRemoteNotificationTypeSound;
        [[UIApplication sharedApplication] registerForRemoteNotificationTypes:myTypes];
    }

#warning 测试 开发环境 时需要修改BPushMode为BPushModeDevelopment 需要修改Apikey为自己的Apikey
    // 在 App 启动时注册百度云推送服务,需要提供Apikey
    [BPush registerChannel:launchOptions apiKey:@"6To53HGcdtzvQELbZeC50Nm1"pushMode:BPushModeDevelopment withFirstAction:NSLocalizedString(@"open", nil) withSecondAction:NSLocalizedString(@"close", nil) withCategory:NSLocalizedString(@"msg_notice", nil) useBehaviorTextInput:YES isDebug:YES];

    // 禁用地理位置推送 需要再绑定接口前调用。
    [BPush disableLbs];

    // App 是用户点击推送消息启动
    NSDictionary *userInfo = [launchOptions objectForKey:UIApplicationLaunchOptionsRemoteNotificationKey];
    if (userInfo) {
        [BPush handleNotification:userInfo];
    }
#if TARGET_IPHONE_SIMULATOR
    Byte dt[32] = {0xc6, 0x1e, 0x5a, 0x13, 0x2d, 0x04, 0x83, 0x82, 0x12, 0x4c, 0x26, 0xcd, 0x0c, 0x16, 0xf6, 0x7c, 0x74, 0x78, 0xb3, 0x5f, 0x6b, 0x37, 0x0a, 0x42, 0x4f, 0xe7, 0x97, 0xdc, 0x9f, 0x3a, 0x54, 0x10};
    [self application:application didRegisterForRemoteNotificationsWithDeviceToken:[NSData dataWithBytes:dt length:32]];
#endif
    //角标清0
    //[[UIApplication sharedApplication] setApplicationIconBadgeNumber:0];
    // 测试本地通知
    //[self performSelector:@selector(testLocalNotifi) withObject:nil afterDelay:1.0];
}

// 在 iOS8 系统中,还需要添加这个方法。通过新的 API 注册推送服务
- (void)application:(UIApplication *)application didRegisterUserNotificationSettings:(UIUserNotificationSettings *)notificationSettings
{
    [application registerForRemoteNotifications];
}
这里一定要注意registerChannel函数的pushMode参数,调试时要用BPushModeDevelopment,而发布程序时用BPushModeProduction。我当时就没注意,怎么也收不到推送。
最后要在didReceiveRemoteNotification函数中处理接收到的推送:
- (void)application:(UIApplication *)application didReceiveRemoteNotification:(NSDictionary *)userInfo fetchCompletionHandler:(void (^)(UIBackgroundFetchResult))completionHandler
{
    completionHandler(UIBackgroundFetchResultNewData);
   ...
   // 处理推送参数
    if ([userInfo isKindOfClass:[NSDictionary class]]) {
    ...
    // 应用在前台
    if (application.applicationState == UIApplicationStateActive) {
       ...
    }
    //杀死状态下,直接跳转到跳转页面。
    //if (application.applicationState == UIApplicationStateInactive && !isBackGroundActivateApplication)
    else
    {
            if (application.applicationIconBadgeNumber > 0)
                application.applicationIconBadgeNumber--;                     // 清除角标
            //[[UIApplication sharedApplication] cancelAllLocalNotifications];// 清除APP所有通知消息
        }
    }
    // 应用在后台。当后台设置aps字段里的 content-available 值为 1 并开启远程通知激活应用的选项
    if (application.applicationState == UIApplicationStateBackground) {
        NSLog(@"background is Activated Application ");
        // 此处可以选择激活应用提前下载邮件图片等内容。
        isBackGroundActivateApplication = YES;
    }
    //NSLog(@"%@",userInfo);
}
代码准备好了,要想测试得需要制作证书
- 制作证书
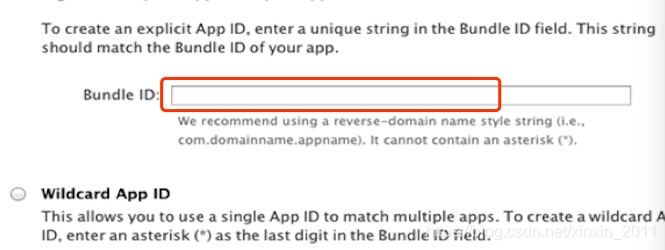
登录Apple ID,根据官网介绍,要创建一个新的 App ID,注意这里的Bundle ID名称一定要选择唯一的命名方式,而不能选下面那种含有通配符*的方式:
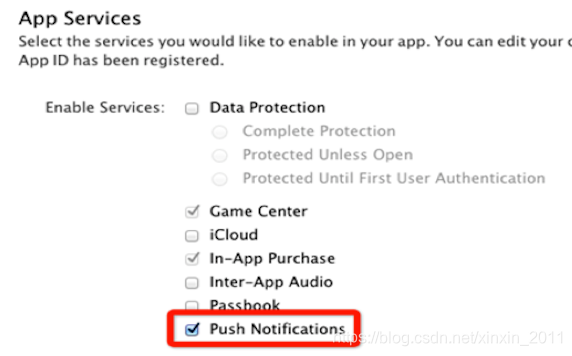
然后App Services里一定要勾选上Push Notifications功能:
下面是按照官网所说的从“钥匙串访问” 程序中导出证书:
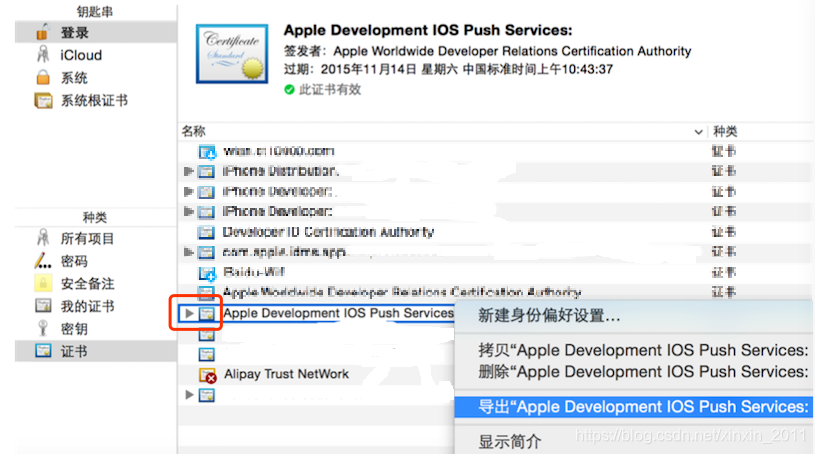
这步一定注意不要点开证书前面的黑三角,保存为 .p12 格式文件时可以有密码,也可以不要密码,不要密码就直接空着就行。然后打开终端,到证书目录下,运行以下命令将p12文件转换为pem证书文件:
openssl pkcs12 -in ios_development.p12 -out ios_development.pem -nodes
这里的ios_development是保存时自己填写的名字,自己命名的什么就写什么,不要盲目照抄这里的。最后把pem证书文件上传百度云推送,结果显示“证书无效”。
开始以为是配置的问题,重复多次都不行,怀疑是使用的openssl工具版本太新了,百度云推送不支持。打开终端查一下版本信息:
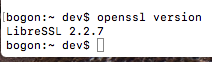
还是下一个用的比较通用的0.9.8版本吧,openssl下载地址
这里下载的是openssl-0.9.8zh.tar.gz文件,解压后进入目录:
tar -zxf openssl-0.9.8zh.tar.gz
cd openssl-0.9.8zh
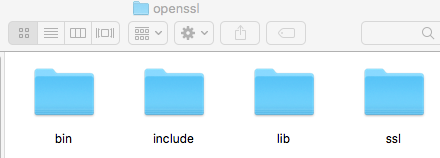
在配置前,先进入/usr/local/目录,创建openssl文件夹,里面创建如下几个目录:
如果不提前创建的话,编译时会因为没有权限创建而出错误,准备好这些后就可以运行配置命令了:
./Configure darwin64-x86_64-cc –prefix=/usr/local/openssl –shared
没有错误,就可以运行编译命令:
make
make install
成功后,在/usr/local/openssl/bin/路径下就生成新的openssl文件了,进入目录查看一下版本:

确认是0.9.8版本后,得用它重新生成证书,由于默认的版本是2.2.7,这里没指定环境变量,所以制作证书时要指定这个新的openssl完整路径:
/usr/local/openssl/bin/openssl pkcs12 -in ios_development.p12 -out ios_development.pem -nodes
这次把新生成的证书上传百度云推送,就成功了,便可以发送推送进行测试了。