android monkey源码下载见:http://fanfq.iteye.com/blog/781694
Monkeyrunner在这里:http://www.51testing.com/html/59/n-242759.html
=======================================================
Monkey测试是Android自动化测试的一种手段,Monkey测试本身非常简单,就是模拟用户的按键输入,触摸屏输入,手势输入等,看设备多长时间会出异常。
当Monkey程序在模拟器或设备运行的时候,如果用户出发了比如点击,触摸,手势或一些系统级别的事件的时候,它就会产生随机脉冲,所以可以用Monkey用随机重复的方法去负荷测试你开发的软件.
最简单的方法就是用用下面的命令来使用Monkey,这个命令将会启动你的软件并且触发500个事件.
$ adb shell monkey -v -p your.package.name 500
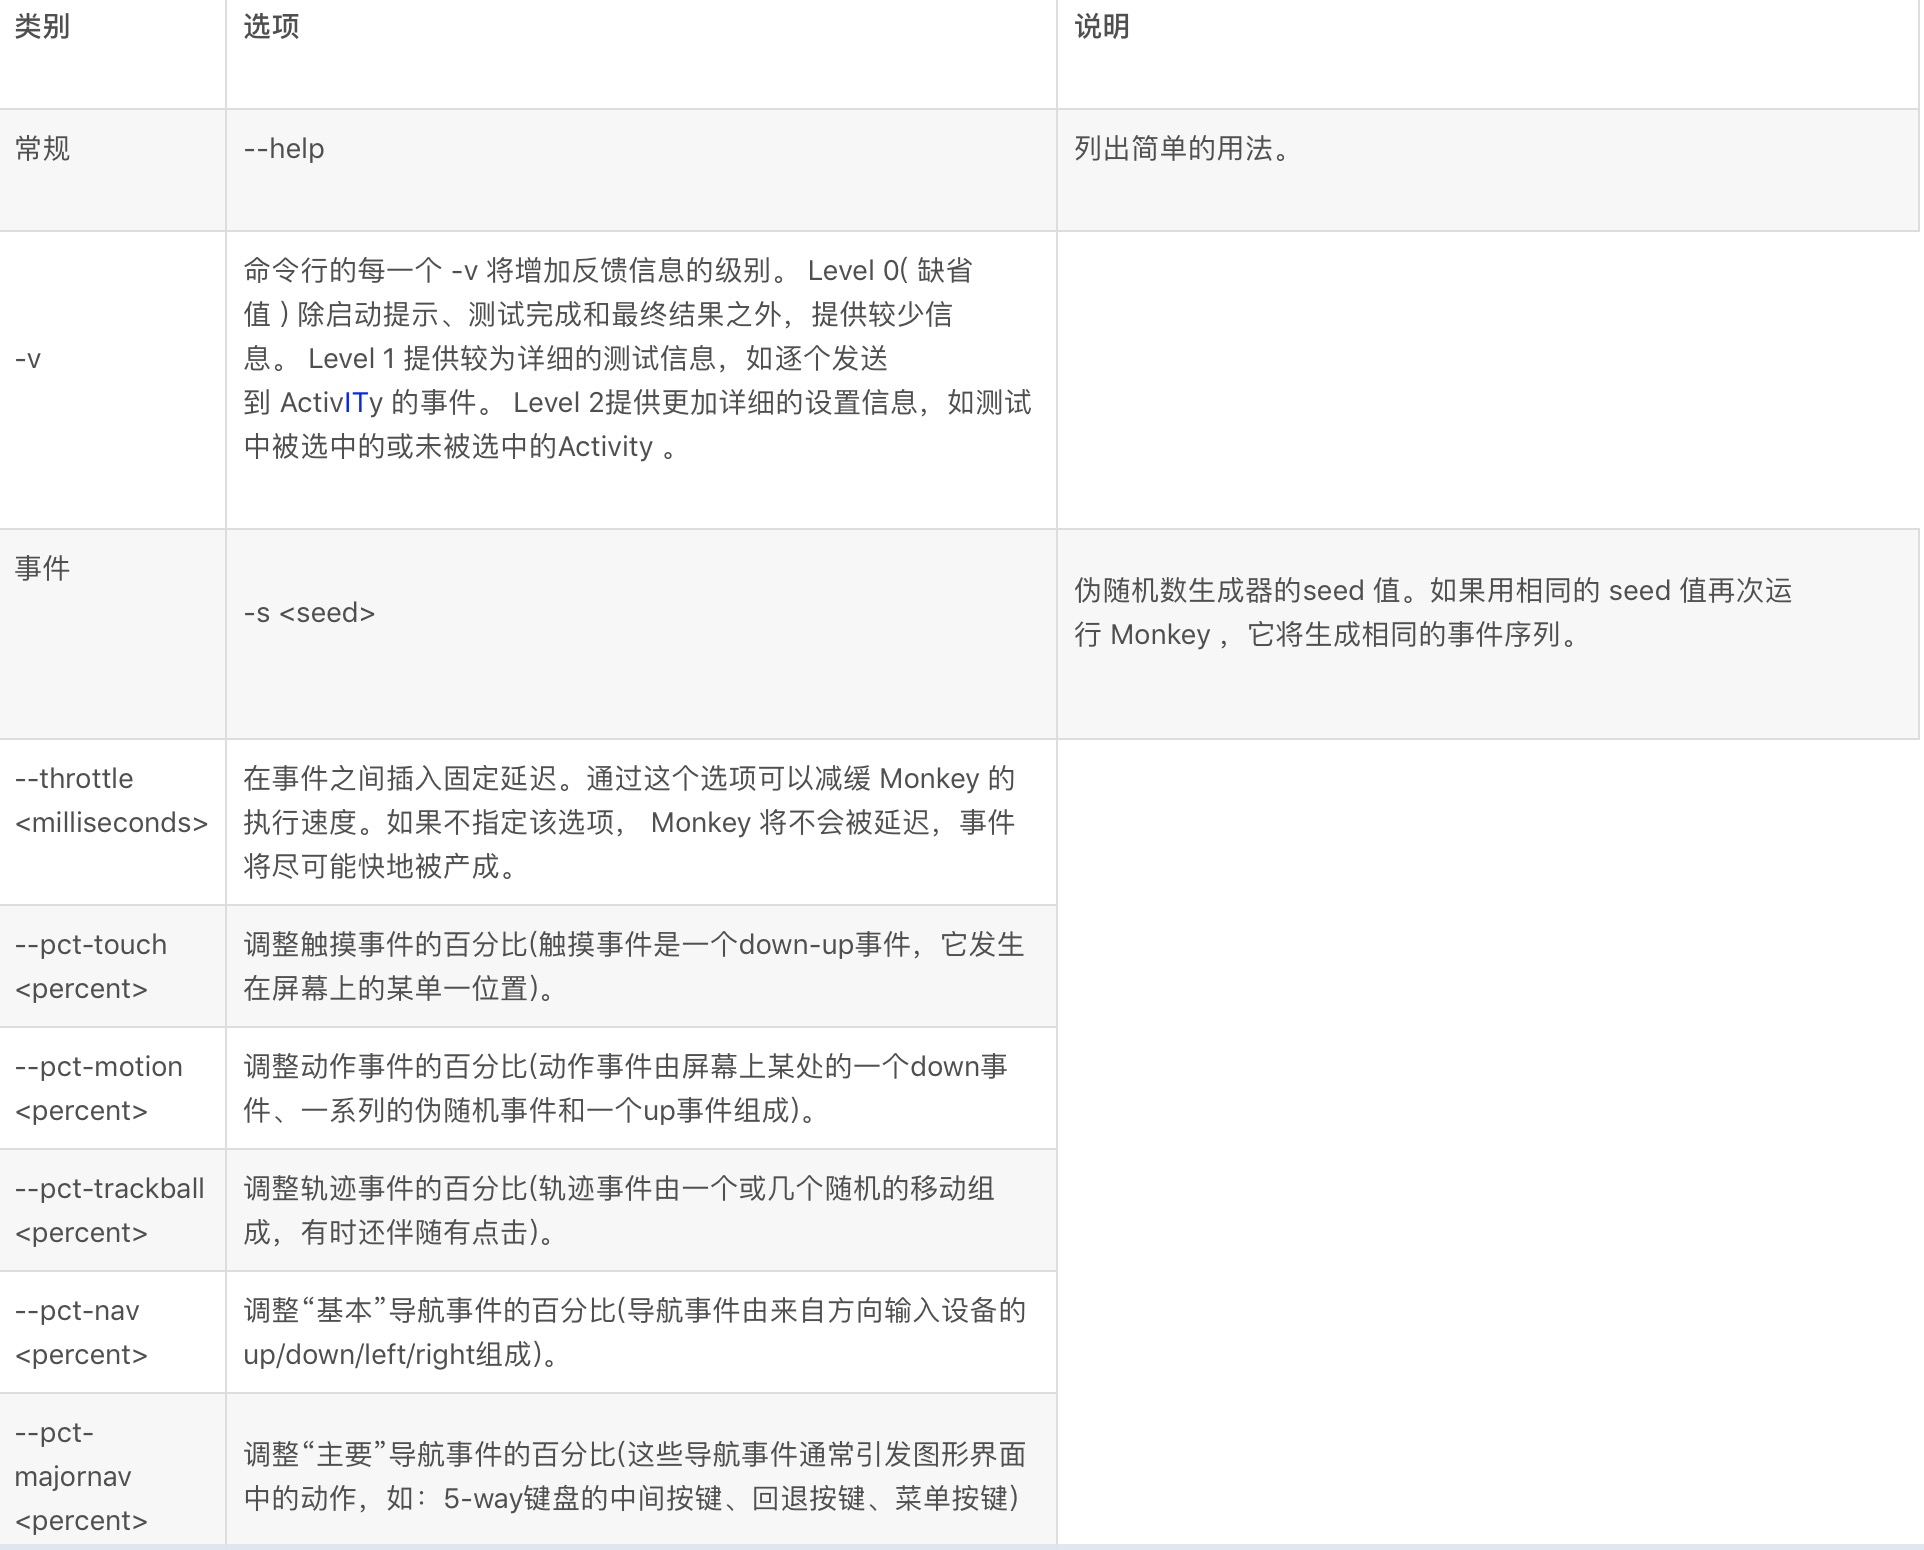
Monkey是一个命令行工具,可以运行在模拟器里或实际设备中。它向系统发送伪随机的用户事件流,实现对正在开发的应用程序进行压力测试。Monkey包括许多选项,它们大致分为四大类:
• 基本配置选项,如设置尝试的事件数量。
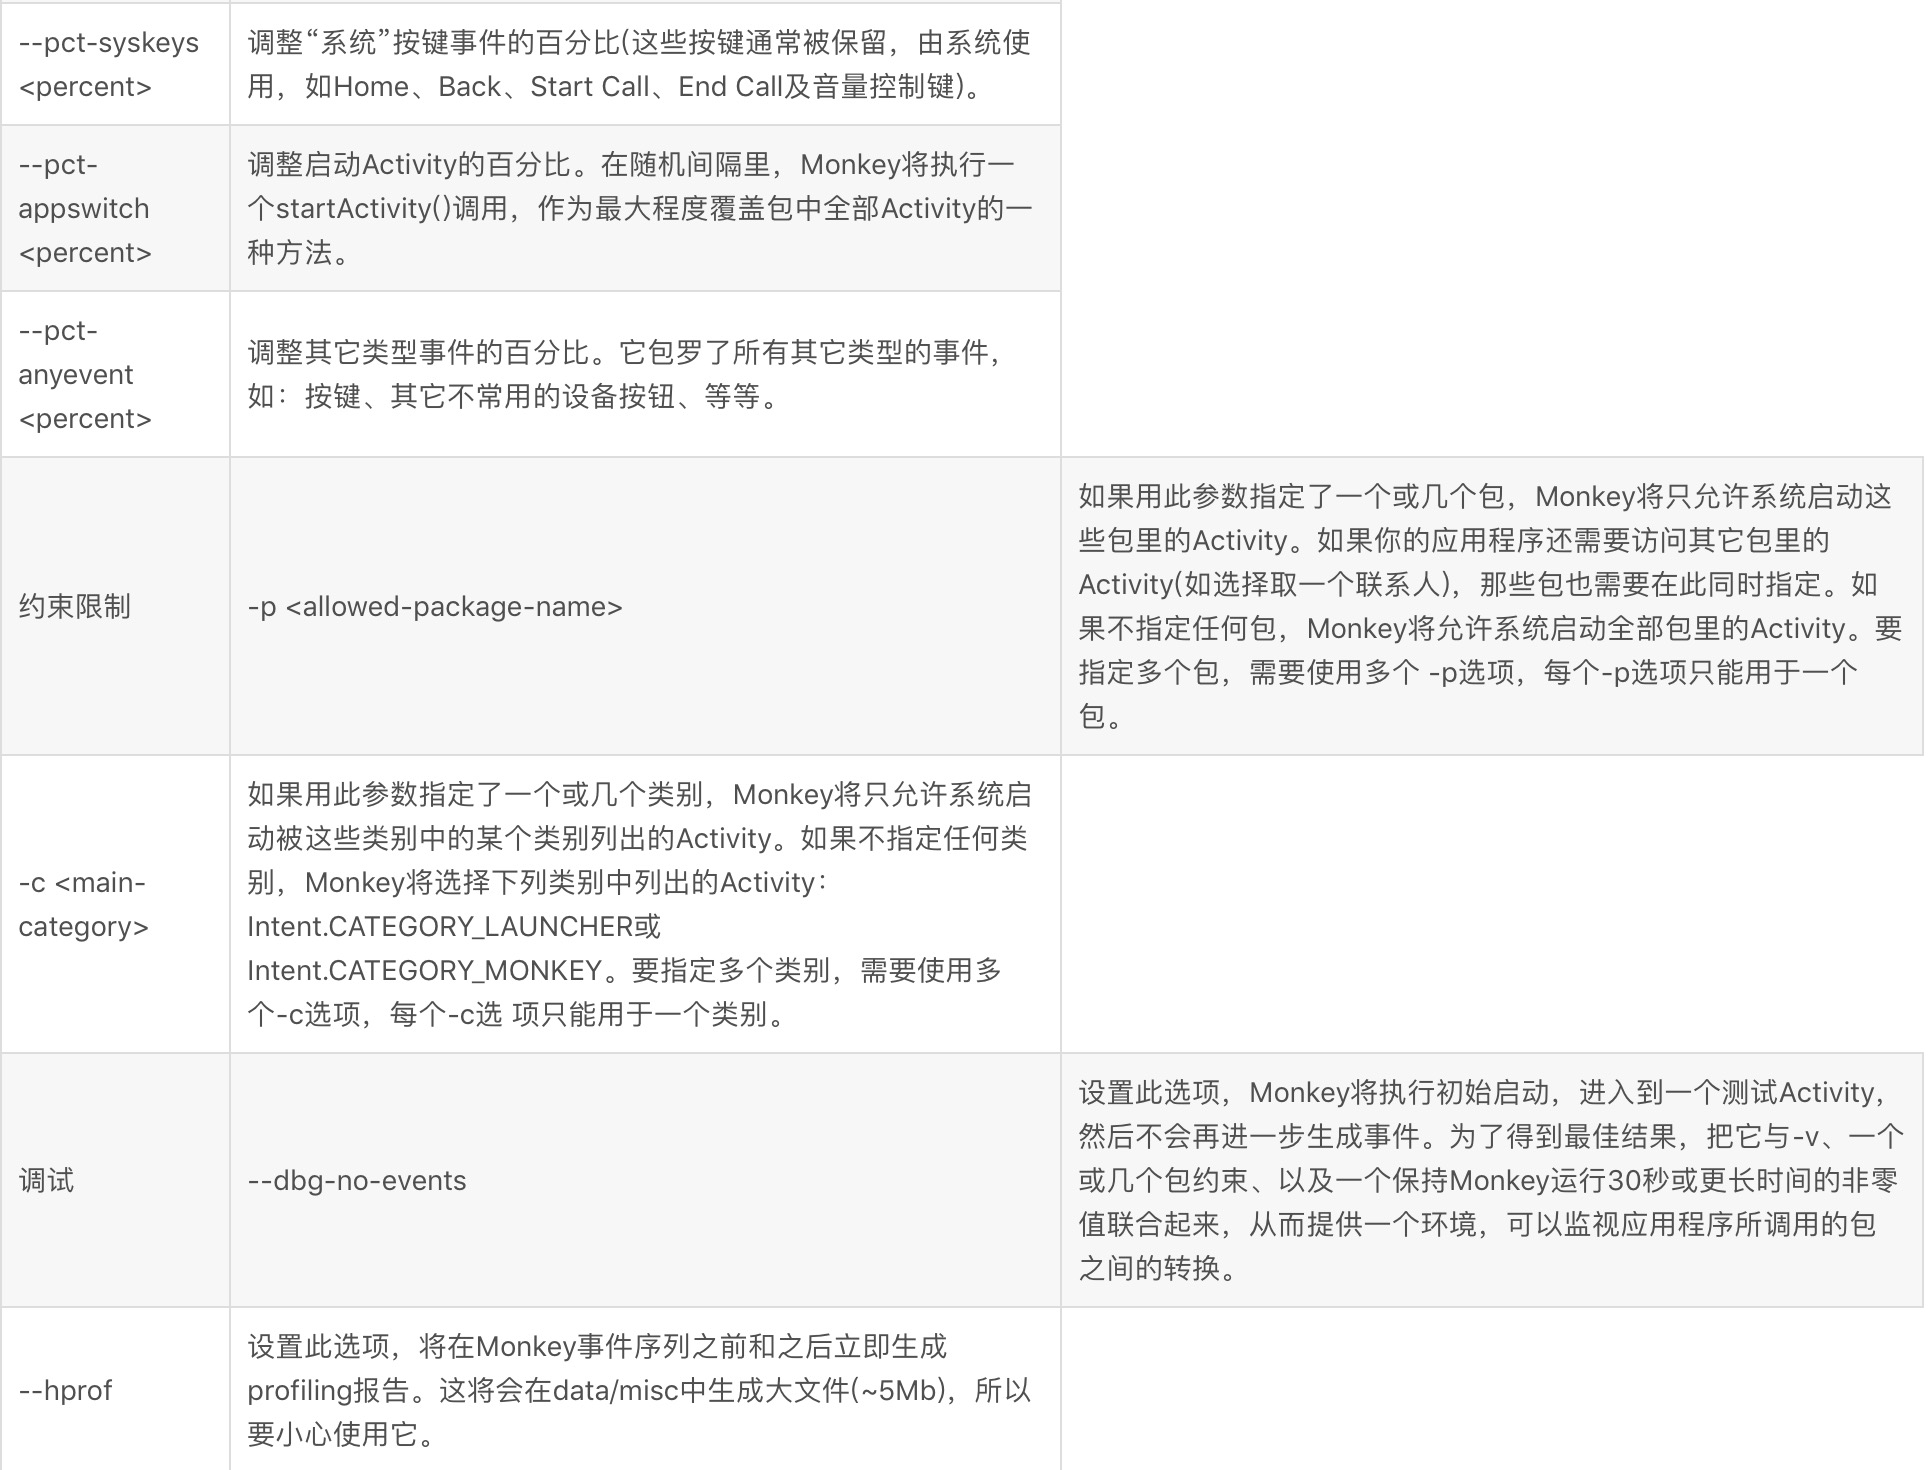
• 运行约束选项,如设置只对单独的一个包进行测试。
• 事件类型和频率。
• 调试选项。
在Monkey运行的时候,它生成事件,并把它们发给系统。同时,Monkey还对测试中的系统进行监测,对下列三种情况进行特殊处理:
• 如果限定了Monkey运行在一个或几个特定的包上,那么它会监测试图转到其它包的操作,并对其进行阻止。
• 如果应用程序崩溃或接收到任何失控异常,Monkey将停止并报错。
• 如果应用程序产生了应用程序不响应(application not responding)的错误,Monkey将会停止并报错。
按照选定的不同级别的反馈信息,在Monkey中还可以看到其执行过程报告和生成的事件。
Monkey基本用法 :
可以通过开发机器上的命令行或脚本来启动Monkey。由于Monkey运行在模拟器/设备环境中,所以必须用其环境中的shell来进行启动。可以通过在每条命令前加上adb shell来达到目的,也可以进入Shell后直接输入Monkey命令。基本语法如下:
$ adb shell monkey [options]
如果不指定options,Monkey将以无反馈模式启动,并把事件任意发送到安装在目标环境中的全部包。下面是一个更为典型的命令行示例,它启动指定的应用程序,并向其发送500个伪随机事件:
$ adb shell monkey -p your.package.name -v 500
命令选项参考:
下表中列出了Monkey命令行可用的全部选项。

monkey [-p ALLOWED_PACKAGE [-p ALLOWED_PACKAGE] ...]
[-c MAIN_CATEGORY [-c MAIN_CATEGORY] ...]
[--ignore-crashes] [--ignore-timeouts]
[--ignore-security-exceptions] [--monitor-native-crashes]
[--kill-process-after-error] [--hprof]
[--pct-touch PERCENT] [--pct-motion PERCENT]
[--pct-trackball PERCENT] [--pct-syskeys PERCENT]
[--pct-nav PERCENT] [--pct-majornav PERCENT]
[--pct-appswitch PERCENT] [--pct-flip PERCENT]
[--pct-anyevent PERCENT]
[--wait-dbg] [--dbg-no-events] [-f scriptfile]
[--port port]
[-s SEED] [-v [-v] ...] [--throttle MILLISEC]
COUNT
讲了这么多,好像很枯燥,很难懂,即使看完了选项也不知道如何使用。
首先我们应该明白我们不可能使用monkey来制定做一样测试,重复做很多次,因为monkey是伪随机的,就是说虽然有一定规律可循,但是并不是我们就可以指定动作,但是我们可以通过添加命令选项来将操作限制在一定的范围内。
monkey -v -p com.android.camera --throttle 5000 --pct-anyevent 100 500
这条命令的解释是:
-v显示默认程度的信息;
-p com.android.camera是指定测试的程序,// Allowing start of Intent { act=android.intent.action.MAIN cat=[android.intent.category.LAUNCHER] cmp=com.android.camera/.Camera } in package com.android.camera这是开始测试的camera的内容;
--throttle 5000 设定延时;
--pct-anyevent 100设定启动activity的百分比为100%。如果没有指定,我们可以看到在开始执行的时候8个事件(上面的选项中有介绍)的百分比如下:
# monkey -v -p com.android.camera --throttle 5000 500
monkey -v -p com.android.camera --throttle 5000 500
:Monkey: seed=0 count=500
:AllowPackage: com.android.camera
:IncludeCategory: android.intent.category.LAUNCHER
:IncludeCategory: android.intent.category.MONKEY
// Event percentages:
// 0: 15.0%
// 1: 10.0%
// 2: 15.0%
// 3: 25.0%
// 4: 15.0%
// 5: 2.0%
// 6: 2.0%
// 7: 1.0%
// 8: 15.0%
指定事件之后
# monkey -v -p com.android.camera --throttle 5000 --pct-anyevent 100 500
monkey -v -p com.android.camera --throttle 5000 --pct-anyevent 100 500
:Monkey: seed=0 count=500
:AllowPackage: com.android.camera
:IncludeCategory: android.intent.category.LAUNCHER
:IncludeCategory: android.intent.category.MONKEY
// Event percentages:
// 0: 0.0%
// 1: 0.0%
// 2: 0.0%
// 3: 0.0%
// 4: 0.0%
// 5: 0.0%
// 6: 0.0%
// 7: 0.0%
// 8: 100.0%
最后count就是事件数设定为500
接下来看一个实例
Monkey的用法是$ adb shell monkey -p your.package.name -v 500 ,首先,我们要找到应用程序在Emulator中所对应的包名,我一开始是一个个目录找得,前7步完成了这项工作,最终发现应用程序包都在data/data下,你可以在shell中cd data/data,然后ls查看当前Emulator中的所有应用程序包。
假如我们想对SDK中的APIDemos做压力测试,
1.在Eclipse中新建工程,将: \android-sdk-windows\samples\android-8\samples\ApiDemos添加到工程中点击运行,此时,他的APK应该加载到了Emulator上
2.在命令行输入adb shell
3.输入ls查看当前文件夹下的目录,执行结果如下
C:\Documents and Settings\fanfq>adb shell
# ls
ls
config
cache
sdcard
acct
mnt
d
etc
system
sys
sbin
proc
init.rc
init.goldfish.rc
init
default.prop
data
root
dev
4.应用程序包都在data下,我们输入cd data进入data文件夹,如下
# cd data
cd data
5.输入ls查看文件夹下的内容,如下所示:
# ls
ls
backup
property
data
misc
local
app-private
dontpanic
system
app
dalvik-cache
lost+found
6.还有个data,所有的应用程序就在这个data下了,进入这个data,然后输入ls如下:
# cd data
cd data
# ls
ls
com.android.fallback
com.android.providers.settings
com.android.inputmethod.pinyin
com.android.launcher
com.android.providers.telephony
com.android.providers.contacts
com.android.providers.downloads
com.android.email
com.android.alarmclock
com.android.mms
com.example.android.apis
com.android.settings
com.android.inputmethod.latin
com.android.providers.userdictionary
com.android.music
com.android.camera
com.android.certinstaller
android.tts
com.svox.pico
com.android.browser
com.android.providers.applications
com.android.netspeed
com.android.gallery
com.android.htmlviewer
com.android.customlocale
com.android.term
com.android.providers.media
com.android.wallpaper.livepicker
com.android.providers.drm
com.android.speechrecorder
com.android.server.vpn
com.android.packageinstaller
com.android.protips
com.android.development
com.android.defcontainer
com.android.carhome
com.android.cardock
com.android.calculator2
com.android.spare_parts
jp.co.omronsoft.openwnn
com.android.sdksetup
com.android.contacts
com.android.soundrecorder
com.android.providers.subscribedfeeds
com.android.phone
7.最后一个就是我们刚才加载的APIDemo的应用程序包
8.可以直接输入monkey -p com.example.android.apis -v 50,结果如下,也可以退出shell,在命令行输入,adb shell monkey -p com.example.android.apis -v 500 ,运行过程中,Emulator中的应用程序在不断地切换画面,可以看一下,呵呵
# monkey -p com.example.android.apis -v 50
monkey -p com.example.android.apis -v 50
:Monkey: seed=0 count=50
:AllowPackage: com.example.android.apis
:IncludeCategory: android.intent.category.LAUNCHER
:IncludeCategory: android.intent.category.MONKEY
// Event percentages:
// 0: 15.0%
// 1: 10.0%
// 2: 15.0%
// 3: 25.0%
// 4: 15.0%
// 5: 2.0%
// 6: 2.0%
// 7: 1.0%
// 8: 15.0%
:Switch: #Intent;action=android.intent.action.MAIN;category=android.intent.categ
ory.LAUNCHER;launchFlags=0x10000000;component=com.example.android.apis/.ApiDemos
;end
// Allowing start of Intent { act=android.intent.action.MAIN cat=[android.intent.category.LAUNCHER] cmp=com.example.android.apis/.ApiDemos } in package com.
example.android.apis
:Sending Pointer ACTION_MOVE x=-4.0 y=2.0
:Sending Pointer ACTION_UP x=0.0 y=0.0
// Allowing start of Intent { cmp=com.example.android.apis/.ApiDemos } in pa
ckage com.example.android.apis
:Sending Pointer ACTION_DOWN x=207.0 y=282.0
:Sending Pointer ACTION_UP x=189.0 y=289.0
// Allowing start of Intent { cmp=com.example.android.apis/.app.Intents } in
package com.example.android.apis
:Sending Pointer ACTION_DOWN x=95.0 y=259.0
:Sending Pointer ACTION_UP x=95.0 y=259.0
:Sending Pointer ACTION_DOWN x=295.0 y=223.0
:Sending Pointer ACTION_UP x=290.0 y=213.0
:Sending Pointer ACTION_MOVE x=-5.0 y=3.0
:Dropped: keys=0 pointers=0 trackballs=0 flips=0
## Network stats: elapsed time=3799ms (3799ms mobile, 0ms wifi, 0ms not connecte
d)
// Monkey finished
此文档居然有被翻译成英文版的,http://www.codeweblog.com/the-android-monkey-automated-testing-tools/