一、试验环境
1、操作系统:Windows 10
2、nexus版本:nexus-3.14.0-04-win64
Nexus常用功能就是:指定私服的中央地址、将自己的Maven项目指定到私服地址、从私服下载中央库的项目索引、从私服仓库下载依赖组件、将第三方项目jar上传到私服供其他项目组使用。
二、安装
1、下载地址:http://www.sonatype.com/download-oss-sonatype
2、我们下载 nexus-3.14.0-04-win64 后,使用cmd 命令安装
进入bin目录:D:\nexus-3.14.0-04-win64\nexus-3.14.0-04\bin
安装:nexus.exe/install (直接安装到本机服务中)
启动:nexus.exe/start (或者在管理,服务中,直接启动,)
安装过程报错: Could not open SCManager. 以管理员身份运行cmd (C:\Windows\System32-搜索cmd.exe,右键用管理员身份打开)
开启Nexus服务后访问url地址http://localhost:8081
用户名密码分别是:admin/admin123.
三、使用
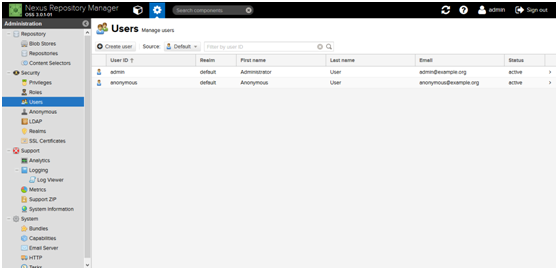
安装成功后有两个默认账号admin、anonymous,其中admin具有全部权限默认密码admin123;anonymous作为匿名用户,只具有查看权限。
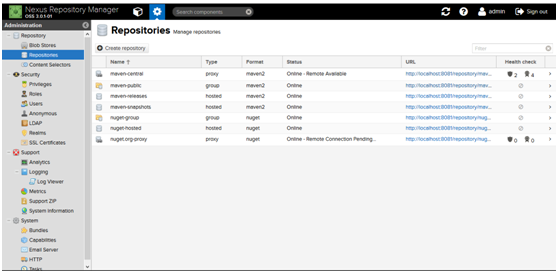
pepositories说明
maven-central:maven中央库,默认从https://repo1.maven.org/maven2/拉取jar
maven-releases:私库发行版jar
maven-snapshots:私库快照(调试版本)jar
maven-public:仓库分组,把上面三个仓库组合在一起对外提供服务,在本地maven基础配置settings.xml中使用。
本地maven库配置settings.xml
<settings>
<pluginGroups>
<pluginGroup>org.sonatype.plugins</pluginGroup>
</pluginGroups><servers>
<server>
<id>nexus</id>
<username>admin</username>
<password>admin123</password>
</server>
</servers><mirrors>
<mirror>
<id>nexus</id>
<mirrorOf>*</mirrorOf>
<url>http://localhost:8081/repository/maven-public/</url>
</mirror>
<mirror>
<id>repo2</id>
<mirrorOf>central</mirrorOf>
<name>Human Readable Name for this Mirror.</name>
<url>http://repo2.maven.org/maven2/</url>
</mirror></mirrors>
<profiles>
<profile>
<id>nexus</id>
<repositories>
<repository>
<id>central</id>
<url>http://central</url>
<releases><enabled>true</enabled></releases>
<snapshots><enabled>true</enabled></snapshots>
</repository>
</repositories>
<pluginRepositories>
<pluginRepository>
<id>central</id>
<url>http://central</url>
<releases><enabled>true</enabled></releases>
<snapshots><enabled>true</enabled></snapshots>
</pluginRepository>
</pluginRepositories>
</profile></profiles>
<activeProfiles>
<activeProfile>nexus</activeProfile>
</activeProfiles>
</settings>
工程配置pox.xml
<distributionManagement>
<repository>
<id>nexus</id>
<name>Releases</name>
<url>http://localhost:8081/repository/maven-releases</url>
</repository>
<snapshotRepository>
<id>nexus</id>
<name>Snapshot</name>
<url>http://localhost:8081/repository/maven-snapshots</url>
</snapshotRepository>
</distributionManagement>
<build>
<defaultGoal>compile</defaultGoal>
<finalName>page</finalName>
<plugins>
<plugin>
<groupId>org.apache.maven.plugins</groupId>
<artifactId>maven-surefire-plugin</artifactId>
<configuration>
<skip>true</skip>
</configuration>
</plugin>
<plugin>
<groupId>org.apache.maven.plugins</groupId>
<artifactId>maven-compiler-plugin</artifactId>
<version>3.3</version>
<configuration>
<source>1.8</source>
<target>1.8</target>
</configuration>
</plugin>
</plugins>
</build>
编译到maven私库
deploy -e
项目右单击->Run As->Maven build..
进入如下界面
快照编译:pom.xml中版本设置
<version>0.0.1-SNAPSHOT</version>
1
编译后在nexus中看到如下图结果,快照已经编译到nexus中Components-> maven-snapshots。
发行版编译:pom.xml中版本设置
<version>0.0.1-RELEASE</version>
1
编译后在nexus中看到如下图结果,发行版已经编译到nexus中Components->maven-releases。

