版权声明:本文为博主原创文章,转载请注明出处 https://blog.csdn.net/fengyu_xueer/article/details/78426757
1.前言
俗话说“打铁要趁热”,趁着自己的劲头还未消失,关于struts2又学了一点点(囧),就再写一篇博客吧,就当巩固自己刚学的这一点点知识了。
2.struts2结果跳转方式
方式1:转发
<result name="success" type="dispatcher">/jsp/hello.jsp</result>方式2:转发到Action
<result name="success" type="chain">
    <!-- 转发到的Action名称 -->
    <param name="actionName">Demo1Action</param>
    <!-- 转发到的Action所在的命名空间 -->
    <param name="namespace">/</param>
</result>
方式3:重定向
<result name="success" type="redirect">/jsp/hello.jsp</result>方式4:重定向到Action
<result name="success" type="redirectAction">
    <!-- 重定向到的Action名称 -->
    <param name="actionName">Demo1Action</param>
    <!-- 重定向到的Action所在的命名空间 -->
    <param name="namespace">/</param>
</result>
3.struts2访问Servlet api的方式
方式1:通过ActionContext(常用,推荐)
//获取request域,不推荐使用
Map<String,Object> requestScope = (Map<String, Object>) ActionContext.getContext().get("request");
//ActionContext.getContext()等同于获取了request,推荐使用
ActionContext.getContext().put("name", "zhangsan");
//获取session域
Map<String, Object> sessionScope = ActionContext.getContext().getSession();
sessionScope.put("name", "Name");
//获取Application域
Map<String, Object> applicationScope = ActionContext.getContext().getApplication();
applicationScope.put("name", "lisi");
方式2:通过ServletActionContext
//获取原生request
HttpServletRequest request = ServletActionContext.getRequest();
//通过request获取原生session
HttpSession session = request.getSession();
//获取原生response
HttpServletResponse response = ServletActionContext.getResponse();
//获取原生ServletContext
ServletContext servletContext = ServletActionContext.getServletContext();
方式3:通过实现接口方式
public class Hello2Action extends ActionSupport implements ServletRequestAware{

    private HttpServletRequest request;
    public String execute() throws Exception {
        System.out.println("Hello2 Action!");
        return SUCCESS;
    }

    public void setServletRequest(HttpServletRequest request) {
        this.request = request;
    }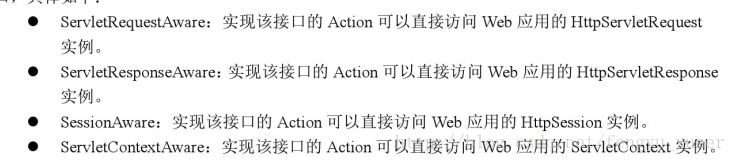
}- 接口说明
4.struts2获得参数
方式1:属性驱动获得参数
- jsp页面代码
<form action="${pageContext.request.contextPath}/Hello2Action.action">
    用户名:<input type="text" name="name"/><br/>
    密码:<input type="text" name="password"/><br/>
    <input type="submit" value="提交">
</form>- Action类接收参数代码
public class Hello2Action extends ActionSupport {

    //属性名必须与前端参数名保持绝对一致,添加getset方法
    //有getset方法称之为属性,没有则称之为变量
    private String name;
    private String password;

    public String execute() throws Exception {
        System.out.println("name=" + name + ";pass=" + password);
        return SUCCESS;
    }
    public String getName() {
        return name;
    }
    public void setName(String name) {
        this.name = name;
    }
    public String getPassword() {
        return password;
    }
    public void setPassword(String password) {
        this.password = password;
    }
}
2.对象驱动
- jsp页面代码
<form action="${pageContext.request.contextPath}/Hello2Action.action">
    用户名:<input type="text" name="user.name"/><br/>
    密码:<input type="text" name="user.password"/><br/>
        <input type="submit" value="提交">
</form>- Action类接收参数代码
public class Hello2Action extends ActionSupport {

    private User user;

    public User getUser() {
        return user;
    }
    public void setUser(User user) {
        this.user = user;
    }

    public String execute() throws Exception {
        System.out.println(user);
        return SUCCESS;
    }
}
3.模型驱动
- jsp页面代码
<form action="${pageContext.request.contextPath}/Hello2Action.action">
    用户名:<input type="text" name="name"/><br/>
    密码:<input type="text" name="password"/><br/>
        <input type="submit" value="提交">
</form>- Action类代码
public class Hello2Action extends ActionSupport implements ModelDriven<User>{

    private User user = new User();

    public String execute() throws Exception {
        System.out.println(user);
        return SUCCESS;
    }
    public User getModel() {
        // TODO Auto-generated method stub
        return user;
    }
}
5.struts2集合类型参数封装
- jsp页面代码
<form
action="${pageContext.request.contextPath}/Hello2Action.action" method="post">
    list:<input type="text" name="list"/><br/>
    list:<input type="text" name="list[3]"/><br/>
    map:<input type="text" name="map['haha']" /><br>
        <input type="submit" value="提交">
</form>- Action类代码
public class Hello2Action extends ActionSupport{

    private List<String> list;
    private Map<String,String> map;

    public List<String> getList() {
        return list;
    }
    public void setList(List<String> list) {
        this.list = list;
    }
    public Map<String, String> getMap() {
        return map;
    }
    public void setMap(Map<String, String> map) {
        this.map = map;
    }

    public String execute() throws Exception {
        System.out.println("list:" + list);
        System.out.println("map:" + map);
        return SUCCESS;
    }
}
6.扩展
1.strutsMVC:filter(c)、Action(m)、Result(v)
2.Action生命周期:
- 每次请求到来时,都会创建一个新的Action实例
- Action是线程安全的.可以使用成员变量接收参数
7.总结
以上就是本人学习的关于struts2参数接收方面个人认为比较重要的知识点了,能力有限,欢迎批评指正,谢谢!