文章目录
在Android9.0 Activity启动流程分析(一)中,我们最终分析到AMS通过zygote启动Activity对应的进程,接下来继续分析。
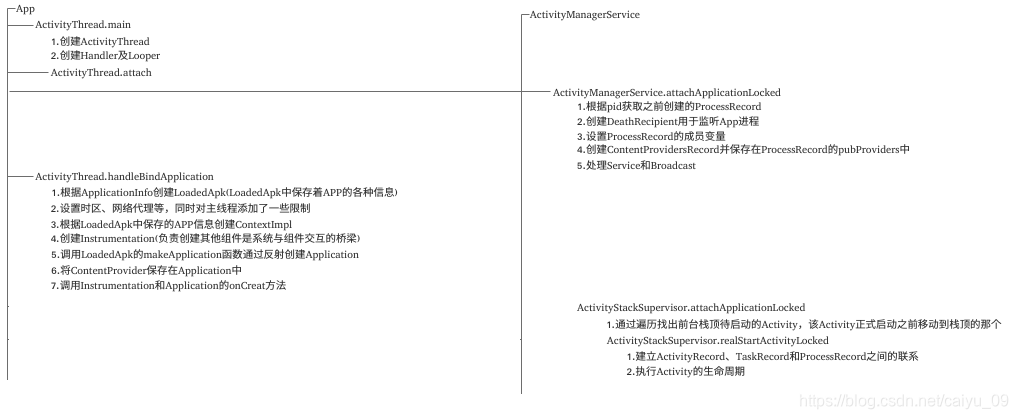
1、ActivityThread的main函数
通过zygote启动进程时,传入的className为android.app.ActivityThread。
因此,当zygote通过反射调用进程的main函数时,ActivityThread的main函数将被调用
// frameworks/base/core/java/android/app/ActivityThread.java
public static void main(String[] args) {
    Trace.traceBegin(Trace.TRACE_TAG_ACTIVITY_MANAGER, "ActivityThreadMain");

    // CloseGuard defaults to true and can be quite spammy.  We
    // disable it here, but selectively enable it later (via
    // StrictMode) on debug builds, but using DropBox, not logs.
    CloseGuard.setEnabled(false);

    Environment.initForCurrentUser();

    // Set the reporter for event logging in libcore
    EventLogger.setReporter(new EventLoggingReporter());

    // Make sure TrustedCertificateStore looks in the right place for CA certificates
    final File configDir = Environment.getUserConfigDirectory(UserHandle.myUserId());
    TrustedCertificateStore.setDefaultUserDirectory(configDir);

    Process.setArgV0("<pre-initialized>");

    //准备主线程的Looper
    Looper.prepareMainLooper();

    // Find the value for {@link #PROC_START_SEQ_IDENT} if provided on the command line.
    // It will be in the format "seq=114"
    long startSeq = 0;
    if (args != null) {
        for (int i = args.length - 1; i >= 0; --i) {
            if (args[i] != null && args[i].startsWith(PROC_START_SEQ_IDENT)) {
                startSeq = Long.parseLong(
                        args[i].substring(PROC_START_SEQ_IDENT.length()));
            }
        }
    }
    // 创建当前进程的ActivityThread
    ActivityThread thread = new ActivityThread();
    //调用attach函数
    thread.attach(false, startSeq);

    if (sMainThreadHandler == null) {
        // 保存进程对应的主线程Handler
        sMainThreadHandler = thread.getHandler();
    }

    if (false) {
        Looper.myLooper().setMessageLogging(new
                LogPrinter(Log.DEBUG, "ActivityThread"));
    }

    // End of event ActivityThreadMain.
    Trace.traceEnd(Trace.TRACE_TAG_ACTIVITY_MANAGER);
    // 进入主线程的消息循环
    Looper.loop();

    throw new RuntimeException("Main thread loop unexpectedly exited");
}
从上述代码可以看出,ActivityThread的main函数最主要工作是:
- 创建出一个Looper,并将主线程加入到消息循环中。
- 创建出ActivityThread,并调用其attach函数。
接下来看ActivityThread的attach函数
// frameworks/base/core/java/android/app/ActivityThread.java
private void attach(boolean system, long startSeq) {
    sCurrentActivityThread = this;
    mSystemThread = system;
    if (!system) {
        ViewRootImpl.addFirstDrawHandler(new Runnable() {
            @Override
            public void run() {
                //JIT-Just in time
                //JIT技术主要是对多次运行的代码进行编译,当再次调用时使用编译之后的机器码,而不是每次都解释,以节约时间
                //JIT原理:
                //每启动一个应用程序,都会相应地启动一个dalvik虚拟机,启动时会建立JIT线程,一直在后台运行。
                //当某段代码被调用时,虚拟机会判断它是否需要编译成机器码,如果需要,就做一个标记。
                //JIT线程在后台检测该标记,如果发现标记被设定,就把对应代码编译成机器码,并将其机器码地址及相关信息保存起来
                //当进程下次执行到此段代码时,就会直接跳到机器码执行,而不再解释执行,从而提高运行速度
                //这里开启JIT,应该是为了提高android绘制的速度
                ensureJitEnabled();
            }
        });
        // 设置在DDMS中看到的进程名为"<pre-initialized>"
        android.ddm.DdmHandleAppName.setAppName("<pre-initialized>",
                                                UserHandle.myUserId());

        //设置RuntimeInit的mApplicationObject参数
        RuntimeInit.setApplicationObject(mAppThread.asBinder());
        final IActivityManager mgr = ActivityManager.getService();
        try {
            // 与AMS通信,调用其attachApplication接口
            mgr.attachApplication(mAppThread, startSeq);
        } catch (RemoteException ex) {
            throw ex.rethrowFromSystemServer();
        }
        // 监控GC操作; 当进程内的一些Activity发生变化,同时内存占用量较大时
        // 通知AMS释放一些Activity
        // Watch for getting close to heap limit.
        BinderInternal.addGcWatcher(new Runnable() {
            @Override public void run() {
                if (!mSomeActivitiesChanged) {
                    return;
                }
                Runtime runtime = Runtime.getRuntime();
                long dalvikMax = runtime.maxMemory();
                long dalvikUsed = runtime.totalMemory() - runtime.freeMemory();
                // 判断内存占用量是否过大
                if (dalvikUsed > ((3*dalvikMax)/4)) {
                    if (DEBUG_MEMORY_TRIM) Slog.d(TAG, "Dalvik max=" + (dalvikMax/1024)
                            + " total=" + (runtime.totalMemory()/1024)
                            + " used=" + (dalvikUsed/1024));
                    mSomeActivitiesChanged = false;
                    try {
                        // 通知AMS释放一些Activity,以缓解内存紧张
                        mgr.releaseSomeActivities(mAppThread);
                    } catch (RemoteException e) {
                        throw e.rethrowFromSystemServer();
                    }
                }
            }
        });
    } else {
        // SystemServer进程为了融入Android体系,调用createSystemContext函数。
        // 在createSystemContext函数中,SystemServer进程创建了自己的ActivityThread,并调用了attach函数。
        // 下面处理的是SystemServer进程
        // Don't set application object here -- if the system crashes,
        // we can't display an alert, we just want to die die die.
        android.ddm.DdmHandleAppName.setAppName("system_process",
                UserHandle.myUserId());
        try {
            mInstrumentation = new Instrumentation();
            mInstrumentation.basicInit(this);
            ContextImpl context = ContextImpl.createAppContext(
                    this, getSystemContext().mPackageInfo);
            mInitialApplication = context.mPackageInfo.makeApplication(true, null);
            mInitialApplication.onCreate();
        } catch (Exception e) {
            throw new RuntimeException(
                    "Unable to instantiate Application():" + e.toString(), e);
        }
    }
    ....
}
2. AMS的attachApplication函数
接下来通过Binder调用AMS的attachApplication函数,我们从应用进程又回到了SystemServer的AMS中.由于该函数比较长我们分段分析。
2.1 Part-I
// frameworks/base/services/core/java/com/android/server/am/ActivityManagerService
public final void attachApplication(IApplicationThread thread, long startSeq) {
    synchronized (this) {
        int callingPid = Binder.getCallingPid();
        final int callingUid = Binder.getCallingUid();
        final long origId = Binder.clearCallingIdentity();
        // 转调用
        attachApplicationLocked(thread, callingPid, callingUid, startSeq);
        Binder.restoreCallingIdentity(origId);
    }
}
----------------------------------------------------------------------------------------------------------------------------------------------------------
private final boolean attachApplicationLocked(IApplicationThread thread,
        int pid, int callingUid, long startSeq) {

    // Find the application record that is being attached...  either via
    // the pid if we are running in multiple processes, or just pull the
    // next app record if we are emulating process with anonymous threads.
    ProcessRecord app;
    long startTime = SystemClock.uptimeMillis();
    if (pid != MY_PID && pid >= 0) {
        synchronized (mPidsSelfLocked) {
            // 根据pid查找对应的ProcessRecord对象
            app = mPidsSelfLocked.get(pid);
        }
    } else {
        app = null;
    }

    // 如果无法根据pid查找到对应的ProcessRecord则从mPendingStarts列表中查找
    // It's possible that process called attachApplication before we got a chance to
    // update the internal state.
    if (app == null && startSeq > 0) {
        final ProcessRecord pending = mPendingStarts.get(startSeq);
        if (pending != null && pending.startUid == callingUid
                && handleProcessStartedLocked(pending, pid, pending.usingWrapper,
                        startSeq, true)) {
            app = pending;
        }
    }

    // 如果进程由AMS启动,则它在AMS中一定有对应的ProcessRecord
    // 此处app为null,则表示AMS没有该进程的记录,故需要kill掉此异常进程
    if (app == null) {
        Slog.w(TAG, "No pending application record for pid " + pid
                + " (IApplicationThread " + thread + "); dropping process");
        EventLog.writeEvent(EventLogTags.AM_DROP_PROCESS, pid);
        if (pid > 0 && pid != MY_PID) {
            killProcessQuiet(pid);
            //TODO: killProcessGroup(app.info.uid, pid);
        } else {
            // pid < 0时,fork进程失败,因此仅上层完成清理工作即可
            // 调用ApplicationThread的scheduleExit函数
            // 应用进程将进行一些扫尾工作,例如结束消息循环,然后退出运行
            try {
                thread.scheduleExit();
            } catch (Exception e) {
                // Ignore exceptions.
            }
        }
        return false;
    }
    // 判断pid对应processRecord的IApplicationThread是否为null
    // AMS创建ProcessRecord后,在attach之前,正常情况下IApplicationThread应该为null
    // 特殊情况下:如果旧应用进程被杀死,底层对应的pid被释放,在通知到达AMS之前(AMS在下面的代码里注册了“讣告”接收对象),
    // 用户又启动了一个新的进程,新进程刚好分配到旧进程的pid时
    // 此处得到的processRecord可能就是旧进程的,于是app.thread可能不为null,因此需要作判断和处理
    // If this application record is still attached to a previous
    // process, clean it up now.
    if (app.thread != null) {
        handleAppDiedLocked(app, true, true);
    }

    // Tell the process all about itself.

    if (DEBUG_ALL) Slog.v(
            TAG, "Binding process pid " + pid + " to record " + app);

    // 创建一个“讣告”接收对象,注册到应用进程的ApplicationThread中
    // 当应用进程退出时,该对象的binderDied将被调用,这样AMS就能做相应的处理
    // binderDied函数将在另一个线程中被调用,其内部也会调用handleAppDiedLocked函数
    final String processName = app.processName;
    try {
        AppDeathRecipient adr = new AppDeathRecipient(
                app, pid, thread);
        thread.asBinder().linkToDeath(adr, 0);
        app.deathRecipient = adr;
    } catch (RemoteException e) {
        app.resetPackageList(mProcessStats);
        startProcessLocked(app, "link fail", processName);
        return false;
    }

    EventLog.writeEvent(EventLogTags.AM_PROC_BOUND, app.userId, app.pid, app.processName);
    // 设置app的一些变量,例如调度优先级和oom_adj相关的成员
    app.makeActive(thread, mProcessStats);
    app.curAdj = app.setAdj = app.verifiedAdj = ProcessList.INVALID_ADJ;
    app.curSchedGroup = app.setSchedGroup = ProcessList.SCHED_GROUP_DEFAULT;
    app.forcingToImportant = null;
    updateProcessForegroundLocked(app, false, false);
    app.hasShownUi = false;
    app.debugging = false;
    app.cached = false;
    app.killedByAm = false;
    app.killed = false;


    // We carefully use the same state that PackageManager uses for
    // filtering, since we use this flag to decide if we need to install
    // providers when user is unlocked later
    app.unlocked = StorageManager.isUserKeyUnlocked(app.userId);

    mHandler.removeMessages(PROC_START_TIMEOUT_MSG, app);
至此,attachApplicationLocked的第一部分介绍完毕。
这部分代码的核心功能比较简单,其实就是:
1. 判断进程的有效性,同时注册观察者监听进程的死亡信号。
2. 设置pid对应的ProcessRecord对象的一些成员变量,例如和应用进程交互的IApplicationThread对象、进程调度的优先级等。
2.2 Part-II
下面我们看看attachApplicationLocked第二部分的代码:
    // frameworks/base/services/core/java/com/android/server/am/ActivityManagerService
    // AMS正常启动后,mProcessesReady就已经变为true了
    boolean normalMode = mProcessesReady || isAllowedWhileBooting(app.info);

    // generateApplicationProvidersLocked将通过PKMS查询定义在进程中的ContentProvider,并将其保存在AMS的数据结构中
    List<ProviderInfo> providers = normalMode ? generateApplicationProvidersLocked(app) : null;

    //这里应该是处理:加载ContentProvider时,启动进程的场景
    //checkAppInLaunchingProvidersLocked主要将当前启动进程的ProcessRecord,和AMS中mLaunchingProviders的ProcessRecord进行比较
    //当判断出该进程是由于启动ContentProvider而被加载的,那么就发送一个延迟消息(10s)
    //通过这里可以看出,当由于加载ContentProvider启动进程时,在进程启动后,ContentProvider在10s内要完成发布
    if (providers != null && checkAppInLaunchingProvidersLocked(app)) {
        Message msg = mHandler.obtainMessage(CONTENT_PROVIDER_PUBLISH_TIMEOUT_MSG);
        msg.obj = app;
        mHandler.sendMessageDelayed(msg, CONTENT_PROVIDER_PUBLISH_TIMEOUT);
    }

    checkTime(startTime, "attachApplicationLocked: before bindApplication");

    // 获取App的信息,准备bindApplication的参数
    ...

        if (app.isolatedEntryPoint != null) {
            // This is an isolated process which should just call an entry point instead of
            // being bound to an application.
            thread.runIsolatedEntryPoint(app.isolatedEntryPoint, app.isolatedEntryPointArgs);
        } else if (app.instr != null) {
            // 回调进程ApplicationThread的bindApplication接口
            thread.bindApplication(processName, appInfo, providers,
                    app.instr.mClass,
                    profilerInfo, app.instr.mArguments,
                    app.instr.mWatcher,
                    app.instr.mUiAutomationConnection, testMode,
                    mBinderTransactionTrackingEnabled, enableTrackAllocation,
                    isRestrictedBackupMode || !normalMode, app.persistent,
                    new Configuration(getGlobalConfiguration()), app.compat,
                    getCommonServicesLocked(app.isolated),
                    mCoreSettingsObserver.getCoreSettingsLocked(),
                    buildSerial, isAutofillCompatEnabled);
        } else {
            thread.bindApplication(processName, appInfo, providers, null, profilerInfo,
                    null, null, null, testMode,
                    mBinderTransactionTrackingEnabled, enableTrackAllocation,
                    isRestrictedBackupMode || !normalMode, app.persistent,
                    new Configuration(getGlobalConfiguration()), app.compat,
                    getCommonServicesLocked(app.isolated),
                    mCoreSettingsObserver.getCoreSettingsLocked(),
                    buildSerial, isAutofillCompatEnabled);
        }
        if (profilerInfo != null) {
            profilerInfo.closeFd();
            profilerInfo = null;
        }
        checkTime(startTime, "attachApplicationLocked: immediately after bindApplication");
        // 更新进程调度策略
        updateLruProcessLocked(app, false, null);
        checkTime(startTime, "attachApplicationLocked: after updateLruProcessLocked");
        app.lastRequestedGc = app.lastLowMemory = SystemClock.uptimeMillis();
    } catch (Exception e) {
        ...
    }
从代码来看,第二阶段最核心工作就是:
调用进程ApplicationThread的bindApplication函数,接下来我们分析一下该函数。
2.2.1 ApplicationThread的bindApplication函数
从之前的代码,我们知道应用进程由zygote fork得到,然后调用ActivityThread的main函数,进入到Java世界。在Process.java通知zygote fork进程的时候并没有包含任何与Activity相关的信息,也就是说该进程并没有融入到Android的体系中,因此仅能被称为一个Java进程,甚至连进程名也只是“敷衍”地定义为“pre-initialized”。
此处的bindApplication函数,就是在新进程中创建并初始化对应的Android运行环境。
现在,我们看看bindApplication函数的主要流程:
// frameworks/base/core/java/android/app/ActivityThread.java
public final void bindApplication(String processName, ApplicationInfo appInfo,
      List<ProviderInfo> providers, ComponentName instrumentationName,
      ProfilerInfo profilerInfo, Bundle instrumentationArgs,
      IInstrumentationWatcher instrumentationWatcher,
      IUiAutomationConnection instrumentationUiConnection, int debugMode,
      boolean enableBinderTracking, boolean trackAllocation,
      boolean isRestrictedBackupMode, boolean persistent, Configuration config,
      CompatibilityInfo compatInfo, Map services, Bundle coreSettings,
      String buildSerial, boolean autofillCompatibilityEnabled) {

  // 按照string-IBinder的方式,保存AMS传递过来的系统service的Binder接口
  // 这样进程与系统服务通信时,就不需要先通过SystemServer查询了
  if (services != null) {
      ...

      // Setup the service cache in the ServiceManager
      ServiceManager.initServiceCache(services);
  }

  // 内部发送H.SET_CORE_SETTINGS消息
  // 由handleSetCoreSettings进行处理,主要用于保存新的信息
  setCoreSettings(coreSettings);

  // 用AppBindData对象保存参数对应的信息
  AppBindData data = new AppBindData();
  data.processName = processName;
  data.appInfo = appInfo;
  data.providers = providers;
  data.instrumentationName = instrumentationName;
  ...
  // 发送消息
  sendMessage(H.BIND_APPLICATION, data);
}
由以上代码可知,ActivityThread的接口被AMS调用后,会将参数保存到AppBindData对象中,然后发送消息让ActivityThread的主线程处理。ActivityThread中处理该消息的实际函数为handleBindApplication,我们看看这个函数的内容。
// frameworks/base/core/java/android/app/ActivityThread.java
private void handleBindApplication(AppBindData data) {
    // Register the UI Thread as a sensitive thread to the runtime.
    VMRuntime.registerSensitiveThread();
    ...
    // app配置相关
    mConfiguration = new Configuration(data.config);
    mCompatConfiguration = new Configuration(data.config);

    // 初始化性能统计对象
    mProfiler = new Profiler();
    String agent = null;
    if (data.initProfilerInfo != null) {
        mProfiler.profileFile = data.initProfilerInfo.profileFile;
        mProfiler.profileFd = data.initProfilerInfo.profileFd;
        mProfiler.samplingInterval = data.initProfilerInfo.samplingInterval;
        mProfiler.autoStopProfiler = data.initProfilerInfo.autoStopProfiler;
        mProfiler.streamingOutput = data.initProfilerInfo.streamingOutput;
        if (data.initProfilerInfo.attachAgentDuringBind) {
            agent = data.initProfilerInfo.agent;
        }
    }

    // 重新设置进程名,并修改DDMS中的名称
    // send up app name; do this *before* waiting for debugger
    Process.setArgV0(data.processName);
    android.ddm.DdmHandleAppName.setAppName(data.processName,
                                            UserHandle.myUserId());
    VMRuntime.setProcessPackageName(data.appInfo.packageName);

    // 启动性能统计
    if (mProfiler.profileFd != null) {
        mProfiler.startProfiling();
    }

    // If the app is Honeycomb MR1 or earlier, switch its AsyncTask
    // implementation to use the pool executor.  Normally, we use the
    // serialized executor as the default. This has to happen in the
    // main thread so the main looper is set right.
    if (data.appInfo.targetSdkVersion <= android.os.Build.VERSION_CODES.HONEYCOMB_MR1) {
        AsyncTask.setDefaultExecutor(AsyncTask.THREAD_POOL_EXECUTOR);
    }

    Message.updateCheckRecycle(data.appInfo.targetSdkVersion);

    // Prior to P, internal calls to decode Bitmaps used BitmapFactory,
    // which may scale up to account for density. In P, we switched to
    // ImageDecoder, which skips the upscale to save memory. ImageDecoder
    // needs to still scale up in older apps, in case they rely on the
    // size of the Bitmap without considering its density.
    ImageDecoder.sApiLevel = data.appInfo.targetSdkVersion;

    /*
     * Before spawning a new process, reset the time zone to be the system time zone.
     * This needs to be done because the system time zone could have changed after the
     * the spawning of this process. Without doing this this process would have the incorrect
     * system time zone.
     */
    TimeZone.setDefault(null);

    /*
     * Set the LocaleList. This may change once we create the App Context.
     */
    LocaleList.setDefault(data.config.getLocales());

    // 更新资源和兼容性相关的配置
    synchronized (mResourcesManager) {
        /*
         * Update the system configuration since its preloaded and might not
         * reflect configuration changes. The configuration object passed
         * in AppBindData can be safely assumed to be up to date
         */
        mResourcesManager.applyConfigurationToResourcesLocked(data.config, data.compatInfo);
        mCurDefaultDisplayDpi = data.config.densityDpi;

        // This calls mResourcesManager so keep it within the synchronized block.
        applyCompatConfiguration(mCurDefaultDisplayDpi);
    }

     // 根据传递过来的ApplicationInfo创建一个对应的LoadedApk对象
    data.info = getPackageInfoNoCheck(data.appInfo, data.compatInfo);

    if (agent != null) {
        handleAttachAgent(agent, data.info);
    }

    // 如果没有设置屏幕密度,则为Bitmap设置默认的屏幕密度
    /**
     * Switch this process to density compatibility mode if needed.
     */
    if ((data.appInfo.flags&ApplicationInfo.FLAG_SUPPORTS_SCREEN_DENSITIES)
            == 0) {
        mDensityCompatMode = true;
        Bitmap.setDefaultDensity(DisplayMetrics.DENSITY_DEFAULT);
    }
    updateDefaultDensity();

    // 设置时间模式
    final String use24HourSetting = mCoreSettings.getString(Settings.System.TIME_12_24);
    Boolean is24Hr = null;
    if (use24HourSetting != null) {
        is24Hr = "24".equals(use24HourSetting) ? Boolean.TRUE : Boolean.FALSE;
    }
    // null : use locale default for 12/24 hour formatting,
    // false : use 12 hour format,
    // true : use 24 hour format.
    DateFormat.set24HourTimePref(is24Hr);

    // App 调试相关
    ....

    // 设置网络代理
    /**
     * Initialize the default http proxy in this process for the reasons we set the time zone.
     */
    Trace.traceBegin(Trace.TRACE_TAG_ACTIVITY_MANAGER, "Setup proxies");
    final IBinder b = ServiceManager.getService(Context.CONNECTIVITY_SERVICE);
    if (b != null) {
        // In pre-boot mode (doing initial launch to collect password), not
        // all system is up.  This includes the connectivity service, so don't
        // crash if we can't get it.
        final IConnectivityManager service = IConnectivityManager.Stub.asInterface(b);
        try {
            final ProxyInfo proxyInfo = service.getProxyForNetwork(null);
            Proxy.setHttpProxySystemProperty(proxyInfo);
        } catch (RemoteException e) {
            Trace.traceEnd(Trace.TRACE_TAG_ACTIVITY_MANAGER);
            throw e.rethrowFromSystemServer();
        }
    }
    Trace.traceEnd(Trace.TRACE_TAG_ACTIVITY_MANAGER);

    // 如果启动App是指定了ComponentName则在此处创建Instrumentation,Instrumentation用于创建其他组件,他是系统与组件交互的桥梁
    // Instrumentation info affects the class loader, so load it before
    // setting up the app context.
    final InstrumentationInfo ii;
    if (data.instrumentationName != null) {
        try {
            ii = new ApplicationPackageManager(null, getPackageManager())
                    .getInstrumentationInfo(data.instrumentationName, 0);
        } catch (PackageManager.NameNotFoundException e) {
            throw new RuntimeException(
                    "Unable to find instrumentation info for: " + data.instrumentationName);
        }

        // Warn of potential ABI mismatches.
        if (!Objects.equals(data.appInfo.primaryCpuAbi, ii.primaryCpuAbi)
                || !Objects.equals(data.appInfo.secondaryCpuAbi, ii.secondaryCpuAbi)) {
            Slog.w(TAG, "Package uses different ABI(s) than its instrumentation: "
                    + "package[" + data.appInfo.packageName + "]: "
                    + data.appInfo.primaryCpuAbi + ", " + data.appInfo.secondaryCpuAbi
                    + " instrumentation[" + ii.packageName + "]: "
                    + ii.primaryCpuAbi + ", " + ii.secondaryCpuAbi);
        }

        mInstrumentationPackageName = ii.packageName;
        mInstrumentationAppDir = ii.sourceDir;
        mInstrumentationSplitAppDirs = ii.splitSourceDirs;
        mInstrumentationLibDir = getInstrumentationLibrary(data.appInfo, ii);
        mInstrumentedAppDir = data.info.getAppDir();
        mInstrumentedSplitAppDirs = data.info.getSplitAppDirs();
        mInstrumentedLibDir = data.info.getLibDir();
    } else {
        ii = null;
    }
    // 创建出进程读应的Android运行环境
    final ContextImpl appContext = ContextImpl.createAppContext(this, data.info);
    updateLocaleListFromAppContext(appContext,
            mResourcesManager.getConfiguration().getLocales());

    ....

    // 如果上面创建了instrumentation则此处继续配置mInstrumentation,如果没有创建则此处新建一个instrumentation
    // Continue loading instrumentation.
    if (ii != null) {
        ApplicationInfo instrApp;
        try {
            instrApp = getPackageManager().getApplicationInfo(ii.packageName, 0,
                    UserHandle.myUserId());
        } catch (RemoteException e) {
            instrApp = null;
        }
        if (instrApp == null) {
            instrApp = new ApplicationInfo();
        }
        ii.copyTo(instrApp);
        instrApp.initForUser(UserHandle.myUserId());
        final LoadedApk pi = getPackageInfo(instrApp, data.compatInfo,
                appContext.getClassLoader(), false, true, false);
        final ContextImpl instrContext = ContextImpl.createAppContext(this, pi);

        try {
            final ClassLoader cl = instrContext.getClassLoader();
            mInstrumentation = (Instrumentation)
                cl.loadClass(data.instrumentationName.getClassName()).newInstance();
        } catch (Exception e) {
            throw new RuntimeException(
                "Unable to instantiate instrumentation "
                + data.instrumentationName + ": " + e.toString(), e);
        }

        final ComponentName component = new ComponentName(ii.packageName, ii.name);
        mInstrumentation.init(this, instrContext, appContext, component,
                data.instrumentationWatcher, data.instrumentationUiAutomationConnection);

        if (mProfiler.profileFile != null && !ii.handleProfiling
                && mProfiler.profileFd == null) {
            mProfiler.handlingProfiling = true;
            final File file = new File(mProfiler.profileFile);
            file.getParentFile().mkdirs();
            Debug.startMethodTracing(file.toString(), 8 * 1024 * 1024);
        }
    } else {
        mInstrumentation = new Instrumentation();
        mInstrumentation.basicInit(this);
    }

    // 如果package中声明了FLAG_LARGE_HEAP,则可跳出虚拟机对内存限制
    if ((data.appInfo.flags&ApplicationInfo.FLAG_LARGE_HEAP) != 0) {
        dalvik.system.VMRuntime.getRuntime().clearGrowthLimit();
    } else {
        // Small heap, clamp to the current growth limit and let the heap release
        // pages after the growth limit to the non growth limit capacity. b/18387825
        dalvik.system.VMRuntime.getRuntime().clampGrowthLimit();
    }

    // Allow disk access during application and provider setup. This could
    // block processing ordered broadcasts, but later processing would
    // probably end up doing the same disk access.
    Application app;
    final StrictMode.ThreadPolicy savedPolicy = StrictMode.allowThreadDiskWrites();
    final StrictMode.ThreadPolicy writesAllowedPolicy = StrictMode.getThreadPolicy();
    try {
        // 利用LoadedApk的makeApplication函数,通过反射创建出Application
        // If the app is being launched for full backup or restore, bring it up in
        // a restricted environment with the base application class.
        app = data.info.makeApplication(data.restrictedBackupMode, null);

        // Propagate autofill compat state
        app.setAutofillCompatibilityEnabled(data.autofillCompatibilityEnabled);

        mInitialApplication = app;

        // don't bring up providers in restricted mode; they may depend on the
        // app's custom Application class
        if (!data.restrictedBackupMode) {
            if (!ArrayUtils.isEmpty(data.providers)) {
                // 加载进程对应Package中携带的ContentProvider
                installContentProviders(app, data.providers);
                // For process that contains content providers, we want to
                // ensure that the JIT is enabled "at some point".
                mH.sendEmptyMessageDelayed(H.ENABLE_JIT, 10*1000);
            }
        }

        // 调用Instrumentation的onCreate函数
        // Do this after providers, since instrumentation tests generally start their
        // test thread at this point, and we don't want that racing.
        try {
            mInstrumentation.onCreate(data.instrumentationArgs);
        }
        catch (Exception e) {
            throw new RuntimeException(
                "Exception thrown in onCreate() of "
                + data.instrumentationName + ": " + e.toString(), e);
        }
        try {
            // 调用Application的onCreate函数,完成一些初始化工作
            mInstrumentation.callApplicationOnCreate(app);
        } catch (Exception e) {
            if (!mInstrumentation.onException(app, e)) {
                throw new RuntimeException(
                  "Unable to create application " + app.getClass().getName()
                  + ": " + e.toString(), e);
            }
        }
    } finally {
        // If the app targets < O-MR1, or doesn't change the thread policy
        // during startup, clobber the policy to maintain behavior of b/36951662
        if (data.appInfo.targetSdkVersion < Build.VERSION_CODES.O_MR1
                || StrictMode.getThreadPolicy().equals(writesAllowedPolicy)) {
            StrictMode.setThreadPolicy(savedPolicy);
        }
    }

    // 加载文字资源
    // Preload fonts resources
    FontsContract.setApplicationContextForResources(appContext);
    if (!Process.isIsolated()) {
        try {
            final ApplicationInfo info =
                    getPackageManager().getApplicationInfo(
                            data.appInfo.packageName,
                            PackageManager.GET_META_DATA /*flags*/,
                            UserHandle.myUserId());
            if (info.metaData != null) {
                final int preloadedFontsResource = info.metaData.getInt(
                        ApplicationInfo.METADATA_PRELOADED_FONTS, 0);
                if (preloadedFontsResource != 0) {
                    data.info.getResources().preloadFonts(preloadedFontsResource);
                }
            }
        } catch (RemoteException e) {
            throw e.rethrowFromSystemServer();
        }
    }
}
如上文所述,handleBindApplication的目的是让一个Java进程融入到Android体系中。
因此,该函数中的代码主要进行以下工作:
- 按照Android的要求,完成对进程基本参数的设置置,包括设置进程名、时区、资源及兼容性配置;
- 创建进程对应的ContextImpl、LoadedApk、Application等对象,同时加载Application中的ContentProvider,并初始化Application。
当完成上述工作后,新建的进程终于加入到了Android体系。
2.3 Part-III
前面AMS中的attachApplicationLocked函数还没有分析完,接下来我们回头继续分析attachApplicationLocked函数的第三部分
  // frameworks/base/services/core/java/com/android/server/am/ActivityManagerService.java
  // 进程已经启动,从一些列表中移除对应的记录
  // Remove this record from the list of starting applications.
  mPersistentStartingProcesses.remove(app);
  if (DEBUG_PROCESSES && mProcessesOnHold.contains(app)) Slog.v(TAG_PROCESSES,
          "Attach application locked removing on hold: " + app);
  mProcessesOnHold.remove(app);

  boolean badApp = false;
  boolean didSomething = false;

  // See if the top visible activity is waiting to run in this process...
  if (normalMode) {
      try {
          // 启动Activity
          if (mStackSupervisor.attachApplicationLocked(app)) {
              didSomething = true;
          }
      } catch (Exception e) {
          Slog.wtf(TAG, "Exception thrown launching activities in " + app, e);
          badApp = true;
      }
  }

  // Find any services that should be running in this process...
  if (!badApp) {
      try {
          // 启动因目标进程还未启动,而处于等待状态的service
          didSomething |= mServices.attachApplicationLocked(app, processName);
          checkTime(startTime, "attachApplicationLocked: after mServices.attachApplicationLocked");
      } catch (Exception e) {
          Slog.wtf(TAG, "Exception thrown starting services in " + app, e);
          badApp = true;
      }
  }

  // Check if a next-broadcast receiver is in this process...
  if (!badApp && isPendingBroadcastProcessLocked(pid)) {
      try {
          // 发送因目标进程还未启动,而处于等待状态的Broadcast
          didSomething |= sendPendingBroadcastsLocked(app);
          checkTime(startTime, "attachApplicationLocked: after sendPendingBroadcastsLocked");
      } catch (Exception e) {
          // If the app died trying to launch the receiver we declare it 'bad'
          Slog.wtf(TAG, "Exception thrown dispatching broadcasts in " + app, e);
          badApp = true;
      }
  }

  // Check whether the next backup agent is in this process...
  if (!badApp && mBackupTarget != null && mBackupTarget.app == app) {
      if (DEBUG_BACKUP) Slog.v(TAG_BACKUP,
              "New app is backup target, launching agent for " + app);
      notifyPackageUse(mBackupTarget.appInfo.packageName,
                       PackageManager.NOTIFY_PACKAGE_USE_BACKUP);
      try {
          // 启动backup Agent
          thread.scheduleCreateBackupAgent(mBackupTarget.appInfo,
                  compatibilityInfoForPackageLocked(mBackupTarget.appInfo),
                  mBackupTarget.backupMode);
      } catch (Exception e) {
          Slog.wtf(TAG, "Exception thrown creating backup agent in " + app, e);
          badApp = true;
      }
  }

  if (badApp) {
      // 如果以上组件启动出错,则需要杀死进程并移除记录
      app.kill("error during init", true);
      handleAppDiedLocked(app, false, true);
      return false;
  }

  if (!didSomething) {
      // 调整进程的oom_adj值, oom_adj相当于一种优先级
      // 如果应用进程没有运行任何组件,那么当内存出现不足时,该进程是最先被系统“杀死”
      // 反之,进程中运行的组件越多,则越不容易被“杀死”
      updateOomAdjLocked();
      checkTime(startTime, "attachApplicationLocked: after updateOomAdjLocked");
  }

  return true;
}
这段代码比较好理解,主要功能就是启动新建进程中运行的Activity、Service等组件。这里我们主要关注一下Activity的启动过程,所以我们跟进定义于ActivityStackSupervisor中的attachApplicationLocked函数:
// frameworks/base/services/core/java/com/android/server/am/ActivityStackSupervisor.java
boolean attachApplicationLocked(ProcessRecord app) throws RemoteException {
    final String processName = app.processName;
    boolean didSomething = false;
    // ActivityStackSupervisor维护着终端中所有Activity和Task之间的关系
    // 此处通过轮寻,找出前台栈顶端的待启动Activity
    for (int displayNdx = mActivityDisplays.size() - 1; displayNdx >= 0; --displayNdx) {
        final ActivityDisplay display = mActivityDisplays.valueAt(displayNdx);
        for (int stackNdx = display.getChildCount() - 1; stackNdx >= 0; --stackNdx) {
            final ActivityStack stack = display.getChildAt(stackNdx);
            if (!isFocusedStack(stack)) {
                continue;
            }
            stack.getAllRunningVisibleActivitiesLocked(mTmpActivityList);
            final ActivityRecord top = stack.topRunningActivityLocked();
            final int size = mTmpActivityList.size();
            for (int i = 0; i < size; i++) {
                final ActivityRecord activity = mTmpActivityList.get(i);
                // 前台待启动的Activity与当前新建的进程一致时,启动这个Activity
                if (activity.app == null && app.uid == activity.info.applicationInfo.uid
                        && processName.equals(activity.processName)) {
                    try {
                        // realStartActivityLocked进行实际的启动工作
                        if (realStartActivityLocked(activity, app,
                                top == activity /* andResume */, true /* checkConfig */)) {
                            didSomething = true;
                        }
                    } catch (RemoteException e) {
                        Slog.w(TAG, "Exception in new application when starting activity "
                                + top.intent.getComponent().flattenToShortString(), e);
                        throw e;
                    }
                }
            }
        }
    }
    if (!didSomething) {
        ensureActivitiesVisibleLocked(null, 0, !PRESERVE_WINDOWS);
    }
    return didSomething;
}
通过这段代码,我们终于明白了Android9.0 Activity启动流程分析(一)中的流程,为什么要花大力气先将待启动的Activity的Task移动到前台,并且要将该Activity移动到栈顶。毕竟,在创建新进程时,无法将待启动Activity的信息一并传递给新进程(进程刚创建时,并没有加入到Android体系),因此新进程被创建后,无法知道需要创建的Activity。于是,上面的代码就规定:如果前台栈顶Activity对应的进程信息,与新启动的进程相互吻合时,该进程就需要启动该Activity。
// frameworks/base/services/core/java/com/android/server/am/ActivityStackSupervisor.java
final boolean realStartActivityLocked(ActivityRecord r, ProcessRecord app,
        boolean andResume, boolean checkConfig) throws RemoteException {

    if (!allPausedActivitiesComplete()) {
        // While there are activities pausing we skipping starting any new activities until
        // pauses are complete. NOTE: that we also do this for activities that are starting in
        // the paused state because they will first be resumed then paused on the client side.
        if (DEBUG_SWITCH || DEBUG_PAUSE || DEBUG_STATES) Slog.v(TAG_PAUSE,
                "realStartActivityLocked: Skipping start of r=" + r
                + " some activities pausing...");
        return false;
    }

    final TaskRecord task = r.getTask();
    final ActivityStack stack = task.getStack();

    beginDeferResume();

    try {
        r.startFreezingScreenLocked(app, 0);

        // schedule launch ticks to collect information about slow apps.
        r.startLaunchTickingLocked();
        // 将ProcessRecord和ActivityRecord和TaskRecord关联
        r.setProcess(app);

        if (getKeyguardController().isKeyguardLocked()) {
            r.notifyUnknownVisibilityLaunched();
        }

        // Have the window manager re-evaluate the orientation of the screen based on the new
        // activity order.  Note that as a result of this, it can call back into the activity
        // manager with a new orientation.  We don't care about that, because the activity is
        // not currently running so we are just restarting it anyway.
        if (checkConfig) {
            // AMS更新绘制相关的配置信息
            // Deferring resume here because we're going to launch new activity shortly.
            // We don't want to perform a redundant launch of the same record while ensuring
            // configurations and trying to resume top activity of focused stack.
            ensureVisibilityAndConfig(r, r.getDisplayId(),
                    false /* markFrozenIfConfigChanged */, true /* deferResume */);
        }

        if (r.getStack().checkKeyguardVisibility(r, true /* shouldBeVisible */,
                true /* isTop */)) {
            // 为显示做准备
            // We only set the visibility to true if the activity is allowed to be visible
            // based on
            // keyguard state. This avoids setting this into motion in window manager that is
            // later cancelled due to later calls to ensure visible activities that set
            // visibility back to false.
            r.setVisibility(true);
        }

        final int applicationInfoUid =
                (r.info.applicationInfo != null) ? r.info.applicationInfo.uid : -1;
        if ((r.userId != app.userId) || (r.appInfo.uid != applicationInfoUid)) {
            Slog.wtf(TAG,
                    "User ID for activity changing for " + r
                            + " appInfo.uid=" + r.appInfo.uid
                            + " info.ai.uid=" + applicationInfoUid
                            + " old=" + r.app + " new=" + app);
        }

        app.waitingToKill = null;
        r.launchCount++;
        r.lastLaunchTime = SystemClock.uptimeMillis();

        if (DEBUG_ALL) Slog.v(TAG, "Launching: " + r);
        // 将待启动Activity对应ActivityRecord加入到进程中保存
        int idx = app.activities.indexOf(r);
        if (idx < 0) {
            app.activities.add(r);
        }
        // 更新优先级
        mService.updateLruProcessLocked(app, true, null);
        mService.updateOomAdjLocked();

        final LockTaskController lockTaskController = mService.getLockTaskController();
        if (task.mLockTaskAuth == LOCK_TASK_AUTH_LAUNCHABLE
                || task.mLockTaskAuth == LOCK_TASK_AUTH_LAUNCHABLE_PRIV
                || (task.mLockTaskAuth == LOCK_TASK_AUTH_WHITELISTED
                        && lockTaskController.getLockTaskModeState()
                                == LOCK_TASK_MODE_LOCKED)) {
            lockTaskController.startLockTaskMode(task, false, 0 /* blank UID */);
        }

        try {
            if (app.thread == null) {
                throw new RemoteException();
            }
            List<ResultInfo> results = null;
            List<ReferrerIntent> newIntents = null;
            if (andResume) {
                // We don't need to deliver new intents and/or set results if activity is going
                // to pause immediately after launch.
                results = r.results;
                newIntents = r.newIntents;
            }
            if (DEBUG_SWITCH) Slog.v(TAG_SWITCH,
                    "Launching: " + r + " icicle=" + r.icicle + " with results=" + results
                            + " newIntents=" + newIntents + " andResume=" + andResume);
            EventLog.writeEvent(EventLogTags.AM_RESTART_ACTIVITY, r.userId,
                    System.identityHashCode(r), task.taskId, r.shortComponentName);
            if (r.isActivityTypeHome()) {
                // Home process is the root process of the task.
                mService.mHomeProcess = task.mActivities.get(0).app;
            }
            mService.notifyPackageUse(r.intent.getComponent().getPackageName(),
                    PackageManager.NOTIFY_PACKAGE_USE_ACTIVITY);
            r.sleeping = false;
            r.forceNewConfig = false;
            mService.getAppWarningsLocked().onStartActivity(r);
            mService.showAskCompatModeDialogLocked(r);
            r.compat = mService.compatibilityInfoForPackageLocked(r.info.applicationInfo);
            ProfilerInfo profilerInfo = null;
            if (mService.mProfileApp != null && mService.mProfileApp.equals(app.processName)) {
                if (mService.mProfileProc == null || mService.mProfileProc == app) {
                    mService.mProfileProc = app;
                    ProfilerInfo profilerInfoSvc = mService.mProfilerInfo;
                    if (profilerInfoSvc != null && profilerInfoSvc.profileFile != null) {
                        if (profilerInfoSvc.profileFd != null) {
                            try {
                                profilerInfoSvc.profileFd = profilerInfoSvc.profileFd.dup();
                            } catch (IOException e) {
                                profilerInfoSvc.closeFd();
                            }
                        }

                        profilerInfo = new ProfilerInfo(profilerInfoSvc);
                    }
                }
            }

            app.hasShownUi = true;
            app.pendingUiClean = true;
            app.forceProcessStateUpTo(mService.mTopProcessState);
            // Because we could be starting an Activity in the system process this may not go
            // across a Binder interface which would create a new Configuration. Consequently
            // we have to always create a new Configuration here.

            final MergedConfiguration mergedConfiguration = new MergedConfiguration(
                    mService.getGlobalConfiguration(), r.getMergedOverrideConfiguration());
            r.setLastReportedConfiguration(mergedConfiguration);

            logIfTransactionTooLarge(r.intent, r.icicle);


            // Create activity launch transaction.
            final ClientTransaction clientTransaction = ClientTransaction.obtain(app.thread,
                    r.appToken);
            clientTransaction.addCallback(LaunchActivityItem.obtain(new Intent(r.intent),
                    System.identityHashCode(r), r.info,
                    // TODO: Have this take the merged configuration instead of separate global
                    // and override configs.
                    mergedConfiguration.getGlobalConfiguration(),
                    mergedConfiguration.getOverrideConfiguration(), r.compat,
                    r.launchedFromPackage, task.voiceInteractor, app.repProcState, r.icicle,
                    r.persistentState, results, newIntents, mService.isNextTransitionForward(),
                    profilerInfo));
            // 下面开始执行Activity的生命周期
            // Set desired final state.
            final ActivityLifecycleItem lifecycleItem;
            if (andResume) {
                lifecycleItem = ResumeActivityItem.obtain(mService.isNextTransitionForward());
            } else {
                lifecycleItem = PauseActivityItem.obtain();
            }
            clientTransaction.setLifecycleStateRequest(lifecycleItem);

            // 获得ClientLiftCycleManager对象并调用其scheduleTransaction方法
            // Schedule transaction.
            mService.getLifecycleManager().scheduleTransaction(clientTransaction);


            if ((app.info.privateFlags & ApplicationInfo.PRIVATE_FLAG_CANT_SAVE_STATE) != 0
                    && mService.mHasHeavyWeightFeature) {
                // 处理heavy-weight进程的情况
                // This may be a heavy-weight process!  Note that the package
                // manager will ensure that only activity can run in the main
                // process of the .apk, which is the only thing that will be
                // considered heavy-weight.
                if (app.processName.equals(app.info.packageName)) {
                    if (mService.mHeavyWeightProcess != null
                            && mService.mHeavyWeightProcess != app) {
                        Slog.w(TAG, "Starting new heavy weight process " + app
                                + " when already running "
                                + mService.mHeavyWeightProcess);
                    }
                    mService.mHeavyWeightProcess = app;
                    Message msg = mService.mHandler.obtainMessage(
                            ActivityManagerService.POST_HEAVY_NOTIFICATION_MSG);
                    msg.obj = r;
                    mService.mHandler.sendMessage(msg);
                }
            }

        } catch (RemoteException e) {
            if (r.launchFailed) {
                // 从代码来看,第二次启动失败,才会将ActivityRecord中的launchFailed置为true
                // This is the second time we failed -- finish activity
                // and give up.
                Slog.e(TAG, "Second failure launching "
                        + r.intent.getComponent().flattenToShortString()
                        + ", giving up", e);
                mService.appDiedLocked(app);
                stack.requestFinishActivityLocked(r.appToken, Activity.RESULT_CANCELED, null,
                        "2nd-crash", false);
                return false;
            }

            // This is the first time we failed -- restart process and
            // retry.
            r.launchFailed = true;
            app.activities.remove(r);
            throw e;
        }
    } finally {
        endDeferResume();
    }

    r.launchFailed = false;
    if (stack.updateLRUListLocked(r)) {
        Slog.w(TAG, "Activity " + r + " being launched, but already in LRU list");
    }

    // TODO(lifecycler): Resume or pause requests are done as part of launch transaction,
    // so updating the state should be done accordingly.
    if (andResume && readyToResume()) {
        // Activity进入resumeState后,更新相应的状态
        // As part of the process of launching, ActivityThread also performs
        // a resume.
        stack.minimalResumeActivityLocked(r);
    } else {
        // This activity is not starting in the resumed state... which should look like we asked
        // it to pause+stop (but remain visible), and it has done so and reported back the
        // current icicle and other state.
        if (DEBUG_STATES) Slog.v(TAG_STATES,
                "Moving to PAUSED: " + r + " (starting in paused state)");
        r.setState(PAUSED, "realStartActivityLocked");
    }

    // Launch the new version setup screen if needed.  We do this -after-
    // launching the initial activity (that is, home), so that it can have
    // a chance to initialize itself while in the background, making the
    // switch back to it faster and look better.
    if (isFocusedStack(stack)) {
        // 启动系统设置向导对应的Activity,当系统更新或初次使用时需要配置
        mService.getActivityStartController().startSetupActivity();
    }

    // Update any services we are bound to that might care about whether
    // their client may have activities.
    if (r.app != null) {
        mService.mServices.updateServiceConnectionActivitiesLocked(r.app);
    }

    return true;
}
从上面的代码可以看出,realStartActivityLocked函数主要工作包括:
1、进一步配置ActivityRecord和ProcessRecord;
2、使用ClientLiftCycleManager,通知应用进程执行Activity的生命周期;
3、在Activity启动后,AMS调用ActivityStack的minimalResumeActivityLocked更新Activity
的相应的状态。
到目前为止我们已经创建了APP进程,并完成对进程基本参数的设置置,包括设置进程名、时区、资源及兼容性配置等;之后我们又创建了ContextImpl、LoadedApk、Application等对象,同时加载Application中的ContentProvider,并初始化Application。让一个Java进程融入到Android体系中。
最后调用realStartActivityLocked函数进一步配置ActivityRecord和ProcessRecord,并通过ClientLiftCycleManager执行Activity的生命周期。
关于Activity的生命周期我们将在下一篇文章中分析,下面整理一下本篇的内容。