这里介绍在Ubuntu下安装Google Test的一种简便方法,如果大家要用最新版,可以去相关网站上下载最新源码。
环境:Ubuntu 16.04 64位桌面版
1. 安装libgtest-dev;
sudo apt install libgtest-dev -y
2. 编译
cd /usr/src/gtest/
sudo cmake CMakeLists.txt
sudo make
通过以上步骤后,会在/usr/src/gtest/目录下生成库文件:libgtest_main.a与libgtest.a。把二者复制到/usr/local/lib/目录下:
sudo cp libgtest*.a /usr/local/lib
好了,现在我们写一个小例子来试试。
a. sample.h
#ifndef C_SAMPLES_SAMPLE_H_
#define C_SAMPLES_SAMPLE_H_

int Add(int value1, int value2);

#endif //  C_SAMPLES_SAMPLE_H_
b. sample.cpp
#include "sample.h"

int Add(int value1, int value2) {
  return (value1 + value2);
}
c. test.cpp
#include <gtest/gtest.h>
#include "sample.cpp"

TEST(Add, case1) {
  EXPECT_LT(-2, Add(1, 2));
  EXPECT_EQ(-1, Add(1, 2));
  ASSERT_LT(-2, Add(1, 2));
  ASSERT_EQ(-1, Add(1, 2));
}

int main(int argc, char **argv) {
  testing::InitGoogleTest(&argc, argv);
  return RUN_ALL_TESTS();
}
编译:
g++ test.cpp -o test -Igtest/include -lgtest -lpthread执行生成的ttest文件:
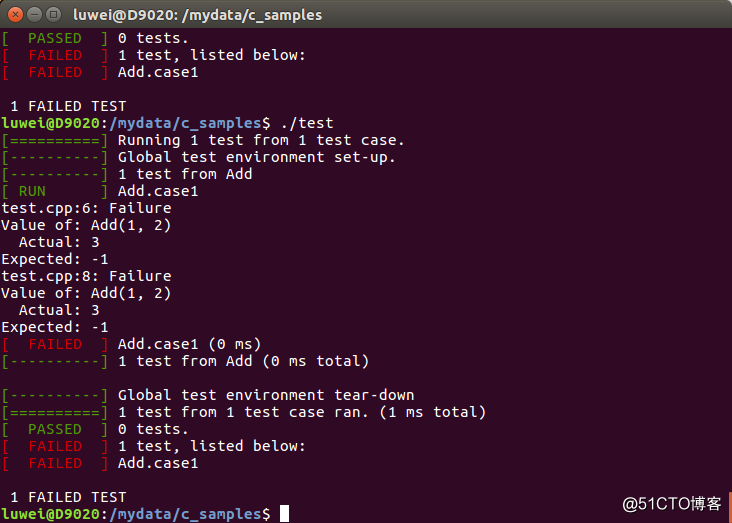
./test结果如下: