1. Spring负责对象的创建( 控制反转 IOC),处理对象之间的依赖关系(依赖注入 DI)
2. Spring在 WEB应用中的使用:整合Mybatis、Hibernate、SpringMVC、Struts
3. 使用步骤:
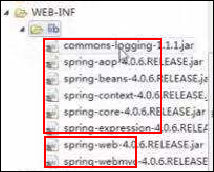
- 引入 jar包:
spring-core
spring-web:spring-web-4.x.jar、spring-webmvc-4.x.jar
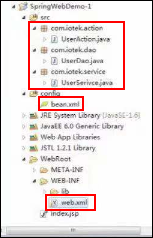
- 配置文件
bean.xml(/applicationContext.xml)—spring容器的配置
web.xml—初始化 springIOC容器
eg_项目工程目录:
1. bean.xml
<beans xmlns="http://www.springframework.org/schema/beans"
       xmlns:p="http://www.springframework.org/schema/p"
       xmlns:xsi="http://www.w3.org/2001/XMLSchema-instance"
       xmlns:context="http://www.springframework.org/schema/context" xmlns:tx="http://www.springframework.org/schema/tx"
       xmlns:aop="http://www.springframework.org/schema/aop"
       xsi:schemaLocation="http://www.springframework.org/schema/beans
http://www.springframework.org/schema/beans/spring-beans.xsd http://www.springframework.org/schema/context http://www.springframework.org/schema/context/spring-context.xsd http://www.springframework.org/schema/tx http://www.springframework.org/schema/tx/spring-tx.xsd http://www.springframework.org/schema/aop http://www.springframework.org/schema/aop/spring-aop.xsd">

    <!-- base-package扫描包即子包下的类 -->
    <context:component-scan base-package="com.asd"></context:component-scan>

</beans>
2. web.xml
(参考 tomcat安装目录下的 webapps/examples/WEB-INF/web.xml ;此web.xml文件中: < welcome-file-list> 标签配置默认请求的页面;因为此 web.xml文件是被应用程序默认加载的,所以在此文件中配置SpringIOC容器加载:通过< listener>标签配置容器的上下文加载,通过 < context-param> 标签加载相应的 xml文件(因为编译后的 xml文件是 WEB-INF下的 classes文件夹下,所以路径写classes;bean*表示以 bean开头的多个 bean文件; ))
<?xml version="1.0" encoding="UTF-8"?>
<web-app xmlns="http://java.sun.com/xml/ns/javaee"
  xmlns:xsi="http://www.w3.org/2001/XMLSchema-instance"
  xsi:schemaLocation="http://java.sun.com/xml/ns/javaee
                      http://java.sun.com/xml/ns/javaee/web-app_3_0.xsd"
  version="3.0">

  <!-- 配置SpringIOC容器加载 -->
  <context-param>
  	<param-name>contextConfigLocation</param-name>
  	<param-value>/WEB-INF/classes/bean*.xml</param-value>//
  </context-param>
  <listener>
  	<listener-class>org.springframework.web.context.ContextLoaderListener</listener-class>
  </listener>

  <welcome-file-list><!-- 默认请求的页面 -->
        <welcome-file>index.jsp</welcome-file>
  </welcome-file-list>

</web-app>
3. UserDao.java
@Repository  //持久层
public class UserDao{
	public void save(){
		System.out.println("保存到数据库");
	}
}
4. UserService.java
@Service  //业务逻辑层
public class UserService{
	@Resource
	private UserDao userDao;
	public void save(){
		userDao.save();
	}
}
5. UserAction.java
@Controller //控制层
public class UserAction{
        @Resource
	private UserSerice userService;
	public String addUser(){
		userService.save();
		return null;
	}
}
运行结果:(jsp页面显示的内容)