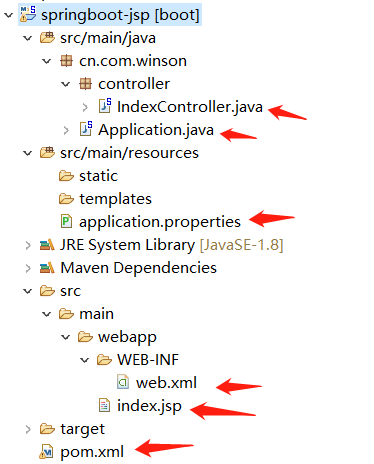
一、新建SpringBoot工程,目录结构如下:
二、pom.xml中添加依赖,使SpringBoot内置的Tomcat服务器可以解析jsp页面:(这里我们只是展示很简单的功能,其它的jsp依赖和jstl依赖并没有引入,因为不影响我目前功能)
  <!-- https://mvnrepository.com/artifact/org.apache.tomcat.embed/tomcat-embed-jasper -->
        <dependency>
            <groupId>org.apache.tomcat.embed</groupId>
            <artifactId>tomcat-embed-jasper</artifactId>
            <version>9.0.12</version>
        </dependency>
完整的pom.xml文件内容为:


<project xmlns="http://maven.apache.org/POM/4.0.0" xmlns:xsi="http://www.w3.org/2001/XMLSchema-instance"
    xsi:schemaLocation="http://maven.apache.org/POM/4.0.0 http://maven.apache.org/maven-v4_0_0.xsd">
    <modelVersion>4.0.0</modelVersion>
    <groupId>cn.com.winson.springboot</groupId>
    <artifactId>springboot-jsp</artifactId>
    <packaging>war</packaging>
    <version>0.0.1-SNAPSHOT</version>
    <parent>
        <groupId>org.springframework.boot</groupId>
        <artifactId>spring-boot-starter-parent</artifactId>
        <version>1.5.17.RELEASE</version>
        <relativePath />
    </parent>

    <properties>
        <project.build.sourceEncoding>UTF-8</project.build.sourceEncoding>
        <project.reporting.outputEncoding>UTF-8</project.reporting.outputEncoding>
        <java.version>1.8</java.version>
    </properties>

    <dependencies>
        <!-- https://mvnrepository.com/artifact/org.apache.tomcat.embed/tomcat-embed-jasper -->
        <dependency>
            <groupId>org.apache.tomcat.embed</groupId>
            <artifactId>tomcat-embed-jasper</artifactId>
            <version>9.0.12</version>
        </dependency>

        <dependency>
            <groupId>org.springframework.boot</groupId>
            <artifactId>spring-boot-starter-web</artifactId>
        </dependency>

        <dependency>
            <groupId>org.springframework.boot</groupId>
            <artifactId>spring-boot-starter-test</artifactId>
            <scope>test</scope>
        </dependency>
    </dependencies>

    <build>
        <plugins>
            <plugin>
                <groupId>org.springframework.boot</groupId>
                <artifactId>spring-boot-maven-plugin</artifactId>
            </plugin>
        </plugins>
    </build>
</project>
三、IndexController.java文件内容如下:在model中放置一个属性msg,内容为Hello JSP_Page。这里@ResponseBody注解并没有与返回值类型String组合使用,所以返回的index实际上是一个页面,完整的页面名称是结合核心配置文件中的格式,结果为index.jsp。
package cn.com.winson.controller;

import org.springframework.stereotype.Controller;
import org.springframework.ui.Model;
import org.springframework.web.bind.annotation.GetMapping;

@Controller
public class IndexController {

    @GetMapping("/index")
    public String index(Model model) {
        model.addAttribute("msg", "Hello JSP_Page");
        return "index";
    }

}
四、核心配置文件,配置视图解析器解析文件的格式:
#配置视图解析器解析文件的格式
spring.mvc.view.prefix=/
spring.mvc.view.suffix=.jsp
五、index.jsp页面内容为:使用EL表达式获取存储在model对象中的msg属性的值
<%@ page language="java" contentType="text/html; charset=UTF-8"
    pageEncoding="UTF-8"%>
<!DOCTYPE html PUBLIC "-//W3C//DTD HTML 4.01 Transitional//EN" "http://www.w3.org/TR/html4/loose.dtd">
<html>
<head>
<meta http-equiv="Content-Type" content="text/html; charset=UTF-8">
<title>Insert title here</title>
</head>
<body>
    ${msg}
</body>
</html>
六、运行程序,访问结果:
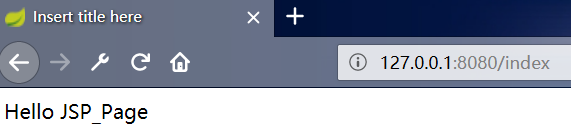
总结:上述就是SpringBoot使用jsp页面的方法。
注意:
一、因为SpringBoot默认的解析页面的路径就在webapp下,所以核心配置文件无需配置文件路径。
二、因为我只展示使用jsp页面,所以引入的依赖很少,实际开发中需要引入其他的相关jsp依赖,比如jstl依赖等。