Springs
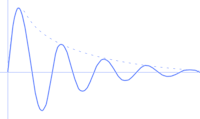
The main workhorse of UFPS is a spring system that operates on transform position, rotation or scale. The spring has a Rest State (also known as the "static equilibrium") where it "wants to be". If you move it away from the target value using external force, it will immediately and continuously strive back to its target position or angle. The spring Stiffness - or mechanical strength - determines how loosely or rigidly the spring behaves. Finally, the Damping makes spring velocity wear off as it approaches its rest state. Springs can be used to simulate everything from jello (a loose spring operating on object scale), an arrow hitting a wall (a very stiff spring rotating the arrow with the pivot at the head) or an underwater camera (a loose spring making the camera bounce softly as your feet hit the ocean floor).
Bob

Bob is the sinusoidal motion of an object or the camera. View bob has been around in first person shooters for ages as a means of moving the camera up and down when walking. Modern shooters don't always have a very pronounced view bob, but bob is still very useful for animating the weapon model (and camera if used in moderation). If applying bob along both the x and y vector you can get interesting results such as the feeling of being a dinosaur or a huge ogre.
Noise

Procedural noise has been used in computer graphics and special effects for years as a means of generating smoke, terrains and camera shakes (to name but a few areas). UFPS uses a standard perlin noise function for applying random turbulence to the weapon and camera. For example: a slight breathing camera motion as you zoom in with a sniper rifle, gentle idle movements for a hand holding a sub machine gun, or the heavily disturbed camera movements of a character that is drunk or poisoned.
Free Fly
When active, this enables a throttle logic for moving a flying controller in an arbitrary direction based on player (camera) forward vector. This can be used for many things in an FPS, for example spectator cams, ingame editor modes, zero gravity, swimming underwater, jetpacks and superhero style flying. Free fly movement can be toggled at any time. This feature works best if the Physics > Gravity Modifier is zero or very low.
| |
Jumping and crouching behaves differently in Free Fly mode. The Jump activity will make the camera go straight up. The Crouch activity will make it go straight down. The collider will only shrink upon crouching if the controller has ground contact. |

| |
Note: When playing in 1st person in the editor, you will spot this guy bouncing around in the Scene view, arms flying everywhere and legs sticking through the ground. Not to worry! This is not how the character will appear in 3rd person or multiplayer - it's just the full body awareness systems at work and this will never be rendered into the actual game. |

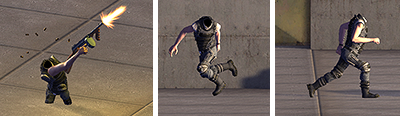
Nevermind the "headless dude" ...
Head & Arm materials setup
When you first add a plain human body model to an FPS player, usually you can see too many arms in 1st person plus the inside of the player model's head (teeth, tongue, eyeballs).
To fix this, the head must be made invisible at all times in 1st person, and the arms must be made invisible when wielding any 1st person weapons that come with their own arms.
This result can be temporarily achieved using the "cheat" described here, however that's a quick fix resulting in several unintended glitches, making it useful only for prototyping and quick tests.
UFPS can solve the issue "properly" by applying a little black magic to make the arm and head meshes invisible although still casting shadows in the 3d world. For this to work your player model needs to have one material assignment for the head, one for the arms and one for the rest of the body.

| |
TIP: The following tutorial can be done by hand, but there is also a great add-on asset for UFPS by CodeBison, called FPS Mesh Tool. This excellent piece of software will take care of all the below steps for you and a whole lot more (no need for a standalone art program). |

For any new player model you want to use for 1st person:
- Open the body model in a 3d art program and split it up so that the head has its own material slot, the arms sharing one material slot, and the rest of the body has one material slot.
- In Unity, on the SkinnedMeshRenderer of the body model, assign any material you like to the "Body".
- Assign two separate materials to the "Arm" and "Head" slots. Make sure the names of these materials have "head" and "arm" in them, respectively (case insensitive).
- Verify that the player body's vp_FPBodyAnimator component has the default UFPS "InvisibleShadowCaster" material assigned to it.
Now, in 1st person mode, the inside of your head should be invisible (like in the real world ;) and there should be no more cases of "too many arms". Toggling to 3rd person view should make the head and arms come instantly back into visibilty, everything in a seamless manner.
| |
The character can of course have many more materials too if you like. What's important is that the arms share a material with the letters "arm" in the name inside Unity, and that the head has a material of its own with the word "head" in its name. |
