1. 自绘控件
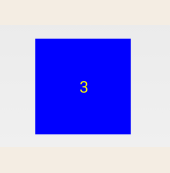
自绘控件的内容都是自己绘制出来时,在View的onDraw方法中完成绘制。下面是一个简单的计数器 每点击一次 计数值就加一
运行效果如下:
创建CounterView类,继承View,实现OnClickListener接口:
import android.content.Context;
import android.graphics.Canvas;
import android.graphics.Color;
import android.graphics.Paint;
import android.graphics.Rect;
import android.util.AttributeSet;
import android.view.View;

public class CounterView extends View implements View.OnClickListener {
    // 定义画笔
    private Paint mPaint;
    // 用于获取文字的宽和高
    private Rect mBounds;
    // 计数值,每点击一次本控件,其值增加1
    private int mCount;

    public CounterView(Context context, AttributeSet attrs) {
        super(context, attrs);
        // 初始化画笔、Rect
        mPaint = new Paint(Paint.ANTI_ALIAS_FLAG);
        mBounds = new Rect();
        // 本控件的点击事件
        setOnClickListener(this);
    }

    @Override
    protected void onDraw(Canvas canvas) {
        super.onDraw(canvas);
        mPaint.setColor(Color.BLUE);
        canvas.drawRect(0, 0, getWidth(), getHeight(), mPaint);
        mPaint.setColor(Color.YELLOW);
        mPaint.setTextSize(50);
        String text = String.valueOf(mCount);
        mPaint.getTextBounds(text, 0, text.length(), mBounds);
        float textWidth = mBounds.width();
        float textHeight = mBounds.height();
        // 绘制字符串
        canvas.drawText(text, getWidth() / 2 - textWidth / 2, getHeight() / 2
                + textHeight / 2, mPaint);
    }

    @Override
    public void onClick(View v) {
        mCount++;
        //重绘
        invalidate();
    }
}
在activity_main.xml中引入该自定义布局:
<?xml version="1.0" encoding="utf-8"?>
<android.support.constraint.ConstraintLayout xmlns:android="http://schemas.android.com/apk/res/android"
    xmlns:app="http://schemas.android.com/apk/res-auto"
    xmlns:tools="http://schemas.android.com/tools"
    android:layout_width="match_parent"
    android:layout_height="match_parent"
    tools:context=".MainActivity">

    <com.example.day1.weight.CounterView
        android:id="@+id/counter_view"
        android:layout_width="100dp"
        android:layout_height="100dp"
        android:layout_gravity="center_horizontal|top"
        android:layout_margin="20dp" />

</android.support.constraint.ConstraintLayout>
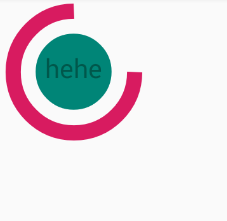
2. 重写View来实现全新控件
效果如下
  <declare-styleable name="circleView">
        <attr name="textSize" format="dimension" />
        <attr name="text" format="string" />
        <attr name="circleColor" format="color" />
        <attr name="arcColor" format="color" />
        <attr name="textColor" format="color" />
        <attr name="startAngle" format="integer" />
        <attr name="sweepAngle" format="integer" />
    </declare-styleable>
Ⅰ、textSize——对应中间文本文字的大小
Ⅱ、text——对应中间文本
Ⅲ、circleColor——对应内圆的颜色
Ⅳ、arcColor——对应外环的颜色
Ⅴ、textColor——对应文本的颜色
Ⅵ、startAngle——对应外环的起始角度
Ⅶ、sweepAngle——对应外环扫描角度
创建CircleView类,继承View
import android.content.Context;
import android.content.res.TypedArray;
import android.graphics.Canvas;
import android.graphics.Paint;
import android.graphics.RectF;
import android.util.AttributeSet;
import android.view.View;

import com.example.day1.R;

public class CircleView extends View {

    private int startAngle;
    private int sweepAngle;
    private String text;
    private float textSize;
    private int textColor;
    private int circleColor;
    private int arcColor;
    private int mCircleXY;
    private float mRadius;
    private Paint mCirclePaint;
    private RectF mRectF;
    private Paint mArcPaint;
    private Paint mTextPaint;

    public CircleView(Context context, AttributeSet attrs) {
        super(context, attrs);
        TypedArray ta = context.obtainStyledAttributes(attrs, R.styleable.circleView);
        if (ta != null) {
            circleColor = ta.getColor(R.styleable.circleView_circleColor, 0);
            arcColor = ta.getColor(R.styleable.circleView_arcColor, 0);
            textColor = ta.getColor(R.styleable.circleView_textColor, 0);
            textSize = ta.getDimension(R.styleable.circleView_textSize, 50);
            text = ta.getString(R.styleable.circleView_text);
            startAngle = ta.getInt(R.styleable.circleView_startAngle, 0);
            sweepAngle = ta.getInt(R.styleable.circleView_sweepAngle, 90);
            ta.recycle();
        }
    }

    private void init() {
        int length = Math.min(getWidth(), getHeight());
        mCircleXY = length / 2;
        mRadius = length * 0.5f / 2;
        mCirclePaint = new Paint(Paint.ANTI_ALIAS_FLAG);
        mCirclePaint.setColor(circleColor);
        mRectF = new RectF(length * 0.1f, length * 0.1f, length * 0.9f,
                length * 0.9f);

        mArcPaint = new Paint(Paint.ANTI_ALIAS_FLAG);
        mArcPaint.setColor(arcColor);
        mArcPaint.setStyle(Paint.Style.STROKE);
        mArcPaint.setStrokeWidth((getWidth() * 0.1f));

        mTextPaint = new Paint(Paint.ANTI_ALIAS_FLAG);
        mTextPaint.setTextSize(textSize);
        mTextPaint.setColor(textColor);
        mTextPaint.setTextAlign(Paint.Align.CENTER);

    }

    @Override
    protected void onDraw(Canvas canvas) {
        super.onDraw(canvas);
        init();
        drawSth(canvas);
    }

    public void drawSth(Canvas canvas) {
        canvas.drawCircle(mCircleXY, mCircleXY, mRadius, mCirclePaint);
        canvas.drawArc(mRectF, startAngle, sweepAngle, false, mArcPaint);
        canvas.drawText(text, 0, text.length(), mCircleXY, mCircleXY + textSize
                / 4, mTextPaint);
    }
}
在activity_main.xml中引入该自定义布局:
<?xml version="1.0" encoding="utf-8"?>
<android.support.constraint.ConstraintLayout xmlns:android="http://schemas.android.com/apk/res/android"
    xmlns:app="http://schemas.android.com/apk/res-auto"
    xmlns:tools="http://schemas.android.com/tools"
    android:layout_width="match_parent"
    android:layout_height="match_parent"
    tools:context=".MainActivity">

    <com.example.day1.weight.CircleView
        android:layout_width="200dp"
        android:layout_height="200dp"
        app:startAngle="0"
        app:sweepAngle="270"
        app:text="hehe"
        app:textSize="30sp"
        app:textColor="@color/colorPrimaryDark"
        app:circleColor="@color/colorPrimary"
        app:arcColor="@color/colorAccent" />
</android.support.constraint.ConstraintLayout>
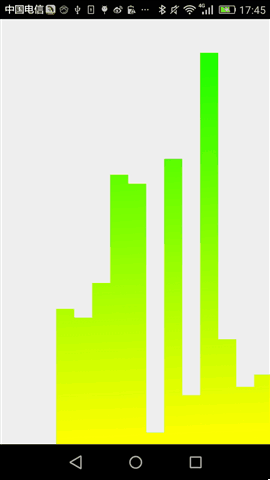
3. 动态条形图
首先,在OnMeasure()方法中计算出每个矩形宽与高,这里为了方便起见,每个矩形默认的高为屏幕的高,每个矩形的宽这里定义为屏幕的宽度乘以80%除以矩形的个数。然后根据宽与高来初始化笔刷(Paint)。为什么要根据宽与高来初始化笔刷了,这里我为了使自定义View更加的逼真,我这里使用LinearGradient(线性渲染器)进行了渲染,这个对象需要使用矩形宽与高。需要指出来的是这个自定义控件是动态的,我只需要onDraw方法不断发生重绘,这里为了防止控件刷新太快,我这里每隔300毫秒刷新视图。
最终,运行效果如下:
这个控件的完整源代码如下:
    <declare-styleable name="volumneView">
        <attr name="count" format="integer" />
    </declare-styleable>
import android.content.Context;
import android.content.res.TypedArray;
import android.graphics.Canvas;
import android.graphics.Color;
import android.graphics.LinearGradient;
import android.graphics.Paint;
import android.graphics.Shader;
import android.util.AttributeSet;
import android.view.View;

import com.example.day1.R;

public class VolumneView extends View {
    private Paint mPaint;
    private int mCount;
    private int mWidth;
    private int mRectHeight;
    private int mRectWidth;
    private LinearGradient mLinearGradient;
    private double mRandom;
    private float mcurrentHeight;
    public static final int OFFSET = 5;

    public VolumneView(Context context, AttributeSet attrs, int defStyleAttr) {
        super(context, attrs, defStyleAttr);
        initView(context, attrs);

    }

    private void initView(Context context, AttributeSet attrs) {
        mPaint = new Paint(Paint.ANTI_ALIAS_FLAG);
        mPaint.setColor(Color.GREEN);
        mPaint.setStyle(Paint.Style.FILL);
        TypedArray ta = context.obtainStyledAttributes(attrs,
                R.styleable.volumneView);
        if (ta != null) {
            mCount = ta.getInt(R.styleable.volumneView_count, 6);
            ta.recycle();
        }
    }

    public VolumneView(Context context, AttributeSet attrs) {
        this(context, attrs, 0);
    }

    public VolumneView(Context context) {
        this(context, null);
    }

    @Override
    protected void onSizeChanged(int w, int h, int oldw, int oldh) {
        super.onSizeChanged(w, h, oldw, oldh);
        mWidth = getMeasuredWidth();
        mRectHeight = getMeasuredHeight();
        mRectWidth = (int) (mWidth * 0.8 / mCount);
        mLinearGradient = new LinearGradient(0, 0, mRectWidth, mRectHeight,
                Color.GREEN, Color.YELLOW, Shader.TileMode.CLAMP);
        mPaint.setShader(mLinearGradient);

    }

    @Override
    protected void onDraw(Canvas canvas) {
        super.onDraw(canvas);
        for (int i = 0; i < mCount; i++) {
            mRandom = Math.random();
            mcurrentHeight = (float) (mRectHeight * mRandom);
            float width = (float) (mWidth * 0.4 / 2 + OFFSET);
            canvas.drawRect(width + i * mRectWidth, mcurrentHeight, width
                    + (i + 1) * mRectWidth, mRectHeight, mPaint);
        }
        postInvalidateDelayed(300);
    }
}