Spring Boot JdbcTemplate
基于Bootstrap3的ACE模板,并实现了一个基本的增删改查分页功能
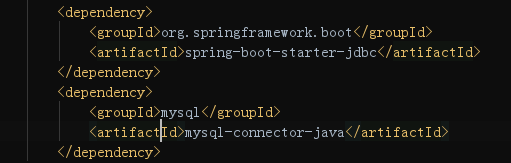
Jar 依赖
主要是thymeleaf 的使用比较经典,Bootstrap ACE真的好用
明天来完善其细节
优点如下
在配置上,0配置,约定大于配置
@Autowired
private Environment env;
//destroy-method="close"的作用是当数据库连接不使用的时候,就把该连接重新放到数据池中,方便下次使用调用.
@Bean(destroyMethod = "close")
public DataSource dataSource() {
DruidDataSource dataSource = new DruidDataSource();
dataSource.setUrl(env.getProperty("spring.datasource.url"));
dataSource.setUsername(env.getProperty("spring.datasource.username"));//用户名
dataSource.setPassword(env.getProperty("spring.datasource.password"));//密码
dataSource.setDriverClassName(env.getProperty("spring.datasource.driver-class-name"));
dataSource.setInitialSize(2);//初始化时建立物理连接的个数
dataSource.setMaxActive(20);//最大连接池数量
dataSource.setMinIdle(0);//最小连接池数量
dataSource.setMaxWait(60000);//获取连接时最大等待时间,单位毫秒。
dataSource.setValidationQuery("SELECT 1");//用来检测连接是否有效的sql
dataSource.setTestOnBorrow(false);//申请连接时执行validationQuery检测连接是否有效
dataSource.setTestWhileIdle(true);//建议配置为true,不影响性能,并且保证安全性。
dataSource.setPoolPreparedStatements(false);//是否缓存preparedStatement,也就是PSCache
return dataSource;
}
连接池如此配置,相当简单,没有多余的代码和笨重的xml配置
然后直接注入Spring JDBC的JdbcTemplate即可用, 但是如何控制事务呢,明天写
2017年10月12日23:46:13
其次 Dao Daoimpl Service ServiceImpl 一气呵成,
controller层如下
					@RequestMapping(value = "/queryLeanList",method = RequestMethod.POST,produces="application/json;charset=UTF-8")
public @ResponseBody Map<String,Object> queryLearnList(HttpServletRequest request , HttpServletResponse response,
@RequestParam(value = "page",required = false)String page1,
@RequestParam(value = "rows",required = false)String rows1,
@RequestParam(value = "author",required = false)String author,
@RequestParam(value = "title",required = false)String title
 ){
 String page = page1; // 取得当前页数,注意这是jqgrid自身的参数
String rows = rows1; // 取得每页显示行数,,注意这是jqgrid自身的参数
Map<String,Object> params = new HashMap<String,Object>();
params.put("page", page);
params.put("rows", rows);
params.put("author", author);
params.put("title", title);
Page pageObj =learnService.queryLearnResouceList(params);
List<Map<String, Object>> learnList=pageObj.getResultList();
Map<String,Object> jo= new HashMap<>();
jo.put("rows", learnList);
jo.put("total", pageObj.getTotalPages());
jo.put("records", pageObj.getTotalRows());
 return jo;
}
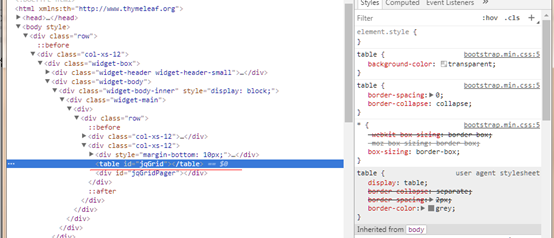
Spring MVC 超级好用的书写方式, @RequestParam @ResponseBody 得益于强大的HttpMessageConverters , 如下图

其实Struts2也有第三方插件可以实现,只不过很不好用
这个Demo中 Page写的也不错,很有逻辑性 还有tools包中的一些工具类也相当好
静态资源:
SpringBoot 约定大于规则, 
下面是 thymeleaf引擎的好处, 与SpringMVC Spring 完美结合。 然后是Bootstrap ACE模板的好处
Thymeleaf优点
正如Thymeleaf官网所说。
Thymeleaf是面向Web和独立环境的现代服务器端Java模板引擎。
Thymeleaf的主要目标是为您的开发工作流程带来优雅的自然模板 - 可以正确显示在浏览器中的HTML,也可以作为静态原型工作,从而在开发团队中进行更强大的协作。
随着Spring框架的模块,与您最喜欢的工具的集成,以及插入自己的功能的能力,Thymeleaf是现代HTML5 JVM Web开发的理想选择,尽管它可以做的更多。
用Thymeleaf 编写的HTML模板仍然像HTMl一样工作,让您在应用程序运行的实际模板继续作为有用的设计
-
1.Thymeleaf 在有网络和无网络的环境下皆可运行,即它可以让美工在浏览器查看页面的静态效果,也可以让程序员在服务器查看带数据的动态页面效果。这是由于它支持 html 原型,然后在 html 标签里增加额外的属性来达到模板+数据的展示方式。浏览器解释 html 时会忽略未定义的标签属性,所以 thymeleaf 的模板可以静态地运行;当有数据返回到页面时,Thymeleaf 标签会动态地替换掉静态内容,使页面动态显示。
-
2.Thymeleaf 开箱即用的特性。它提供标准和spring标准两种方言,可以直接套用模板实现JSTL、 OGNL表达式效果,避免每天套模板、该jstl、改标签的困扰。同时开发人员也可以扩展和创建自定义的方言。
-
3.Thymeleaf 提供spring标准方言和一个与 SpringMVC 完美集成的可选模块,可以快速的实现表单绑定、属性编辑器、国际化等功能。
Bootstrap ACE模板优点
从功能实现来分析
1、查询功能和初始化数据
Jdgird
$(grid_selector).jqGrid({
url:"learn/queryLeanList", //对应的controller层方法
datatype: "json",
mtype: 'POST',
height:window.screen.height-550,
colModel: [
 { label: 'id', name: 'id', width: 75,hidden:true},
{ label: '作者', name: 'author', width: 200 },
{ label: '教程名称', name: 'title', width: 200 },
{ label: '地址', name: 'url', width: 200 ,hidden:true},
{ label: '地址', name: 'opt', width: 200,formatter: function(cellvalue, options, cell){
return '<a href="'+cell.url+'" class="btn btn-purple btn-sm" target="_blank"><i class="fa fa-cog fa-spin" aria-hidden="true"></i>点我</a>';
}}
 ],
Controller层代码,聪明的是查询方法和自动初始化数据用的是一个Controller方法(但是增加了耦合性,估计在大型项目中肯定不会采取)
					@RequestMapping(value = "/queryLeanList",method = RequestMethod.POST,produces="application/json;charset=UTF-8")
public @ResponseBody Map<String,Object> queryLearnList(HttpServletRequest request , HttpServletResponse response,
@RequestParam(value = "page",required = false)String page1,
@RequestParam(value = "rows",required = false)String rows1,
@RequestParam(value = "author",required = false)String author,
@RequestParam(value = "title",required = false)String title
 ){
 String page = page1; // 取得当前页数,注意这是jqgrid自身的参数
String rows = rows1; // 取得每页显示行数,,注意这是jqgrid自身的参数
Map<String,Object> params = new HashMap<String,Object>();
params.put("page", page);
params.put("rows", rows);
params.put("author", author);
params.put("title", title);
Page pageObj =learnService.queryLearnResouceList(params);
List<Map<String, Object>> learnList=pageObj.getResultList();
Map<String,Object> jo= new HashMap<>();
jo.put("rows", learnList);
jo.put("total", pageObj.getTotalPages());
jo.put("records", pageObj.getTotalRows());
 return jo;
}
只需要在实现的时候,这样写(有一个where 1=1 , 后面根据传入参数来判断,是否要加入and 等等)
@Override
public Page queryLearnResouceList(Map<String,Object> params) {
 StringBuffer sql =new StringBuffer();
sql.append("select * from learn_resource where 1=1");
 if(!StringUtil.isNull((String)params.get("author"))){ //StringUtil 是自己写的工具类,防止为null,""等
sql.append(" and author like '%").append((String)params.get("author")).append("%'");
}
if(!StringUtil.isNull((String)params.get("title"))){
 sql.append(" and title like '%").append((String)params.get("title")).append("%'");
}
 Page page = new Page(sql.toString(), Integer.parseInt(params.get("page").toString()), Integer.parseInt(params.get("rows").toString()), jdbcTemplate);
 return page;
}
查询代码,直接调用

//查询点击事件
$("#queryBtn").click(function(){
var qryAuthor=$("#qryAuthor").val();
var qryTitle=$("#qryTitle").val();
$(grid_selector).jqGrid('setGridParam',{
postData:{author:qryAuthor,title:qryTitle},
//search: true,
page:1
}).trigger("reloadGrid");
});
2、新增用户和修改用户
按钮
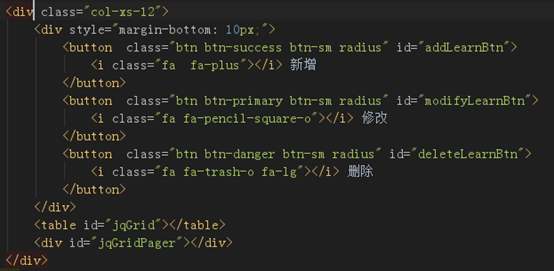
新增和修改窗口
<!--新增窗口-->
<div id="addModal" class="bootbox modal fade" tabindex="-1" role="dialog"> // role 决定了其隐藏
<div class="modal-dialog ">
<div class="modal-content">
<div class="modal-header">
<button type="button" class="close" data-dismiss="modal" aria-label="Close"><span aria-hidden="true">×</span></button>
<h4 class="modal-title" id="myModalLabel">新增教程</h4>
</div>
<div class="modal-body">
<form class="form-horizontal" role="form" onsubmit="return false;">
<div class="form-group" style="display: none;">
<label class="col-sm-2 control-label">id</label>
<div class="col-sm-8">
<input id="id" type="text" class="form-control" placeholder="" />
</div>
</div>
<div class="form-group">
<label class="col-sm-2 control-label">作者</label>
<div class="col-sm-8">
<input id="author" type="text" class="form-control" placeholder="输入作者" />
</div>
</div>
<div class="form-group" >
<label class="col-sm-2 control-label">教程名称</label>
<div class="col-sm-8">
<input id="title" type="text" class="form-control" placeholder="输入教程名称" />
</div>
</div>
<div class="form-group">
<label class="col-sm-2 control-label">教程地址</label>
<div class="col-sm-8">
<input id="url" type="text" class="form-control" placeholder="输入教程地址" />
</div>
</div>
</form>
</div>
<div class="modal-footer">
<button data-bb-handler="confirm" type="button" id="saveLearnBtn" class="btn btn-success radius">
<span><i class="icon-ok"></i></span> 保 存
</button>
<button data-bb-handler="cancel" type="button" id="cancelSave" class="btn btn-danger radius">取消</button>
</div>
</div>
</div>
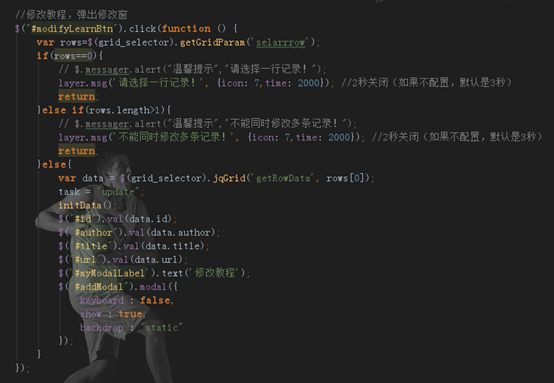
</div> 点击修改和增加的按钮,弹出对话框
这里有两个小细节
-
Task变量, 用来选择是调用的add方法,还是update方法
-
往前台数据时已经将每个数据的信息都获取了,这样就不用再单独请求单条数据了

弹出对话框后 保存方法, 新增和更新用的是一个按钮,用task 属性智能识别
/**
 * 保存教程(新增或修改)
 */
function saveLearn(){
var id = $('#id').val(); //获取输入数据
var author = $('#author').val();
var title = $('#title').val();
var url = $('#url').val();
$.ajax({
url: "learn/"+task,//动态的改变请求Controller
cache: false,
dataType:'json',
data : {
"id":id,
"author":author,
"title": title,
"url":url
 },
type : 'post',
beforeSend: function () { //防止重复提交
 // 禁用按钮防止重复提交
$('#saveLearnBtn').attr({ disabled: "disabled"});
},
success: function(result){
if(result.flag == true){ //如果没有成功
$.messager.alert('温馨提示',result.message);
$("#addModal").modal('hide');
refreshData(); //刷新结果
}else{
$.messager.alert('温馨提示',result.message);
}
 },
complete: function () {
$('#saveLearnBtn').removeAttr("disabled"); //控制dom属性,删除disabled属性
},
error: function (data) {
console.info("error: " + data.responseText); //错误返回值
}
 });
}
后台就很好实现了
-
删除功能的实现
					//删除教程方法 选择多个的话,行id用逗号隔开比如 3,4
$("#deleteLearnBtn").click(function () {
var rows=$(grid_selector).getGridParam('selarrrow'); //这点很灵性
if(rows.length>0){
$.messager.confirm("温馨提示", "是否确定删除所选记录?", function() {
$.ajax({
url:"learn/delete",
cache: false,
type:"post",
data:{"ids": rows.join(",")}, //这点很灵性,自动的
beforeSend : function(){
 loading=layer.load("正在删除中...");
},
success:function(result){
$.messager.alert(result.message);
refreshData();
},error:function(){
$.messager.alert("温馨提示","请求错误!");
},
complete : function(){
layer.close(loading);
}
 });
});
}else{
//两种风格的提示,layer或者messager自己选择一种用即可。
 // $.messager.alert("温馨提示","至少选择一行记录!");
layer.msg('至少选中一行记录!', {icon: 7,time: 2000}); //2秒关闭(如果不配置,默认是3秒)
}
 })

});
删除后台逻辑也很好实现
至此结束