Ansible 介绍以及基本命令
Ansible 简介:
Ansible 和目前市面上一些其他的项目管理工具有很大的不同,它的设计初衷就是为了更方便、快捷的进行配置管理。它易于安装和实用,语法也非常简单易学。可以使用 Ansible 将平常复杂的配置工作变得简单、更加标准化和更容易控制。
Ansible 只需要在一台普通的服务器上运行即可,不需要在被管控的服务器上安装客户端,因为它是基于 SSH 的。Linux 服务器离不开 SSH,所以 Ansible 不需要为配置工作添加额外的支持,可通过命令行来使用 Ansible,运行 Ansible 的服务器俗称 “管理节点”,通过 Ansible 进行管理的服务器俗称 “受控节点”。
Ansible 是一款极为灵活的开源工具套件,能够大大简化 Unix 管理员的自动化配置管理与流程控制方式。它利用推送方式对客户系统加以配置,这样所有的工作都可以在主服务器完成。其命令行机制同样非常强大,允许利用商业许可 Web UI 实现授权管理与配置。
Ansible 的优点:
① 轻量级,不需要去客户端安装 agent,更新时只需要在操作机上进行一次更新即可,采用 SSH 协议。
② 批量任务执行可以写成脚本,而且不用分发到远程就可以执行。
③ 使用 Python 编写的,维护更简单。
④ 支持 sudo 普通用户命令。
Ansible 安装配置:
Ansible 能够安装到 Linux、BSD、Mac OS 等平台,Python 最低版本要求为 2.6。
安装 Ansible 之前要先安装第三方 epel 源:
[root@ansible ~]# cat /etc/redhat-release  #  查看系统内核。
CentOS Linux release 7.3.1611 (Core)
[root@ansible ~]# python -V   #  查看 Python 版本(Python 版本最低为 2.6)。
Python 2.7.5
[root@ansible ~]# yum install epel-release -y    #  安装 EPEL 源
通过 Yum 安装 Ansible 软件:
[root@ansible ~]# yum install ansible -y
[root@ansible ~]# cd /etc/ansible/   #  配置文件默认的路径。
[root@ansible ansible]# ll
-rw-r--r-- 1 root root 19549 8月  17 17:06 ansible.cfg
-rw-r--r-- 1 root root  1016 8月  17 17:06 hosts
drwxr-xr-x 2 root root     6 8月  17 17:06 roles
配置之前需要通过 SSH 让多台服务器建立互信:(机器多的话可以用 expect 非交互式脚本实现)
非交互式创建一对密钥对:
[root@ansible ansible]# ssh-keygen -t dsa -P "" -f ~/.ssh/id_dsa
Generating public/private dsa key pair.
Created directory '/root/.ssh'.
Your identification has been saved in /root/.ssh/id_dsa.
Your public key has been saved in /root/.ssh/id_dsa.pub.
The key fingerprint is:
ee:18:eb:be:bc:1e:4c:98:aa:98:e0:63:0a:2b:24:a3 root@ansible
The key's randomart image is:
+--[ DSA 1024]----+
|                 |
|                 |
|                 |
|     o           |
|    o . S        |
|o. . o .         |
|*..   + .        |
|E*   . *         |
|X..  +Xo.        |
+-----------------+
[root@ansible ansible]# cd ~
[root@ansible ~]#  ls -l .ssh/
总用量 8
-rw------- 1 root root 668 8月  28 21:16 id_dsa
-rw-r--r-- 1 root root 602 8月  28 21:16 id_dsa.pub
分别给受控节点分发公钥:
[root@ansible ~]# ssh-copy-id -i .ssh/id_dsa.pub root@localhost
[root@ansible ~]# ssh-copy-id -i .ssh/id_dsa.pub [email protected]
[root@ansible ~]# ssh-copy-id -i .ssh/id_dsa.pub [email protected]
测试互信是否成功:【成功】
[root@ansible ~]# ssh -p 22 [email protected] "cat /etc/redhat-release"
CentOS Linux release 7.3.1611 (Core)
[root@ansible ~]# ssh -p 22 [email protected] "cat /etc/redhat-release"
CentOS Linux release 7.3.1611 (Core)
开始配置并通过 Ansible 管理其他节点:
[root@ansible ~]# cd /etc/ansible/
[root@ansible ansible]# ll
总用量 24
-rw-r--r-- 1 root root 19549 8月  17 17:06 ansible.cfg
-rw-r--r-- 1 root root  1016 8月  17 17:06 hosts
drwxr-xr-x 2 root root     6 8月  17 17:06 roles
[root@ansible ansible]# cp hosts hosts.bak
[root@ansible ansible]# vim hosts
[root@ansible ansible]# cat hosts   #  默认 hosts 内容可以分组甚至分文件。
[local]
localhost         #  本机。
[webservers]
192.168.193.132   #  受控节点一。
[dbservers]
192.168.193.133   #  受控节点二。
通过命令使用 Ansible:
[root@ansible ~]# ansible -i /etc/ansible/hosts all -a "date"
192.168.136.183 | SUCCESS | rc=0 >>
2018年 08月 28日 星期二 21:41:46 EDT

192.168.136.182 | SUCCESS | rc=0 >>
2018年 08月 28日 星期二 21:41:46 EDT

localhost | SUCCESS | rc=0 >>
2018年 08月 28日 星期二 21:41:47 EDT
[root@ansible ~]# ansible all -a "ping baidu.com -c 1"
192.168.136.183 | SUCCESS | rc=0 >>
192.168.136.182 | SUCCESS | rc=0 >>
localhost | SUCCESS | rc=0 >>
[root@ansible ~]# ansible all -m ping
192.168.136.182 | SUCCESS => {
"changed": false,
"ping": "pong"
}
192.168.136.183 | SUCCESS => {
"changed": false,
"ping": "pong"
}
localhost | SUCCESS => {
"changed": false,
"ping": "pong"
}Ansible 主要参数: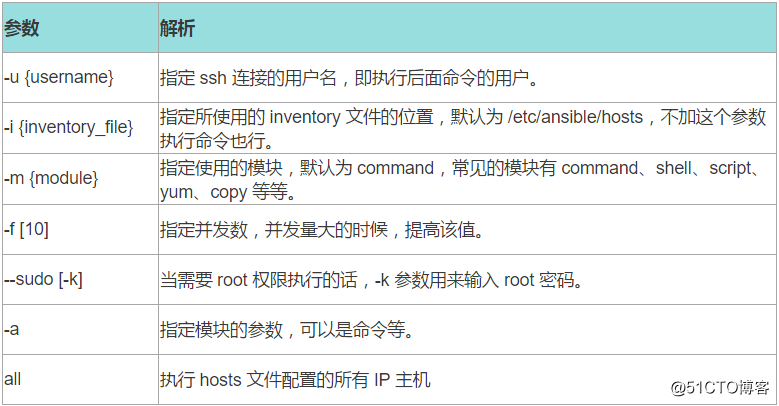
Ansible 正则表达式的使用:
[root@ansible ~]# ansible 192.168.* -m command -a "df -h"
192.168.193.132 | SUCCESS | rc=0 >>
文件系统        容量  已用  可用 已用% 挂载点
/dev/sda2        16G  1.7G   15G   11% /
devtmpfs        483M     0  483M    0% /dev
tmpfs           493M     0  493M    0% /dev/shm
tmpfs           493M  6.8M  486M    2% /run
tmpfs           493M     0  493M    0% /sys/fs/cgroup
tmpfs            99M     0   99M    0% /run/user/0

192.168.193.133 | SUCCESS | rc=0 >>
文件系统        容量  已用  可用 已用% 挂载点
/dev/sda2        16G  1.6G   15G   10% /
devtmpfs        483M     0  483M    0% /dev
tmpfs           493M     0  493M    0% /dev/shm
tmpfs           493M   13M  480M    3% /run
tmpfs           493M     0  493M    0% /sys/fs/cgroup
tmpfs            99M     0   99M    0% /run/user/0

[root@ansible ~]# ansible 192.168.136.* -m shell -a "df -h"   # 此处换成 shell 同上 command。
Ansible 远程批量拷贝文件或目录:
[root@ansible ~]# ansible all -m copy -a 'src=/etc/hosts dest=/home/ mode=755 owner=root'
# 拷贝文件到所有受控节点的 /home/ 目录下。
192.168.193.132 | SUCCESS => {
    "changed": true,
    "checksum": "7335999eb54c15c67566186bdfc46f64e0d5a1aa",
    "dest": "/home/hosts",
    "gid": 0,
    "group": "root",
    "md5sum": "54fb6627dbaa37721048e4549db3224d",
    "mode": "0755",
    "owner": "root",
    "size": 158,
    "src": "/root/.ansible/tmp/ansible-tmp-1538574556.34-237168714952191/source",
    "state": "file",
    "uid": 0
}
localhost | SUCCESS => {
    "changed": true,
    "checksum": "7335999eb54c15c67566186bdfc46f64e0d5a1aa",
    "dest": "/home/hosts",
    "gid": 0,
    "group": "root",
    "md5sum": "54fb6627dbaa37721048e4549db3224d",
    "mode": "0755",
    "owner": "root",
    "size": 158,
    "src": "/root/.ansible/tmp/ansible-tmp-1538574556.32-40315963626608/source",
    "state": "file",
    "uid": 0
}
192.168.193.133 | SUCCESS => {
    "changed": true,
    "checksum": "7335999eb54c15c67566186bdfc46f64e0d5a1aa",
    "dest": "/home/hosts",
    "gid": 0,
    "group": "root",
    "md5sum": "54fb6627dbaa37721048e4549db3224d",
    "mode": "0755",
    "owner": "root",
    "size": 158,
    "src": "/root/.ansible/tmp/ansible-tmp-1538574556.29-213260987463029/source",
    "state": "file",
    "uid": 0
}
[root@ansible ~]# mkdir /root/hehe
[root@ansible ~]# cd /root/hehe/
[root@ansible hehe]# touch {1..5}
[root@ansible ~]# ansible all -m copy -a 'src=/root/hehe dest=/tmp/ mode=755 owner=root’
# 将 /root/hehe 目录拷贝到所有受控节点的 /tmp 目录下(目录后面加 / 则会拷贝目录下文件)。
192.168.136.182 | SUCCESS => {
"changed": true,
"dest": "/tmp/",
"src": "/root/hehe"
}
192.168.136.183 | SUCCESS => {
"changed": true,
"dest": "/tmp/",
"src": "/root/hehe"
}
localhost | SUCCESS => {
"changed": true,
"dest": "/tmp/",
"src": "/root/hehe"
}Ansible YUM 远程批量安装:
[root@ansible ~]# ansible 192.168.* -m yum -a "name=sysstat,screen,ntpdate state=installed"
#  通过 yum 为 IP 以 192.168.* 开头的受控节点安装命令,输出省略若干。
192.168.136.182 | SUCCESS => {
192.168.136.183 | SUCCESS => {
Playbook 配置管理:
我们使用如上这些命令可以快速利用 Ansible 的工具编写脚本,从而以非常简便的方式实现任务处理的自动化与流程化。除此之外我们还可以创建 Ansible Playbook 以收集命令与任务集,这样能够大大降低管理工作的复杂程度。
Playbook 采用 YAML 语法结构,因此它们一般比较易于阅读并加以配置。
案例一:使用 Playbook 实现在客户端安装 screen 软件:
[root@uncle_drew tmp]# rpm -qa|grep screen
screen-4.1.0-0.25.20120314git3c2946.el7.x86_64
[root@uncle_drew ~]# yum remove screen   #  先把 182 上面的 screen 软件卸载掉。
[root@uncle_drew tmp]# rpm -qa|grep screen   #  此时该服务器上面的 screen 没有了。
[root@ansible ansible]# cd /etc/ansible/
#  在 /etc/ansible/ 目录下,新建 screen.yaml 文件,内容如下:
[root@ansible ansible]# vim screen.yaml
[root@ansible ansible]# cat screen.yaml   #  提示:每个冒号后面都要有空格。
- hosts: 192.168.136.182  #  定义主机。
  remote_user: root    #  远程用户名。
  tasks:
  - name: +++++++++yum install screen+++++++++  #  显示的任务名称。
    shell: yum install screen -y
#  指定需要在远程客户端执行的命令(可多个命令,中间用分号隔开)。
[root@ansible ansible]# ansible-playbook screen.yaml  #  运行这个 Playbook 的命令。
#  以下内容表示执行完毕(忽略警告)。
PLAY [192.168.136.182] ***************************
TASK [Gathering Facts] ****************************
ok: [192.168.136.182]
TASK [+++++++++yum install screen+++++++++] **
 [WARNING]: Consider using the yum module rather than running yum.  If you need to use command
because yum is insufficient you can add warn=False to this command task or set
command_warnings=False in ansible.cfg to get rid of this message.
changed: [192.168.136.182]
PLAY RECAP **************************
192.168.136.182            : ok=2    changed=1    unreachable=0    failed=0
[root@uncle_drew ~]# rpm -qa|grep screen  # 到 IP 182 的客户端即可看到安装的 screen。
screen-4.1.0-0.25.20120314git3c2946.el7.x86_64
案例二:定义源码安装 Nginx 软件:
[root@ansible ansible]# cd /etc/ansible/
[root@ansible ansible]# vim nginx.yaml
[root@ansible ansible]# cat nginx.yaml
- hosts: 192.168.136.182
  remote_user: root
  tasks:
  - name: +++++++++Install nginx web version 1.6.1++++++++++
    shell: wget http://nginx.org/download/nginx-1.6.1.tar.gz ;tar zxf nginx-1.6.1.tar.gz ;cd nginx-1.6.1 ;./configure --prefix=/usr/local/nginx ;make ;make install
[root@ansible ansible]# ansible-playbook nginx.yaml   #  执行该 Playbook。
Ansible 批量部署 tomcat 项目
1、项目需求
公司有4台机器,需要将 jdk8 和 tomcat8 两个包同时上传到四台机器的 /opt/ 目录下,并进行安装 。安装成功后让四台机器通过邮件的方式通知运维人员,邮件格式为:IP+hostname+servername。
2、项目计划
通过 Ansible 批量部署
3、部署方案
3.1、四台机器的基本信息
3.2、在 ansible 的主机清单中定义一个主机组,指定需要部署的机器的 IP
[root@ansible ~]# cat /etc/ansible/hosts
[websrvs]
192.168.24.129
192.168.24.130
192.168.24.131
192.168.24.132
3.3、目录结构
[root@ansible ~]# tree /etc/ansible/
├── files
│   ├── apache-tomcat-8.0.27.tar.gz # tomcat 包
│   ├── jdk-8u60-linux-x64.tar.gz       # jdk 包
│   ├── notice.txt                  # 脚本里的文件
│   ├── tomcat_ini.sh               # tomcat 服务的配置文件
│   └── tomcat_mail.sh              # 发邮件脚本
├── hosts                       # 主机清单
├── tomcat.yml                  # 批量部署 tomcat 服务的 ansible-palybook 脚本
3.4、文件详细内容
[root@ansible ~]# cd /etc/ansible/files/
[root@ansible ansible]# ll
总用量 185912
-rw-r--r-- 1 root root   9128610 11月  6 07:47 apache-tomcat-8.0.27.tar.gz
-rw-r--r-- 1 root root 181238643 7月  23 03:49 jdk-8u60-linux-x64.tar.gz
-rw-r--r-- 1 root root      1465 11月 10 08:02 tomcat_ini.sh
[root@ansible files]# cat tomcat_ini.sh # 脚本详细内容
#!/bin/sh
# chkconfig: 345 99 10
# description: Auto-starts tomcat
# /etc/init.d/tomcatd
# Tomcat auto-start
# Source function library.
#. /etc/init.d/functions
# source networking configuration.
#. /etc/sysconfig/network
RETVAL=0
export JAVA_HOME=/application/jdk
export JAVA_HOME
export CATALINA_HOME=/application/tomcat
export CATALINA_BASE=/application/tomcat
start()
{
if [ -f $CATALINA_HOME/bin/startup.sh ];
then
echo $"Starting tomcat"
$CATALINA_HOME/bin/startup.sh
RETVAL=$?
echo " OK"
return $RETVAL
fi
}
stop()
{
if [ -f $CATALINA_HOME/bin/shutdown.sh ];
then
echo $"Stopping tomcat"
$CATALINA_HOME/bin/shutdown.sh
RETVAL=$?
sleep 1
ps -fwwu root | grep tomcat|grep -v grep | grep -v PID | awk '{print $2}'|xargs kill -9
echo " OK"
# [ $RETVAL -eq 0 ] && rm -f /var/lock/...
return $RETVAL
fi
}
case "$1" in
start)
start
;;
stop)
stop
;;
restart)
echo $"Restaring tomcat"
$0 stop
sleep 1
$0 start
;;
*)
echo $"Usage: $0 {start|stop|restart}"
exit 1
;;
esac
exit $RETVAL[root@ansible ansible]# cat files/tomcat_mail.sh # 邮件脚本详细内容
#!/bin/bash
File=/etc/ansible/files/notice.txt
if [ ! -f $File ]
then
touch $File
fi
> $File
for n in `seq 129 131`
do
number=`ansible -m shell 192.168.24.$n -a 'netstat -lntup|grep 8080|wc -l'|sed -n '2p'`
if [ $number -eq 1 ]
then
ansible 192.168.24.$n -a 'hostname -I' >> $File
ansible 192.168.24.$n -a 'hostname' >> $File
echo "tomcat success" >> $File
else
ansible 192.168.24.$n -a 'hostname -I' >> $File
ansible 192.168.24.$n -a 'hostname' >> $File
echo "tomcat failed" >> $File
fi
done
grep -v "192.168.24.* | SUCCESS | rc=0 >>" $File|mail -s "tomcat state" [email protected][root@ansible ansible]# cat tomcat.yml # 批量部署 tomcat 服务 ansible-playbook 脚本详细内容
---
- hosts: websrvs
remote_user: root
tasks:
############Install JDK################
- name: copy jdk-8u60-linux-x64.tar.gz
copy: src=files/jdk-8u60-linux-x64.tar.gz dest=/opt/jdk-8u60-linux-x64.tar.gz
- name: tar jdk
command: /bin/tar xf /opt/jdk-8u60-linux-x64.tar.gz -C /application
- name: rename jdk
shell: mv /application/jdk1.8.0_60 /application/jdk
- name: add /etc/profile
shell: sed -i.ori '$a export JAVA_HOME=/application/jdk\nexport PATH=$JAVA_HOME/bin:$JAVA_HOME/jre/bin:$PATH\nexport CLASSPATH=.$CLASSPATH:$JAVA_HOME/lib:$JAVA_HOME/jre/lib:$JAVA_HOME/lib/tools.jar' /etc/profile
- name: add /etc/profile
shell: echo 'export TOMCAT_HOME=/application/tomcat'>>/etc/profile
- name: source profile
shell: source /etc/profile
############Install Tomcat################
- name: copy apache-tomcat-8.0.27.tar.gz
copy: src=files/apache-tomcat-8.0.27.tar.gz dest=/opt/apache-tomcat-8.0.27.tar.gz
- name: tar tomcat
command: /bin/tar xf /opt/apache-tomcat-8.0.27.tar.gz -C /application
- name: softlink tomcat
file: src=/application/apache-tomcat-8.0.27/ dest=/application/tomcat state=link
- name: create group
group: name=tomcat
- name: create user
user: name=tomcat group=tomcat system=yes shell=/sbin/nologin
- name: push conf file
template: src=/application/tomcat/conf/tomcat-users.xml dest=/application/tomcat/conf/
notify: restart tomcat
- name: copy startup.sh
copy: src=files/tomcat_ini.sh dest=/etc/init.d/tomcat mode=0755
- name: start tomcat
shell: /etc/init.d/tomcat start
handlers:
- name: restart tomcat
shell: /etc/init.d/tomcat restart3.5、执行过程
[root@ansible ansible]# ansible-playbook tomcat.yml

PLAY [websrvs] ********************************************************************

TASK [Gathering Facts] ************************************************************
ok: [192.168.24.131]
ok: [192.168.24.130]
ok: [192.168.24.129]

TASK [copy jdk-8u60-linux-x64.tar.gz] *********************************************
changed: [192.168.24.129]
changed: [192.168.24.130]
changed: [192.168.24.131]

TASK [tar jdk] ********************************************************************
 [WARNING]: Consider using the unarchive module rather than running tar.  If you
need to use command because unarchive is insufficient you can add warn=False to
this command task or set command_warnings=False in ansible.cfg to get rid of this
message.
changed: [192.168.24.130]
changed: [192.168.24.129]
changed: [192.168.24.131]

TASK [rename jdk] *****************************************************************
changed: [192.168.24.129]
changed: [192.168.24.130]
changed: [192.168.24.131]

TASK [add /etc/profile] ***********************************************************
 [WARNING]: Consider using the replace, lineinfile or template module rather than
running sed.  If you need to use command because replace, lineinfile or template
is insufficient you can add warn=False to this command task or set
command_warnings=False in ansible.cfg to get rid of this message.
changed: [192.168.24.129]
changed: [192.168.24.131]
changed: [192.168.24.130]

TASK [add /etc/profile] ***********************************************************
changed: [192.168.24.129]
changed: [192.168.24.130]
changed: [192.168.24.131]

TASK [source profile] *************************************************************
changed: [192.168.24.130]
changed: [192.168.24.131]
changed: [192.168.24.129]

TASK [copy apache-tomcat-8.0.27.tar.gz] *******************************************
changed: [192.168.24.129]
changed: [192.168.24.131]
changed: [192.168.24.130]

TASK [tar tomcat] *****************************************************************
changed: [192.168.24.129]
changed: [192.168.24.130]
changed: [192.168.24.131]

TASK [softlink tomcat] ************************************************************
changed: [192.168.24.130]
changed: [192.168.24.131]
changed: [192.168.24.129]

TASK [create group] ***************************************************************
ok: [192.168.24.129]
ok: [192.168.24.131]
ok: [192.168.24.130]

TASK [create user] ****************************************************************
ok: [192.168.24.130]
ok: [192.168.24.129]
ok: [192.168.24.131]

TASK [push conf file] *************************************************************
ok: [192.168.24.129]
ok: [192.168.24.131]
ok: [192.168.24.130]

TASK [copy startup.sh] ************************************************************
changed: [192.168.24.129]
changed: [192.168.24.131]
changed: [192.168.24.130]

TASK [start tomcat] ***************************************************************
changed: [192.168.24.129]
changed: [192.168.24.130]
changed: [192.168.24.131]

PLAY RECAP ************************************************************************
192.168.24.129             : ok=15   changed=11   unreachable=0    failed=0
192.168.24.130             : ok=15   changed=11   unreachable=0    failed=0
192.168.24.131             : ok=15   changed=11   unreachable=0    failed=0

[root@ansible ansible]# sh files/tomcat_mail.sh     # 执行发邮件的脚本
3.6、查看结果
[root@ansible ansible]# ansible all -m shell -a 'netstat -lntup|grep java'
192.168.24.131 | SUCCESS | rc=0 >>
tcp6       0      0 :::8080                 :::*                    LISTEN      4092/java
tcp6       0      0 127.0.0.1:8005          :::*                    LISTEN      4092/java
tcp6       0      0 :::8009                 :::*                    LISTEN      4092/java
192.168.24.129 | SUCCESS | rc=0 >>
tcp6       0      0 :::8080                 :::*                    LISTEN      38742/java
tcp6       0      0 127.0.0.1:8005          :::*                    LISTEN      38742/java
tcp6       0      0 :::8009                 :::*                    LISTEN      38742/java
192.168.24.130 | SUCCESS | rc=0 >>
tcp6       0      0 :::8080                 :::*                    LISTEN      31653/java
tcp6       0      0 127.0.0.1:8005          :::*                    LISTEN      31653/java
tcp6 0 0 :::8009 :::* LISTEN 31653/java 