前言
MyBatis官网:http://www.mybatis.org/mybatis-3/zh/index.html
本文记录springboot与mybatis的整合实例;1、以注解方式;2、手写XML配置、逆向工程生成XML配置
maven依赖
        <!-- springboot -->
        <dependency>
            <groupId>org.springframework.boot</groupId>
            <artifactId>spring-boot-starter-web</artifactId>
        </dependency>

        <!-- MVC -->
        <dependency>
            <groupId>org.springframework.boot</groupId>
            <artifactId>spring-boot-starter-test</artifactId>
            <scope>test</scope>
        </dependency>

        <!--Thymeleaf模板依赖-->
        <dependency>
            <groupId>org.springframework.boot</groupId>
            <artifactId>spring-boot-starter-thymeleaf</artifactId>
        </dependency>

        <!--热部署工具dev-tools-->
        <dependency>
            <groupId>org.springframework.boot</groupId>
            <artifactId>spring-boot-devtools</artifactId>
            <scope>runtime</scope>
        </dependency>

        <!--添加MyBatis依赖 -->
        <dependency>
            <groupId>org.mybatis.spring.boot</groupId>
            <artifactId>mybatis-spring-boot-starter</artifactId>
            <version>1.3.1</version>
        </dependency>

        <!--添加MySQL驱动依赖 -->
        <dependency>
            <groupId>mysql</groupId>
            <artifactId>mysql-connector-java</artifactId>
            <scope>runtime</scope>
        </dependency>
application.yml
#注意:在yml文件中添加value值时,value前面需要加一个空格
#2.0.0的配置切换为servlet.path而不是"-"
server:
  port: 10086 #端口号
  servlet:
    context-path: /springboot

spring:
    thymeleaf:
      cache: false  #关闭页面缓存
      prefix: classpath:/view/  #thymeleaf访问根路径
      mode: LEGACYHTML5

    datasource: #数据库相关
      url: jdbc:mysql://localhost:3306/test?characterEncoding=utf-8
      username: root
      password: 123456
      driver-class-name: com.mysql.jdbc.Driver
    mvc:
      date-format: yyyy-MM-dd HH:mm:ss #mvc接收参数时对日期进行格式化

    jackson:
      date-format: yyyy-MM-dd HH:mm:ss #jackson对响应回去的日期参数进行格式化
      time-zone: GMT+8

mybatis:
  configuration:
   map-underscore-to-camel-case: true #开启驼峰映射
result,通用响应数据格式
注:不想自己写set、get方法的用lombok插件
public class Result {

    private String message;

    private Integer status;

    private Object data;

    public Result() {
    }

    public Result(String message, Integer status, Object data) {
        this.message = message;
        this.status = status;
        this.data = data;
    }

    public String getMessage() {
        return message;
    }

    public void setMessage(String message) {
        this.message = message;
    }

    public Integer getStatus() {
        return status;
    }

    public void setStatus(Integer status) {
        this.status = status;
    }

    public Object getData() {
        return data;
    }

    public void setData(Object data) {
        this.data = data;
    }

    @Override
    public String toString() {
        return "Result{" +
                "message='" + message + '\'' +
                ", status=" + status +
                ", data=" + data +
                '}';
    }

    public static Result build(Integer status,String message,Object data){
            return new Result(message,status,data);
    }
}
user,实体类
注:不想自己写set、get方法的用lombok插件
public class User {

    private Integer id;

    private String username;

    private String password;

    private Date created;

    public User(){}

    public Integer getId() {
        return id;
    }

    public void setId(Integer id) {
        this.id = id;
    }

    public String getUsername() {
        return username;
    }

    public void setUsername(String username) {
        this.username = username;
    }

    public String getPassword() {
        return password;
    }

    public void setPassword(String password) {
        this.password = password;
    }

    public Date getCreated() {
        return created;
    }

    public void setCreated(Date created) {
        this.created = created;
    }

    @Override
    public String toString() {
        return "User{" +
                "id=" + id +
                ", username='" + username + '\'' +
                ", password='" + password + '\'' +
                ", created=" + created +
                '}';
    }
}
controller
@RestController
@RequestMapping("/user")
public class UserController {

    @Autowired
    private UserService userService;

    @RequestMapping("/insert")
    public Result insert(User user) {
        return  userService.insert(user);
    }

    @RequestMapping("/delete")
    public Result delete(User user) {
        return  userService.delete(user);
    }

    @RequestMapping("/update")
    public Result update(User user) {
        return  userService.update(user);
    }

    @RequestMapping("/select")
    public Result select(User user) {
        return  userService.select(user);
    }
}
service
public interface UserService {

    /**
     * 增
     */
    Result insert(User user);

    /**
     * 删
     */
    Result delete(User user);

    /**
     * 改
     */
    Result update(User user);

    /**
     * 查
     */
    Result select(User user);
}
@Service
public class UserServiceImpl implements UserService {

    @Autowired
    private UserMapper userMapper;

    @Override
    public Result insert(User user) {
        int i = userMapper.insert(user);
        if (i > 0) {
            return Result.build(200, "操作成功!", user);
        } else {
            return Result.build(400, "操作失败!", null);
        }
    }

    @Override
    public Result delete(User user) {
        int i = userMapper.delete(user);
        if (i > 0) {
            return Result.build(200, "操作成功!", user);
        } else {
            return Result.build(400, "操作失败!", null);
        }
    }

    @Override
    public Result update(User user) {
        int i = userMapper.update(user);
        if (i > 0) {
            return select(user);
        } else {
            return Result.build(400, "操作失败!", null);
        }
    }

    @Override
    public Result select(User user) {
        User user1 = userMapper.select(user);
        if (user1 != null) {
            return Result.build(200, "操作成功!", user1);
        } else {
            return Result.build(400, "操作失败!", user1);
        }
    }
}
接下来不同就是mapper映射了
注解方式
工程结构

mapper.java
直接使用注解,@Insert、@Delete、@Update、@Select,前三个事务自动提交,不用我们管理;增、删、改返回的是影响的行数,当设置了主键自动递增,需要返回自增主键时添加@Options(useGeneratedKeys = true),设置是否获取主键并设置到模型实体属性中;注意:insert接口返回的依旧是受影响的行数,但自增主键已经设置到了模型实体属性中。
@Mapper
@Component(value = "UserMapper")
public interface UserMapper {

    /**
     * 增
     */
    @Insert(value = "insert into tb_user(username,password,created) value(#{username},#{password},#{created})")
    @Options(useGeneratedKeys = true)
    int insert(User user);

    /**
     * 删
     */
    @Delete("delete from tb_user where id = #{id}")
    int delete(User user);

    /**
     * 改
     */
    @Update(value = "update tb_user set username = #{username} where id = #{id}")
    int update(User user);

    /**
     * 查
     */
    @Select(value = "select * from tb_user where id = #{id}")
    User select(User user);

}
配置XML
工程目录
加多了mybatis相关的XML配置文件
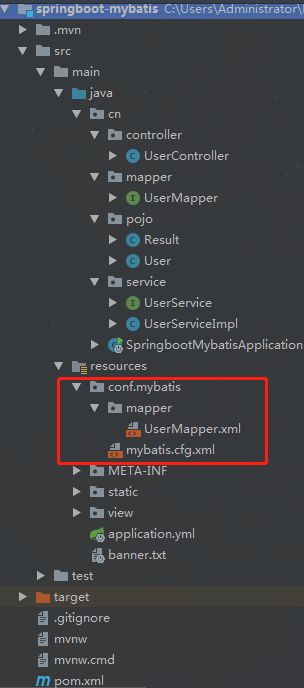
其他部分都没有变,变的只有以下部分:
application.yml的mybatis部分改成,
mybatis:

  # 配置mapper的扫描,找到所有的mapper.xml映射文件
  mapperLocations: classpath:conf/mybatis/mapper/*.xml

  # 加载全局的配置文件
  configLocation: classpath:conf/mybatis/mybatis.cfg.xml
mapper.java
不再使用注解,将SQL写到XML里面
@Mapper
@Component(value = "UserMapper")
public interface UserMapper {

    /**
     * 增
     */
    int insert(User user);

    /**
     * 删
     */
    int delete(User user);

    /**
     * 改
     */
    int update(User user);

    /**
     * 查
     */
    User select(User user);

}
mybatis.cgf.xml
这里配置全局设置,但我这里没什么要配的
<?xml version="1.0" encoding="UTF-8" ?>
<!DOCTYPE configuration
        PUBLIC "-//mybatis.org//DTD Config 3.0//EN"
        "http://mybatis.org/dtd/mybatis-3-config.dtd">
<!-- 全局配置文件 -->
<configuration>

</configuration>
UserMapper.xml
因为我们的表主键是自动递增,insert标签使用useGeneratedKeys="true" keyProperty="id",模型实体属性就会设置递增后的值
<?xml version="1.0" encoding="UTF-8" ?>
<!DOCTYPE mapper
        PUBLIC "-//mybatis.org//DTD Mapper 3.0//EN"
        "http://mybatis.org/dtd/mybatis-3-mapper.dtd">
<mapper namespace="cn.mapper.UserMapper">

    <insert id="insert" useGeneratedKeys="true" keyProperty="id" parameterType="cn.pojo.User">
        insert into tb_user(username,password,created) value(#{username},#{password},#{created})
    </insert>

    <delete id="delete" parameterType="cn.pojo.User">
        delete from tb_user where id = #{id}
    </delete>

    <update id="update" parameterType="cn.pojo.User">
        update tb_user set username = #{username} where id = #{id}
    </update>

    <select id="select" parameterType="cn.pojo.User" resultType="cn.pojo.User">
        select * from tb_user where id = #{id}
    </select>

</mapper>
逆向工程
数据库单表逆向生成单表对应的pojo实体、mapper.java、mapper.xml,无需手写这几个文件,生成的接口方法已经足够满足大部分业务需求,实现快速开发,关于逆向工程的具体配置,请戳这篇博客:Mybatis(七) mybatis的逆向工程的配置详解
效果展示
经测试,注解方式跟配置XML方式效果一致,传参、调用方式、返回结果都一致,接口均能正常调用。
insert接口

update接口

select接口

delete接口

后记
MyBatis 是一款优秀的持久层框架,它支持定制化 SQL、存储过程以及高级映射。MyBatis 避免了几乎所有的 JDBC 代码和手动设置参数以及获取结果集。MyBatis 可以使用简单的 XML 或注解来配置和映射原生信息,将接口和 Java 的 POJOs(Plain Old Java Objects,普通的 Java对象)映射成数据库中的记录。