Spring boot AOP 示例
在之前的文章中,介绍过Spring 的AOP与AspectJ相关的内容。最近实验室的一个项目又用到了springboot的AOP,在网上调研了一下发现了几个配置极其简单但功能很完善的示例,在这里总结一下。AOP相关的原理及含义不再解释,参考之前的文章。
1. 前期代码准备
创建一个Springboot项目,在项目中编写一个IndexController,一个User实体类,以及一个service(为了简单起见我直接编写了Service的实现,而没有按照接口-实现的方式)
IndexController
@RestController
public class IndexController {

    @Autowired
    MyService myService;

    @GetMapping(value = "hello")
    public String hello(){
        myService.sayHello("Greet to everyone");
        return "hhh";
    }
}
在hello()函数中,我们调用myservice的sayHello函数,并向前台发送字符串hhh
User
public class User {
    private int id;
    private String name;
    public User(){

    }
    public User(int id,String name){
        this.id = id;
        this.name = name;
    }
    public int getId() {
        return id;
    }
    public String getName() {
        return name;
    }
}
MyService
@Service
public class MyService {
    public void sayHello(String greet){
        System.out.println("Hello, I'm fucntion sayHello of MyService");
    }
    public void introduce(User user){
        System.out.println("Hello My name is "+ user.getName());
    }
}
2. 定义切面
在项目中定义一个切面,如下所示:
RuleAspect
@Aspect
@Component
public class RuleAspect {

    @Pointcut("execution(* com.example.demo.service.MyService.sayHello(..))")
    public void pointCutName(){}

    @Before(value = "execution(* com.example.demo.service.MyService.sayHello(..))")
    public void beforeFunc(){
        System.out.println("Function before sayHello");
    }

    @After("pointCutName()")
    public void afterFunc(){
        System.out.println("Function after sayHello");
    }

    @Around("execution(* com.example.demo.controller.IndexController.hello(..))")
    public Object aroundHelloCtrl(ProceedingJoinPoint proceedingJoinPoint) throws Throwable {
        System.out.println("Before");
        Object res = proceedingJoinPoint.proceed();
        System.out.println("After");
        return res;
    }
}
要解释的地方有以下几点:
-
定义切点有几种方法,可以使用
@Pointcut首先定义一个函数,然后在后面的注解中直接使用,例如代码中的@After标注的函数,也可像@Before的示例一样,直接在注解后面写明完整的函数路径 -
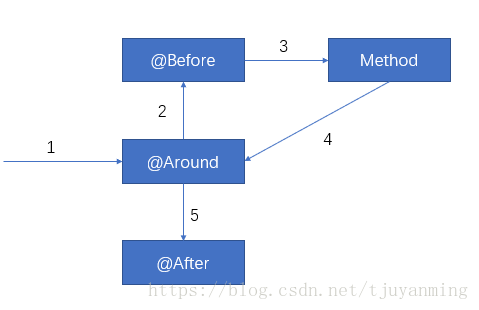
@Before,@After,@Around分别对应在前置通知(在连接点执行之前)、后置通知,和环绕通知。三种通知的执行顺序如下(不考虑@AfterReturning和@AfterReturning)扫描二维码关注公众号,回复: 4358778 查看本文章
-
在环绕通知
@Around中,我们看到函数签名处有参数ProceedingJoinPoint,这个参数是获取切入点函数的参数。我们可以看到,在示例函数中,我们首先打印Before,然后调用proceedingJoinPoint.proceed()来执行切入点函数,然后在函数结束后打印After。同时,要注意的是,如果你的切入点函数有返回值,那么
@Around注解的通知函数一定也要有返回值,否则切入点函数不能正常返回结果
启动程序,我们在postman中输入http://localhost:8080/hello
控制台结果如下:
Before
Function before sayHello
Hello, I'm fucntion sayHello of MyService
Function after sayHello
After
调用顺序参见上面的顺序图
3. 获取切入点函数中的参数
获取切入点函数中的参数,在网上有很多采用反射的方法来获取的。虽然也能很好的完成功能,但过程有点冗杂。还是推荐使用aspectj中基于注解传递参数的方法
我们向Controller中添加一个控制函数,专门用来展示连接点参数传递的效果。该函数从url中拿到参数作为函数形参
@GetMapping(value = "getArgs")
public String getArgs(@RequestParam("key")String key,@RequestParam("value") String value){
    return "hhh";
}
在切面中定义一个通知,获取连接点中的参数值
@Around(value = "execution(* com.example.demo.controller.IndexController.getArgs(..)) && args(key,value)")
public Object aroundSayHello(ProceedingJoinPoint joinPoint,String key,String value) throws Throwable {
    System.out.printf("The args of this method is %s and %s \n",key,value);
    return joinPoint.proceed();
}
方法很简单,在execution后边添加 && args(key,value),并在函数的签名处声明对应的参数。要注意的是args()后面的参数,必须和切入点函数对应的签名是一样的,即形参的类型和个数、顺序必须一样,否则无法调用通知函数
在postman中输入以下地址:http://localhost:8080/getArgs?key=123&value=456
The args of this method is 123 and 456
该方法不仅可以传入基本类型,还可以传入我们定义的实体,示例如下:
向Controller中添加控制函数:
@GetMapping(value = "intro")
public void intro(){
	myService.introduce(new User(123456,"ming"));
}
在切面中新添加一个环绕通知,用来测试接受切入点实体参数
@Before("execution(* com.example.demo.service.MyService.introduce(..)) && args(user)")
public void beforeIntro(User user){
    System.out.println(user.getName());
}
在postman中输入http://localhost:8080/intro
ming
Hello My name is ming
4. 使用注解声明切入点
还有一种方法是自定义一个注解,然后在切入点函数上添加这个注解,即基于注解的AOP形式。在这里就不赘述,个人还是比较喜欢这种在通知上声明函数路径的方式,有兴趣的同学可以在网上调研学习一下。另外所有代码基本都在文章里,就不在上传完整项目了。