Prototype 模式
在Java中,如果我们一般使用new XXClass()的方式获取一个实例。而Prototype提供了这样一种方式,既不通过new的方式获取实例,同时和工厂方法获取实例的方法不同。该模式使用类对应的对象来产生新的实例。
在介绍Prototype模式之前,我们要首先介绍Java中的clone()和Cloneable。我们知道,在java中,所有的类都继承于一个叫Object的类。而该类中一个重要的方法就是clone()。他可以通过复制实例的方式获取一个新的实例,而不需要知道该类的具体实现。
如果我们希望对一个类的实例进行克隆,那么我们被克隆的类必须实现Cloneable 接口,否则调用clone()时会抛出CloneNotSupportedException异常。Cloneable接口中并没有声明任何方法,只是用来标记这个类可以被复制,这类接口被称为标记接口。
我们结合一段代码来看clone()函数的作用。假设我们有个类实现了Cloneable:
public class Stuent implements Cloneable {
    private String name;
    private Date birth;

    public Stuent(String name,Date date) {
        this.name = name;
        this.birth = date;

    }

    public String getName() {
        return name;
    }

    public void setName(String name) {
        this.name = name;
    }

    @Override
    public Object clone() throws CloneNotSupportedException {
        return super.clone();
    }

    @Override
    public String toString() {
        return String.format("name: %s,birth: %s", this.name,this.birth.toString());
    }
}
在Student中有两个成员变量,一个是String类型的姓名,一个是Date类型的生日。
由于clone()函数访问权限是protected的,所以这里我在Student中重载了该函数,修改访问修饰符为public,直接调用父类的clone()
我们在主函数中这样调用Student:
public class Main {
            Date date = new Date();
        date.setYear(1995);
        date.setMonth(7);
        date.setDate(3);
        Stuent s1 = new Stuent("xiaoming",date);
        Stuent s2 = (Stuent) s1.clone();
        System.out.println(s1.toString());
        System.out.println(s2.toString());
        System.out.println(s1.getName()==s2.getName()?"s1.name == s2.name":"s1.name != s2.name");
        System.out.println(s1.getBirth()==s2.getBirth()?"s1.birth == s2.birth":"s1.birth != s2.birth");

        System.out.println("\n-------After change-------\n");
        s2.setName("xiaohong");
        date.setYear(1996);
        date.setMonth(5);
        date.setDate(12);
        System.out.println(s1.toString());
        System.out.println(s2.toString());
        System.out.println(s1.getName()==s2.getName()?"s1.name == s2.name":"s1.name != s2.name");
        System.out.println(s1.getBirth()==s2.getBirth()?"s1.birth == s2.birth":"s1.birth != s2.birth");
}
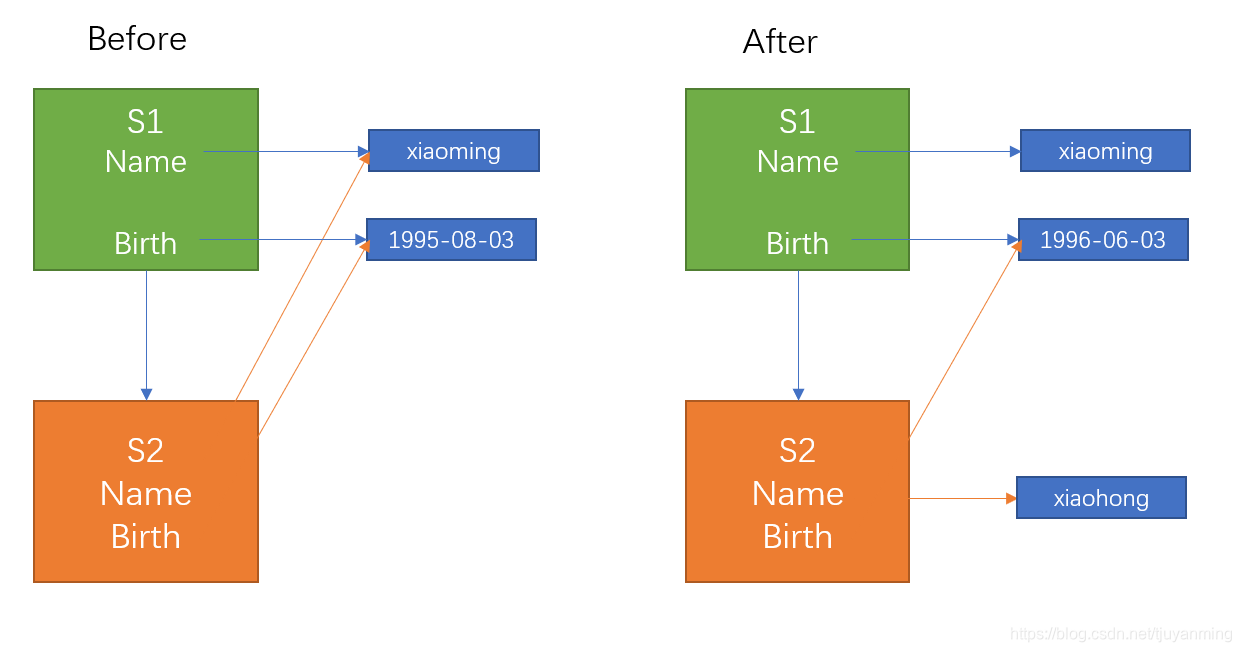
我们首先创建一个s1,其变量name值为"xiaoming",并且birth对象指向date。然后调用该函数的clone()函数来克隆一个新的实例。打印两个实例。接下来我们修改date中的值,并在此打印两个实例。(上面代码中Date类的月份从0开始,所以7对应八月,5对应六月)
输出如下所示:
name: xiaoming,birth: Sat Aug 03 10:21:41 CST 3895
name: xiaoming,birth: Sat Aug 03 10:21:41 CST 3895
s1.name == s2.name
s1.birth == s2.birth-------After change-------
name: xiaoming,birth: Fri Jun 12 10:21:41 CST 3896
name: xiaohong,birth: Fri Jun 12 10:21:41 CST 3896
s1.name != s2.name
s1.birth == s2.birth
可以看出,在我们修改了date之后,s1和s2对应的date变量均发生了改变。也就是说两个实例内部的成员变量birth指向同一段内存空间。这也就是我们说的,浅拷贝。
浅拷贝:当我们复制一个对象A时,返回一个新的对象引用B。同时A和B具有相同的成员变量,而对于A中含有的引用,B也仅仅复制该引用,而没有复制该引用所指向的内存空间存储的值。我们用一张图来表示上述的过程。
回到Prototype模式,一个简单的Prototype 模式如下所示:
首先,我们有一个Product接口,该接口继承了Cloneable接口,所有克隆的类实现了该接口。
public interface Product extends Cloneable {
    public abstract void show(String s);
    public abstract Product createClone();
}
然后,我们有一个Manager类,该类维护了一个Map存储我们想要克隆的实例
public class Manager {
    private HashMap showcase = new HashMap();
    public void register(String name, Product proto) {
        showcase.put(name, proto);
    }
    public Product create(String protoname) {
        Product p = (Product)showcase.get(protoname);
        return p.createClone();
    }
}
最后,实现了两个具体类MessageBox和UnderlinePen,其实现了具体的打印方法和克隆方法。
public class MessageBox implements Product {
    private char decochar;
    public MessageBox(char decochar) {
        this.decochar = decochar;
    }

    @Override
    public void show(String s) {
        int length = s.getBytes().length;
        for (int i = 0; i < length + 4; i++) {
            System.out.print(decochar);
        }
        System.out.println("");
        System.out.println(decochar + " "  + s + " " + decochar);
        for (int i = 0; i < length + 4; i++) {
            System.out.print(decochar);
        }
        System.out.println("");
    }

    @Override
    public Product createClone() {
        Product p = null;
        try {
            //浅拷贝
            p = (Product)clone();
        } catch (CloneNotSupportedException e) {
            e.printStackTrace();
        }
        return p;
    }
}
public class UnderlinePen implements Product {
    private char ulchar;
    public UnderlinePen(char ulchar) {
        this.ulchar = ulchar;

    }

    @Override
    public void show(String s) {
        int length = s.getBytes().length;
        System.out.println("\""  + s + "\"");
        System.out.print(" ");
        for (int i = 0; i < length; i++) {
            System.out.print(ulchar);
        }
        System.out.println("");
    }

    @Override
    public Product createClone() {
        Product p = null;
        try {
            p = (Product)clone();
        } catch (CloneNotSupportedException e) {
            e.printStackTrace();
        }
        return p;
    }
}
在Main函数中调用过程如下:
public class Main {

    public static void main(String args []){

        Manager manager = new Manager();
        UnderlinePen upen = new UnderlinePen('~');
        MessageBox mbox = new MessageBox('*');
        MessageBox sbox = new MessageBox('/');
        manager.register("strong date",upen);
        manager.register("star date",mbox);
        manager.register("slash date",sbox);

        Product p1 = manager.create("strong date");
        Product p2 = manager.create("star date");
        Product p3 = manager.create("slash date");
        p1.show("Hello, world.");
        p2.show("Hello, world.");
        p3.show("Hello, world.");

    }
}
"Hello, world."
 ~~~~~~~~~~~~~
*****************
* Hello, world. *
*****************
/////////////////
/ Hello, world. /
/////////////////

Process finished with exit code 0
由于在前面我们解释clone()和Cloneable以及浅拷贝,所以这段代码看起来比较简单,这里就不在介绍了。
一个一般的prototype模式的UML类图如下:
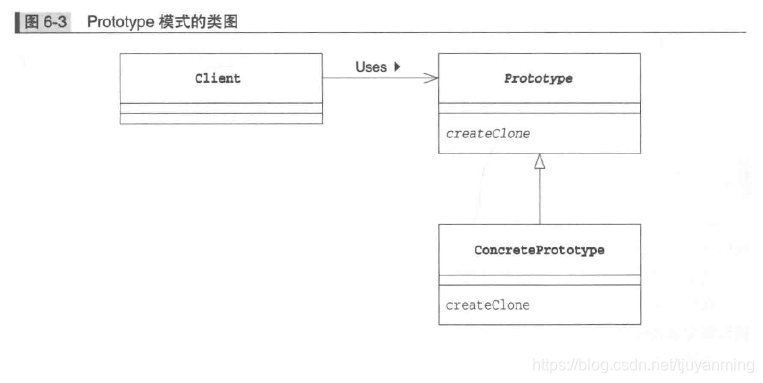
简单来说就是两个部分:
- 一个是继承了
Cloneable接口的prototype接口,该接口向外部调用提供了被克隆对象的clone方法,同时在内部声明一些其他的函数,例如打印函数之类的。 - 另外一个就是具体的类,该类实现了
prototype接口,实现了具体的createclone函数以及具体的一些函数。
那么prototype模式具体有什么样的用处呢?在《图解设计模式》这本书中,提到了以下三点:
-
对象种类繁多,无法将他们整合到一个类中
-
难以根据类生成实例
-
想解耦框架与生成的实例