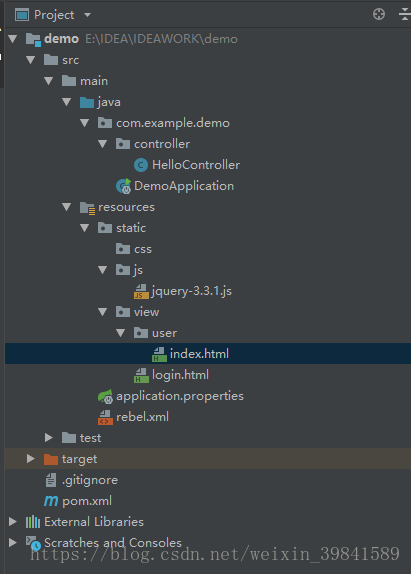
项目结构如图所示,由于没有使用thymeleaf模版所以删掉了文件夹:
前端页面代码:
登录页:
<!DOCTYPE html>
<html lang="en">
<head>
    <meta charset="UTF-8">
    <title>Title</title>
</head>
<body>
<button type="button">提交</button>
</body>
<script type="text/javascript" src="/js/jquery-3.3.1.js"></script>
<script type="text/javascript">
    //获取basePath,测试的话就能用就完了
    var obj = window.document.location;
    var BASE_PATH = obj.href.substring(0, obj.href.indexOf(obj.pathname));
    //请求传参模拟
    var username = "root";
    var password = "123456";
    $("button").on("click", function () {
        $.ajax({
            url: BASE_PATH + "/login/" + username + "/" + password,
            type: "get",
            success: function f(data) {
                console.log(data);
                debugger;
                window.location.href = BASE_PATH + "/view/user/index.html";
            }
        })
    });
</script>
</html>
登录后的列表页:
<!DOCTYPE html>
<html lang="en">
<head>
    <meta charset="UTF-8">
    <title>Title</title>
</head>
<body>
<input id="username" readonly="readonly">
<input id="password" readonly="readonly">
</body>
<script type="text/javascript" src="/js/jquery-3.3.1.js"></script>
<script type="text/javascript">
    //获取basePath,测试的话就能用就完了
    var obj = window.document.location;
    var BASE_PATH = obj.href.substring(0, obj.href.indexOf(obj.pathname));
    //请求渲染模拟
    $.ajax({
        url: BASE_PATH + "/list",
        type: "get",
        success: function f(data) {
            $("#username").val(data.username);
            $("#password").val(data.password);
        }
    })
</script>
</html>
注意引入的静态资源路径,springboot默认读取static下的文件,所以你只需写出相对于static文件夹的相对路径即可
后端Controller代码:
package com.example.demo.controller;

import org.springframework.web.bind.annotation.PathVariable;
import org.springframework.web.bind.annotation.RequestMapping;
import org.springframework.web.bind.annotation.RequestMethod;
import org.springframework.web.bind.annotation.RestController;

import java.util.HashMap;

/**
 * @ClassName HelloController
 * @Description TODO
 * @Author Rock-PC5
 * @Date 2018/9/13 9:02
 * @Version 1.0
 **/
@RestController
public class HelloController {

    //模拟用户登录验证
	@RequestMapping(value = "/login/{username}/{password}",method = RequestMethod.GET)
	public Object login(@PathVariable String username,@PathVariable String password){
		System.out.println(username);
		System.out.println(password);
		return "success";
	}

    //模拟现实用户信息
	@RequestMapping(value = "/list")
	public Object list(){
		String username = "root";
		String password = "123456";
		HashMap<Object, Object> objectObjectHashMap = new HashMap<>(1);
		objectObjectHashMap.put("username",username);
		objectObjectHashMap.put("password",password);
		return objectObjectHashMap;
	}
}
@RestController主要起到@Controller + @ResponseBody的作用
它使得整个Controller的每一个方法都返回json数据,因为个人感觉jsp有些慢,现在的h5都是先加载页面再渲染数据,所以跳转页面的工作并不需要你来做,交给前端就好。
@RequestMapping主要起到设置请求路径的作用
value为请求路径,请求路径就是我们常说的接口,本测试的接口符合restful风格,这么写的原因就是看起来简洁高大上;
method为请求类型,请求类型常用的有get、post,不常用的有delete、options、put、head、patch等等,如果以后要做tomcat options禁用,会把不常用的都禁用掉,如果你没有接触过,就只用get和post就行。
@PathVariable主要起到取请求路径中的参数的作用
它后面的参数名必须要与路径中{}里的参数名一致,不然会报错,否则你可以使用@PathVarible里的参数value来绑定路径中的参数,大概长这个样子:
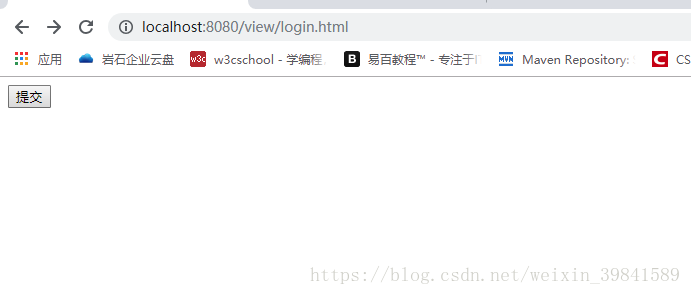
@PathVariable(value = "username") String newUsername现在我们来测试一下,static下的东西都能直接访问,所以我们直接访问http://localhost:8080/view/login.html,注意别加static,效果就是一个提交按钮,现在我们点击这个提交按钮:
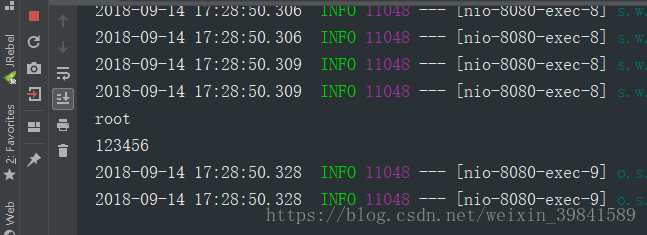
看看后端,参数已经成功传到后端了:
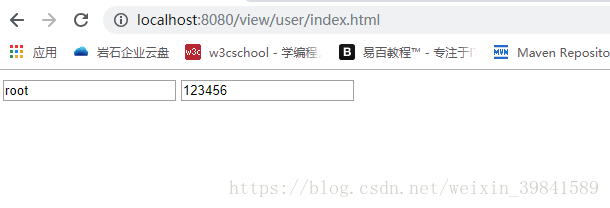
然后就是渲染页面: