Spring 的配置
一、Spring的发展
Spring1.x
全部通过xml文件配置bean,随着项目的不断扩大,需要将xml配置分放到不同的配置文件中,需要频繁的在java类和xml配置文件中切换。
Spring2.x
随着JDK 1.5带来的注解支持,Spring2.x可以使用注解对Bean进行声名和注入,大大的减少了xml配置文件,同时也大大简化了项目的开发。
最佳实践:
1、 应用的基本配置用xml,比如:数据源、资源文件等;
2、 业务开发用注解,比如:Service中注入bean等;
Spring3.x
从Spring3.x开始提供了Java配置方式,使用Java配置方式可以更好的理解你配置的Bean。
Spring4.x +
Spring4.x和Spring boot都推荐使用java配置的方式,可以完全替代xml配置。
二、Spring的Java配置方式
@Configuration 和 @Bean
Spring的Java配置方式是通过 @Configuration 和 @Bean 这两个注解实现的:
1、@Configuration 作用于类上,相当于一个xml配置文件;
2、@Bean 作用于方法上,相当于xml配置中的;
示例
该示例演示了通过Java配置的方式进行配置Spring,并且实现了Spring IOC功能。
1. 创建Maven工程以及导入依赖
<project xmlns="http://maven.apache.org/POM/4.0.0" xmlns:xsi="http://www.w3.org/2001/XMLSchema-instance"
	xsi:schemaLocation="http://maven.apache.org/POM/4.0.0 http://maven.apache.org/xsd/maven-4.0.0.xsd">
	<modelVersion>4.0.0</modelVersion>
	<groupId>cn.itcast.springboot</groupId>
	<artifactId>itcast-springboot</artifactId>
	<version>1.0.0-SNAPSHOT</version>
	<packaging>war</packaging>

	<dependencies>
		<dependency>
			<groupId>org.springframework</groupId>
			<artifactId>spring-webmvc</artifactId>
			<version>4.3.7.RELEASE</version>
		</dependency>
		<!-- 连接池 -->
		<dependency>
			<groupId>com.jolbox</groupId>
			<artifactId>bonecp-spring</artifactId>
			<version>0.8.0.RELEASE</version>
		</dependency>
	</dependencies>
	<build>
		<finalName>${project.artifactId}</finalName>
		<plugins>
			<!-- 资源文件拷贝插件 -->
			<plugin>
				<groupId>org.apache.maven.plugins</groupId>
				<artifactId>maven-resources-plugin</artifactId>
				<configuration>
					<encoding>UTF-8</encoding>
				</configuration>
			</plugin>
			<!-- java编译插件 -->
			<plugin>
				<groupId>org.apache.maven.plugins</groupId>
				<artifactId>maven-compiler-plugin</artifactId>
				<configuration>
					<source>1.7</source>
					<target>1.7</target>
					<encoding>UTF-8</encoding>
				</configuration>
			</plugin>
		</plugins>
		<pluginManagement>
			<plugins>
				<!-- 配置Tomcat插件 -->
				<plugin>
					<groupId>org.apache.tomcat.maven</groupId>
					<artifactId>tomcat7-maven-plugin</artifactId>
					<version>2.2</version>
				</plugin>
			</plugins>
		</pluginManagement>
	</build>
</project>
2.编写User对象
public class User {

    private String username;

    private String password;

    private Integer age;

    public String getUsername() {
        return username;
    }

    public void setUsername(String username) {
        this.username = username;
    }

    public String getPassword() {
        return password;
    }

    public void setPassword(String password) {
        this.password = password;
    }

    public Integer getAge() {
        return age;
    }

    public void setAge(Integer age) {
        this.age = age;
    }

}
3.编写UserDAO,模拟操作数据库
public class UserDAO {

    public List<User> queryUserList(){
        List<User> result = new ArrayList<User>();
        // 模拟数据库的查询
        for (int i = 0; i < 10; i++) {
            User user = new User();
            user.setUsername("username_" + i);
            user.setPassword("password_" + i);
            user.setAge(i + 1);
            result.add(user);
        }
        return result;
    }

}
4.编写UserService
@Service
public class UserService {

    @Autowired // 注入Spring容器中的bean对象
    private UserDAO userDAO;

    public List<User> queryUserList() {
        // 调用userDAO中的方法进行查询
        return this.userDAO.queryUserList();
    }

}
5.编写SpringConfig 用于实例化Spring容器
@Configuration //通过该注解来表明该类是一个Spring的配置,相当于一个xml文件
@ComponentScan(basePackages = "cn.itcast.springboot.javaconfig") //配置扫描包
public class SpringConfig {

    @Bean // 通过该注解来表明是一个Bean对象,相当于xml中的<bean>
    public UserDAO getUserDAO(){
        return new UserDAO(); // 直接new对象做演示
    }

}
6.编写测试方法 用于启动Spring容器
public class Main {

    public static void main(String[] args) {
        // 通过Java配置来实例化Spring容器
        AnnotationConfigApplicationContext context = new AnnotationConfigApplicationContext(SpringConfig.class);

        // 在Spring容器中获取Bean对象
        UserService userService = context.getBean(UserService.class);

        // 调用对象中的方法
        List<User> list = userService.queryUserList();
        for (User user : list) {
            System.out.println(user.getUsername() + ", " + user.getPassword() + ", " + user.getPassword());
        }

        // 销毁该容器
        context.destroy();
    }

}
7.测试效果

8.小结
从以上的示例中可以看出,使用Java代码就完美的替代xml配置文件,并且结构更加的清晰。
实战
读取外部的资源配置文件
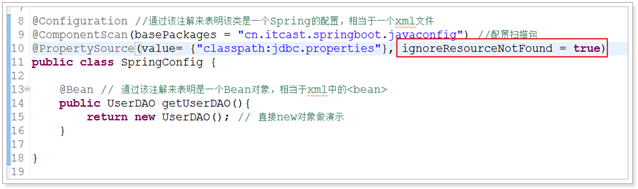
通过@PropertySource可以指定读取的配置文件,通过@Value注解获取值,具体用法:
@Configuration //通过该注解来表明该类是一个Spring的配置,相当于一个xml文件
@ComponentScan(basePackages = "cn.itcast.springboot.javaconfig") //配置扫描包
@PropertySource(value= {"classpath:jdbc.properties"})
public class SpringConfig {

    @Value("${jdbc.url}")
    private String jdbcUrl;

    @Bean // 通过该注解来表明是一个Bean对象,相当于xml中的<bean>
    public UserDAO getUserDAO(){
        return new UserDAO(); // 直接new对象做演示
    }

}
思考:
1、 如何配置多个配置文件?

2、 如果配置的配置文件不存在会怎么样?
配置数据库连接池
导入依赖:
        <!-- 连接池 -->
		<dependency>
			<groupId>com.jolbox</groupId>
			<artifactId>bonecp-spring</artifactId>
			<version>0.8.0.RELEASE</version>
		</dependency>
之前的Spring xml配置:
	 <!-- 定义数据源 -->
	<bean id="dataSource" class="com.jolbox.bonecp.BoneCPDataSource"
		destroy-method="close">
		<!-- 数据库驱动 -->
		<property name="driverClass" value="${jdbc.driverClassName}" />
		<!-- 相应驱动的jdbcUrl -->
		<property name="jdbcUrl" value="${jdbc.url}" />
		<!-- 数据库的用户名 -->
		<property name="username" value="${jdbc.username}" />
		<!-- 数据库的密码 -->
		<property name="password" value="${jdbc.password}" />
		<!-- 检查数据库连接池中空闲连接的间隔时间,单位是分,默认值:240,如果要取消则设置为0 -->
		<property name="idleConnectionTestPeriod" value="60" />
		<!-- 连接池中未使用的链接最大存活时间,单位是分,默认值:60,如果要永远存活设置为0 -->
		<property name="idleMaxAge" value="30" />
		<!-- 每个分区最大的连接数 -->
		<!--
			判断依据:请求并发数
		 -->
		<property name="maxConnectionsPerPartition" value="100" />
		<!-- 每个分区最小的连接数 -->
		<property name="minConnectionsPerPartition" value="5" />
	</bean>
参考xml配置改造成java配置方式:
    @Value("${jdbc.url}")
    private String jdbcUrl;

    @Value("${jdbc.driverClassName}")
    private String jdbcDriverClassName;

    @Value("${jdbc.username}")
    private String jdbcUsername;

    @Value("${jdbc.password}")
    private String jdbcPassword;

    @Bean(destroyMethod = "close")
    public DataSource dataSource() {
        BoneCPDataSource boneCPDataSource = new BoneCPDataSource();
        // 数据库驱动
        boneCPDataSource.setDriverClass(jdbcDriverClassName);
        // 相应驱动的jdbcUrl
        boneCPDataSource.setJdbcUrl(jdbcUrl);
        // 数据库的用户名
        boneCPDataSource.setUsername(jdbcUsername);
        // 数据库的密码
        boneCPDataSource.setPassword(jdbcUsername);
        // 检查数据库连接池中空闲连接的间隔时间,单位是分,默认值:240,如果要取消则设置为0
        boneCPDataSource.setIdleConnectionTestPeriodInMinutes(60);
        // 连接池中未使用的链接最大存活时间,单位是分,默认值:60,如果要永远存活设置为0
        boneCPDataSource.setIdleMaxAgeInMinutes(30);
        // 每个分区最大的连接数
        boneCPDataSource.setMaxConnectionsPerPartition(100);
        // 每个分区最小的连接数
        boneCPDataSource.setMinConnectionsPerPartition(5);
        return boneCPDataSource;
}
思考: 如何使用该DataSource对象?