消息中间件解决方案续
上一篇中我们讲到了在Spring工程中基本的使用消息中间件,这里就不在继续赘述。
针对消息中间件,这篇讲解两个我们常遇到的问题。
问题1:如果我们的消息的接收过程中发生异常,怎么解决?
问题2:发布订阅模式(Topic)下如果消费端宕机引起的消息的丢失,怎么解决?
问题解决方案:
问题1暂时有两种解决方案:第一种是开启消息确认机制,第二种开启事务。下面会在点对点模式下进行演示。
问题2的解决方案:实现发布订阅消息的持久化保存。
根据上面的解决方案搭建工程如下:测试消息的重发使用的是点对点模式(queue)

问题一解决方案如下:
方案一:消息确认机制
1.消息的生产类QueueProducer
 1 @Component
 2 public class QueueProducer {
 3
 4     @Autowired
 5     private JmsTemplate jmsTemplate;
 6
 7     @Autowired // 注意Destination是javax.jms.Destination;
 8     private Destination queueTextDestination;
 9
10     /**
11      * 点对点方式发送文本信息
12      * @param message
13      */
14     public void sendTestMessage(final String message){
15         jmsTemplate.send(queueTextDestination, new MessageCreator() {
16             @Override
17             public Message createMessage(Session session) throws JMSException {
18                 return session.createTextMessage(message);
19             }
20         });
21     }
22 }
2.消息的监听类MyMessageListenerQueueAcknowledge
 1 public class MyMessageListenerQueueAcknowledge implements SessionAwareMessageListener {
 2
 3     @Override
 4     public void onMessage(Message message, Session session) throws JMSException {
 5         // 为了在点对点模式情况下记录消息发送的次数
 6         System.out.println(System.currentTimeMillis()+"请接收开启了消息确认机制的消息");
 7
 8         try { // 模拟发生异常
 9             if(1==1){
10                 throw new RuntimeException("出异常了");
11             }
12             TextMessage textMessage = (TextMessage)message;
13             System.out.println(textMessage);
14             System.out.println("queue模式接收到新消息"+textMessage.getText());
15
16             message.acknowledge();// 接收完成,通知activeMq我们正常消费完
17         } catch (JMSException e) {
18             session.recover();// 发生异常,通知activeMQ需要恢复消息发送重新消费
19             e.printStackTrace();
20         }
21     }
22 }
3.消息生产者的配置文件producer-queue.xml
 1 <?xml version="1.0" encoding="UTF-8"?>
 2 <beans xmlns="http://www.springframework.org/schema/beans"
 3        xmlns:context="http://www.springframework.org/schema/context"
 4        xmlns:xsi="http://www.w3.org/2001/XMLSchema-instance"
 5        xmlns:amq="http://activemq.apache.org/schema/core"
 6        xmlns:jms="http://www.springframework.org/schema/jms"
 7        xsi:schemaLocation="http://www.springframework.org/schema/beans
 8         http://www.springframework.org/schema/beans/spring-beans.xsd
 9         http://www.springframework.org/schema/context
10         http://www.springframework.org/schema/context/spring-context.xsd">
11
12     <!--包扫描-->
13     <context:component-scan base-package="com.buwei"></context:component-scan>
14
15     <!-- 真正可以产生Connection的ConnectionFactory,由对应的 JMS服务厂商提供-->
16     <bean id="targetConnectionFactory" class="org.apache.activemq.ActiveMQConnectionFactory">
17         <property name="brokerURL" value="tcp://192.168.25.128:61616"/>
18     </bean>
19
20     <!-- Spring用于管理真正的ConnectionFactory的ConnectionFactory -->
21     <bean id="connectionFactory" class="org.springframework.jms.connection.SingleConnectionFactory">
22         <!-- 目标ConnectionFactory对应真实的可以产生JMS Connection的ConnectionFactory -->
23         <property name="targetConnectionFactory" ref="targetConnectionFactory"/>
24     </bean>
25
26     <!-- Spring提供的JMS工具类,它可以进行消息发送、接收等 -->
27     <bean id="jmsTemplate" class="org.springframework.jms.core.JmsTemplate">
28         <!-- 这个connectionFactory对应的是我们定义的Spring提供的那个ConnectionFactory对象 -->
29         <property name="connectionFactory" ref="connectionFactory"/>
30     </bean>
31
32     <!--这个是队列目的地,点对点的  文本信息-->
33     <bean id="queueTextDestination" class="org.apache.activemq.command.ActiveMQQueue">
34         <constructor-arg value="jms-queue"/>
35     </bean>
36
37 </beans>
4.消息消费者的配置文件consumer-queue-acknowledge.xml
这是需要主要第53行配置的消息的确认模式为CLIENT_ACKNOWLEDGE,有两种配置在注释用有指出。
其中第19行以及22-25注释掉的配置是对于消息重发的一些规则的配置,为了不影响测试效果,这里先注释掉。
 1 <?xml version="1.0" encoding="UTF-8"?>
 2 <beans xmlns="http://www.springframework.org/schema/beans"
 3        xmlns:context="http://www.springframework.org/schema/context"
 4        xmlns:xsi="http://www.w3.org/2001/XMLSchema-instance"
 5        xmlns:amq="http://activemq.apache.org/schema/core"
 6        xmlns:jms="http://www.springframework.org/schema/jms"
 7        xsi:schemaLocation="http://www.springframework.org/schema/beans
 8         http://www.springframework.org/schema/beans/spring-beans.xsd
 9         http://www.springframework.org/schema/context
10         http://www.springframework.org/schema/context/spring-context.xsd">
11
12     <!--包扫描-->
13     <context:component-scan base-package="com.buwei"></context:component-scan>
14
15     <!-- 真正可以产生Connection的ConnectionFactory,由对应的 JMS服务厂商提供-->
16     <bean id="targetConnectionFactory" class="org.apache.activemq.ActiveMQConnectionFactory">
17         <property name="brokerURL" value="tcp://192.168.25.128:61616"/>
18         <!--配置消息重发的是一些设置-->
19         <!--<property name="redeliveryPolicy" ref="activeMQRedeliveryPolicy"/>-->
20     </bean>
21
22     <!--实现消息重发的bean-->
23     <!--<bean id="activeMQRedeliveryPolicy" class = "org.apache.activemq.RedeliveryPolicy">
24         <property name="maximumRedeliveries" value="2"></property>
25     </bean>-->
26
27     <!-- Spring用于管理真正的ConnectionFactory的ConnectionFactory -->
28     <bean id="connectionFactory" class="org.springframework.jms.connection.SingleConnectionFactory">
29         <!-- 目标ConnectionFactory对应真实的可以产生JMS Connection的ConnectionFactory -->
30         <property name="targetConnectionFactory" ref="targetConnectionFactory"/>
31     </bean>
32
33     <!-- Spring提供的JMS工具类,它可以进行消息发送、接收等 -->
34     <bean id="jmsTemplate" class="org.springframework.jms.core.JmsTemplate">
35         <!-- 这个connectionFactory对应的是我们定义的Spring提供的那个ConnectionFactory对象 -->
36         <property name="connectionFactory" ref="connectionFactory"/>
37     </bean>
38
39     <!--这个是消息目的地,点对点的  文本信息-->
40     <bean id="queueTextDestination" class="org.apache.activemq.command.ActiveMQQueue">
41         <constructor-arg value="jms-queue"/>
42     </bean>
43
44     <!--我的监听类-->
45     <bean id="myMessageListenerQueue" class="com.buwei.MyMessageListenerQueueAcknowledge"></bean>
46
47     <!--消息监听容器-->
48     <bean class="org.springframework.jms.listener.DefaultMessageListenerContainer" >
49         <property name="connectionFactory" ref="connectionFactory" />
50         <property name="destination" ref="queueTextDestination" />
51         <property name="messageListener" ref="myMessageListenerQueue" />
52         <!--设置消息的确认模式,数字2对应为ClIENT_ACKNOWLEDGE模式,也可以设置属性sessionAcknowledgeModeName的名称来实现-->
53         <property name="sessionAcknowledgeMode" value="2"/>
54   </bean>
55 </beans>
5.配置消息生产者的测试类QueueProducerTest
 1 @RunWith(SpringJUnit4ClassRunner.class)
 2 @ContextConfiguration(locations = "classpath:producer-queue.xml")
 3 public class QueueProducerTest {
 4
 5     @Autowired
 6     private QueueProducer queueProducer;
 7
 8     @Test
 9     public void queueSendTest(){
10         queueProducer.sendTestMessage("SpringJms-queue模式,吃了嘛?");
11     }
12 }
6.配置消息消费者测试类
 1 @RunWith(SpringJUnit4ClassRunner.class)
 2 @ContextConfiguration(locations = "classpath:consumer-queue-acknowledge.xml")
 3 public class QueueConsumerAcknowledgeTest {
 4     @Test
 5     public void queueAcknowledgeReceiveTest(){
 6         try {
 7             // 这里是为了使消息监听持续进行
 8             System.in.read();
 9         } catch (IOException e) {
10             e.printStackTrace();
11         }
12     }
13 }
7.执行测试
首先开启消息消费者的测试类中的测试方法,然后开启消息生产者的测试类中的测试方法
控制台打印如下:

也就是在消息接收发生异常的情况下,消息的确认机制让消息生产者再次重发了6次消息,这个也是消息中间件默认的重发次数,我们可以通过我在consumer配置文件中的注释掉的activeMQRedeliveryPolicy这个bean来设置重发的次数。
方案二:开启事务管理
消息的生产者QueueProducer类、配置文件producer-queue.xml、生产者测试类QueueProducerTest继续沿用上面方案一中的,其他的配置如下:
1.消息的监听类MyMessageListenerQueueTransaction
 1 public class MyMessageListenerQueueTransaction implements SessionAwareMessageListener {
 2
 3     @Override
 4     public void onMessage(Message message, Session session) throws JMSException {
 5
 6         // 为了在点对点模式情况下记录消息发送的次数
 7         System.out.println(System.currentTimeMillis()+"请接收开启了事务管理机制的消息");
 8
 9         try {
10             if (1 == 1) {
11                 throw new RuntimeException("出异常了");
12             }
13             TextMessage textMessage = (TextMessage) message;
14             System.out.println(textMessage);
15             System.out.println("queue模式接收到新消息" + textMessage.getText());
16
17             session.commit();// 接收成功,提交事务
18         } catch (JMSException e) {
19             session.rollback();// 发生异常,消息回滚重新发送
20             e.printStackTrace();
21         }
22     }
23 }
2.配置了事务管理的消费者配置文件
— —这里主要的不同的是第54行以及58-60行,配置了事务管理相关的内容
 1 <?xml version="1.0" encoding="UTF-8"?>
 2 <beans xmlns="http://www.springframework.org/schema/beans"
 3        xmlns:context="http://www.springframework.org/schema/context"
 4        xmlns:xsi="http://www.w3.org/2001/XMLSchema-instance"
 5        xmlns:amq="http://activemq.apache.org/schema/core"
 6        xmlns:jms="http://www.springframework.org/schema/jms"
 7        xsi:schemaLocation="http://www.springframework.org/schema/beans
 8         http://www.springframework.org/schema/beans/spring-beans.xsd
 9         http://www.springframework.org/schema/context
10         http://www.springframework.org/schema/context/spring-context.xsd">
11
12     <!--包扫描-->
13     <context:component-scan base-package="com.buwei"></context:component-scan>
14
15     <!-- 真正可以产生Connection的ConnectionFactory,由对应的 JMS服务厂商提供-->
16     <bean id="targetConnectionFactory" class="org.apache.activemq.ActiveMQConnectionFactory">
17         <property name="brokerURL" value="tcp://192.168.25.128:61616"/>
18         <!--配置消息重发的是一些设置-->
19         <!--<property name="redeliveryPolicy" ref="activeMQRedeliveryPolicy"/>-->
20     </bean>
21
22     <!--对消息重发进行属性设置的bean-->
23     <!--<bean id="activeMQRedeliveryPolicy" class = "org.apache.activemq.RedeliveryPolicy">
24         <property name="maximumRedeliveries" value="2"></property>
25     </bean>-->
26
27     <!-- Spring用于管理真正的ConnectionFactory的ConnectionFactory -->
28     <bean id="connectionFactory" class="org.springframework.jms.connection.SingleConnectionFactory">
29         <!-- 目标ConnectionFactory对应真实的可以产生JMS Connection的ConnectionFactory -->
30         <property name="targetConnectionFactory" ref="targetConnectionFactory"/>
31     </bean>
32
33     <!-- Spring提供的JMS工具类,它可以进行消息发送、接收等 -->
34     <bean id="jmsTemplate" class="org.springframework.jms.core.JmsTemplate">
35         <!-- 这个connectionFactory对应的是我们定义的Spring提供的那个ConnectionFactory对象 -->
36         <property name="connectionFactory" ref="connectionFactory"/>
37     </bean>
38
39     <!--这个是消息目的地,点对点的  文本信息-->
40     <bean id="queueTextDestination" class="org.apache.activemq.command.ActiveMQQueue">
41         <constructor-arg value="jms-queue"/>
42     </bean>
43
44     <!--我的监听类-->
45     <bean id="myMessageListenerQueue" class="com.buwei.MyMessageListenerQueueTransaction"></bean>
46
47     <!--消息监听容器-->
48     <bean class="org.springframework.jms.listener.DefaultMessageListenerContainer" >
49         <property name="connectionFactory" ref="connectionFactory" />
50         <property name="destination" ref="queueTextDestination" />
51         <property name="messageListener" ref="myMessageListenerQueue" />
52
53         <!--设置开启事务管理-->
54         <property name="transactionManager" ref="transactionManager"/>
55     </bean>
56
57     <!--配置事务管理的bean-->
58     <bean id="transactionManager" class = "org.springframework.jms.connection.JmsTransactionManager">
59         <property name="connectionFactory" ref="connectionFactory"/>
60     </bean>
61 </beans>
3.配置了事务管理的消息消费者的测试类
 1 @RunWith(SpringJUnit4ClassRunner.class)
 2 @ContextConfiguration(locations = "classpath:consumer-queue-transaction.xml")
 3 public class QueueConsumerTransactionTest {
 4
 5     @Test
 6     public void queueTransactionReceiveTest(){
 7         try {   // 这里是为了使消息监听持续进行
 8             System.in.read();
 9         } catch (IOException e) {
10             e.printStackTrace();
11         }
12     }
13 }
4.执行测试
同样的先开启消费端的测试类中的方法,再开启生产者的测试类中的测试方法,控制台打印如下:
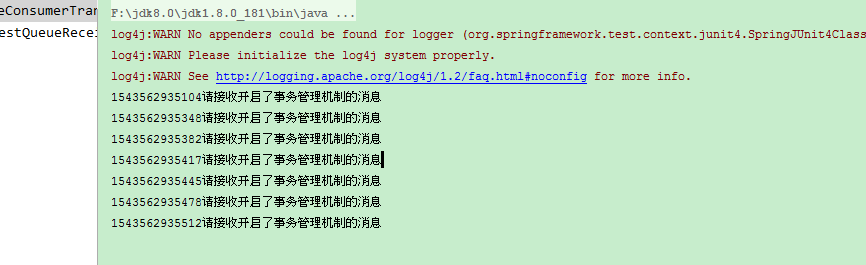
一样的,在默认情况下,如果发生异常,消息会回滚6次。
总结:消息的重发可以通过设置消息确认机制或者事务管理的方式来实现,系统默认的可重发次数是6次,加上原来的1次总共是发送7次。可以通过配置RedeliveryPolicy类来修改默认值。
问题二解决方案如下:
在消费端开启持久的消息订阅服务,主要的也是在消费者的配置文件中进行配置
1.消息的生产者TopicProducer类
 1 @Component
 2 public class TopicProducer {
 3     @Autowired
 4     private JmsTemplate jmsTemplate;
 5
 6     @Autowired // 注意Destination是javax.jms.Destination;
 7     private Destination topicTextDestination;
 8
 9     /**
10      * 发布订阅方式发送
11      * @param message
12      */
13     public void sendTestMessage(final String message){
14         jmsTemplate.send(topicTextDestination, new MessageCreator() {
15             @Override
16             public Message createMessage(Session session) throws JMSException {
17                 return session.createTextMessage(message);
18             }
19         });
20     }
21 }
2.消息的监听类MyMessageListenerTopic
 1 public class MyMessageListenerTopic implements MessageListener {
 2
 3     @Override
 4     public void onMessage(Message message) {
 5         TextMessage textMessage = (TextMessage)message;
 6         try {
 7             System.out.println("topic模式接收到新消息"+textMessage.getText());
 8         } catch (JMSException e) {
 9             e.printStackTrace();
10         }
11     }
12 }
3.消息的生产者的配置文件producer-topic.xml
 1 <?xml version="1.0" encoding="UTF-8"?>
 2 <beans xmlns="http://www.springframework.org/schema/beans"
 3        xmlns:context="http://www.springframework.org/schema/context"
 4        xmlns:xsi="http://www.w3.org/2001/XMLSchema-instance"
 5        xmlns:amq="http://activemq.apache.org/schema/core"
 6        xmlns:jms="http://www.springframework.org/schema/jms"
 7        xsi:schemaLocation="http://www.springframework.org/schema/beans
 8         http://www.springframework.org/schema/beans/spring-beans.xsd
 9         http://www.springframework.org/schema/context
10         http://www.springframework.org/schema/context/spring-context.xsd">
11
12     <!--包扫描-->
13     <context:component-scan base-package="com.buwei"></context:component-scan>
14
15     <!-- 真正可以产生Connection的ConnectionFactory,由对应的 JMS服务厂商提供-->
16     <bean id="targetConnectionFactory" class="org.apache.activemq.ActiveMQConnectionFactory">
17         <property name="brokerURL" value="tcp://192.168.25.128:61616"/>
18     </bean>
19
20     <!-- Spring用于管理真正的ConnectionFactory的ConnectionFactory -->
21     <bean id="connectionFactory" class="org.springframework.jms.connection.SingleConnectionFactory">
22         <!-- 目标ConnectionFactory对应真实的可以产生JMS Connection的ConnectionFactory -->
23         <property name="targetConnectionFactory" ref="targetConnectionFactory"/>
24     </bean>
25
26     <!-- Spring提供的JMS工具类,它可以进行消息发送、接收等 -->
27     <bean id="jmsTemplate" class="org.springframework.jms.core.JmsTemplate">
28         <!-- 这个connectionFactory对应的是我们定义的Spring提供的那个ConnectionFactory对象 -->
29         <property name="connectionFactory" ref="connectionFactory"/>
30     </bean>
31
32     <!--这个是发布、订阅模式 文本信息-->
33     <bean id="topicTextDestination" class="org.apache.activemq.command.ActiveMQTopic">
34         <constructor-arg value="jms-topic"/>
35     </bean>
36
37 </beans>
4.消息的消费者的配置文件consumer-topic.xml
主要在第25行以及第49行的配置,声明消息的订阅者的id,以及将订阅者id加入到到消息的监听容器中的持久化主体订阅者中
 1 <?xml version="1.0" encoding="UTF-8"?>
 2 <beans xmlns="http://www.springframework.org/schema/beans"
 3        xmlns:context="http://www.springframework.org/schema/context"
 4        xmlns:xsi="http://www.w3.org/2001/XMLSchema-instance"
 5        xmlns:amq="http://activemq.apache.org/schema/core"
 6        xmlns:jms="http://www.springframework.org/schema/jms"
 7        xsi:schemaLocation="http://www.springframework.org/schema/beans
 8         http://www.springframework.org/schema/beans/spring-beans.xsd
 9         http://www.springframework.org/schema/context
10         http://www.springframework.org/schema/context/spring-context.xsd">
11
12     <!--包扫描-->
13     <context:component-scan base-package="com.buwei"></context:component-scan>
14
15     <!-- 真正可以产生Connection的ConnectionFactory,由对应的 JMS服务厂商提供-->
16     <bean id="targetConnectionFactory" class="org.apache.activemq.ActiveMQConnectionFactory">
17         <property name="brokerURL" value="tcp://192.168.25.128:61616"/>
18     </bean>
19
20     <!-- Spring用于管理真正的ConnectionFactory的ConnectionFactory -->
21     <bean  id="connectionFactory" class="org.springframework.jms.connection.CachingConnectionFactory">
22         <property name="targetConnectionFactory" ref="targetConnectionFactory"/>
23         <property name="sessionCacheSize" value="100"/>
24         <!--声明消息的订阅者的id-->
25         <property name="clientId" value="buwei"/>
26     </bean>
27
28     <!-- Spring提供的JMS工具类,它可以进行消息发送、接收等 -->
29     <bean id="jmsTemplate" class="org.springframework.jms.core.JmsTemplate">
30         <!-- 这个connectionFactory对应的是我们定义的Spring提供的那个ConnectionFactory对象 -->
31         <property name="connectionFactory" ref="connectionFactory"/>
32     </bean>
33
34     <!--这个消息目的地,发布订阅的,文本信息-->
35     <bean id="topicTextDestination"  class="org.apache.activemq.command.ActiveMQTopic">
36         <constructor-arg value="jms-topic"/>
37     </bean>
38
39     <!--我的监听类-->
40     <bean id="myMessageListenerTopic" class="com.buwei.MyMessageListenerTopic"></bean>
41
42     <!--消息监听容器-->
43     <bean class="org.springframework.jms.listener.DefaultMessageListenerContainer">
44         <property name="connectionFactory" ref="connectionFactory" />
45         <property name="destination" ref="topicTextDestination" />
46         <property name="messageListener" ref="myMessageListenerTopic" />
47
48         <!--指明持久化消息的订阅者的名称,对应connectionFactory中的clientId-->
49         <property name="durableSubscriptionName" value="buwei"></property>
50     </bean>
51 </beans>
5.生产者的测试类TopicProducerTest
 1 @RunWith(SpringJUnit4ClassRunner.class)
 2 @ContextConfiguration(locations= "classpath:producer-topic.xml ")
 3 public class TopicProducerTest {
 4     @Autowired
 5     private TopicProducer topicProducer;
 6
 7     @Test
 8     public void  topicSendTest(){
 9         topicProducer.sendTestMessage("SpringJms-topic模式,吃好了");
10     }
11 }
6.消费者的测试类TopicConsumerTest
 1 @RunWith(SpringJUnit4ClassRunner.class)
 2 @ContextConfiguration(locations = "classpath:consumer-topic.xml")
 3 public class TopicConsumerTest {
 4
 5     @Test
 6     public void topicReceiveTest(){
 7         try {
 8             System.in.read();
 9         } catch (IOException e) {
10             e.printStackTrace();
11         }
12     }
13 }
7.开启测试
这里为了实现持久化,我们需要先运行消息的消费者测试类中的方法以实现消息的订阅,然后停止消费者的方法,再来执行两次生产者测试类中的方法,再次运行消费者测试类中的方法,控制台打印如下:

我们可以发现在实现了订阅机制之后,即使消费者宕机,只要再上线仍然可以收到在宕机期间生产者发送的消息。
但是如果没有实现订阅的话那在Topic模式下进行的就是广播形式,即生产者发送消息时,消费端在线即可收到消息,如果错过了就是一辈子。。。。
补充:
死信队列:没有被我们正常消费的消息就会存入到死信队列当中。
activeMQ中的消息数据其实都是存放在文件中的,可以通过修改activeMQ安装目录config下的activemq.xml进行配置。例如如果我们需要重新发送死信队列当中的消息就可以重新进行读取来进行重发。
当然这里只是简单的介绍一下,死信队列的用处如果有了解的话希望大家能够补充。:)
查看了一下网上的一些资源发现解决问题的配置很多种,这里仅作为自己学习的一种记录,大家共勉。