在学生成绩管理的应用设计中经常会有需求场景,需要使用教务系统提供的服务,为了节约用户的时间,有时候会提供账号绑定的服务,即用户提供账号和密码,开发者登陆教务系统,获取其中的信息,这个时候就需要识别验证码的功能。
首先第一步,获取验证码数据集
从检查元素中,我们可以得知,二维码的链接为http://210.42.121.241/servlet/GenImg
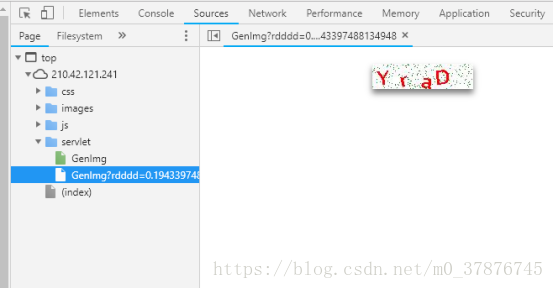
利用一个简单的爬虫小程序,我们就可以获得大量的二维码数据,见spider.py
代码如下
import re
import requests
import os
from bs4 import BeautifulSoup
url = 'http://210.42.121.241/servlet/GenImg'
#html = requests.get(url).text #获取网页内容
if not os.path.exists('image'):
os.makedirs('image')
i = 1719
for i in range(100000):
#img = requests.get(url,timeout=5)
try:
pic = requests.get(url,timeout=5) #超时异常判断 5秒超时
except requests.exceptions.ConnectionError:
print('当前图片无法下载')
continue
file_name = "F:/hacker/image/"+str(i)+".jpg" #拼接图片名
print(file_name)
#将图片存入本地
fp = open(file_name,"wb")
fp.write(pic.content) #写入图片
fp.close()
i+=1
运行之后可以获取10w张的图片
图像由四个符合组成,因此我们可以以某种方式将图像分割开以令每张图像只有一个符号。这样的话我们只需训练神经网络识别单个字符就行了。我们并不能手动地用 Photoshop 等图像软件将它们分割开,因为训练图像总共有 10万张。此外,我们也不能将图像切分为四个等大小的图像块,因为验证码生成程序会随机地将这些不同的字符放置在不同的水平线上。
幸运的是,我们能使用已有的方法自动完成这一部分。在图像处理中,我们经常需要检测有相同色彩的像素块,这些连续像素块的边界可以称之为轮廓。而 OpenCV 有一个内置的 findContours ( ) 函数可以检测这些轮廓的区域。
然后我们将该图像转换为纯净的黑白像素点(即采用色彩阈值的方法),因此我们将很容易寻找到连续的轮廓边界:
使用 OpenCV 的 findContours ( ) 函数以检测包含连续相同像素块的分离部分,当然也不乏会有一些图片出现了字符重叠在了一起,这种情况下,分离出来的图片数目不是4个,比较容易选出来,可以直接丢弃,或者采取另外一种选择办法(因为验证的时候也会遇到这种问题)
如果字符轮廓的宽要比高长一些,那么很有可能这一个切分内就包含了两个字符。因此我们可以将这种连体的字符拆分为两半,并将它们视为单独的字符。如果连的实在太紧密了,那就放弃吧,数据集还有很多
代码如下:
import os
import os.path
import cv2
import glob
import imutils
IMAGE_FOLDER = "F:/hacker/image2"
OUTPUT_FOLDER = "F:/hacker/letter2"
# Get a list of all the images we need to process
image_files = glob.glob(os.path.join(IMAGE_FOLDER, "*"))
counts = {}
count = 0
# loop over the image paths
for (i, image_file) in enumerate(image_files):
print("[INFO] processing image {}/{}".format(i + 1, len(image_files)))
# Since the filename contains the text (i.e. "2A2X.png" has the text "2A2X"),
# grab the base filename as the text
filename = os.path.basename(image_file)
correct_text = os.path.splitext(filename)[0]
# Load the image and convert it to grayscale
image = cv2.imread(image_file)
gray = cv2.cvtColor(image, cv2.COLOR_BGR2GRAY)
# Add some extra padding around the image
gray = cv2.copyMakeBorder(gray, 8, 8, 8, 8, cv2.BORDER_REPLICATE)
# threshold the image (convert it to pure black and white)
thresh = cv2.threshold(gray, 0, 255, cv2.THRESH_BINARY_INV | cv2.THRESH_OTSU)[1]
# find the contours (continuous blobs of pixels) the image
contours = cv2.findContours(thresh.copy(), cv2.RETR_EXTERNAL, cv2.CHAIN_APPROX_SIMPLE)
# Hack for compatibility with different OpenCV versions
contours = contours[0] if imutils.is_cv2() else contours[1]
letter_image_regions = []
# Now we can loop through each of the four contours and extract the letter
# inside of each one
for contour in contours:
# Get the rectangle that contains the contour
(x, y, w, h) = cv2.boundingRect(contour)
# Compare the width and height of the contour to detect letters that
# are conjoined into one chunk
if w / h > 1.25:
# This contour is too wide to be a single letter!
# Split it in half into two letter regions!
half_width = int(w / 2)
letter_image_regions.append((x, y, half_width, h))
letter_image_regions.append((x + half_width, y, half_width, h))
else:
# This is a normal letter by itself
letter_image_regions.append((x, y, w, h))
# If we found more or less than 4 letters in the , our letter extraction
# didn't work correcly. Skip the image instead of saving bad training data!
if len(letter_image_regions) != 4:
continue
# Sort the detected letter images based on the x coordinate to make sure
# we are processing them from left-to-right so we match the right image
# with the right letter
letter_image_regions = sorted(letter_image_regions, key=lambda x: x[0])
# Save out each letter as a single image
for letter_bounding_box, letter_text in zip(letter_image_regions, correct_text):
# Grab the coordinates of the letter in the image
x, y, w, h = letter_bounding_box
# Extract the letter from the original image with a 2-pixel margin around the edge
letter_image = gray[y - 2:y + h + 2, x - 2:x + w + 2]
# Get the folder to save the image in
save_path = os.path.join(OUTPUT_FOLDER)
# if the output directory does not exist, create it
if not os.path.exists(save_path):
os.makedirs(save_path)
# write the letter image to a file
#count = counts.get(letter_text, 1)
p = os.path.join(save_path, "{}.png".format(str(count).zfill(6)))
cv2.imwrite(p, letter_image)
# increment the count for the current key
# counts[letter_text] = count + 1
count = count+1
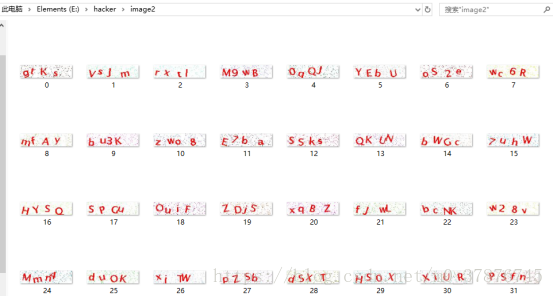
获得的字母图片(灰度图)如下所示

从获取的数据集来看,分词效果比较不错,接下来要面临的是训练以及验证问题。
因为我们获取到的数据是缺少label的,我们没有办法直接运行监督学习图片分类。
作为无监督学习,我第一想到的方法就是kmeans分类,利用kmeans进行图片分类
然而进行分类的效果并不是很好,其实比较好理解,在运行的时候把二维的图片数据抽成了一列,然后每个数据样本一列,一共分成了数字10类,大写字母26类,小写字母(去除了c,i,l,o,p,s,u,v,w,x,y,z)一共50种
下面的是代码:
import os
from imutils import paths
import numpy as np
import matplotlib.pyplot as plt
import pandas as pd
import cv2
from PIL import Image
#images = os.listdir('F://hacker//letter')
FOLOER = "E:\hacker\letter"
data = []
#num = len(images)
#digits_test = pd.read_csv('https://archive.ics.uci.edu/ml/machine-learning-databases/optdigits/optdigits.tes',header=None)
for imagefile in paths.list_images("E:\\hacker\\letter"):
#img = Image.open(imagefile)
try:
img = Image.open(imagefile) #超时异常判断 5秒超时
except IOError:
print('当前图片打开失败')
continue
img = img.resize((20,20))
img = img.convert('L')
#img = np.expand_dims(img,axis=0)
img = np.array(img).reshape(400)
data.append(img)
print(len(data))
from sklearn.cluster import KMeans
from sklearn.decomposition import PCA
kmeans = KMeans(n_clusters=50)
#pca = PCA(n_components=3) #输出两维
#newData = pca.fit_transform(data) #载入N维
kmeans.fit(data)
print(kmeans.labels_)
for i in range(3615) :
p = os.path.join('E://hacker//kinds//'+str(kmeans.labels_[i])+"//{}.png".format(str(i).zfill(6)))
cv2.imwrite(p, data[i].reshape(20,20))
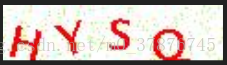
但是这种粗略简单的方法并不是很理想,如s和5分不出来,d和p以及b分不出来,D和O分不出来,这些都是问题,因此寄希望于一个简单的模型解决问题是不现实的
这是kmeans分出的其中一类,可以看出分类效果是很不好的

解决这个问题,我想得到了两种解决方案,其中一个方案,利用自学习式的神经网络对数据进行降维,如SOM网络,这个后面我会继续跟进。
另外一个方法就是进行手工的数据标注,从网络上获取的数据可知,对字母进行学习,需要的样本数据并不大,因此可以对数据进行标注,之后再进行有监督的学习。
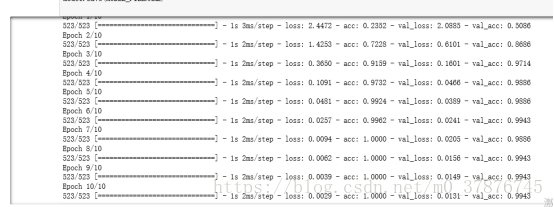
于是我从中抽取了0-9以及选取了几种出现概率较高的图片,每种抽取了大约50-100张的数据,利用keras构建了cnn卷积神经网络,因为我们一次只需要识别单个字符,所以并不需要一个复杂的神经网络架构,且识别这种字母与数字的任务要比其它识别复杂图像的任务简单地多。因此我们使用了一个简单的卷积神经网络,它一共包含两个卷积层与两个全连接层。

我们可以看出在仅在一共500多个训练数据的情况下,数据的准确率能达到99.7%,因此可以说明我们得到了比较高的准确率

验证
首先运行分词程序,cut.py,获取四张图片,然后运行model.test(img)观察结果即可
后续的工作主要集中在数据的无标签分类上,首先的思路是使用SOM自组织网络进行特征学习以及数据降维分类,其次是比较SVM和CNN网络的效果对比,观察彼此的优劣,以及重构代码,API化,便于使用和调用