深入理解Android Gradle
标签(空格分隔): 未分类
原作者真的写的很棒附上链接
新的android开发工具引用了Gradle构建工具,方便了开发者进行构建不同的应用版本以完成不同的需求。(从此多版本不再痛苦)
1. gradle基本语法
新建项目把默认的配置文件粘贴来
apply plugin: 'com.android.application'
android {
    compileSdkVersion 22
    buildToolsVersion "19.1.0"
    defaultConfig {
        applicationId "org.guf.mediagesturedetector"
        minSdkVersion 22
        targetSdkVersion 22
        versionCode 1
        versionName "1.0"
    }
    buildTypes {
        release {
            minifyEnabled false
            proguardFiles getDefaultProguardFile('proguard-android.txt'), 'proguard-rules.pro'
        }
    }
}
dependencies {
    compile fileTree(dir: 'libs', include: ['*.jar'])
    testCompile 'junit:junit:4.12'
    compile 'com.android.support:appcompat-v7:22.2.1'
    compile 'com.android.support:design:22.2.1'
}
apply plugin:
我的理解为构建版本,当你作为一个普通的安卓应用程序的时候为
apply plugin: ‘com.android.application’
当你作为安卓modle形式为apply plugin: ‘com.android.library’
当然最简单的只是java项目则为 apply plugin: ‘java’
android
这个标签下主要包含了应用程序编译的sdkapi版本,sdkbuildTools的版本
defaultConfig 里包含了manifests里的编译属性
buildTypes 里包含了输出版本的类型
当然这些是可扩充的,这个下面会说到
dependencies
android studio的依赖库配置
开发工具给我们提供了三种方式添加依赖包,这就是gradle带来的好处
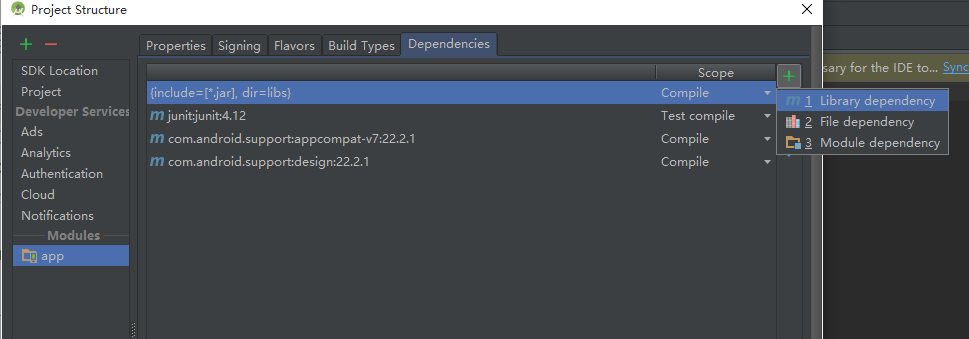
第一种是通过maven仓库下载在线的依赖库,比较依赖网络,但是更新编辑,后期只需要修改版本号即可
第二种是以文件的方式引入jar文件,如果你是eclipse转过来的话就用的是这种方式,当然如果你已经配置了
compile fileTree(dir: ‘libs’, include: [‘*.jar’])
那么就无需手动的添加,它自动加载libs里的jar包
第三种就是引入项目中的modle项目,这个无需多讲,跟eclipse中添加library类似
2. 通过gradle替换AndroidManifest中的占位符
  <application
        android:allowBackup="true"
        android:icon="@mipmap/ic_launcher"
        android:label="${APP_NAME}"
        android:theme="@style/AppTheme">
现在我需要在AndroidManifest中添加占位符’APP_NAME’,通过gradle编译的过程中,通过bulid.gradle修改它,
manifestPlaceholders=[占位符:需要修改的值]
buildTypes {
        release {
            manifestPlaceholders = [APP_NAME: 'test']
            minifyEnabled false
            proguardFiles getDefaultProguardFile('proguard-android.txt'), 'proguard-rules.pro'
        }
    }
3. 独立配置签名信息
对于签名相关的信息,直接写在gradle当然不好,特别是一些开源项目,可以添加到gradle.properties:
RELEASE_KEY_PASSWORD=xxxx
RELEASE_KEY_ALIAS=xxx
RELEASE_STORE_PASSWORD=xxx
RELEASE_STORE_FILE=../.keystore/xxx.jks
然后在build.gradle中引用即可:
android {
    signingConfigs {
        release {
            storeFile file(RELEASE_STORE_FILE)
            storePassword RELEASE_STORE_PASSWORD
            keyAlias RELEASE_KEY_ALIAS
            keyPassword RELEASE_KEY_PASSWORD
        }
    }
}
4. 多版本生产环境
版本发布的流程分为:
所以,我们的版本可以分为三种版本
debug-开发测试版
preview-测试预览版
release-正式版
每个版本都会有不同的要求,测试版不能影响生产环境,不用通过改代码来切换测试环境和生产环境,可以增加自定义Build Type完成此类版本需求
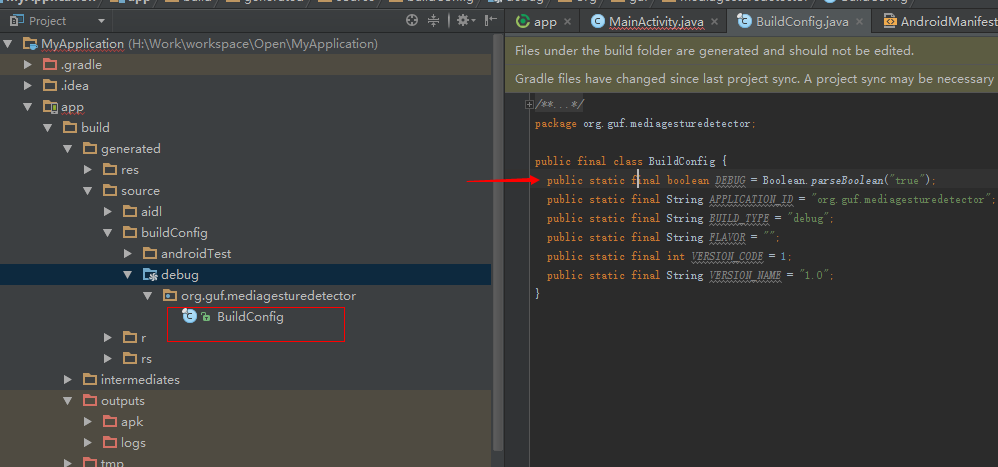
在这个目录下会有个BuildConfig,我们可以用配置这里面的值来切换全局log的开关,保证生产环境不会泄漏log日志
    buildTypes {
        debug {
            buildConfigField "boolean", "DEBUG", "true"
            minifyEnabled false
            proguardFiles getDefaultProguardFile('proguard-android.txt'), 'proguard-rules.pro'
        }
        release {
            buildConfigField "boolean", "DEBUG", "false"
            minifyEnabled true
            proguardFiles getDefaultProguardFile('proguard-android.txt'), 'proguard-rules.pro'
        }
    }
5. build type中的定制参数
我这里列几个我在工作中用到的:
android {
        debug {
            manifestPlaceholders = [app_label:"@string/app_name_debug"]
            applicationIdSuffix ".debug"
            minifyEnabled false
            signingConfig signingConfigs.debug
            proguardFiles getDefaultProguardFile('proguard-android.txt'), 'proguard-rules.pro'
        }
        release {
            manifestPlaceholders = [app_label:"@string/app_name"]
            minifyEnabled true
            shrinkResources true
            signingConfig signingConfigs.release
            proguardFiles getDefaultProguardFile('proguard-android.txt'), 'proguard-rules.pro'
        }
        preview{
            manifestPlaceholders = [app_label:"@string/app_name_preview"]
            applicationIdSuffix ".preview"
            debuggable true // 保留debug信息
            minifyEnabled true
            shrinkResources true
            signingConfig signingConfigs.preview
            proguardFiles getDefaultProguardFile('proguard-android.txt'), 'proguard-rules.pro'
        }
    }
}
这些都用的太多了,稍微解释一下:
// minifyEnabled 混淆处理
// shrinkResources 去除无用资源
// signingConfig 签名
// proguardFiles 混淆配置
// applicationIdSuffix 增加APP ID的后缀
// debuggable 是否保留调试信息
// ... ...
6. 多工程全局配置
随着产品渠道的铺开,往往一套代码需要支持多个产品形态,这就需要抽象出主要代码到一个Library,然后基于Library扩展几个App Module。
相信每个module的build.gradle都会有这个代码:
android {
    compileSdkVersion 22
    buildToolsVersion "23.0.1"

    defaultConfig {
        minSdkVersion 10
        targetSdkVersion 22
        versionCode 34
        versionName "v2.6.1"
    }
}
当升级sdk、build tool、target sdk等,几个module都要更改,非常的麻烦。最重要的是,很容易忘记,最终导致app module之间的差异不统一,也不可控。
强大的gradle插件在1.1.0支持全局变量设定,一举解决了这个问题。
先在project的根目录下的build.gradle定义ext全局变量:
ext {
    compileSdkVersion = 22
    buildToolsVersion = "23.0.1"
    minSdkVersion = 10
    targetSdkVersion = 22
    versionCode = 34
    versionName = "v2.6.1"
}
然后在各module的build.gradle中引用如下:
android {
    compileSdkVersion rootProject.ext.compileSdkVersion
    buildToolsVersion rootProject.ext.buildToolsVersion

    defaultConfig {
        applicationId "com.xxx.xxx"
        minSdkVersion rootProject.ext.minSdkVersion
        targetSdkVersion rootProject.ext.targetSdkVersion
        versionCode rootProject.ext.versionCode
        versionName rootProject.ext.versionName
    }
}
然后每次修改project级别的build.gradle即可实现全局统一配置。
7. 自定义导出的APK名称
默认android studio生成的apk名称为app-debug.apk或者app-release.apk,当有多个渠道的时候,需要同时编出50个渠道包的时候,就麻烦了,不知道谁是谁了。
这个时候,就需要自定义导出的APK名称了,不同的渠道编出的APK的文件名应该是不一样的。
android {
    // rename the apk with the version name
    applicationVariants.all { variant ->
        variant.outputs.each { output ->
            output.outputFile = new File(
                    output.outputFile.parent,
                    "ganchai-${variant.buildType.name}-${variant.versionName}-${variant.productFlavors[0].name}.apk".toLowerCase())
        }
    }
}
当apk太多时,如果能把apk按debug,release,preview分一下类就更好了(事实上,对于我这样经常发版的人,一编往往就要编四五十个版本的人,debug和release版本全混在一起没法看,必须分类),简单:
android {
    // rename the apk with the version name
    // add output file sub folder by build type
    applicationVariants.all { variant ->
        variant.outputs.each { output ->
            output.outputFile = new File(
                    output.outputFile.parent + "/${variant.buildType.name}",
                    "ganchai-${variant.buildType.name}-${variant.versionName}-${variant.productFlavors[0].name}.apk".toLowerCase())
        }
    }
}
现在生成了类似于ganchai-dev-preview-v2.4.0.0.apk这样格式的包了,preview的包自然就放在preview的文件夹下,清晰明了。
8. 多渠道打包
多渠道打包的关键之处在于,定义不同的product flavor, 并把AndroiManifest中的channel渠道编号替换为对应的flavor标识:
android {
    productFlavors {
        dev{
            manifestPlaceholders = [channel:"dev"]
        }
        official{
            manifestPlaceholders = [channel:"official"]
        }
        // ... ...
        wandoujia{
            manifestPlaceholders = [channel:"wandoujia"]
        }
        xiaomi{
            manifestPlaceholders = [channel:"xiaomi"]
        }
        "360"{
            manifestPlaceholders = [channel:"360"]
        }
}
注意一点,这里的flavor名如果是数字开头,必须用引号引起来。
构建一下,就能生成一系列的Build Variant了:
devDebug
devRelease
officialDebug
officialRelease
wandoujiaDebug
wandoujiaRelease
xiaomiDebug
xiaomiRelease
360Debug
360Release
其中debug, release是gradle默认自带的两个build type, 下一节还会继续说明。
选择一个,就能编译出对应渠道的apk了。
9. 动态设置一些额外信息
假如想把当前的编译时间、编译的机器、最新的commit版本添加到apk,而这些信息又不好写在代码里,强大的gradle给了我创造可能的自信:
android {
    defaultConfig {
        resValue "string", "build_time", buildTime()
        resValue "string", "build_host", hostName()
        resValue "string", "build_revision", revision()
    }
}

def buildTime() {
    return new Date().format("yyyy-MM-dd HH:mm:ss")
}
def hostName() {
    return System.getProperty("user.name") + "@" + InetAddress.localHost.hostName
}
def revision() {
    def code = new ByteArrayOutputStream()
    exec {
        commandLine 'git', 'rev-parse', '--short', 'HEAD'
        standardOutput = code
    }
    return code.toString()
}
上述代码实现了动态的添加了3个字符串资源: build_time、build_host、build_revision, 然后在其他地方可像如引用字符串一样