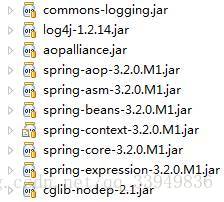
第一步 引入相关jar包,Cache主要类库位于context jar包下.
第二步 Spring 配置文件设置,本人项目中配置文件名为 applicationContext.xml.
f118b3bf040c499e8836145f82e44aaa<?xml version="1.0" encoding="UTF-8"?>
<beans xmlns="http://www.springframework.org/schema/beans"
    xmlns:xsi="http://www.w3.org/2001/XMLSchema-instance"
    xmlns:context="http://www.springframework.org/schema/context"
    xmlns:cache="http://www.springframework.org/schema/cache"
    xsi:schemaLocation="http://www.springframework.org/schema/beans      http://www.springframework.org/schema/beans/spring-beans-3.2.xsd
    http://www.springframework.org/schema/cache
    http://www.springframework.org/schema/cache/spring-cache.xsd"">//命名空间

    <cache:annotation-driven/>//开启注解

    <bean id="userController" class="com.chw.controller.system.SysUserController"/> // 注入Bean

    <bean id="cacheManager" class="org.springframework.cache.support.SimpleCacheManager">//cacle缓存管理器
       <property name="caches">
           <set>
               <bean class="org.springframework.cache.concurrent.ConcurrentMapCacheFactoryBean">
                   <property name="name" value="default"/>//默认缓存
               </bean>
               <bean class="org.springframework.cache.concurrent.ConcurrentMapCacheFactoryBean">
                   <property name="id" value="userCache"/>//根据自己需求定义的缓存name相当于Map中的key,value相当于Map中的value
               </bean>
           </set>
       </property>
    </bean>
</beans>
第三部 SysUserController类
package com.chw.controller.system;
import org.springframework.cache.annotation.CacheEvict;
import org.springframework.cache.annotation.Cacheable;
public class SysUserController extends BaseController {
@Cacheable(value="userCache")
public SysUser findById(String userId) {
System.out.println("查询数据库");
return sysUserService.findById(userId);
}
@CacheEvict(value="userCache",key="#sysUser.getId()")
public int updateUser(SysUser sysUser) {
return sysUserService.update(sysUser);
}
@CacheEvict(value="userCache",allEntries=true)
public void deleteAll() {
}
}
第四部 main测试类
import org.springframework.context.support.ClassPathXmlApplicationContext
import com.chw.controller.system.SysUserController
import com.chw.model.system.SysUser
public class test {
@SuppressWarnings("resource")
public static void main(String[] args) {
ClassPathXmlApplicationContext context = new ClassPathXmlApplicationContext("applicationContext.xml")
SysUserController userController = (SysUserController)context.getBean("userController")
SysUser firstUser = userController.findById("1")
System.out.println("first query..."+firstUser.toString())
SysUser secondUser = userController.findById("1")
System.out.println("second query..."+secondUser.toString())
}
}
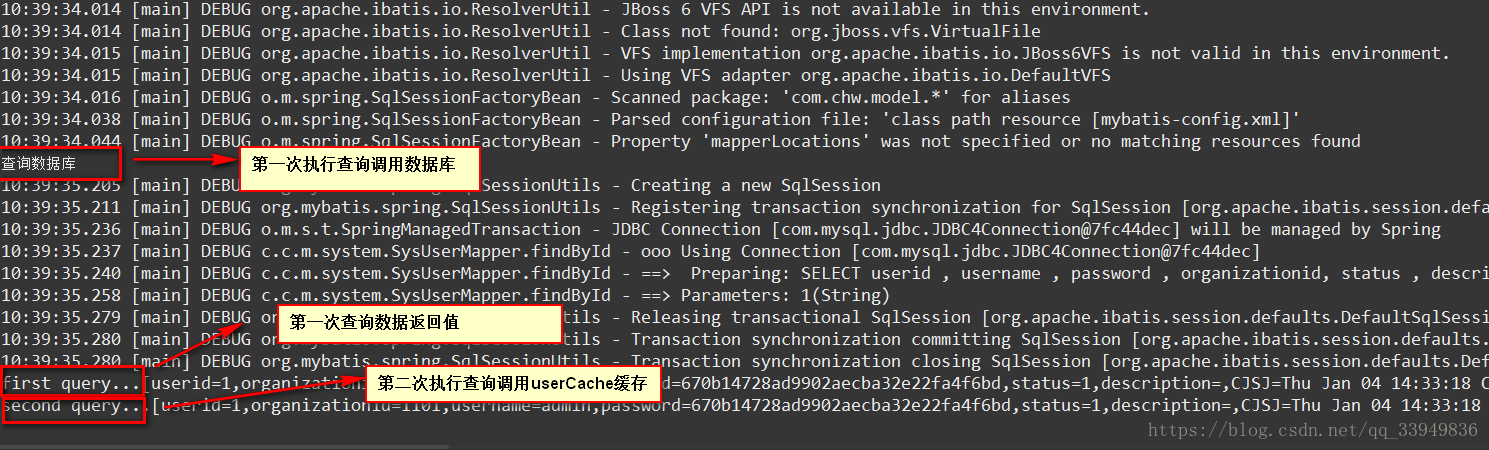
第五部 运行结果