文章目录
1.tomcat架构
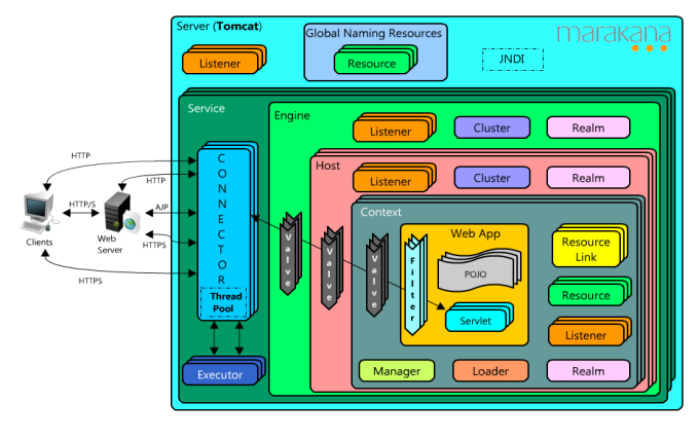
下图是tomcat的一个整体架构,图可以与server.xml进行对比学习,标签都有关联,每个标签都对应一个类,可以尝试去查找一下源码,标签上的字段对应get与set。标签的详细介绍可查看官方文档
Container 是个集合 (结合图可以更加深刻理解,图形对于集合是层叠的一个图形)
- Context
- Host
- Service
- …
大部分应用容器都是基于tomcat实现的,比如jboss、weblogic等都参考了tomcat
1.1 目录结构
1.1.1 conf 目录
catalina.policy : Tomcat 安全策略文件,控制 JVM 相关权限,具体可以参考java.security.Permission
catalina.properties : Tomcat Catalina 行为控制配置文件,加载lib目录的jar包中的类,比如 Common ClassLoader
logging.properties : Tomcat 日志配置文件,JDK Logging
server.xml : Tomcat Server 配置文件
- GlobalNamingResources : 全局 JNDI 资源
context.xml : 全局 Context 配置文件
tomcat-users.xml : Tomcat 角色配置文件(Realm基于文件实现方式,Realm是安全认证,还有基于数据库的实现)
web.xml : Servlet 标准的 web.xml 部署文件,Tomcat 默认实现部分配置入内 - org.apache.catalina.servlets.DefaultServlet 处理静态文件
- org.apache.jasper.servlet.JspServlet Jsp的处理(其实性能会比velocity好,jsp缺点在于不灵活是servlet)
1.1.2 lib 目录
Tomcat 存放公用类库
ecj-*.jar : Eclipse Java 编译器
jasper.jar : JSP 编译器
1.1.3 logs 目录
localhost.${date}.log : 当 Tomcat 应用起不来的时候,多看该文件,比如:类冲突
- NoClassDefFoundError
- ClassNotFoundException
catalina.${date}.log : 控制台输出(System.out 输出控制台的同时输出到文件)
1.1.4 webapps 目录
部署 Web 应用
方法一:放置在 webapps目录
直接拖过去
方法二: 修改 confi/server.xml
添加Context 元素:
<Context docBase="${webAppAbsolutePath}" path="/" reloadable="true" />
<Context docBase="${webAppAbsolutePath}" path="/tomcat" reloadable="true" />
熟悉配置元素可以参考org.apache.catalina.core.StandardContext setter 方法
该方式不支持动态部署,建议考虑在生产环境使用。
方法三:独立 context xml 配置文件
首先注意 conf\Catalina\localhost
独立 context XML 配置文件路径:${TOMCAT_HOME}/conf/Catalina/localhost + ${ContextPath} .xml
注意:该方式可以实现热部署,因此建议在开发环境使用
1.2 I/O 连接器
实现类:org.apache.catalina.connector.Connector
tomcat8实现了NIO,server.xml的Connector可以配置 查看文档
BIO与NIO的对比(详细查看官方文档)
                       Java Blocking Connector   Java Non Blocking Connector   APR/native Connector
                                 BIO                         NIO                       APR
    Classname              Http11Protocol             Http11NioProtocol         Http11AprProtocol
    Tomcat Version           3.x onwards                 6.x onwards              5.5.x onwards
    Support Polling              NO                          YES                       YES
    Polling Size                 N/A                   maxConnections             maxConnections
    Read Request Headers      Blocking                  Non Blocking                 Blocking
    Read Request Body         Blocking                    Blocking                   Blocking
    Write Response            Blocking                    Blocking                   Blocking
    Wait for next Request     Blocking                  Non Blocking               Non Blocking
    SSL Support               Java SSL                    Java SSL                   OpenSSL
    SSL Handshake             Blocking                  Non blocking                 Blocking
    Max Connections        maxConnections              maxConnections             maxConnections
查看tomcat文档可知容器的默认编码
URIEncoding |
This specifies the character encoding used to decode the URI bytes, after %xx decoding the URL. If not specified, ISO-8859-1 will be used. |
|---|
1.3 问题
问题1:连接器里面的线程池 是用的哪个线程池
注意conf/server.xml 文件中的一段注释:
<Connector executor="tomcatThreadPool"
               port="8080" protocol="HTTP/1.1"
               connectionTimeout="20000"
               redirectPort="8443" />
org.apache.catalina.Executor:
public interface Executor extends java.util.concurrent.Executor, Lifecycle {
    public String getName();

    /**
     * Executes the given command at some time in the future.  The command
     * may execute in a new thread, in a pooled thread, or in the calling
     * thread, at the discretion of the <tt>Executor</tt> implementation.
     * If no threads are available, it will be added to the work queue.
     * If the work queue is full, the system will wait for the specified
     * time until it throws a RejectedExecutionException
     *
     * @param command the runnable task
     * @throws java.util.concurrent.RejectedExecutionException if this task
     * cannot be accepted for execution - the queue is full
     * @throws NullPointerException if command or unit is null
     */
    void execute(Runnable command, long timeout, TimeUnit unit);
}
tomcat线程池的标准实现:org.apache.catalina.core.StandardThreadExecutor ->
追踪源码可知是将连接处理交付给 Java 标准线程池:org.apache.tomcat.util.threads.ThreadPoolExecutor。
问题2:JNDI 能不能稍微说下
<Context ...>
  ...
  <Resource name="mail/Session" auth="Container"
            type="javax.mail.Session"
            mail.smtp.host="localhost"/>
  ...
</Context>
Context initCtx = new InitialContext();//类似SpringContext
Context envCtx = (Context) initCtx.lookup("java:comp/env");//类似spring的依赖查找
Session session = (Session) envCtx.lookup("mail/Session");

Message message = new MimeMessage(session);
message.setFrom(new InternetAddress(request.getParameter("from")));
InternetAddress to[] = new InternetAddress[1];
to[0] = new InternetAddress(request.getParameter("to"));
message.setRecipients(Message.RecipientType.TO, to);
message.setSubject(request.getParameter("subject"));
message.setContent(request.getParameter("content"), "text/plain");
Transport.send(message);
2.tomcat内嵌
2.1 Web 自动装配
2.1.1 API 角度分析
Servlet 3.0 + API 实现自动装配,核心API是 ServletContainerInitializer
2.1.2 容器角度分析
传统的 Web 应用,将 webapp 部署到 Servlet 容器中。
嵌入式 Web 应用,灵活部署,任意指定位置(或者通过复杂的条件判断)
Tomcat 7 是 Servlet 3.0 的实现,ServletContainerInitializer
Tomcat 8 是 Servlet 3.1 的实现,新增了NIO ->查看 HttpServletRequest、HttpServletResponse
NIO 并非一定能够提高性能,比如请求数据量较大,NIO 性能比 BIO 还要差
NIO 多工,读、写,同步非阻塞
2.1.3 jar 应用启动
java -jar 或者 jar 读取 .jar文件里面的META-INF/MANIFEST.MF ,其中属性 Main-Class 就是引导类所在。
参考 JDK API :
java.util.jar.Manifest
2.2 Tomcat Maven 插件
Tomcat 7 Maven 插件
<groupId>org.apache.tomcat.maven</groupId>
<artifactId>tomcat7-maven-plugin</artifactId>
<version>2.1</version>
查看 META-INF/MANIFEST.MF
Manifest-Version: 1.0
Main-Class: org.apache.tomcat.maven.runner.Tomcat7RunnerCli
得出 Tomcat 7 可执行 jar 引导类是org.apache.tomcat.maven.runner.Tomcat7RunnerCli
-> org.apache.tomcat.maven.runner.Tomcat7Runner
查看代码可知此处就是tomcat的api调用与配置代码了(我们可以参考该代码依葫芦画瓢)
tomcat = new Tomcat()
{
public Context addWebapp( Host host, String url, String name, String path )
{

    Context ctx = new StandardContext();
    ctx.setName( name );
    ctx.setPath( url );
    ctx.setDocBase( path );

    ContextConfig ctxCfg = new ContextConfig();
    ctx.addLifecycleListener( ctxCfg );

    ctxCfg.setDefaultWebXml( new File( extractDirectory, "conf/web.xml" ).getAbsolutePath() );

    if ( host == null )
    {
        getHost().addChild( ctx );
    }
    else
    {
        host.addChild( ctx );
    }

    return ctx;
}
};

if ( this.enableNaming() )
{
System.setProperty( "catalina.useNaming", "true" );
tomcat.enableNaming();
}

tomcat.getHost().setAppBase( new File( extractDirectory, "webapps" ).getAbsolutePath() );

String connectorHttpProtocol = runtimeProperties.getProperty( HTTP_PROTOCOL_KEY );

if ( httpProtocol != null && httpProtocol.trim().length() > 0 )
{
connectorHttpProtocol = httpProtocol;
}

debugMessage( "use connectorHttpProtocol:" + connectorHttpProtocol );

if ( httpPort > 0 )
{
Connector connector = new Connector( connectorHttpProtocol );
connector.setPort( httpPort );

if ( httpsPort > 0 )
{
    connector.setRedirectPort( httpsPort );
}
connector.setURIEncoding( uriEncoding );

tomcat.getService().addConnector( connector );

tomcat.setConnector( connector );
}

// add a default acces log valve
AccessLogValve alv = new AccessLogValve();
alv.setDirectory( new File( extractDirectory, "logs" ).getAbsolutePath() );
alv.setPattern( runtimeProperties.getProperty( Tomcat7Runner.ACCESS_LOG_VALVE_FORMAT_KEY ) );
tomcat.getHost().getPipeline().addValve( alv );

// create https connector
if ( httpsPort > 0 )
{
Connector httpsConnector = new Connector( connectorHttpProtocol );
httpsConnector.setPort( httpsPort );
httpsConnector.setSecure( true );
httpsConnector.setProperty( "SSLEnabled", "true" );
httpsConnector.setProperty( "sslProtocol", "TLS" );
httpsConnector.setURIEncoding( uriEncoding );

String keystoreFile = System.getProperty( "javax.net.ssl.keyStore" );
String keystorePass = System.getProperty( "javax.net.ssl.keyStorePassword" );
String keystoreType = System.getProperty( "javax.net.ssl.keyStoreType", "jks" );

if ( keystoreFile != null )
{
    httpsConnector.setAttribute( "keystoreFile", keystoreFile );
}
if ( keystorePass != null )
{
    httpsConnector.setAttribute( "keystorePass", keystorePass );
}
httpsConnector.setAttribute( "keystoreType", keystoreType );

String truststoreFile = System.getProperty( "javax.net.ssl.trustStore" );
String truststorePass = System.getProperty( "javax.net.ssl.trustStorePassword" );
String truststoreType = System.getProperty( "javax.net.ssl.trustStoreType", "jks" );
if ( truststoreFile != null )
{
    httpsConnector.setAttribute( "truststoreFile", truststoreFile );
}
if ( truststorePass != null )
{
    httpsConnector.setAttribute( "truststorePass", truststorePass );
}
httpsConnector.setAttribute( "truststoreType", truststoreType );

httpsConnector.setAttribute( "clientAuth", clientAuth );
httpsConnector.setAttribute( "keyAlias", keyAlias );

tomcat.getService().addConnector( httpsConnector );

if ( httpPort <= 0 )
{
    tomcat.setConnector( httpsConnector );
}
}

// create ajp connector
if ( ajpPort > 0 )
{
Connector ajpConnector = new Connector( "org.apache.coyote.ajp.AjpProtocol" );
ajpConnector.setPort( ajpPort );
ajpConnector.setURIEncoding( uriEncoding );
tomcat.getService().addConnector( ajpConnector );
}

// add webapps
for ( Map.Entry<String, String> entry : this.webappWarPerContext.entrySet() )
{
String baseDir = null;
Context context = null;
if ( entry.getKey().equals( "/" ) )
{
    baseDir = new File( extractDirectory, "webapps/ROOT.war" ).getAbsolutePath();
    context = tomcat.addWebapp( "", baseDir );
}
else
{
    baseDir = new File( extractDirectory, "webapps/" + entry.getValue() ).getAbsolutePath();
    context = tomcat.addWebapp( entry.getKey(), baseDir );
}

URL contextFileUrl = getContextXml( baseDir );
if ( contextFileUrl != null )
{
    context.setConfigFile( contextFileUrl );
}
}

if ( codeSourceWar != null )
{
String baseDir = new File( extractDirectory, "webapps/" + codeSourceWar.getName() ).getAbsolutePath();
Context context = tomcat.addWebapp( codeSourceContextPath, baseDir );
URL contextFileUrl = getContextXml( baseDir );
if ( contextFileUrl != null )
{
    context.setConfigFile( contextFileUrl );
}
}

tomcat.start();

Runtime.getRuntime().addShutdownHook( new TomcatShutdownHook() );

}

waitIndefinitely();//阻塞主线程
2.3 Tomcat 7 API 编程
按照tomcat架构图来编程,tomcat的架构关键元素如下
Embedded/Tomcat
Service
Engine
Host
Connector
Context
确定 Classpath 目录
classes 绝对路径:E:\Downloads\tomcat\target\classes
String classesPath = System.getProperty("user.dir")
        + File.separator + "target" + File.separator + "classes";
创建 Tomcat 实例
org.apache.catalina.startup.Tomcat
Maven 坐标:org.apache.tomcat.embed:tomcat-embed-core:7.0.37
设置 Host对象
// 设置 Host
Host host = tomcat.getHost();
host.setName("localhost");
host.setAppBase("webapps");
设置 Classpath
Classpath 读取资源:配置、类文件
conf/web.xml 作为配置文件,并且放置 Classpath 目录下(绝对路径)
设置 DemoServlet
 // 添加 DemoServlet 到 Tomcat 容器
Wrapper wrapper = tomcat.addServlet(contextPath, "DemoServlet", new DemoServlet());
wrapper.addMapping("/demo");
完整代码
main/resource/conf/web.xml 复制tomcat的web.xml
main/webapp/index.jsp 测试jsp
DemoServlet.java 测试servlet
EmbeddedTomcatServer.java tomcat启动类
public static void main(String[] args) throws Exception {
    // classes 目录绝对路径
    // E:\Downloads\tomcat\target\classes
    String classesPath = System.getProperty("user.dir")
            + File.separator + "target" + File.separator + "classes";

    System.out.println(classesPath);

    Tomcat tomcat = new Tomcat();
    // 设置端口 12345
    tomcat.setPort(12345);

    // 设置 Host
    Host host = tomcat.getHost();
    host.setName("localhost");
    host.setAppBase("webapps");

    // 设置 Context
    // E:\Downloads\tomcat\src\main\webapp
    String webapp = System.getProperty("user.dir") + File.separator +
            "src" + File.separator + "main" + File.separator + "webapp";
    String contextPath = "/";
    // 设置 webapp 绝对路径到 Context,作为它的 docBase
    Context context = tomcat.addWebapp(contextPath, webapp);
    if (context instanceof StandardContext) {
        StandardContext standardContext = (StandardContext) context;
        // 设置默认的web.xml文件到 Context
        standardContext.setDefaultWebXml(classesPath + File.separator + "conf/web.xml");

        // 设置 Classpath 到 Context
        // 添加 DemoServlet 到 Tomcat 容器
        Wrapper wrapper = tomcat.addServlet(contextPath, "DemoServlet", new DemoServlet());
        wrapper.addMapping("/demo");

    }

    // 设置 Service
    Service service = tomcat.getService();

    // 设置 Connector
    /**
     *     <Connector port="8080" protocol="HTTP/1.1"
     connectionTimeout="20000"
     redirectPort="8443" URIEncoding="UTF-8" />
     */
    Connector connector = new Connector();
    connector.setPort(9090);
    connector.setURIEncoding("UTF-8");
    connector.setProtocol("HTTP/1.1");
    service.addConnector(connector);

    // 启动 Tomcat 服务器
    tomcat.start();
    // 强制 Tomcat Server 等待,避免 main 线程执行结束关闭
    tomcat.getServer().await();
}
2.4 Spring Boot 嵌入式 Tomcat 编程
EmbeddedServletContainerCustomizer
ConfigurableEmbeddedServletContainer
EmbeddedServletContainer
TomcatContextCustomizer
TomcatConnectorCustomizer
实现 EmbeddedServletContainerCustomer
@Configuration
public class TomcatConfiguration implements EmbeddedServletContainerCustomizer {

    @Override
    public void customize(ConfigurableEmbeddedServletContainer container) {
        System.err.println(container.getClass());

        if (container instanceof TomcatEmbeddedServletContainerFactory) {

            TomcatEmbeddedServletContainerFactory factory=
                    (TomcatEmbeddedServletContainerFactory) container;

//            Connector connector = new Connector();
//            connector.setPort(9090);
//            connector.setURIEncoding("UTF-8");
//            connector.setProtocol("HTTP/1.1");
//            factory.addAdditionalTomcatConnectors(connector);


        }

    }
}
自定义 Context
实现TomcatContextCustomizer
  // 相当于 new TomcatContextCustomizer(){}
  factory.addContextCustomizers((context) -> { // Lambda
    if (context instanceof StandardContext) {
      StandardContext standardContext = (StandardContext) context;
      // standardContext.setDefaultWebXml(); // 设置
    }
  });
自定义 Connector
实现 TomcatConnectorCustomizer
  // 相当于 new TomcatConnectorCustomizer() {}
  factory.addConnectorCustomizers(connector -> {
    connector.setPort(12345);
  });
2.5 问答
-
内嵌tomcat是不是比单独的tomcat不是在某方面具有一些优势?
嵌入式 Tomcat 或者嵌入式 Web 容器可以不依赖文件目录,比如在 Docker 场景使用方便。 -
内置的tomcat 和 外部的tomcat 性能有多大差别?生产线上建议用哪个?
嵌入式 Tomcat 和 传统 Tomcat 性能可以说一样,现在非常多的生产环境 Spring Boot 嵌入式 - 嵌入式 Tomcat -
Spring中pre实例化和pre初始化区别(刚刚有提到)
在 Spring 早起版本中,先有初始化生命周期 - org.springframework.beans.factory.config.BeanPostProcessor
后来 Spring 1.2 ,提供新的扩展接口(BeanPostProcessor):
org.springframework.beans.factory.config.InstantiationAwareBeanPostProcessor -
Tomcat 热部署原理能给讲下吗?
org.apache.catalina.Lifecycle
监控资源变化,Class 变化、配置变化了。 Tomcat 决定重启 Contextorg.apache.catalina.Context
Tomcat 自动加载
public void setReloadable(boolean reloadable)
3.配置优化
3.1 减少配置优化
3.1.1 场景一:假设当前 REST 应用(微服务)
分析:它不需要静态资源,移除Tomcat 容器静态和动态
-
静态处理:DefaultServlet tomcat不需要处理静态资源文件,交给nginx
- 优化方案:通过移除conf/web.xml 中 org.apache.catalina.servlets.DefaultServlet。
-
动态:JspServlet
- 优化方案:通过移除conf/web.xml 中 org.apache.jasper.servlet.JspServlet。
DispatcherServlet:Spring Web MVC 应用 Servlet
JspServlet:编译并且执行 Jsp 页面
DefaultServlet:Tomcat 处理静态资源的 Servlet
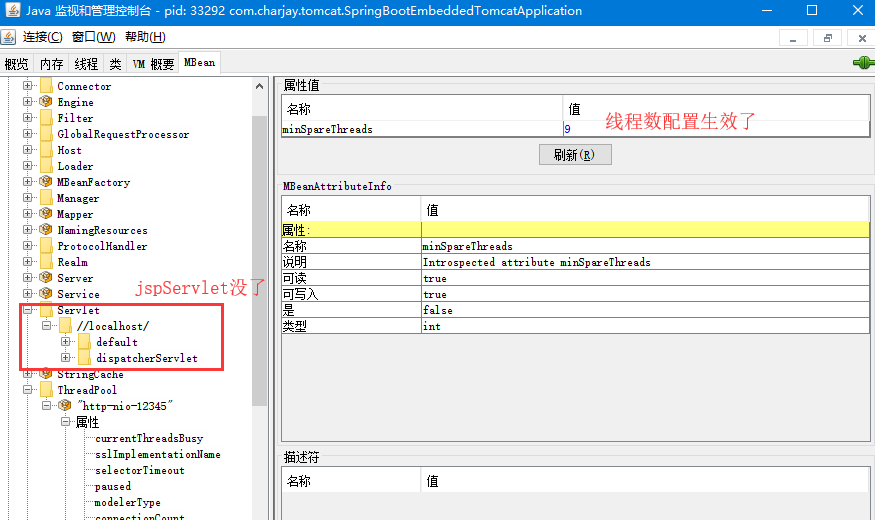
- 优化方案:通过移除conf/web.xml 中 org.apache.jasper.servlet.JspServlet。
-
移除 welcome-file-list
index.html
index.htm
index.jsp -
如果程序是REST JSON Content-Type 或者 MIME Type: application/json
-
移除 Session 设置
对于微服务/REST 应用,不需要 Session,因为不需要状态。 -
移除 Valve
Valve 类似于 Filter
移除 AccessLogValve,可以通过 Nginx 的 Access Log 替代,Valve 实现都需要消耗 Java 应用的计算时间。
3.1.2 场景二:需要 JSP 的情况
分析:JspServlet 无法移除,了解 JspServlet 处理原理
1)Servlet 周期:
- 实例化:Servlet 和 Filter 实现类必须包含默认构造器。反射的方式进行实例化。
- 初始化:Servlet 容器调用 Servlet 或 Filter init() 方法
- 销毁:Servlet 容器关闭时,Servlet 或者 Filter destroy() 方法被调用
Servlet 或者 Filter 在一个容器中,是一般情况在一个 Web App 中是一个单例,不排除应用定义多个(servlet默认是单例,可以配置多个)。
2)JspServlet 相关的优化 ServletConfig 参数:
需要编译
- compiler
- modificationTestInterval
不需要编译 - development 设置 false
development = false ,那么,这些 JSP 要如何编译。优化方法:
- Ant Task 执行 JSP 编译
- Maven 插件:org.codehaus.mojo:jspc-maven-plugin
<dependency>
  <groupId>org.apache.sling</groupId>
  <artifactId>jspc-maven-plugin</artifactId>
  <version>2.1.0</version>
</dependency>
JSP -> 翻译.jsp 或者.jspx 文件成 .java -> 编译 .class
JspServlet 如果 development 参数为 true,它会自定检查文件是否修改,如果修改重新翻译,再编译(加载和执行)。言外之意,JspServlet 开发模式可能会导致内存溢出。卸载 Class不及时会导致 Perm 区域不够。
ParentClassLoader -> 1.class 2.class 3.class
ChildClassLoader -> 4.class , 5.class
ChildClassLoader load 1 - 5 .class如果1.class 卸载,需要将 ParentClassLoader 设置为 null,当 ClassLoader 被 GC 后,1-3 class 全部会被卸载。
3)
conf/web.xml 作为 Servlet 应用的默认web.xml,实际上,应用程序存在两份web.xml,其中包括Tomcat conf/web.xml 和 应用的web.xml,最终将两者合并。
3.2 配置调整
关闭自动重载
context.xml
<Context docBase="E:/Downloads/tomcat/target/tomcat-1.0-SNAPSHOT" reloadable="false" >
</Context>
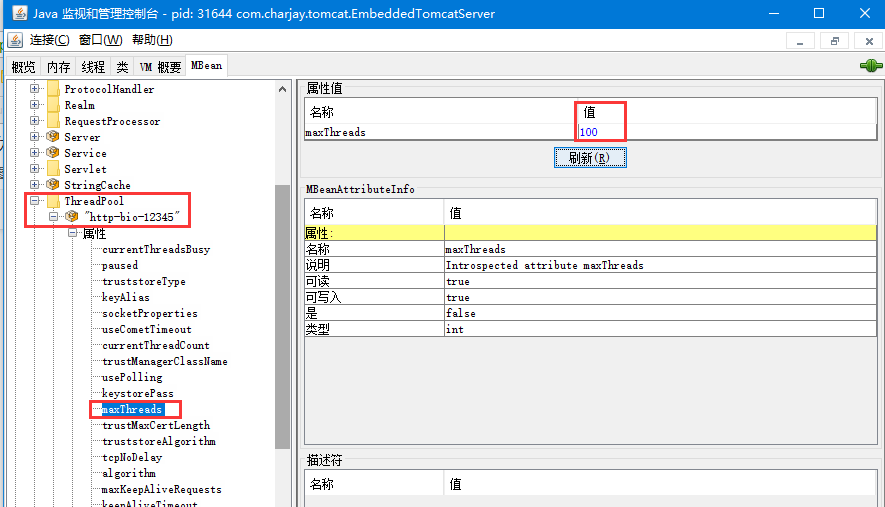
修改连接线程池数量
server.xml
	<Executor name="tomcatThreadPool" namePrefix="catalina-exec-"
        maxThreads="99" minSpareThreads="9"/>

	<Connector executor="tomcatThreadPool"
               port="8080" protocol="HTTP/1.1"
               connectionTimeout="20000"
               redirectPort="8443" />
通过程序来理解, 实际的Tomcat 接口:
- org.apache.catalina.Executor
- 扩展: J.U.C 标准接口 java.util.concurrent.Executor
- 实现:org.apache.catalina.core.StandardThreadExecutor
- 线程数量
-
      /**
       * max number of threads
       */
      protected int maxThreads = 200;

      /**
       * min number of threads
       */
      protected int minSpareThreads = 25;

  	public void setMinSpareThreads(int minSpareThreads) {
          this.minSpareThreads = minSpareThreads;
          if (executor != null) {
              executor.setCorePoolSize(minSpareThreads);
          }
      }

      public void setMaxThreads(int maxThreads) {
          this.maxThreads = maxThreads;
          if (executor != null) {
              executor.setMaximumPoolSize(maxThreads);
          }
      }
-
- 线程池:org.apache.tomcat.util.threads.ThreadPoolExecutor(java.util.concurrent.ThreadPoolExecutor)
- 总结:Tomcat IO 连接器使用的线程池实际标准的 Java 线程池的扩展,最大线程数量和最小线程数量实际上分别是 MaximumPoolSize 和 CorePoolSize。
- 线程数量
通过 JMX
通过jsconsole可以动态调整线程数等
观察StandardThreadExecutor是否存在调整线程池数量的 API
评估一些参考
- jmeter的压测正确率
- Load (主要看 CPU 里面的 JVM GC)
- TPS / QPS (吞吐量越大越好)
- CPU 密集型
- I/O 密集型
到底设置多少的线程数量才是最优?
首先,评估整体的情况量,假设 100W QPS,有机器数量 100 台,每台支撑 1w QPS。
第二,进行压力测试,需要一些测试样本,JMeter 来实现,假设一次请求需要RT 10ms,1秒可以同时完成 100个请求。10000 / 100 = 100 线程。
第三,常规性压测,每次更新都测试一次,由于业务变更,会导致底层性能变化。
Spring Boot 配置调整
查看配置类 org.springframework.boot.autoconfigure.web.ServerProperties
Maven 依赖(因为server.jspServlet.registered需要该依赖,没有该依赖springboot会忽略该配置,即自动装配需条件满足)
		<dependency>
			<groupId>org.apache.tomcat.embed</groupId>
			<artifactId>tomcat-embed-jasper</artifactId>
		</dependency>
application.properties
# <Executor name="tomcatThreadPool" namePrefix="catalina-exec-"
# maxThreads="9" minSpareThreads="9"/>
## 线程池大小
server.tomcat.maxThreads = 99
server.tomcat.minSpareThreads = 9

## 取消 Tomcat AccessLogValve
server.tomcat.accesslog.enabled = false

## 取消 JspServlet
server.jspServlet.registered=false