定位Toast元素
Appium1.6.3开始支持识别toast,且是基于uiautomator2,因此需要如下设置
环境准备
步骤一:安装node js
进入官网下载:https://nodejs.org/en/ 下载node js,并安装好
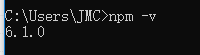
验证是否安装成功:npm -v
步骤二:安装npm包
进行npm包的安装,此时可以将npm换成淘宝的镜像,可以提高程序运行速度,分享一下切换淘宝源的两种方法:
1.通过config命令
npm config set registry https://registry.npm.taobao.org2.命令行方式(本文以此为例)npm --registry https://registry.npm.taobao.org info underscore 安装成功后显示:步骤三:通过淘宝镜像安装cnpm:
npm install -g cnpm --registry=https://registry.npm.taobao.org
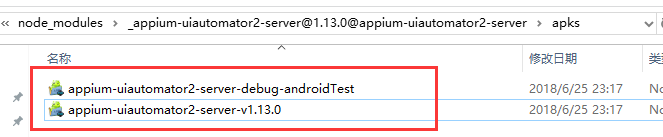
验证安装成功:步骤四:安装uiautomator2
输入指令:>cnpm install appium-uiautomator2-driver
安装完成:

验证安装成功:

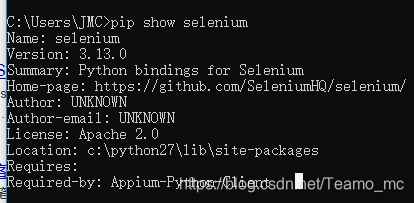
安装selenium:
输入指令pip install selenium
验证安装成功:pip show selenium
编辑识别toast元素的脚本
步骤一:初始化
在capability配置内部增加:desired_caps[‘uiautomationName’]=’ uiautomator2’
步骤二:定位toast元素
(1)定义toast文本内容
(2)定义路径
(3)组合文本内容和路径进行定位:用format()连接路径和文本内容
脚本:
error_message="登录密码错误"
message='//*[@text=\'{}\']'.format(error_message)
toast_element=WebDriverWait(driver,5).until(lambda x:x.find_element_by_xpath(message))
print(toast_element.text)
[JSONWP Proxy] Proxying [POST /touch/perform] to [POST http://localhost:8212/wd/hub/session/9c927409-74fe-4333-a9cc-fd8219c00946/touch/perform] with body: {"startX":810,"startY":960,"endX":54,"endY":960,"steps":28}
说明:
连接不同的类型的变量或内容format()
显示等待:webdriver(driver,5)
driver是webdriver的驱动程序,5是超时时间,以秒为单位
WebDriverWait()一般由 until()或 until_not()方法配合使用,下面是 until()和 until_not()方法的说明。

until(method, message=’’)

调用该方法提供的驱动程序作为一个参数,直到返回值不为 False。

until_not(method, message=’’)

调用该方法提供的驱动程序作为一个参数,直到返回值为 False。
动态函数:lambda x:x+5
X是函数的参数,冒号后面是函数的返回值
Appium的三种等待时间:https://testerhome.com/topics/2576