转自 https://blog.csdn.net/u012317510/article/details/78221218
前言
Android提供了一个叫做Lint的静态代码检查工具。Lint工具可以帮助你检查可能影响应用质量和性能的代码问题。该工具会报告检测到的每个问题并提供问题的描述信息和严重级别,以便你可以快速地确定需要优先进行哪些改进。在使用Android Studio时,配置的Lint工具和IDE检查会在你编写代码时自动运行。当然,你也可以手动运行Lint工具。
Lint简介
Lint支持6大类别的问题检查,并为每个问题定义了唯一的id。要查看Lint支持的问题以及对应的问题id的完整列表,可以运行 lint –list 命令。
使用Android SDK tools目录下的Lint,运行lint –list命令,如下所示:
D:\Android\sdk\tools>lint --list
Valid issue categories:
    Correctness
    Correctness:Messages
    Security
    Performance
    Usability:Typography
    Usability:Icons
    Usability
    Accessibility
    Internationalization
    Internationalization:Bidirectional Text

Valid issue id's:
"ContentDescription": Image without contentDescription
"AddJavascriptInterface": addJavascriptInterface Called
"ShortAlarm": Short or Frequent Alarm
"AllowAllHostnameVerifier": Insecure HostnameVerifier
"AlwaysShowAction": Usage of showAsAction=always
...
"NotSibling": RelativeLayout Invalid Constraints
"UnknownId": Reference to an unknown id
"UnknownIdInLayout": Reference to an id that is not in the current layout
"SuspiciousImport": 'import android.R' statement
"WrongFolder": Resource file in the wrong res folder
可以看到,Lint支持正确性、安全性、性能、易用性、可达性和国际化这6大类别的问题检查,并为每个问题定义了唯一的id。
配置Lint
默认情况下,Lint会检查所有支持的问题,并且所有的问题都有默认的严重级别。你可以限定Lint要检查的问题,也可以指定问题的严重级别。例如,你可以禁止Lint检查与项目无关的特定问题,也可以降低非关键问题的严重级别。
禁止Lint要检查的问题有多种方式:
- 在Java代码中使用@SuppressLint注解。
- 在XML文件中使用tools:ignore属性。
- 在build.gradle文件中使用lintOptions块。
- 使用lint.xml文件配置Lint。
- 使用Android Studio配置Lint。
在Java代码中配置Lint
要禁止Lint检查某个Java类或者方法的某个问题,你可以使用 @SuppressLint 注解。格式如下所示:
// 单个问题
@SuppressLint("id")

// 所有问题
@SuppressLint("all")
示例1:
@SuppressLint("NewApi")
public class MainActivity extends AppCompatActivity {
    ...
}
示例1示范了如何禁止Lint检查MainActivity类中的NewApi问题。
示例2:
@SuppressLint("NewApi")
@Override
protected void onCreate(Bundle savedInstanceState) {
    ...
}
示例2示范了如何禁止Lint检查onCreate()方法中的NewApi问题。
在XML文件中配置Lint
要禁止Lint检查XML文件特定部分的某个问题,你可以使用 tools:ignore 属性。格式如下所示:
<!-- 单个问题 -->
tools:ignore="id"

<!-- 多个问题 -->
tools:ignore="id1,id2"

<!-- 所有问题 -->
tools:ignore="all"
注意: 你需要在XML文件中添加tools命名空间,以使用tools:ignore属性。如下所示:
xmlns:tools="http://schemas.android.com/tools"示例1:
<LinearLayout
    xmlns:android="http://schemas.android.com/apk/res/android"
    xmlns:tools="http://schemas.android.com/tools"
    android:layout_width="match_parent"
    android:layout_height="match_parent"
    tools:ignore="HardcodedText">

    <TextView
        android:layout_width="wrap_content"
        android:layout_height="wrap_content"
        android:text="TextView1" />

    <TextView
        android:layout_width="wrap_content"
        android:layout_height="wrap_content"
        android:text="TextView2" />
</LinearLayout>
示例1示范了如何禁止Lint检查LinearLayout元素及其子元素的HardcodedText问题。如果某个父元素声明了tools:ignore属性,那么它的子元素会继承此属性。
示例2:
<TextView
    android:layout_width="wrap_content"
    android:layout_height="wrap_content"
    android:text="TextView1"
    tools:ignore="HardcodedText" />
示例2示范了如何禁止Lint检查TextView元素的HardcodedText问题。
在build.gradle文件中配置Lint
你可以在Android项目的模块的build.gradle文件中使用 lintOptions 块来配置Lint。例如,禁止或者增加某些问题的检查。
下面这个示例示范了你可以配置的部分属性:
android {
    ...
    lintOptions {
        // Turns off checks for the issue IDs you specify.
        disable 'HardcodedText', 'NewApi'
        // Turns on checks for the issue IDs you specify. These checks are in
        // addition to the default lint checks.
        enable 'RtlHardcoded', 'RtlCompat', 'RtlEnabled'
        // If set to true, turns off analysis progress reporting by lint.
        quiet true
        // if set to true (default), stops the build if errors are found.
        abortOnError false
        // if true, only report errors.
        ignoreWarnings true
    }
}
使用lint.xml文件配置Lint
你可以在Android项目的模块的根目录下使用 lint.xml 文件来配置Lint。
lint.xml文件由封闭的lint父标签组成,该标签包含一个或者多个issue子标签。每个issue标签表示一个问题。你可以在issue标签中设置禁止Lint检查此问题或者问题的严重级别。问题可以设置的严重级别有4种:informational、warning、error和fatal。
lint.xml文件示例如下所示:
<?xml version="1.0" encoding="UTF-8"?>
<lint>
    <!-- Disable the given check in this project -->
    <issue id="HardcodedText" severity="ignore" />

    <!-- Ignore the given check in the specified file -->
    <issue id="UselessLeaf">
        <ignore path="res/layout/activity_main.xml" />
    </issue>

    <!-- Change the severity of given check to "error" -->
    <issue id="NewApi" severity="error" />
</lint>
使用Android Studio配置Lint
在Android Studio中,点击 Analyze > Inspect Code…,在弹出的对话框中你可以配置此次Lint检查的范围。如下图所示:
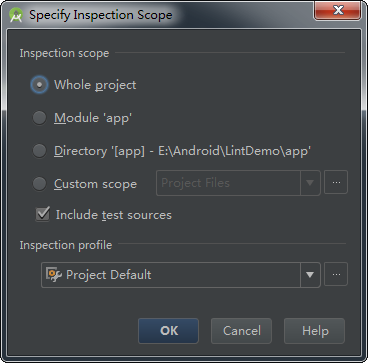
可以看到,我们可以指定此次Lint检查的范围为整个项目或者某个模块或者自定义的范围。
点击此对话框中Inspection profile下方的 … 按钮,在弹出的对话框中你可以配置Lint检查的规则。如下图所示:
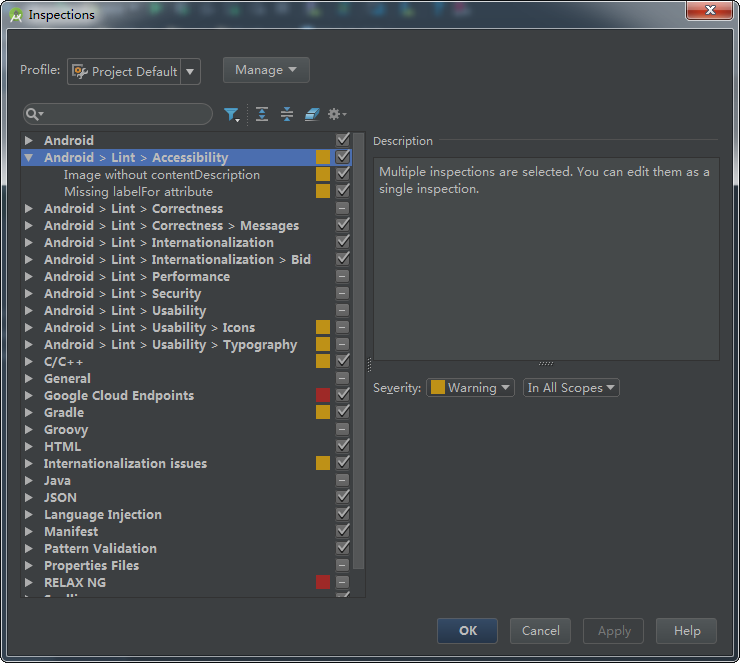
可以看到,我们可以配置Lint打开或者关闭某些问题的检查以及问题的严重级别。
注意: 使用Android Studio配置Lint检查的规则只对Android Studio自动运行的Lint检查和通过该方式手动执行的Lint检查起作用。
运行Lint
在使用Android Studio时,配置的Lint工具和IDE检查会在你编写代码时自动运行。Lint发现问题后,会用黄色高亮显示有问题的代码,而对于更严重的问题,则会在代码下面显示红色的下划线。
当然,你也可以手动运行Lint。手动运行Lint的方法主要有以下三种:
- 使用Gradle运行Lint。
- 使用Android Studio运行Lint。
- 使用Android SDK中的独立工具运行Lint(不常用)。
使用Gradle运行Lint
默认情况下,基于Gradle构建的Android项目已经包含了lint任务以及各种构建变种的lint任务。你可以在项目的根目录下执行 gradlew tasks 命令查看。如下所示:
E:\Android\LintDemo>gradlew tasks
...
Verification tasks
------------------
...
lint - Runs lint on all variants.
lintDebug - Runs lint on the Debug build.
lintRelease - Runs lint on the Release build.
...
因此,你可以在项目的根目录下执行 gradlew lint 命令来运行Lint。如下所示:
E:\Android\LintDemo>gradlew lint
...
:app:lint
Ran lint on variant release: 3 issues found
Ran lint on variant debug: 3 issues found
Wrote HTML report to file:///E:/Android/LintDemo/app/build/outputs/lint-results-debug.html
Wrote XML report to file:///E:/Android/LintDemo/app/build/outputs/lint-results-debug.xml
...
可以看到,Lint完成检查之后,会在 build/outputs/ 目录下生成XML和HTML两种版本的报告。
下图是HTML版本的Lint报告:
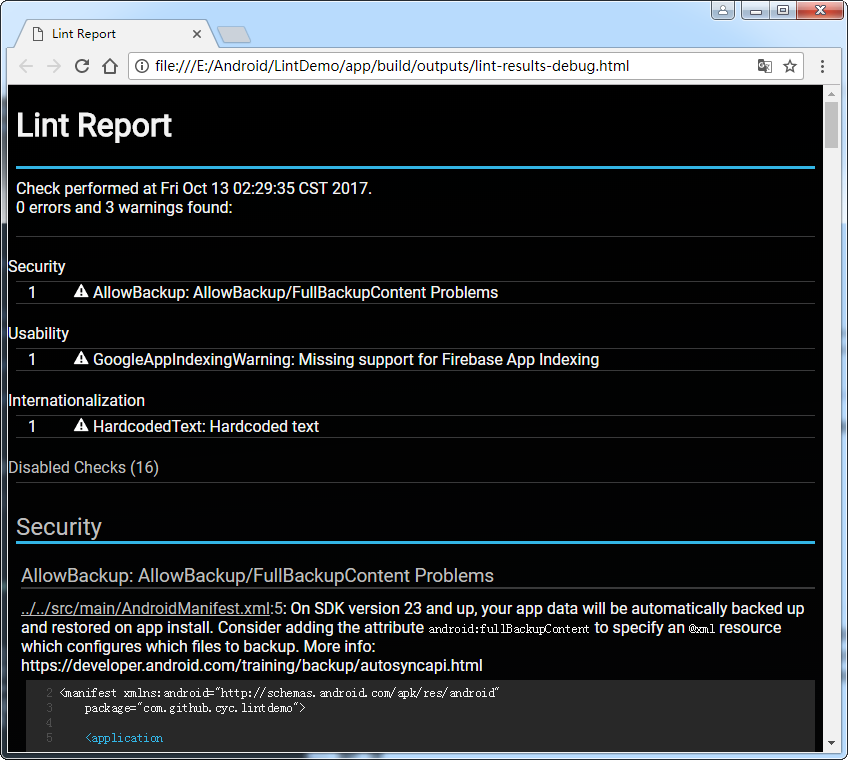
根据Lint报告,我们就可以改进代码了。
使用Android Studio运行Lint
在Android Studio中,点击 Analyze > Inspect Code…,在弹出的对话框中选择要检查的范围,然后点击OK按钮运行Lint。如下图所示:

Lint完成检查之后,会在Android Studio界面下方的 Inspection 面板中显示Lint结果。如下图所示:
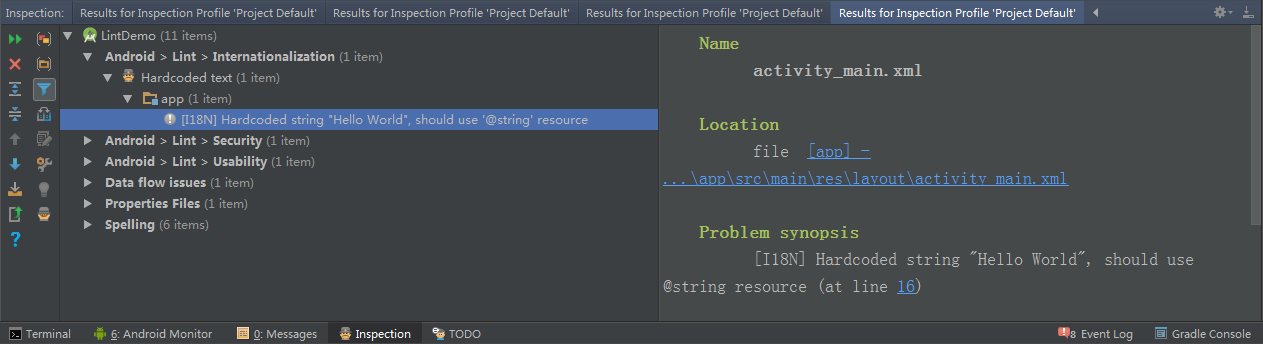
根据Lint结果,我们就可以改进代码了。
总结
Lint工具可以帮助你检查可能影响应用质量和性能的代码问题。该工具会报告检测到的每个问题并提供问题的描述信息和严重级别,以便你可以快速地确定需要优先进行哪些改进。在使用Android Studio时,配置的Lint工具和IDE检查会在你编写代码时自动运行。当然,你也可以手动运行Lint工具。