简介
RxJava是基于响应式编程的框架,响应式编程的思想就是一个事件发生后,监听着这个事件的监听器马上做出响应。类似于平常的开关灯。当我们打开灯的开关时,灯马上亮了;当我们关闭灯的开关时,灯马上熄了。这个过程中,灯对我们控制开关的事件做出了响应。在Android中,设置按钮监听器也用到了响应式的思想,当有点击事件发生时,OnClickListener马上执行。也就是说OnClickListener时刻观察着按钮,当按钮被点击时,OnClickListener马上做出了响应。
RxJava中的三个基本概念:观察者Observer,被观察者Observable,订阅subscribe。当观察者订阅了被观察者,被观察者有事件发生时,观察者可以做出响应。
RxAndroid是JakeWharton对RxJava做的一个扩展,主要是为了让Android中更好的使用RxJava
RxJava的Github地址为:https://github.com/ReactiveX/RxJava
RxAndroid的Github地址为:https://github.com/ReactiveX/RxAndroid
使用
1.在app模块的build.gradle的dependencies中引入RxJava和RxAndroid:
implementation 'io.reactivex.rxjava2:rxandroid:2.1.0'
implementation 'io.reactivex.rxjava2:rxjava:2.2.2'
2.在MainActivity中创建被观察者和观察者,然后建立订阅,例:(本例中布局非常简单,只有一个id为text的TextView,故不再给出布局代码)
class MainActivity : AppCompatActivity() {

    override fun onCreate(savedInstanceState: Bundle?) {
        super.onCreate(savedInstanceState)
        setContentView(R.layout.activity_main)

        //创建一个被观察者,发出整型数据
        val observable = createObservable()
        //创建一个观察者,接收整型数据
        val observer = createObserver()
        //建立订阅
        observable.subscribeOn(Schedulers.newThread())
                .observeOn(AndroidSchedulers.mainThread())
                .subscribe(observer)
    }

    private fun createObservable(): Observable<Int> {
        return Observable.create {
            for (i in 0..9) {
                //通知观察者执行onNext()方法
                it.onNext(i)
            }
            //通知观察者数据发送完成
            it.onComplete()
        }
    }

    private fun createObserver(): Observer<Int> {
        return object : Observer<Int> {
            override fun onSubscribe(d: Disposable) {
                text.append("subscribe\n")
            }

            override fun onNext(integer: Int) {
                text.append("$integer\n")
            }

            override fun onComplete() {
                text.append("complete.")
            }

            override fun onError(e: Throwable) {
                text.append(e.message)
            }
        }
    }
}
注:
(1)被观察者需要重写subscribe()方法,在此方法中使用emitter发出数据,Kotlin对于单方法单参数的对象有一个语法糖,使用it即可表示这个单参数emitter
(2)观察者需要重写onSubscribe()、onNext()、onError()、onComplete()方法。
onSubscribe():订阅开始时调用
onNext():执行发射器发出的事件
onError():当程序出错时,执行onError,订阅结束
onComplete():当程序完成后,执行onComplete,订阅结束
(3)使用observable.subscribe(observer)建立订阅。subscribeOn(Scheduler scheduler)决定被观察者发射事件的线程,observeOn(Scheduler scheduler)决定观察者接收事件的线程。
常用的线程类型有:
Schedulers.newThread():新线程
Schedulers.io():IO线程
Schedulers.computation():计算线程
AndroidSchedulers.mainThread():主线程(RxAndroid库中的)
执行程序,可以看到如下结果:
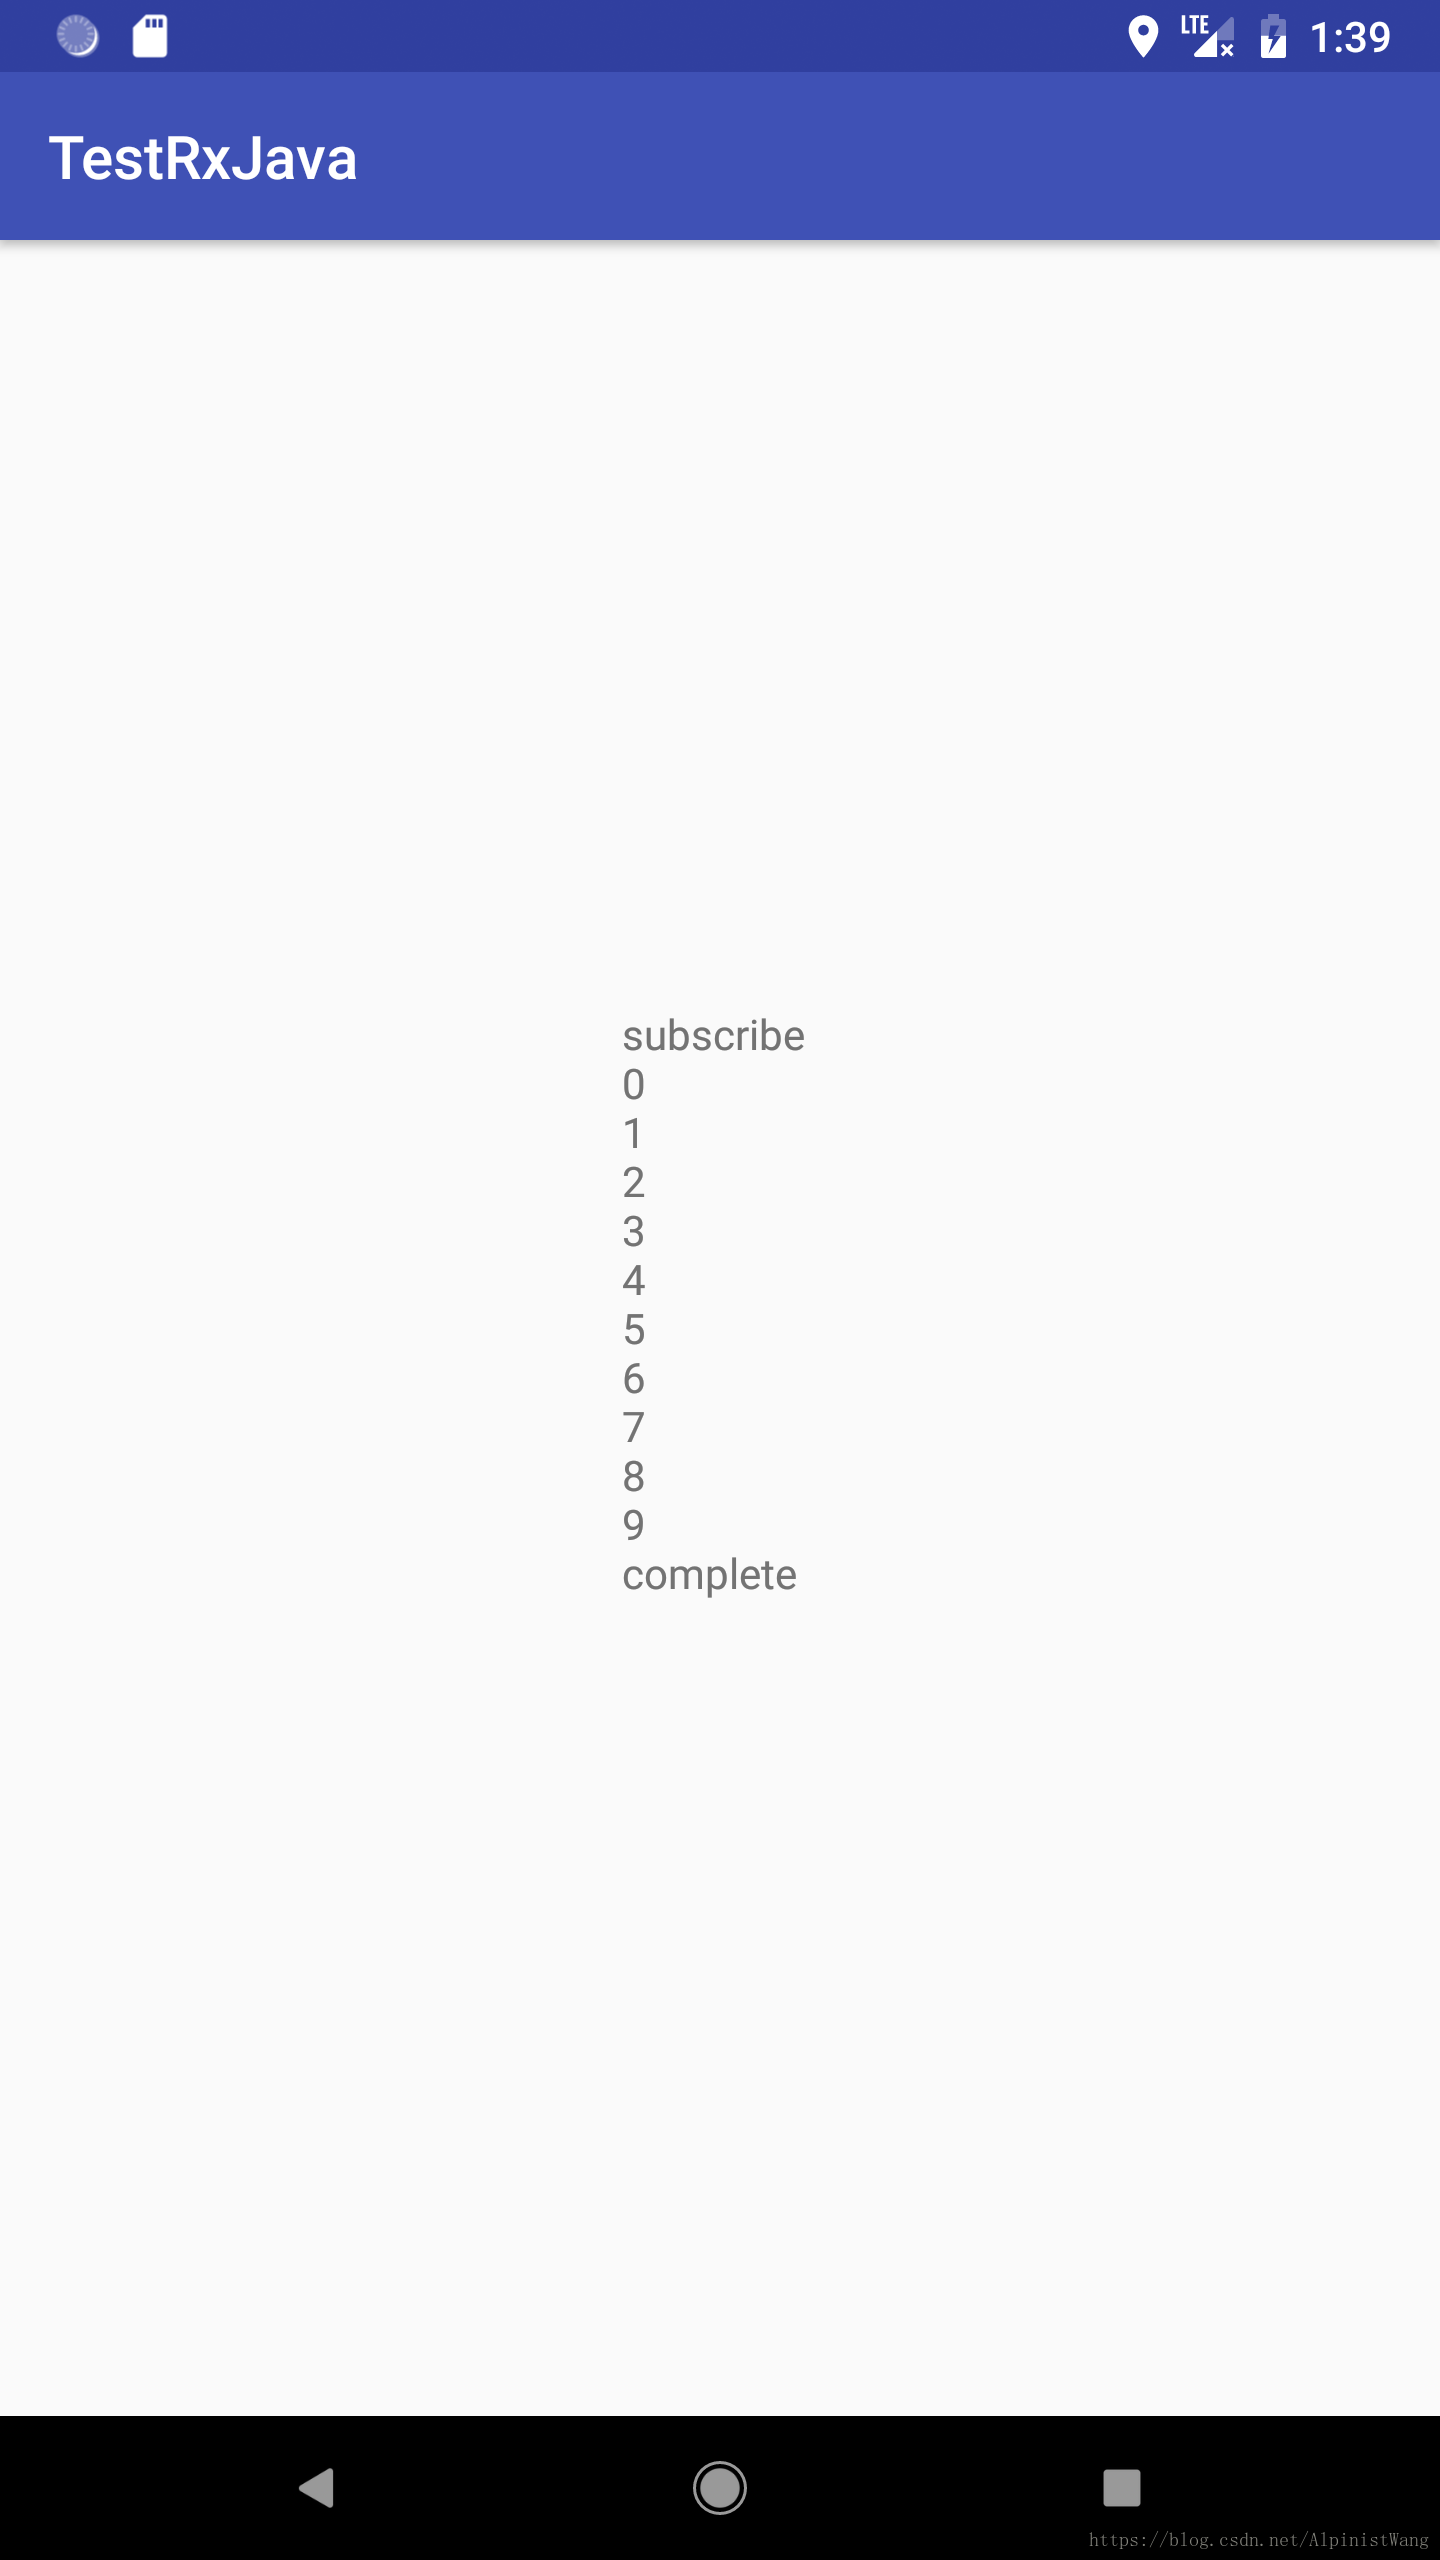
可以看到observable中发出的事件被observer依次执行了
map操作符
3.使用map在数据传递过程中进行数据类型转换
例:在MainActivity中创建发出整型数据的被观察者、接收字符串数据的观察者,使用map将整型数据转换成字符串,建立订阅
class MainActivity : AppCompatActivity() {

    override fun onCreate(savedInstanceState: Bundle?) {
        super.onCreate(savedInstanceState)
        setContentView(R.layout.activity_main)

        //创建一个被观察者,发出整型数据
        val observable = createObservable()
        //创建一个观察者,接收字符串数据
        val observer = createObserver()
        //建立订阅
        observable.subscribeOn(Schedulers.newThread())
                .observeOn(AndroidSchedulers.mainThread())
                .map{
                    "string $it"
                }
                .subscribe(observer)
    }

    private fun createObservable(): Observable<Int> {
        return Observable.create {
            for (i in 0..9) {
                //通知观察者执行onNext()方法
                it.onNext(i)
            }
            //通知观察者数据发送完成
            it.onComplete()
        }
    }

    private fun createObserver(): Observer<String> {
        return object : Observer<String> {
            override fun onSubscribe(d: Disposable) {
                text.append("subscribe\n")
            }

            override fun onNext(string: String) {
                text.append("$string\n")
            }

            override fun onComplete() {
                text.append("complete.")
            }

            override fun onError(e: Throwable) {
                text.append(e.message)
            }
        }
    }
}
注:map()函数中需要传入一个Function<T1,T2>进行类型转换,Function中需要重写apply函数,这里同样使用了kotlin的语法糖,it表示传进来的整数,map函数最后一行作为返回值
T2 apply(T1 data):将T1类型的数据传入,返回T2类型数据,实现数据类型转换
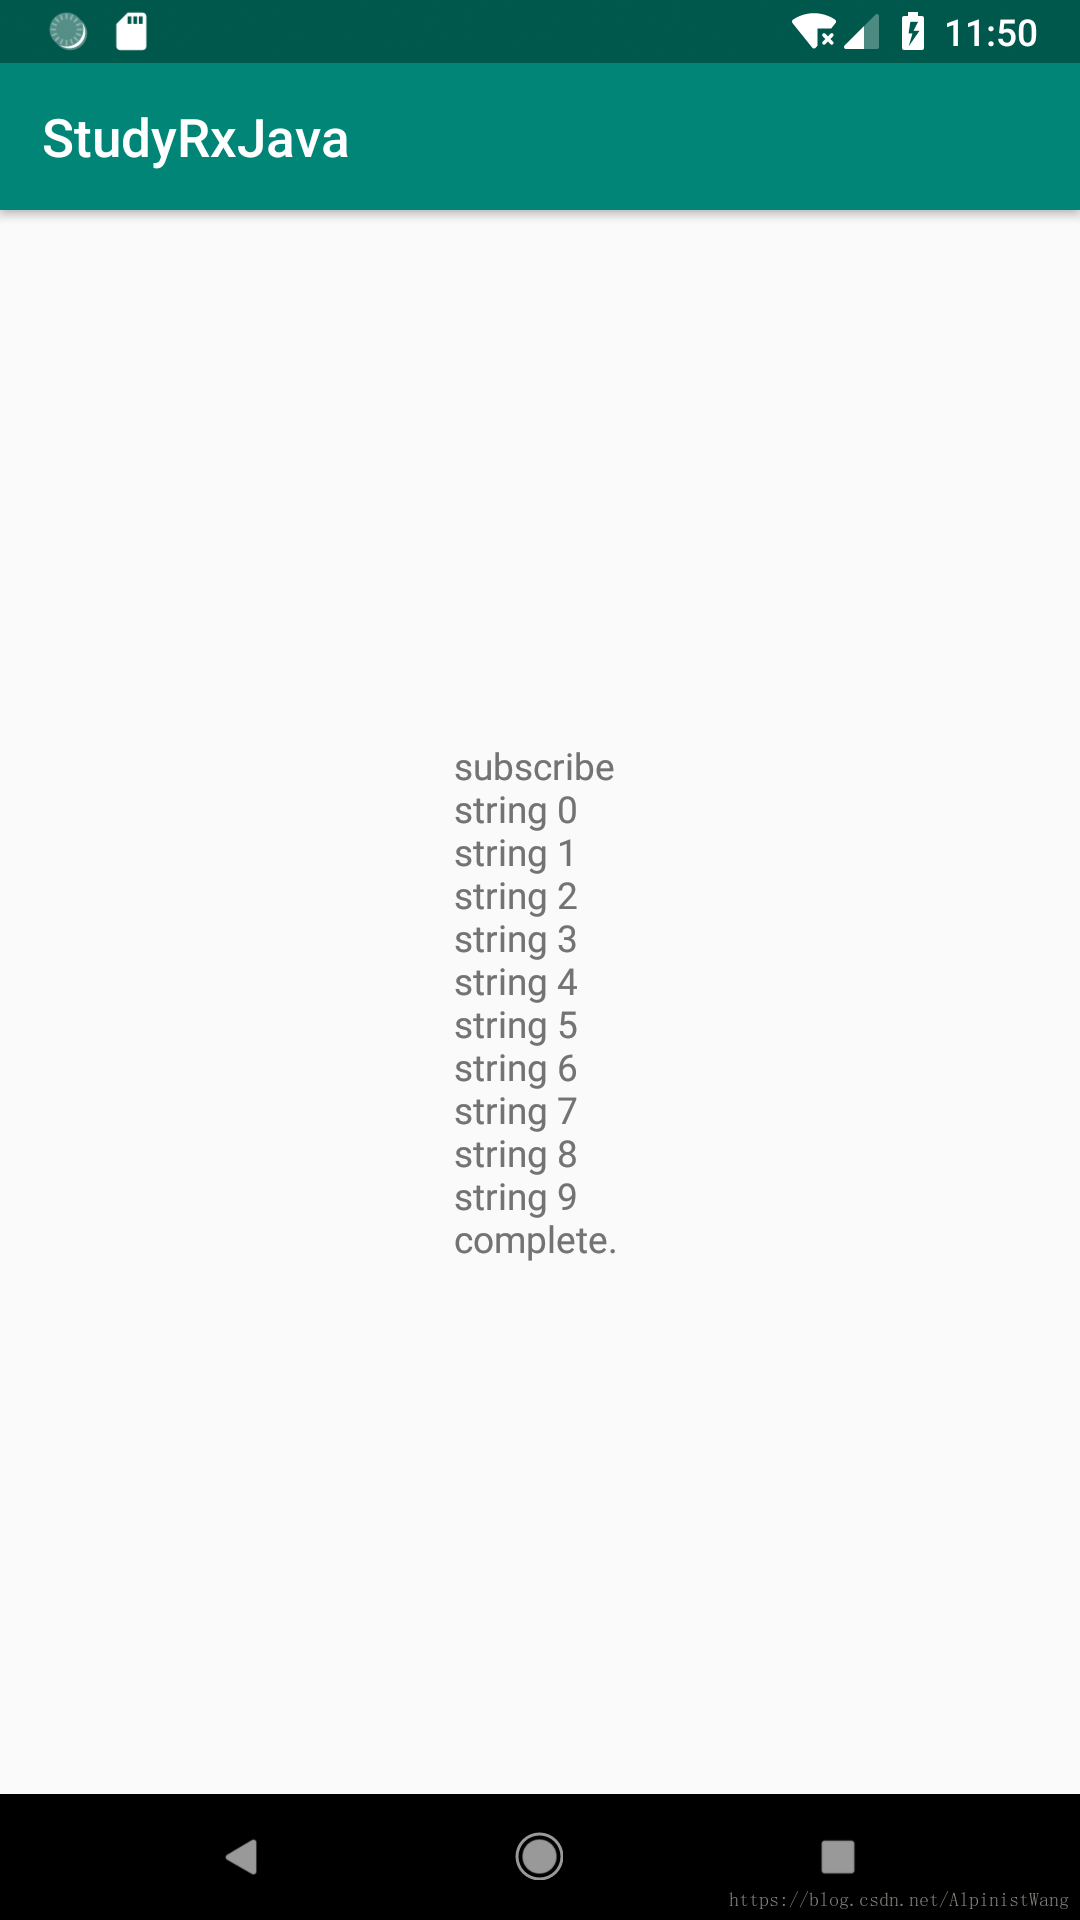
执行程序,可以看到如下结果:
flatMap操作符和concatMap操作符
4.使用flatMap将发射的一列数据列展开,单独发射
例:使用flatMap的代码如下:
class MainActivity : AppCompatActivity() {

    override fun onCreate(savedInstanceState: Bundle?) {
        super.onCreate(savedInstanceState)
        setContentView(R.layout.activity_main)

        //创建一个被观察者,发出整型数据
        val observable = createObservable()
        //创建一个观察者,接收字符串数据
        val observer = createObserver()
        //建立订阅
        observable.subscribeOn(Schedulers.newThread())
                .observeOn(AndroidSchedulers.mainThread())
                .flatMap { origin ->
                    Observable.create<String> {
                        //将原始的一列数据展开,单独用一个被观察者发射出去
                        it.onNext("new emitter:$origin")
                        //当展开的所有被观察者都完成后,原始被观察者才会完成
                        it.onComplete()
                    }
                }
                .subscribe(observer)
    }

    private fun createObservable(): Observable<Int> {
        return Observable.create {
            for (i in 0..9) {
                //通知观察者执行onNext()方法
                it.onNext(i)
            }
            //通知观察者数据发送完成
            it.onComplete()
        }
    }

    private fun createObserver(): Observer<String> {
        return object : Observer<String> {
            override fun onSubscribe(d: Disposable) {
                text.append("subscribe\n")
            }

            override fun onNext(string: String) {
                text.append("$string\n")
            }

            override fun onComplete() {
                text.append("complete.")
            }

            override fun onError(e: Throwable) {
                text.append(e.message)
            }
        }
    }
}
上面的代码原始发射数据是0~9的一列数字,flatMap传入一个原始数据,输出一个被观察者,也就是将单个数字单独用一个被观察者发射出去。执行以上程序,显示如下:
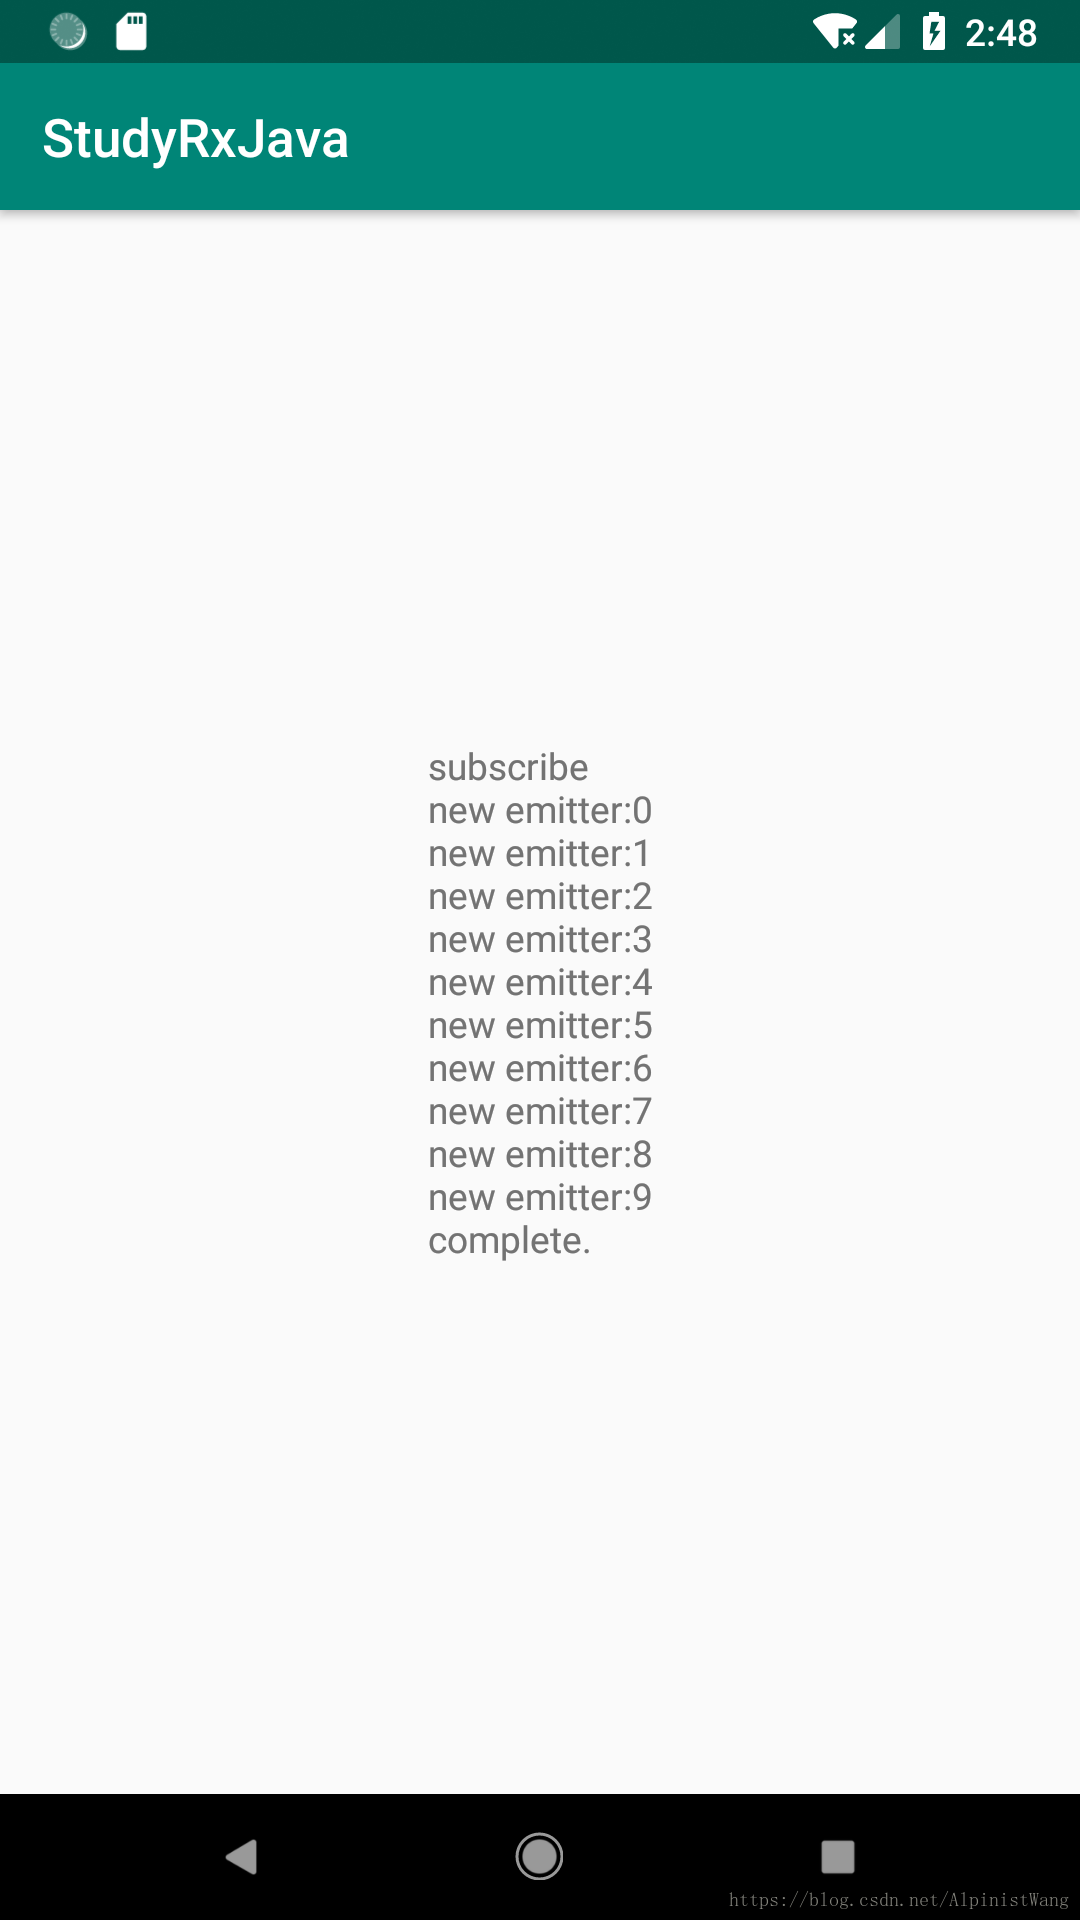
当展开的所有被观察者都完成后,原始的观察者才会完成。
flatMap有个类似的方法concatMap,使用上没有差别,区别在于flatMap展开后是无序的,concatMap展开后是有序的,使用concatMap的话,展开的一列被观察者将会按照原始数据的顺序依次发射
internal操作符
使用internal操作符实现Timer的效果,internal操作传入三个参数:
initialDelay : 延迟多长时间开始
period : 间隔多长时间
unit : 时间单位
例:
class MainActivity : AppCompatActivity() {

    private var disposable: Disposable? = null
    override fun onCreate(savedInstanceState: Bundle?) {
        super.onCreate(savedInstanceState)
        setContentView(R.layout.activity_main)

        //创建一个被观察者,间隔1秒发射数据
        val observable = createObservable()
        //创建一个观察者,接收数据
        val observer = createObserver()
        //建立订阅
        observable.subscribeOn(Schedulers.newThread())
                .observeOn(AndroidSchedulers.mainThread())
                .subscribe(observer)

    }

    private fun createObservable(): Observable<Long> {
        return Observable.interval(0, 1, TimeUnit.SECONDS)

    }

    private fun createObserver(): Observer<Long> {
        return object : Observer<Long> {
            override fun onSubscribe(d: Disposable) {
                text.append("subscribe\n")
                disposable = d
            }

            override fun onNext(data: Long) {
                text.append("$data\n")
                if (data >= 9) {
                    disposable?.dispose()
                    onComplete()
                }
            }

            override fun onComplete() {
                text.append("complete.")
            }

            override fun onError(e: Throwable) {
                text.append(e.message)
            }
        }
    }
}
运行以上程序,显示如下:

代码中可以看出,onSubscribe中的Disposable代表建立的订阅,需要取消订阅时,使用disposable.dispose方法即可。如果不取消订阅,internal的onNext回调将一直执行,直到当前程序进程被杀死。
由此可以看出,RxJava使用时一定要及时关闭订阅,否则会导致内存泄漏问题,有一个比较方便的框架RxLifecycle,可以帮助我们在Activity生命周期中关闭订阅
RxLifecycle
RxLifecycle的Github地址为:https://github.com/trello/RxLifecycle
使用
1.在build.gradle中导入RxLifecycle
implementation 'com.trello.rxlifecycle2:rxlifecycle-components:2.2.2'
注:RxLifecycle中包含了RxJava包,所以导入了RxLifecycle之后就可以不用导入RxJava了,但是RxLifecycle不包含RxAndroid,所以还是需要导入RxAndroid
2.我们先写一个不加入RxLifecycle的订阅,测试一下RxJava带来的内存泄漏:
class MainActivity : AppCompatActivity() {
    companion object {
        const val TAG = "MainActivity"
    }

    override fun onCreate(savedInstanceState: Bundle?) {
        super.onCreate(savedInstanceState)
        setContentView(R.layout.activity_main)

        //创建一个被观察者,间隔1秒发射数据
        val observable = createObservable()
        //创建一个观察者,接收数据
        val observer = createObserver()
        //建立订阅
        observable.subscribeOn(Schedulers.newThread())
                .observeOn(AndroidSchedulers.mainThread())
                .subscribe(observer)
    }


    private fun createObservable(): Observable<Long> {
        return Observable.interval(0, 1, TimeUnit.SECONDS)

    }

    private fun createObserver(): Observer<Long> {
        return object : Observer<Long> {
            override fun onSubscribe(d: Disposable) {
                text.append("subscribe\n")
                Log.d(TAG, "onSubscribe")
            }

            override fun onNext(data: Long) {
                text.append("$data\n")
                Log.d(TAG, "$data")
            }

            override fun onComplete() {
                text.append("complete.")
                Log.d(TAG, "onComplete")
            }

            override fun onError(e: Throwable) {
                text.append(e.message)
                Log.d(TAG, "onError")
            }
        }
    }

    override fun onDestroy() {
        super.onDestroy()
        Log.d(TAG, "onDestroy")
    }
}
运行程序,可以看到如下Log:
com.example.studyrxjava D/MainActivity: onSubscribe
com.example.studyrxjava D/MainActivity: 0
com.example.studyrxjava D/MainActivity: 1
com.example.studyrxjava D/MainActivity: 2
com.example.studyrxjava D/MainActivity: 3
com.example.studyrxjava D/MainActivity: 4
com.example.studyrxjava D/MainActivity: 5
com.example.studyrxjava D/MainActivity: 6
com.example.studyrxjava D/MainActivity: 7
com.example.studyrxjava D/MainActivity: 8
com.example.studyrxjava D/MainActivity: onDestroy
com.example.studyrxjava D/MainActivity: 9
com.example.studyrxjava D/MainActivity: 10
com.example.studyrxjava D/MainActivity: 11
com.example.studyrxjava D/MainActivity: 12
com.example.studyrxjava D/MainActivity: 13
com.example.studyrxjava D/MainActivity: 14
com.example.studyrxjava D/MainActivity: 15
com.example.studyrxjava D/MainActivity: 16
com.example.studyrxjava D/MainActivity: 17
...
由此可见,在Activity已经onDestroy之后,RxJava的internal订阅仍在运行,这就是内存泄漏了。
3.加上RxLifecycle修复此内存泄漏,代码如下
class MainActivity : RxAppCompatActivity() {
    companion object {
        const val TAG = "MainActivity"
    }

    override fun onCreate(savedInstanceState: Bundle?) {
        super.onCreate(savedInstanceState)
        setContentView(R.layout.activity_main)

        //创建一个被观察者,间隔1秒发射数据
        val observable = createObservable()
        //创建一个观察者,接收数据
        val observer = createObserver()
        //建立订阅
        observable.subscribeOn(Schedulers.newThread())
                .observeOn(AndroidSchedulers.mainThread())
                .compose(bindUntilEvent(ActivityEvent.DESTROY))
                .subscribe(observer)
    }


    private fun createObservable(): Observable<Long> {
        return Observable.interval(0, 1, TimeUnit.SECONDS)

    }

    private fun createObserver(): Observer<Long> {
        return object : Observer<Long> {
            override fun onSubscribe(d: Disposable) {
                text.append("subscribe\n")
                Log.d(TAG, "onSubscribe")
            }

            override fun onNext(data: Long) {
                text.append("$data\n")
                Log.d(TAG, "$data")
            }

            override fun onComplete() {
                text.append("complete.")
                Log.d(TAG, "onComplete")
            }

            override fun onError(e: Throwable) {
                text.append(e.message)
                Log.d(TAG, "onError")
            }
        }
    }

    override fun onDestroy() {
        super.onDestroy()
        Log.d(TAG, "onDestroy")
    }
}
首先将继承类由AppCompatActivity改为RxAppCompatActivity,这是使用RxLifecycle必需的,然后建立订阅时加入.compose(bindUntilEvent(ActivityEvent.DESTROY))即可,这行代码需要加在subscribe(observer)调用之前
运行以上加入了RxLifecycle的代码,Log显示如下:
com.example.studyrxjava D/MainActivity: onSubscribe
com.example.studyrxjava D/MainActivity: 0
com.example.studyrxjava D/MainActivity: 1
com.example.studyrxjava D/MainActivity: 2
com.example.studyrxjava D/MainActivity: 3
com.example.studyrxjava D/MainActivity: 4
com.example.studyrxjava D/MainActivity: 5
com.example.studyrxjava D/MainActivity: 6
com.example.studyrxjava D/MainActivity: onDestroy
com.example.studyrxjava D/MainActivity: onComplete
可以看到,onDestroy之后RxJava的internal订阅就结束了。
以上,就是RxJava RxAndroid RxLifecycle基本使用。
源码已上传:
https://github.com/wkxjc/StudyRxJava2