首先需要一台云主机,请自行购买准备
步骤一:搭建 LNMP 环境
1.
登录云服务器后,默认已获取 root 权限。在 root 权限下,通过以下命令,先将必要软件一起安装 (Nginx、MySQL、PHP):
输入以下命令
yum install nginx php php-fpm php-mysql mysql-server -y
安装完成后

2.
将各程序设置为开机自启
chkconfig nginx on
chkconfig mysqld on
chkconfig php-fpm on
将 Nginx、MySQL、PHP 等各软件安装好之后,还需要对各软件分别进行配置。以下是详细步骤:
3.
请使用 Vim 命令打开
default.conf文件,取消对 IPv6 地址的监听同时配置 Nginx,实现与 PHP 的联动。
vim /etc/nginx/conf.d/default.conf
按字母“I”键或 “Insert” 键切换至编辑模式,将已有内容全部清除,复制并粘贴以下内容到
default.conf文件server {
listen 80;
root /usr/share/nginx/html;
server_name localhost;
#charset koi8-r;
#access_log /var/log/nginx/log/host.access.log main;
location / {
index index.php index.html index.htm;
}
#error_page 404 /404.html;
#redirect server error pages to the static page /50x.html
#
error_page 500 502 503 504 /50x.html;
location = /50x.html {
root /usr/share/nginx/html;
}
#pass the PHP scripts to FastCGI server listening on 127.0.0.1:9000
#
location ~ .php$ {
fastcgi_pass   127.0.0.1:9000;
fastcgi_index   index.php;
fastcgi_param  SCRIPT_FILENAME  $document_root$fastcgi_script_name;
include        fastcgi_params;
}
}

修改后

修改完成后,按 “Esc” 键,输入 “:wq”,保存文件并返回。
5.
启动 Nginx。
service nginx start
6.
测试 Nginx 服务是否正常运行。
在浏览器中,访问 CentOS 云主机公网 IP,查看 Nginx 服务是否正常运行。
显示如下,则说明 Nginx 安装配置成功:
在浏览器中,访问 CentOS 云主机公网 IP,查看 Nginx 服务是否正常运行。
显示如下,则说明 Nginx 安装配置成功:

7.
启动MySQL
service mysqld start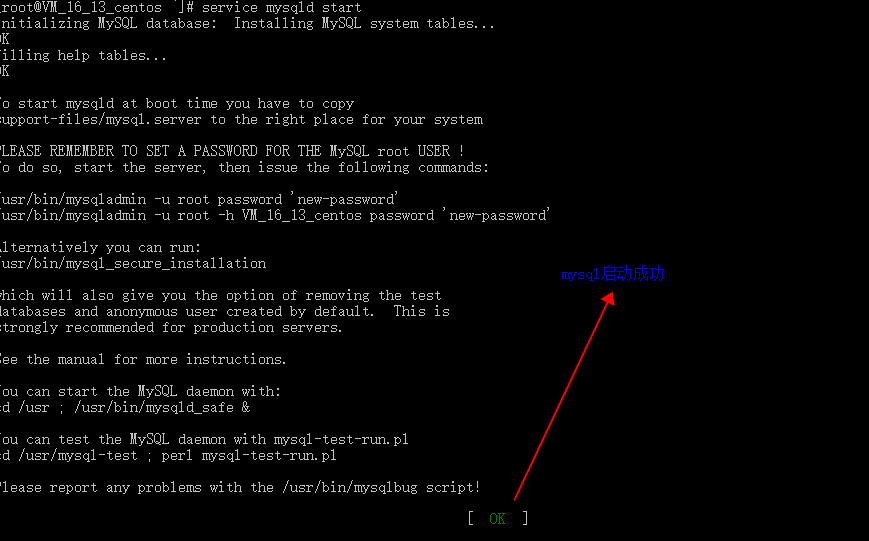
8.
设置 MySQL 服务器 root 用户的密码,本教程设置为 “123456”,后续步骤中需要用到此用户名和密码。
/usr/bin/mysqladmin -u root password "123456"
9.
启动 PHP-FPM 服务。
service php-fpm start
10.
配置 PHP Session 的存储路径。
打开
打开
/etc/php.ini文件。
vim /etc/php.ini
进入后直接输入以下内容,回车定位到 “session.save_path” 的位置:
/session.save_pathsession.save_path = "/var/lib/php/session"
修改完成后,按 “Esc” 键,输入 “:wq”,保存文件并返回。
11.
更改
/var/lib/php/session目录下所有文件的属组都改成 nginx 和 nginx。
chown -R nginx:nginx /var/lib/php/session
请使用以下命令在 Web 目录下创建
index.php文件:
vim /usr/share/nginx/html/index.php
按字母“I”键或 “Insert” 键切换至编辑模式,写入如下内容:
<?php
echo "<title>Test Page</title>";
echo "Hello World!";
?>
输入完成后,按“Esc”键,输入 “:wq”,保存文件并返回。
14.
在浏览器中,访问该
index.php文件,查看环境配置是否成功:
http://云主机的公网 IP/index.php
页面显示 “Hello World!”,则说明 LNMP 环境配置成功。
15.
开始下载安装wordpress,先删除网站根目录下的
index.html文件。
rm /usr/share/nginx/html/index.html
窗口提示是否删除,输入 “y” 回车。
16.
下载 WordPress 并解压到当前目录,依次执行以下命令。
wget https://cn.wordpress.org/wordpress-4.7.4-zh_CN.tar.gztar zxvf wordpress-4.7.4-zh_CN.tar.gz
开始配置数据库,登录 MySQL 服务器,使用 root 用户登录到 MySQL 服务器。
mysql -uroot -p
在系统提示时,输入密码(步骤 2.3.2 已设置 MySQL root 用户的密码为 123456)登录。
18.
为 WordPress 创建数据库并设置用户名和密码(本教程设置如下,您可自行定义)。
为 WordPress 创建 MySQL 数据库 “wordpress”。
为 WordPress 创建 MySQL 数据库 “wordpress”。
CREATE DATABASE wordpress;
为已创建好的 MySQL 数据库创建一个新用户 “user@localhost”。
CREATE USER user@localhost;SET PASSWORD FOR user@localhost=PASSWORD("wordpresspassword");GRANT ALL PRIVILEGES ON wordpress.* TO user@localhost IDENTIFIED BY 'wordpresspassword';FLUSH PRIVILEGES;exit
19.
写入数据库信息,将
wp-config-sample.php文件复制到名为wp-config.php的文件,使用以下命令创建新的配置文件,并将原先的示例配置文件保留作为备份。
cd wordpress/
cp wp-config-sample.php wp-config.php
打开并编辑新创建的配置文件。
vim wp-config.php
找到文件中 MySQL 的部分,按字母“I”键或 “Insert” 键切换至编辑模式,将步骤 3.2 中已配置好的数据库相关信息写入:
// ** MySQL settings - You can get this info from your web host ** //
/** The name of the database for WordPress */
define('DB_NAME', 'wordpress');

/** MySQL database username */
define('DB_USER', 'user');

/** MySQL database password */
define('DB_PASSWORD', 'wordpresspassword');

/** MySQL hostname */
define('DB_HOST', 'localhost');

修改完成后,按“Esc”键,输入“:wq”,保存文件返回。
21.
移动安装文件至 Web 服务器文档根目录,以便可以运行安装脚本完成安装。
mv * /usr/share/nginx/html/
输入y确认操作
22.
在 Web 浏览器地址栏输入 WordPress 站点的 IP 地址(云主机的公网 IP 地址,或者该地址后跟 “wordpress文件夹”),可以看到 WordPress 安装屏幕,就可以开始配置 WordPress。

至此大功告成,撒花!