一、工作流简介
1.什么是工作流?
简单的理解就是工作的流程,这里的流程指的是,完成一个企业中具体业务的一系列工作步骤,所有的步骤合在一起就是业务从开始到结束的流转过程。
从计算机系统的角度来讲,工作流系统表示:业务过程的部分和整体在计算机应用环境的自动化操作。
2.工作流的三大要素
①这个过程要做什么?
②经过多少个步骤?
③每个步骤是由谁来做,做什么,怎么做?
3.工作流系统的组成

流程定义工具:定义流程(画流程图)
表单定制工具:要提交的数据的表单的定制(可以用创建一个(html form)表单的表单形式替代)
工作流引擎: 工作流框架的核心,驱动着流程的流程,流程的数据共享,数据保存,流程的版本迭代....
管理监控工具:监控每一个流程的运转,管理每一个流程;
开发API:暴露给开发人员的api;
4.工作流需要解决的问题
1)、流程的自动化流程控制
2)、流程数据的保存(历史记录,历史数据的保存);
3)、流程版本的更替;(维护流程的版本更替);
4)、流程运行期间数据的共享等;
流程都具有一定的通用性;流程框架抽取流程的通用性,来统一管理和维护流程;
5.工作流的相关概念
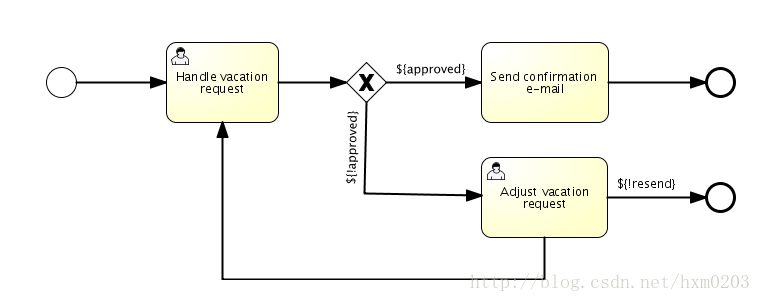
①流程定义:(ProcessDefinition):
流程的定义:流程图。表示一个流程的信息;一个流程定义(如:请假流程图)
②流程实例:(ProcessInstance):
启动一个流程:称为创建一个流程的实例;无数个流程实例(如员工提交的请假单审批流程)
③流程变量:(ProcessVariable):
流程运行提交的数据,共享的数据,等;
④任务:(Task)
每一步需要完成的工作算是一个任务;(每一个流程运行都需要完成自己的流程规定的任务)
⑤开始、结束(Start 、End)
每一个流程只有一个入口,无数的出口;(正常结束的出口,异常结束的出口等)
⑥网关(Gateway):
流程的分支节点(判断节点);决定下一步走哪儿;

6.工作流产品
①JBPM
②OSWorkFlow
③Shark
④信雅达
⑤普元工作流
⑥Activiti5
7.ProcessEngine
ProcessEngine这个类是Activiti5的核心,所有的服务都需要通过ProcessEngine来创建,该类是线程安全的
Activiti5的持久化层采用的是Mybatis,这样移植性好,底层Spring+MyBatis;
Activiti5主要包括7个Service,这些Service都是通过ProcessEngine创建
repositoryService(持久化服务)
runtimeService(运行时服务)
formService(表单服务)
identityService(身份信息)
taskService(任务服务)
historyService(历史信息)
managementService(管理定时任务)
8.Activiti5框架表结构
Activiti使用到的表都是ACT_开头的。
ACT_RE_*: ‘RE’表示repository(存储),RepositoryService接口所操作的表。带此前缀的表包含的是静态信息,如,流程定义,流程的资源(图片,规则等)。
ACT_RU_*: ‘RU’表示runtime,运行时表-RuntimeService。这是运行时的表存储着流程变量,用户任务,变量,职责(job)等运行时的数据。Activiti只存储实例执行期间的运行时数据,当流程实例结束时,将删除这些记录。这就保证了这些运行时的表小且快。
ACT_ID_*: ’ID’表示identity (组织机构),IdentityService接口所操作的表。用户记录,流程中使用到的用户和组。这些表包含标识的信息,如用户,用户组,等等。
ACT_HI_*: ’HI’表示history,历史数据表,HistoryService。就是这些表包含着流程执行的历史相关数据,如结束的流程实例,变量,任务,等等
ACT_GE_*: 全局通用数据及设置(general),各种情况都使用的数据。
act_ge_bytearray二进制数据表
act_ge_property属性数据表存储整个流程引擎级别的数据,初始化表结构时,会默认插入三条记录,
act_hi_actinst历史节点表
act_hi_attachment历史附件表
act_hi_comment历史意见表
act_hi_identitylink历史流程人员表
act_hi_detail历史详情表,提供历史变量的查询
act_hi_procinst历史流程实例表
act_hi_taskinst历史任务实例表
act_hi_varinst历史变量表
act_id_group用户组信息表
act_id_info用户扩展信息表
act_id_membership用户与用户组对应信息表
act_id_user用户信息表
act_re_deployment部署信息表
act_re_model流程设计模型部署表
act_re_procdef流程定义数据表
act_ru_event_subscr throwEvent、catchEvent时间监听信息表
act_ru_execution运行时流程执行实例表
act_ru_identitylink运行时流程人员表,主要存储任务节点与参与者的相关信息
act_ru_job运行时定时任务数据表
act_ru_task运行时任务节点表
act_ru_variable运行时流程变量数据表
9.流程框架的标准
Business Process Management (BPM). 工作流管理系统
BPMN 2.0:Business Process Modeling Notation(中文:业务流程建模与标注)
OMG组织维护业务流程建模规范,以后所有流程框架绘制流程图都遵循这个规范;
二、流程框架的操作
1)、设计流程:画流程图;
2)、保存流程:给数据库中保存绘制的流程图(流程定义)
3)、导出流程:实际上绘制的流程是一个xml文件;bmpn规范;
<?xml version="1.0" encoding="UTF-8"?>
<definitions xmlns="http://www.omg.org/spec/BPMN/20100524/MODEL" xmlns:xsi="http://www.w3.org/2001/XMLSchema-instance" xmlns:activiti="http://activiti.org/bpmn" xmlns:bpmndi="http://www.omg.org/spec/BPMN/20100524/DI" xmlns:omgdc="http://www.omg.org/spec/DD/20100524/DC" xmlns:omgdi="http://www.omg.org/spec/DD/20100524/DI" typeLanguage="http://www.w3.org/2001/XMLSchema" expressionLanguage="http://www.w3.org/1999/XPath" targetNamespace="http://www.activiti.org/test">
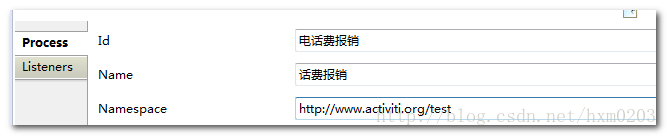
<process id="电话费报销" name="话费报销" isExecutable="true">
<startEvent id="startevent1" name="Start"></startEvent>
<userTask id="usertask1" name="部门经理审批"></userTask>
<sequenceFlow id="flow1" sourceRef="startevent1" targetRef="usertask1"></sequenceFlow>
<userTask id="usertask2" name="财务审批"></userTask>
<sequenceFlow id="flow2" sourceRef="usertask1" targetRef="usertask2"></sequenceFlow>
<userTask id="usertask3" name="总经理审批"></userTask>
<sequenceFlow id="flow3" sourceRef="usertask2" targetRef="usertask3"></sequenceFlow>
<endEvent id="endevent1" name="End"></endEvent>
<sequenceFlow id="flow4" sourceRef="usertask3" targetRef="endevent1"></sequenceFlow>
</process>
<bpmndi:BPMNDiagram id="BPMNDiagram_电话费报销">
<bpmndi:BPMNPlane bpmnElement="电话费报销" id="BPMNPlane_电话费报销">
<bpmndi:BPMNShape bpmnElement="startevent1" id="BPMNShape_startevent1">
<omgdc:Bounds height="35.0" width="35.0" x="90.0" y="190.0"></omgdc:Bounds>
</bpmndi:BPMNShape>
<bpmndi:BPMNShape bpmnElement="usertask1" id="BPMNShape_usertask1">
<omgdc:Bounds height="55.0" width="105.0" x="170.0" y="180.0"></omgdc:Bounds>
</bpmndi:BPMNShape>
<bpmndi:BPMNShape bpmnElement="usertask2" id="BPMNShape_usertask2">
<omgdc:Bounds height="55.0" width="105.0" x="320.0" y="180.0"></omgdc:Bounds>
</bpmndi:BPMNShape>
<bpmndi:BPMNShape bpmnElement="usertask3" id="BPMNShape_usertask3">
<omgdc:Bounds height="55.0" width="105.0" x="470.0" y="180.0"></omgdc:Bounds>
</bpmndi:BPMNShape>
<bpmndi:BPMNShape bpmnElement="endevent1" id="BPMNShape_endevent1">
<omgdc:Bounds height="35.0" width="35.0" x="640.0" y="190.0"></omgdc:Bounds>
</bpmndi:BPMNShape>
<bpmndi:BPMNEdge bpmnElement="flow1" id="BPMNEdge_flow1">
<omgdi:waypoint x="125.0" y="207.0"></omgdi:waypoint>
<omgdi:waypoint x="170.0" y="207.0"></omgdi:waypoint>
</bpmndi:BPMNEdge>
<bpmndi:BPMNEdge bpmnElement="flow2" id="BPMNEdge_flow2">
<omgdi:waypoint x="275.0" y="207.0"></omgdi:waypoint>
<omgdi:waypoint x="320.0" y="207.0"></omgdi:waypoint>
</bpmndi:BPMNEdge>
<bpmndi:BPMNEdge bpmnElement="flow3" id="BPMNEdge_flow3">
<omgdi:waypoint x="425.0" y="207.0"></omgdi:waypoint>
<omgdi:waypoint x="470.0" y="207.0"></omgdi:waypoint>
</bpmndi:BPMNEdge>
<bpmndi:BPMNEdge bpmnElement="flow4" id="BPMNEdge_flow4">
<omgdi:waypoint x="575.0" y="207.0"></omgdi:waypoint>
<omgdi:waypoint x="640.0" y="207.0"></omgdi:waypoint>
</bpmndi:BPMNEdge>
</bpmndi:BPMNPlane>
</bpmndi:BPMNDiagram>
</definitions>
<process></process>规定整个流程的流转;
<userTask ></userTask>规定用户任务;
<sequenceFlow></sequenceFlow>指定流转方向等...
4)、流程部署:实际就是把流程的定义信息(详情)保存到数据库; 给数据保存了流程定义
5)、启动流程:按照流程定义启动一次流程(流程实例)
6)、流程实例:流程框架控制自动流转到下一步;
7)、签收任务完成任务;完成以后,流程框架自动判断来到下一步
8)、查看历史流程
三、Activiti5框架的几大组件
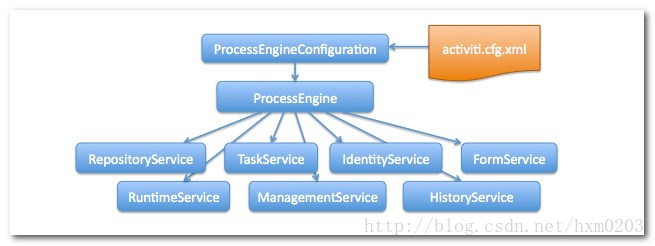
ProcessEngine :流程框架的核心 ;获取各大组件
activiti的七大组件:都是由流程引擎得到的;
以下为组件的获取方式:
ProcessEngine processEngine = ProcessEngines.getDefaultProcessEngine();
RuntimeService runtimeService = processEngine.getRuntimeService();
RepositoryService repositoryService = processEngine.getRepositoryService();
TaskService taskService = processEngine.getTaskService();
ManagementService managementService = processEngine.getManagementService();
IdentityService identityService = processEngine.getIdentityService();
HistoryService historyService = processEngine.getHistoryService();
FormService formService = processEngine.getFormService();
四、Activiti5的使用
1.导包(Activiti5默认使用的是h2的内存数据库,如果要使用mysql需要导入响应的驱动包)
<dependency>
<groupId>org.activiti</groupId>
<artifactId>activiti-engine</artifactId>
<version>5.22.0</version>
</dependency>
<dependency>
<groupId>mysql</groupId>
<artifactId>mysql-connector-java</artifactId>
<version>5.1.42</version>
</dependency>
2.编写流程框架配置文件(文件名:activiti.cfg.xml)
<beans xmlns="http://www.springframework.org/schema/beans"
xmlns:xsi="http://www.w3.org/2001/XMLSchema-instance"
xsi:schemaLocation="http://www.springframework.org/schema/beans http://www.springframework.org/schema/beans/spring-beans.xsd">
<!-- id必须是这个名称 -->
<bean id="processEngineConfiguration"
class="org.activiti.engine.impl.cfg.StandaloneProcessEngineConfiguration">
<!--数据库的连接相关信息 -->
<property name="jdbcUrl" value="jdbc:mysql://localhost:3306/activiti" />
<property name="jdbcDriver" value="com.mysql.jdbc.Driver" />
<property name="jdbcUsername" value="root" />
<property name="jdbcPassword" value="123456" />
<!-- 第一次启动创键数据库;以后升级数据库表结构 -->
<property name="databaseSchemaUpdate" value="true" />
<property name="jobExecutorActivate" value="false" />
<property name="asyncExecutorEnabled" value="true" />
<property name="asyncExecutorActivate" value="false" />
<!--设置解决乱码问题 -->
<property name="activityFontName" value="微软雅黑"></property>
<property name="annotationFontName" value="微软雅黑"></property>
<property name="labelFontName" value="微软雅黑"></property>
</bean>
</beans>
3.获取流程引擎
public static void main(String[] args) {
//第一次获取流程引擎会创建很多表
ProcessEngine engine = ProcessEngines.getDefaultProcessEngine();
System.out.println(engine.toString());
}

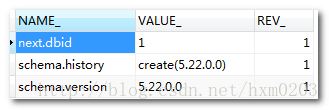
第一次创建数据表时,此表中会有三条记录:

五、在eclipse中使用activiti5绘制流程图
1.安装绘制流程图的插件
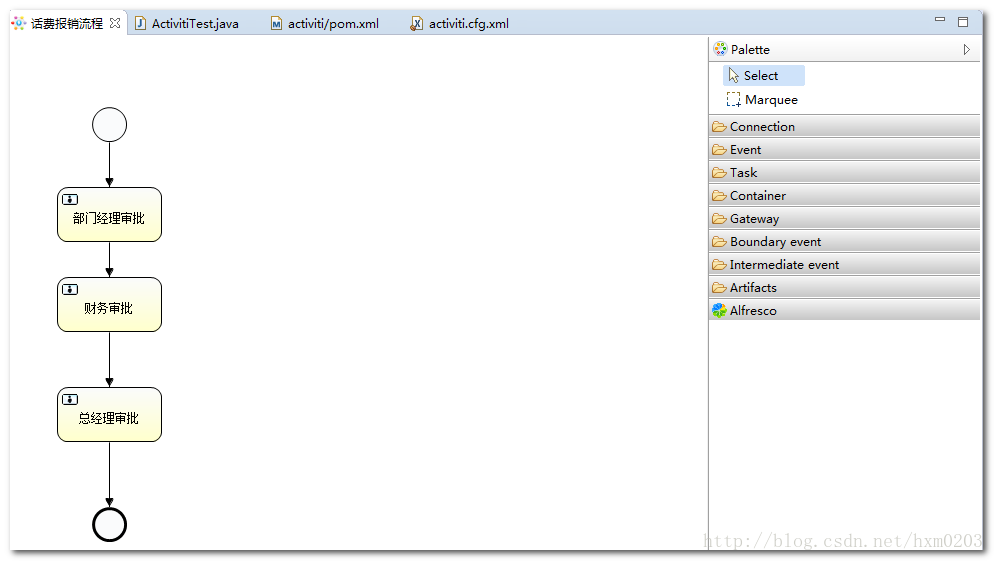
2.部署流程(把流程定义(流程图)保存到数据库中);每次部署产生一个【流程定义】
/**
* 部署项目
*/
@Test
public void testDeployement() {
ProcessEngine engine = ProcessEngines.getDefaultProcessEngine();
RepositoryService repositoryService = engine.getRepositoryService();
Deployment deployment = repositoryService.createDeployment().addClasspathResource("话费报销流程.bpmn").deploy();
System.out.println(deployment.getName());
System.out.println(deployment.getId());
System.out.println(deployment.getDeploymentTime());
}
数据库效果:

act_ge_bytearray

act_re_deployment

act_re_procdef

id_:流程定义的唯一id;流程引擎自动生成的;
rev_:数据库乐观锁机制
category_:分类
name_:流程定义的名字
key_:流程定义的key
version_:流程的版本号
deployment_id:那次部署产生的这个流程定义
resource_name_:流程定义的xml文件的名字;
dgrm_resource_name_:流程图的文件的名字;
其他等等的信息...
每一个流程图都有三个数据;
同一个流程部署多次会产生多个版本;根据每一个流程图的id来区分;
3.查询流程部署信息
/**
* 查看数据库的流程部署信息
*/
@Test
public void testQueryPdeployment() {
ProcessEngine processEngine = ProcessEngines.getDefaultProcessEngine();
RepositoryService repositoryService = processEngine.getRepositoryService();
DeploymentQuery deploymentQuery = repositoryService.createDeploymentQuery();
List<Deployment> list = deploymentQuery.list();
for (Deployment deployment : list) {
System.out.println("部署流程id"+deployment.getId());
System.out.println("部署流程名字"+deployment.getName());
System.out.println("部署流程时间"+deployment.getDeploymentTime());
}
}
4.查询流程定义信息
/**
* 查看数据库的流程定义信息
*/
@Test
public void testQueryPdefintion(){
ProcessEngine processEngine = ProcessEngines.getDefaultProcessEngine();
RepositoryService repositoryService = processEngine.getRepositoryService();
//获取数据库中所有的流程定义信息
List<ProcessDefinition> list = repositoryService.createProcessDefinitionQuery().list();
for (ProcessDefinition processDefinition : list) {
System.out.println("部署的定义目录"+processDefinition.getCategory());
System.out.println("部署的定义id"+processDefinition.getDeploymentId());
System.out.println("部署的定义key"+processDefinition.getKey());
System.out.println("部署的定义name"+processDefinition.getName());
System.out.println("部署的定义版本"+processDefinition.getVersion());
System.out.println("部署的定义流程图资源名"+processDefinition.getDiagramResourceName());
}
}
3.启动流程
/**
* 启动一个流程
*/
@Test
public void testStart() {
ProcessEngine processEngine = ProcessEngines.getDefaultProcessEngine();
RepositoryService repositoryService = processEngine.getRepositoryService();
ProcessDefinitionQuery processDefinitionQuery = repositoryService.createProcessDefinitionQuery();
ProcessDefinition processDefinition = processDefinitionQuery.processDefinitionVersion(2).singleResult();
RuntimeService runtimeService = processEngine.getRuntimeService();
ProcessInstance processInstance = runtimeService.startProcessInstanceById(processDefinition.getId());
System.out.println("流程启动完成"+processInstance);
}
4.查询任务,签收任务
如果某个任务已经固定分配给某个人了,就不能再签了;如果要签,先要撤销签收unclaim;
/**
* 查找当前流程运行的任务;
*/
@Test
public void testQueryTask() {
ProcessEngine processEngine = ProcessEngines.getDefaultProcessEngine();
TaskService taskService = processEngine.getTaskService();
//查询当前任务
Task task = taskService.createTaskQuery().singleResult();
System.out.println(task);
//签收任务
taskService.claim(task.getId(), "admin");
System.out.println("admin签收了"+task);
}
5.执行任务,并自动流转到下一个流程
/**
* 执行任务
*/
@Test
public void testQueryTaskByUser() {
ProcessEngine processEngine = ProcessEngines.getDefaultProcessEngine();
TaskService taskService = processEngine.getTaskService();
//获取admin要执行的任务
Task task = taskService.createTaskQuery().taskAssignee("admin").singleResult();
//执行任务
taskService.complete(task.getId());
System.out.println("admin完成任务"+task);
}
6.查询任务的执行历史
/**
* 查询任务的执行历史
*/
@Test
public void testHistory() {
ProcessEngine processEngine = ProcessEngines.getDefaultProcessEngine();
//获取HistoryService进行历史任务的检索等操作
HistoryService historyService = processEngine.getHistoryService();
//查询所有已经完成的流程实例
List<HistoricTaskInstance> list = historyService.createHistoricTaskInstanceQuery().processFinished().list();
for (HistoricTaskInstance historicTaskInstance : list) {
//查询那个历史任务是由谁在什么时间开始,在什么时间结束
System.out.println(historicTaskInstance);
System.out.println(historicTaskInstance.getName()+"===>"+historicTaskInstance.getAssignee()+"===>"+historicTaskInstance.getStartTime()+"===>"+historicTaskInstance.getEndTime());
}
}