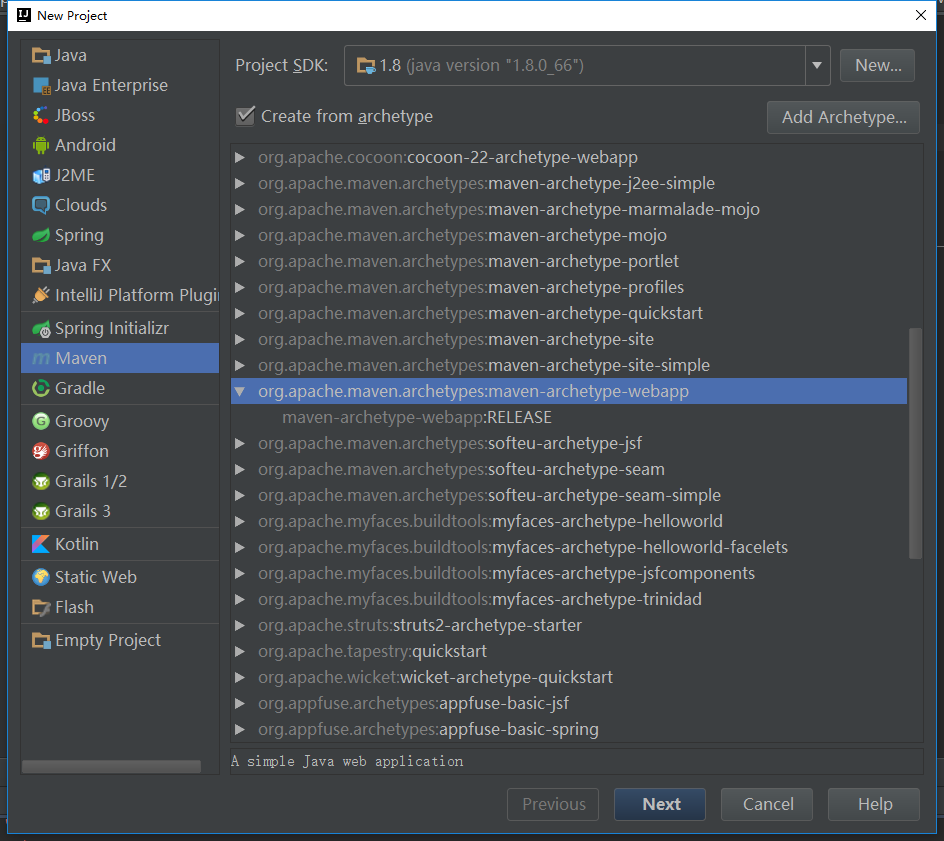
1.创建基本项目结构
用
Idea新建项目[File -> New -> Project]Idea会自动开始下载所依赖的包,等待其完成。创建自己项目结构
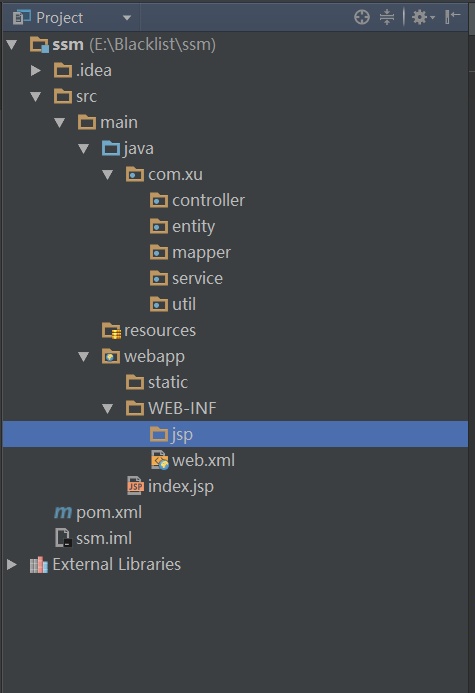
Idea的archtype只有自带的结构,需要添加自己的结构。这里我新建了
java这个目录和目录下的文件夹。记得标记
java目录为Sources Root(文件夹会变成蓝色)

2.修改pom.xml
因为使用Maven管理项目,所以可以通过直接在 pom.xml 中配置来直接引入对应的包和管理对应的包
<project xmlns="http://maven.apache.org/POM/4.0.0" xmlns:xsi="http://www.w3.org/2001/XMLSchema-instance" xsi:schemaLocation="http://maven.apache.org/POM/4.0.0 http://maven.apache.org/maven-v4_0_0.xsd"> <modelVersion>4.0.0</modelVersion> <groupId>com.xu.ssm</groupId> <artifactId>ssm</artifactId> <packaging>war</packaging> <version>1.0-SNAPSHOT</version> <name>ssm Maven Webapp</name> <url>http://maven.apache.org</url> <properties> <spring.version>4.2.5.RELEASE</spring.version> </properties> <dependencies> <!--spring包--> <dependency> <groupId>org.springframework</groupId> <artifactId>spring-core</artifactId> <version>${spring.version}</version> </dependency> <dependency> <groupId>org.springframework</groupId> <artifactId>spring-web</artifactId> <version>${spring.version}</version> </dependency> <dependency> <groupId>org.springframework</groupId> <artifactId>spring-webmvc</artifactId> <version>${spring.version}</version> </dependency> <dependency> <groupId>org.springframework</groupId> <artifactId>spring-beans</artifactId> <version>${spring.version}</version> </dependency> <dependency> <groupId>org.springframework</groupId> <artifactId>spring-context</artifactId> <version>${spring.version}</version> </dependency> <dependency> <groupId>org.springframework</groupId> <artifactId>spring-context-support</artifactId> <version>${spring.version}</version> </dependency> <dependency> <groupId>org.springframework</groupId> <artifactId>spring-jdbc</artifactId> <version>${spring.version}</version> </dependency> <dependency> <groupId>org.springframework</groupId> <artifactId>spring-aop</artifactId> <version>${spring.version}</version> </dependency> <dependency> <groupId>org.springframework.data</groupId> <artifactId>spring-data-jpa</artifactId> <version>1.9.4.RELEASE</version> </dependency> <dependency> <groupId>org.springframework</groupId> <artifactId>spring-test</artifactId> <version>${spring.version}</version> </dependency> <!--mybatis--> <dependency> <groupId>org.mybatis</groupId> <artifactId>mybatis</artifactId> <version>3.3.1</version> </dependency> <dependency> <groupId>org.mybatis</groupId> <artifactId>mybatis-spring</artifactId> <version>1.2.4</version> </dependency> <!--druid--> <dependency> <groupId>com.alibaba</groupId> <artifactId>druid</artifactId> <version>1.0.18</version> </dependency> <!--mysql--> <dependency> <groupId>mysql</groupId> <artifactId>mysql-connector-java</artifactId> <version>5.1.38</version> </dependency> <!--junit--> <dependency> <groupId>junit</groupId> <artifactId>junit</artifactId> <version>4.12</version> <scope>test</scope> </dependency> </dependencies> <build> <finalName>ssm</finalName> <plugins> <plugin> <groupId>org.apache.tomcat.maven</groupId> <artifactId>tomcat7-maven-plugin</artifactId> <version>2.0-beta-1</version> <configuration> <uriEncoding>utf-8</uriEncoding> <port>8080</port> <path>/</path> </configuration> </plugin> </plugins> <!--注意:一定要配置这个,否则会出现target里面没有mapper.xml文件--> <!--配置Maven 对resource文件 过滤 --> <resources> <resource> <directory>src/main/resources</directory> <includes> <include>**/*.properties</include> <include>**/*.xml</include> </includes> <filtering>true</filtering> </resource> <resource> <directory>src/main/java</directory> <includes> <include>**/*.properties</include> <include>**/*.xml</include> </includes> <filtering>true</filtering> </resource> </resources> </build></project>
- 1
- 2
- 3
- 4
- 5
- 6
- 7
- 8
- 9
- 10
- 11
- 12
- 13
- 14
- 15
- 16
- 17
- 18
- 19
- 20
- 21
- 22
- 23
- 24
- 25
- 26
- 27
- 28
- 29
- 30
- 31
- 32
- 33
- 34
- 35
- 36
- 37
- 38
- 39
- 40
- 41
- 42
- 43
- 44
- 45
- 46
- 47
- 48
- 49
- 50
- 51
- 52
- 53
- 54
- 55
- 56
- 57
- 58
- 59
- 60
- 61
- 62
- 63
- 64
- 65
- 66
- 67
- 68
- 69
- 70
- 71
- 72
- 73
- 74
- 75
- 76
- 77
- 78
- 79
- 80
- 81
- 82
- 83
- 84
- 85
- 86
- 87
- 88
- 89
- 90
- 91
- 92
- 93
- 94
- 95
- 96
- 97
- 98
- 99
- 100
- 101
- 102
- 103
- 104
- 105
- 106
- 107
- 108
- 109
- 110
- 111
- 112
- 113
- 114
- 115
- 116
- 117
- 118
- 119
- 120
- 121
- 122
- 123
- 124
- 125
- 126
- 127
- 128
- 129
- 130
- 131
- 132
- 133
3.Spring-MVC配置:
配置springmvc,使用注解的方式来提高开发效率,让程序员能够更关注于业务的实现而不是重复枯燥的配置操作。

<?xml version="1.0" encoding="UTF-8"?> <beans xmlns="http://www.springframework.org/schema/beans" xmlns:xsi="http://www.w3.org/2001/XMLSchema-instance" xmlns:p="http://www.springframework.org/schema/p" xmlns:mvc="http://www.springframework.org/schema/mvc" xmlns:context="http://www.springframework.org/schema/context" xsi:schemaLocation="http://www.springframework.org/schema/beans http://www.springframework.org/schema/beans/spring-beans-3.0.xsd http://www.springframework.org/schema/context http://www.springframework.org/schema/context/spring-context-3.0.xsd http://www.springframework.org/schema/mvc http://www.springframework.org/schema/mvc/spring-mvc-3.0.xsd "> <!-- 启用spring mvc 注解 --> <context:annotation-config/> <!--自动扫描--> <context:component-scan base-package="com.xu"/> <mvc:annotation-driven/> <mvc:default-servlet-handler/> <mvc:resources location="/static/" mapping="/static/**"/> <!-- Declare a view resolver --> <bean class="org.springframework.web.servlet.view.InternalResourceViewResolver"> <property name="prefix" value="/WEB-INF/jsp/"/> <property name="suffix" value=".jsp"/> </bean></beans>
- 1
- 2
- 3
- 4
- 5
- 6
- 7
- 8
- 9
- 10
- 11
- 12
- 13
- 14
- 15
- 16
- 17
- 18
- 19
- 20
- 21
- 22
- 23
- 24
- 25
- 26
- 27
- 28
- 29
4.Spring-Mybatis配置
通过mybatis的配置,简化所有的数据库操作,只需要写基本的sql语句就可以通过配置来操作对应的数据库。
<?xml version="1.0" encoding="GBK"?><beans xmlns:xsi="http://www.w3.org/2001/XMLSchema-instance" xmlns:context="http://www.springframework.org/schema/context" xmlns="http://www.springframework.org/schema/beans" xsi:schemaLocation="http://www.springframework.org/schema/beans http://www.springframework.org/schema/beans/spring-beans-3.1.xsd http://www.springframework.org/schema/context http://www.springframework.org/schema/context/spring-context-3.1.xsd"> <context:component-scan base-package="com.xu"/> <bean id="dataSource" class="com.alibaba.druid.pool.DruidDataSource" init-method="init" destroy-method="close"> <!-- 基本属性 url、user、password --> <property name="url" value="jdbc:mysql://localhost/xus?useUnicode=true&characterEncoding=utf-8"/> <property name="username" value="root"/> <property name="password" value="4321"/> <!-- 配置初始化大小、最小、最大 --> <property name="initialSize" value="1"/> <property name="minIdle" value="1"/> <property name="maxActive" value="20"/> <!-- 配置获取连接等待超时的时间 --> <property name="maxWait" value="60000"/> <!-- 配置间隔多久才进行一次检测,检测需要关闭的空闲连接,单位是毫秒 --> <property name="timeBetweenEvictionRunsMillis" value="60000"/> <!-- 配置一个连接在池中最小生存的时间,单位是毫秒 --> <property name="minEvictableIdleTimeMillis" value="300000"/> <property name="validationQuery" value="SELECT 'x'"/> <property name="testWhileIdle" value="true"/> <property name="testOnBorrow" value="false"/> <property name="testOnReturn" value="false"/> <!-- 打开PSCache,并且指定每个连接上PSCache的大小 --> <property name="poolPreparedStatements" value="true"/> <property name="maxPoolPreparedStatementPerConnectionSize" value="20"/> <!-- 配置监控统计拦截的filters --> <property name="filters" value="stat"/> </bean> <!-- spring和MyBatis整合,不需要mybatis的配置映射文件 --> <bean id="sqlSessionFactory" class="org.mybatis.spring.SqlSessionFactoryBean"> <property name="dataSource" ref="dataSource"/> <!-- 自动扫描mapping.xml文件 --> <property name="mapperLocations" value="classpath*:com/xu/mapper/xml/*.xml"></property> </bean> <!-- DAO接口所在包名,Spring会自动查找其下的类 --> <bean class="org.mybatis.spring.mapper.MapperScannerConfigurer"> <property name="basePackage" value="com.icekredit.credit.mapper"/> <property name="sqlSessionFactoryBeanName" value="sqlSessionFactory"></property> </bean> <!-- (事务管理)transaction manager, use JtaTransactionManager for global tx --> <bean id="transactionManager" class="org.springframework.jdbc.datasource.DataSourceTransactionManager"> <property name="dataSource" ref="dataSource"/> </bean></beans>
- 1
- 2
- 3
- 4
- 5
- 6
- 7
- 8
- 9
- 10
- 11
- 12
- 13
- 14
- 15
- 16
- 17
- 18
- 19
- 20
- 21
- 22
- 23
- 24
- 25
- 26
- 27
- 28
- 29
- 30
- 31
- 32
- 33
- 34
- 35
- 36
- 37
- 38
- 39
- 40
- 41
- 42
- 43
- 44
- 45
- 46
- 47
- 48
- 49
- 50
- 51
- 52
- 53
- 54
- 55
- 56
- 57
- 58
- 59
- 60
- 61
- 62
- 63
- 64
- 65
- 66
- 67
5.web.xml
<web-app xmlns:xsi="http://www.w3.org/2001/XMLSchema-instance" xmlns="http://java.sun.com/xml/ns/javaee" xmlns:web="http://java.sun.com/xml/ns/javaee/web-app_2_5.xsd" xsi:schemaLocation="http://java.sun.com/xml/ns/javaee http://java.sun.com/xml/ns/javaee/web-app_2_5.xsd" id="WebApp_ID" version="2.5"> <display-name>Archetype Created Web Application</display-name> <context-param> <param-name>contextConfigLocation</param-name> <param-value>classpath*:spring-mybatis.xml</param-value> </context-param> <listener> <listener-class>org.springframework.web.context.ContextLoaderListener</listener-class> </listener> <filter> <filter-name>characterEncodingFilter</filter-name> <filter-class>org.springframework.web.filter.CharacterEncodingFilter</filter-class> <init-param> <param-name>encoding</param-name> <param-value>UTF-8</param-value> </init-param> <init-param> <param-name>forceEncoding</param-name> <param-value>true</param-value> </init-param> </filter> <filter-mapping> <filter-name>characterEncodingFilter</filter-name> <url-pattern>/*</url-pattern> </filter-mapping> <servlet> <servlet-name>spring-mvc</servlet-name> <servlet-class>org.springframework.web.servlet.DispatcherServlet</servlet-class> <init-param> <param-name>contextConfigLocation</param-name> <param-value>classpath*:spring-mvc.xml</param-value> </init-param> <load-on-startup>1</load-on-startup> </servlet> <servlet-mapping> <servlet-name>spring-mvc</servlet-name> <url-pattern>/</url-pattern> </servlet-mapping></web-app>
- 1
- 2
- 3
- 4
- 5
- 6
- 7
- 8
- 9
- 10
- 11
- 12
- 13
- 14
- 15
- 16
- 17
- 18
- 19
- 20
- 21
- 22
- 23
- 24
- 25
- 26
- 27
- 28
- 29
- 30
- 31
- 32
- 33
- 34
- 35
- 36
- 37
- 38
- 39
- 40
- 41
- 42
至此,一个ssm项目的框架就建立好了。随着框架的增多,技术的发展,就基本的开发来说是越来越智能,越来越方便了。但是这并不代表写程序就很简单,除了实现基本的业务逻辑以为,程序员应该在项目中更加关注高并发,高性能的实现。
再分享一下我老师大神的人工智能教程吧。零基础!通俗易懂!风趣幽默!希望你也加入到我们人工智能的队伍中来!http://www.captainbed.net

我们对Markdown编辑器进行了一些功能拓展与语法支持,除了标准的Markdown编辑器功能,我们增加了如下几点新功能,帮助你用它写博客:
- 全新的界面设计 ,将会带来全新的写作体验;
- 在创作中心设置你喜爱的代码高亮样式,Markdown 将代码片显示选择的高亮样式 进行展示;
- 增加了 图片拖拽 功能,你可以将本地的图片直接拖拽到编辑区域直接展示;
- 全新的 KaTeX数学公式 语法;
- 增加了支持甘特图的mermaid语法1 功能;
- 增加了 多屏幕编辑 Markdown文章功能;
- 增加了 焦点写作模式、预览模式、简洁写作模式、左右区域同步滚轮设置 等功能,功能按钮位于编辑区域与预览区域中间;
- 增加了 检查列表 功能。
功能快捷键
撤销:Ctrl/Command + Z
重做:Ctrl/Command + Y
加粗:Ctrl/Command + B
斜体:Ctrl/Command + I
标题:Ctrl/Command + Shift + H
无序列表:Ctrl/Command + Shift + U
有序列表:Ctrl/Command + Shift + O
检查列表:Ctrl/Command + Shift + C
插入代码:Ctrl/Command + Shift + K
插入链接:Ctrl/Command + Shift + L
插入图片:Ctrl/Command + Shift + G
合理的创建标题,有助于目录的生成
直接输入1次#,并按下space后,将生成1级标题。
输入2次#,并按下space后,将生成2级标题。
以此类推,我们支持6级标题。有助于使用TOC语法后生成一个完美的目录。
如何改变文本的样式
强调文本 强调文本
加粗文本 加粗文本
标记文本
删除文本
引用文本
H2O is是液体。
210 运算结果是 1024.
插入链接与图片
链接: link.
图片: 
带尺寸的图片: ![]()
当然,我们为了让用户更加便捷,我们增加了图片拖拽功能。
如何插入一段漂亮的代码片
去博客设置页面,选择一款你喜欢的代码片高亮样式,下面展示同样高亮的 代码片.
// An highlighted block var foo = 'bar'; 生成一个适合你的列表
- 项目
- 项目
- 项目
- 项目
- 项目1
- 项目2
- 项目3
- 计划任务
- 完成任务
创建一个表格
一个简单的表格是这么创建的:
| 项目 | Value |
|---|---|
| 电脑 | $1600 |
| 手机 | $12 |
| 导管 | $1 |
设定内容居中、居左、居右
使用:---------:居中
使用:----------居左
使用----------:居右
| 第一列 | 第二列 | 第三列 |
|---|---|---|
| 第一列文本居中 | 第二列文本居右 | 第三列文本居左 |
SmartyPants
SmartyPants将ASCII标点字符转换为“智能”印刷标点HTML实体。例如:
| TYPE | ASCII | HTML |
|---|---|---|
| Single backticks | 'Isn't this fun?' |
‘Isn’t this fun?’ |
| Quotes | "Isn't this fun?" |
“Isn’t this fun?” |
| Dashes | -- is en-dash, --- is em-dash |
– is en-dash, — is em-dash |
创建一个自定义列表
- Markdown
- Text-to- HTML conversion tool
- Authors
- John
- Luke
如何创建一个注脚
一个具有注脚的文本。2
注释也是必不可少的
Markdown将文本转换为 HTML。
KaTeX数学公式
您可以使用渲染LaTeX数学表达式 KaTeX:
Gamma公式展示 是通过欧拉积分
你可以找到更多关于的信息 LaTeX 数学表达式here.
新的甘特图功能,丰富你的文章
gantt
        dateFormat  YYYY-MM-DD
        title Adding GANTT diagram functionality to mermaid
        section 现有任务
        已完成               :done,    des1, 2014-01-06,2014-01-08
        进行中               :active,  des2, 2014-01-09, 3d
        计划一               :         des3, after des2, 5d
        计划二               :         des4, after des3, 5d
- 关于 甘特图 语法,参考 这儿,
UML 图表
可以使用UML图表进行渲染。 Mermaid. 例如下面产生的一个序列图::
这将产生一个流程图。:
- 关于 Mermaid 语法,参考 这儿,
FLowchart流程图
我们依旧会支持flowchart的流程图:
- 关于 Flowchart流程图 语法,参考 这儿.
导出与导入
导出
如果你想尝试使用此编辑器, 你可以在此篇文章任意编辑。当你完成了一篇文章的写作, 在上方工具栏找到 文章导出 ,生成一个.md文件或者.html文件进行本地保存。
导入
如果你想加载一篇你写过的.md文件或者.html文件,在上方工具栏可以选择导入功能进行对应扩展名的文件导入,
继续你的创作。
注脚的解释 ↩︎