jedis 和Spring整合访问sentinel
jedis和spring整合访问sentinel需要一个整合包,这个整合包是通过spring-data支持。整合后会创建RedisTemplate对象,在伪service中就可以调用。
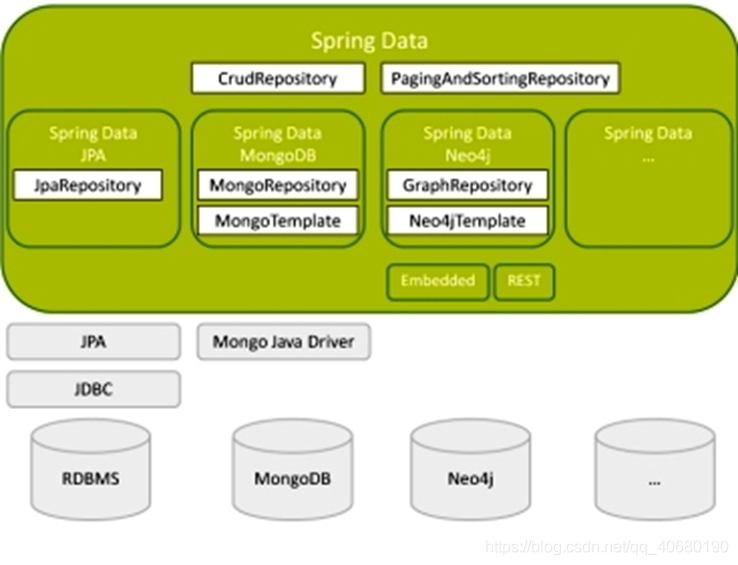
SpringData
Spring Data 作为SpringSource的其中一个父项目, 旨在统一和简化对各类型持久化存储, 而不拘泥于是关系型数据库还是NoSQL 数据存储。

Spring Data 项目旨在为大家提供一种通用的编码模式。

引入依赖包
<dependency>
			<groupId>org.springframework.data</groupId>
			<artifactId>spring-data-redis</artifactId>
			<version>1.4.1.RELEASE</version>
		</dependency>
		<dependency>
			<groupId>redis.clients</groupId>
			<artifactId>jedis</artifactId>
			<version>2.6.2</version>
		</dependency>
整合配置文件applicationContext-sentinel.xml
<?xml version="1.0" encoding="UTF-8"?>
<beans xmlns="http://www.springframework.org/schema/beans"
    xmlns:xsi="http://www.w3.org/2001/XMLSchema-instance" xmlns:p="http://www.springframework.org/schema/p"
    xmlns:context="http://www.springframework.org/schema/context"
    xmlns:jee="http://www.springframework.org/schema/jee" xmlns:tx="http://www.springframework.org/schema/tx"
    xmlns:aop="http://www.springframework.org/schema/aop"
    xsi:schemaLocation="
            http://www.springframework.org/schema/beans http://www.springframework.org/schema/beans/spring-beans.xsd
            http://www.springframework.org/schema/context http://www.springframework.org/schema/context/spring-context.xsd">

    <bean id="poolConfig" class="redis.clients.jedis.JedisPoolConfig">
        <property name="maxTotal" value="${redis.maxTotal}" />
        <property name="minIdle" value="${redis.minIdle}" />
        <property name="maxIdle" value="${redis.maxIdle}" />
    </bean>

    <bean id="sentinelConfiguration"
        class="org.springframework.data.redis.connection.RedisSentinelConfiguration">
        <property name="master">
            <bean class="org.springframework.data.redis.connection.RedisNode">
                <property name="name" value="${redis.sentinel.masterName}"></property>
            </bean>
        </property>
        <property name="sentinels">
            <set>
                <bean class="org.springframework.data.redis.connection.RedisNode">
                    <constructor-arg name="host"
                        value="${redis.sentinel1.host}"></constructor-arg>
                    <constructor-arg name="port"
                        value="${redis.sentinel1.port}" type="int"></constructor-arg>
                </bean>
                <bean class="org.springframework.data.redis.connection.RedisNode">
                    <constructor-arg name="host"
                        value="${redis.sentinel2.host}"></constructor-arg>
                    <constructor-arg name="port"
                        value="${redis.sentinel2.port}" type="int"></constructor-arg>
                </bean>
            </set>
   </property>
    </bean>

  	<!-- p:password="${redis.sentinel.password}" -->
    <bean id="connectionFactory"
        class="org.springframework.data.redis.connection.jedis.JedisConnectionFactory">
        <constructor-arg name="sentinelConfig" ref="sentinelConfiguration"></constructor-arg>
        <constructor-arg name="poolConfig" ref="poolConfig"></constructor-arg>
    </bean>

    <bean id="redisTemplate" class="org.springframework.data.redis.core.StringRedisTemplate">
        <property name="connectionFactory" ref="connectionFactory" />
    </bean>
</beans>
属性配置文件redis-sentinel.properties
注意一个坑,属性文件中不能有空格,redis源码中不会去过滤空格,导致如果有空格就无法连接错误Can connect to sentinel, but mymaster seems to be not monitored。
redis.minIdle=300

redis.maxIdle=500

redis.maxTotal=5000


redis.sentinel1.host=192.168.163.200

redis.sentinel1.port=26379


redis.sentinel2.host=192.168.163.200

redis.sentinel2.port=26380


redis.sentinel.masterName=mymaster

redis.sentinel.password=123456
伪service类
package com.jt.common.service;

import java.util.concurrent.LinkedBlockingQueue;
import java.util.concurrent.ThreadPoolExecutor;
import java.util.concurrent.TimeUnit;

import org.apache.commons.lang3.concurrent.BasicThreadFactory;
import org.slf4j.Logger;
import org.slf4j.LoggerFactory;
import org.springframework.beans.factory.annotation.Autowired;
import org.springframework.dao.DataAccessException;
import org.springframework.data.redis.connection.RedisConnection;
import org.springframework.data.redis.core.RedisCallback;
import org.springframework.data.redis.core.RedisTemplate;
import org.springframework.stereotype.Service;

@Service
public class RedisSentinelService {
	private Logger logger = LoggerFactory.getLogger("RedisSentinelService");

	//有的工程需要,有的工程不需要。设置required=false,有就注入,没有就不注入。
    @Autowired(required = false)
    RedisTemplate<?, ?> redisTemplate;

    // 线程池
    private static final ThreadPoolExecutor executor = new ThreadPoolExecutor(
            256, 256, 30L, TimeUnit.SECONDS,
            new LinkedBlockingQueue<Runnable>(),
            new BasicThreadFactory.Builder().daemon(true)
                    .namingPattern("redis-oper-%d").build(),
            new ThreadPoolExecutor.CallerRunsPolicy());

    public void set(final String key, final String value) {
        redisTemplate.execute(new RedisCallback<Object>() {
            @Override
            public Object doInRedis(RedisConnection connection)
                    throws DataAccessException {
                connection.set(
                        redisTemplate.getStringSerializer().serialize(key),
                        redisTemplate.getStringSerializer().serialize(value));
                return null;
            }
        });
    }

    //设置值后并设置过期时间
    public void set(final String key, final String value, final long seconds) {
    	redisTemplate.execute(new RedisCallback<Object>() {
    		@Override
    		public Object doInRedis(RedisConnection connection)
    				throws DataAccessException {
    			connection.set(
    					redisTemplate.getStringSerializer().serialize(key),
    					redisTemplate.getStringSerializer().serialize(value));
    			connection.expire(redisTemplate.getStringSerializer().serialize(key), seconds);
    			return null;
    		}
 	});
    }

    public String get(final String key) {
        return redisTemplate.execute(new RedisCallback<String>() {
            @Override
            public String doInRedis(RedisConnection connection)
                    throws DataAccessException {
                byte[] byteKye = redisTemplate.getStringSerializer().serialize(
                        key);
                if (connection.exists(byteKye)) {
                    byte[] byteValue = connection.get(byteKye);
                    String value = redisTemplate.getStringSerializer()
                            .deserialize(byteValue);
                    logger.debug("get key:" + key + ",value:" + value);
                    return value;
                }
                logger.error("valus does not exist!,key:"+key);
                return null;
            }
        });
    }

    public void delete(final String key) {
        redisTemplate.execute(new RedisCallback<Object>() {
            public Object doInRedis(RedisConnection connection) {
                connection.del(redisTemplate.getStringSerializer().serialize(
                        key));
                return null;
            }
        });
    }

    /**
     * 线程池并发操作redis
     *
     * @param keyvalue
     */
    public void mulitThreadSaveAndFind(final String keyvalue) {
        executor.execute(new Runnable() {
            @Override
            public void run() {
                try {
                    set(keyvalue, keyvalue);
                    get(keyvalue);
                } catch (Throwable th) {
                    // 防御性容错,避免高并发下的一些问题
                    logger.error("", th);
                }
            }
        });
    }
}
调用代码
就把实现类换下即可,其它调用不变。
@Autowired

private RedisSentinelService redisService;
常见问题
kill和pkill的区别
在测试Redis3.0.0集群的时候偶然遇到的情况。在停止Redis服务时,我分别用了pkill redis-server和kill -9 redis-pid的方式停止Redis服务,但Redis的日志输出却不一样。使用pkill停止Redis时,输入的日志如下。说明Redis是正常退出的。

而使用kill -9停止Redis时,Redis没有任何日志输出,说明用kill命令停止Redis服务是不对的。
从上面的日志也可以看出,如果要Redis正常退出,需要给Redis发出一个SIGTERM信号。而pkill是将含有参数的所有进程kill掉,如果要kill单个进程,并且发出SIGTERM命令可不可以呢?答案是可以的,通过kill -15 redis-pid。
pkill redis-         #杀掉redis-开头的服务

kill -15 redis-pid
下面顺便说一下pkill和kill:
pkill:通过名称和其它属性查找或者发信号给进程。
kill:可以通过kill -l命令查看到kill有64个参数,常用的5个如下:
| kill参数值 |
含义 |
| 1=SIGHUP |
本信号在用户终端连接(正常或非正常)结束时发出, 通常是在终端的控制进程结束时, 通知同一session内的各个作业, 这时它们与控制终端不再关联。 |
| 2=SIGINT |
程序终止(interrupt)信号, 在用户键入INTR字符(通常是Ctrl-C)时发出,用于通知前台进程组终止进程。 |
| 3=SIGQUIT |
和SIGINT类似, 但由QUIT字符(通常是Ctrl-\)来控制. 进程在因收到SIGQUIT退出时会产生core文件, 在这个意义上类似于一个程序错误信号。 |
| 9=SIGKILL |
用来立即结束程序的运行. 本信号不能被阻塞、处理和忽略。如果管理员发现某个进程终止不了,可尝试发送这个信号。 |
| 15=SIGTERM |
程序结束(terminate)信号, 与SIGKILL不同的是该信号可以被阻塞和处理。通常用来要求程序自己正常退出,shell命令kill缺省产生这个信号。如果进程终止不了,我们才会尝试SIGKILL。 |
缓存中的数据能否丢失?
可以,它缓存的是数据库中的数据,如果缓存宕机,用户依然可以访问数据库获取到所需要的数据。
不可以,在海量数据时,现在电商系统已经对缓存的依赖性非常高。有一种情况。当海量的请求过来时,缓存宕机,海量的请求继续涌向数据库,数据库服务器宕机。将数据库服务器重启,重启后,刚起来,海量的请求又来了数据库服务器都无法启动。这种情况称为雪崩(缓存击穿)。
怎么解决呢?
必须使用分布式缓存。集群,可以通过多台的服务器分担缓存。这时如果一台服务器宕机,这时少量的请求涌向数据库,这时数据库可以承担。不会宕机。如果访问压力还非常巨大,可以继续增加服务器。然后分布的备份内容。形成缓存的主从。前面的方案还会有少量的缓存的数据丢失,但高可用后数据就不会丢失。
现在企业开发缓存有趣现象:
在企业中还有利用memcache的,然后被局部的逐渐的被redis替换。
问题:数据倾斜
由于key的设置不当,导致对key哈希后,不够均匀。例如有3个节点,数据大量落到一个节点上,其他节点数量很少。如何发现和解决呢?可以去做实验看看key的分布情况,也有redis的监控工具可以进行观察。通过观察发现有这种数据倾斜的情况,又如何办呢?换一个key的组成即可。
问题:redis能否替代mysql?
不能,redis NO-SQL no SQL,none SQL。它没有复杂结构,不支持强关系型数据。
例如:关系型数据:部门和用户。一个部门下有多个用户,一个用户从属一个部门。非结构化数据:html/xml/json、视频、图片
根据应用场景分类存储:结构化的依然使用mysql传统结构化数据库。对非结构化但是很大的存储到mongodb(视频、word/excel/pdf等文件)。对非结构的但是需要快速查询的memCache或者Redis中(json)。对海量的非结构化的数据,还想对其进行类似关系型数据的分析hbase(列)。对需要分词检索的使用solr或者elasticSearch。
DENIED异常
redis.clients.jedis.exceptions.JedisDataException: DENIED Redis is running in protected
 mode because protected mode is enabled, no bind address was specified, no authentication
password is requested to clients. In this mode connections are only accepted from the
loopback interface. If you want to connect from external computers to Redis you may adopt
one of the following solutions: 1) Just disable protected mode sending the command 'CONFIG
SET protected-mode no' from the loopback interface by connecting to Redis from the same
host the server is running, however MAKE SURE Redis is not publicly accessible from
internet if you do so. Use CONFIG REWRITE to make this change permanent. 2) Alternatively
you can just disable the protected mode by editing the Redis configuration file, and
setting the protected mode option to 'no', and then restarting the server. 3) If you
started the server manually just for testing, restart it with the '--protected-mode no'
option. 4) Setup a bind address or an authentication password. NOTE: You only need to do
one of the above things in order for the server to start accepting connections from the
outside.
解决办法:
登录后执行
127.0.0.1:6479> config set protected-mode no保护模式3.2.5版本要求更加严格,关闭即可。
sentinel directive while not in sentinel mode异常
[root@localhost redis-3.2.4]# redis-server sentinel.conf


*** FATAL CONFIG FILE ERROR ***

Reading the configuration file, at line 69

>>> 'sentinel monitor mymaster 127.0.0.1 6379 2'

sentinel directive while not in sentinel mode
启动方式不对,redis-sentinel而不是redis-server
Increased maximum number of open files to 10032
Increased maximum number of open files to 10032 (it was originally set to 1024).

4395:M 09 Nov 00:46:35.768 # Creating Server TCP listening socket 192.168.163.1:6379: bind: Cannot assign requested address
新装的linux默认只有1024,当负载较大时,会经常出现error: too many open files
ulimit -a:使用可以查看当前系统的所有限制值
vim /etc/security/limits.conf
在文件的末尾加上
* soft nofile 65535
* hard nofile 65535
执行su或者重新关闭连接用户再执行ulimit -a就可以查看修改后的结果。
overcommit_memory
WARNING overcommit_memory is set to 0! Background save may fail under low memory condition.
To fix this issue add 'vm.overcommit_memory = 1' to /etc/sysctl.conf and then reboot or run
the command 'sysctl vm.overcommit_memory=1' for this to take effect.
两个解决方法(overcommit_memory)
1. echo "vm.overcommit_memory=1" > /etc/sysctl.conf 或 vi /etcsysctl.conf , 然后reboot重启机器
2. echo 1 > /proc/sys/vm/overcommit_memory 不需要启机器就生效
overcommit_memory参数说明:
设置内存分配策略(可选,根据服务器的实际情况进行设置)
/proc/sys/vm/overcommit_memory
可选值:0、1、2。
0, 表示内核将检查是否有足够的可用内存供应用进程使用;如果有足够的可用内存,内存申请允许;否则,内存申请失败,并把错误返回给应用进程。
1, 表示内核允许分配所有的物理内存,而不管当前的内存状态如何。
2, 表示内核允许分配超过所有物理内存和交换空间总和的内存