项目开发过程中,涉及到了微信支付功能,这里做一个详细的记录。
小程序和H5的后端代码是通用的,前端调用不同的代码实现,这里不是重点,会简单的给出相关的代码。
微信支付,官方给了开发文档,但是其中还是有一部分需要自己去摸索一下,刚开始接触走一点弯路踩一点坑也比较正常。
当然微信支付这边涉及到商户平台,需要进行验证,使用的是公司的账号,个人小程序没有支付的权限。
1.开发之前的认知
先了解一下铺垫的知识,会让开发的思路更加的清楚,当时觉得这些没啥用,现在回想回想这些流程确实会更加的明确开发的流程,这张时序图就很清楚的描述了流程。这里是小程序的支付模式。
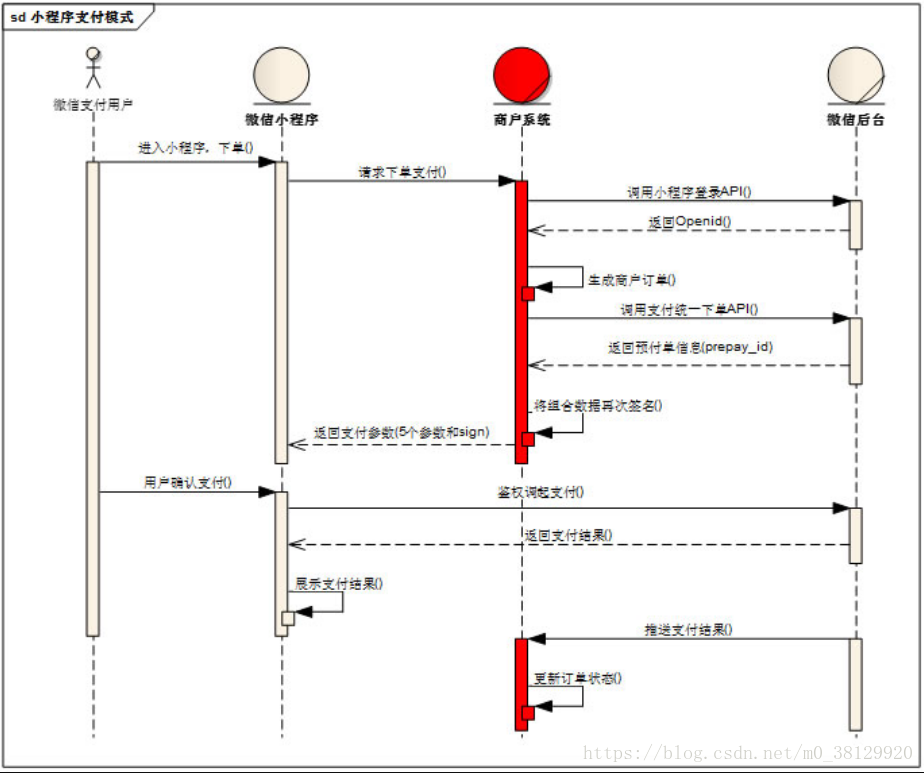
这里知道了大概流程就可以了,是在没办法开发时比对自己的代码逻辑,会发现跟这个时序图还是完全吻合的。
需要:appid,商户mchid,商户秘钥key
支付的开发步骤:

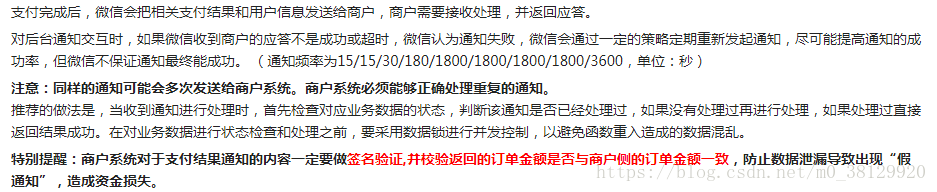
这里官方文档罗列了JSAPI与JSSDK之间的整体流程和一些小区别。H5进行支付时需要在后台设置授权域名,当然也都需要设置微信支付通知的回调接口url,微信会向接口发送支付结果的通知,会按照一定的时间间隔进行通知,接收到支付结果的服务器返回微信成功或失败结果,微信接收到成功结果便不会再进行消息的通知。
了解了基本的流程之后,附上代码为敬。
(1)前端简单的流程就是点击支付按钮
(2)将支付金额等数据传到后台,后台进行处理,并生成预支付订单
//Controller方法 返回给小程序端需要的参数Map集合
Map<String, Object> resultMap = new HashMap<String, Object>();
public class IpUtil {
/**
* IpUtils工具类方法
* 获取真实的ip地址
* @param request
* @return
*/
public static String getIpAddr(HttpServletRequest request) {
String ip = request.getHeader("X-Forwarded-For");
if(StringUtils.isNotEmpty(ip) && !"unKnown".equalsIgnoreCase(ip)){
//多次反向代理后会有多个ip值,第一个ip才是真实ip
int index = ip.indexOf(",");
if(index != -1){
return ip.substring(0,index);
}else{
return ip;
}
}
ip = request.getHeader("X-Real-IP");
if(StringUtils.isNotEmpty(ip) && !"unKnown".equalsIgnoreCase(ip)){
return ip;
}
return request.getRemoteAddr();
}
}public static Map<String, Object> wxPay(String ip,UserInfo user,int inviteAnswerId) throws Exception
{
InviteAnswer answer = seekHelpAnswerService.getInviteAnswer(inviteAnswerId);
Question question = seekHelpQuestionService.getQuestion(answer.questionId);//直接调固定的方法
Account myAccount = seekHelpPayService.getUserAccount(user.id);
BigDecimal qMoney = new BigDecimal(question.money.toString());
BigDecimal totalMoney = new BigDecimal("0");
if(null != answer.helperId && null != question.extraAward && question.extraAward != QuestionExtraAwardType.暂无.code)
{
totalMoney = SeniorBigDecimalUtil.add(qMoney, question.extraAwardMoney);
}else{
totalMoney = qMoney;
}
BigDecimal needPayMoney = SeniorBigDecimalUtil.sub(myAccount.money, totalMoney).abs();
BigDecimal needPayMoneyFormatCent = SeniorBigDecimalUtil.mul(needPayMoney, new BigDecimal("100"));//将需要支付的金额转换为以分为单位的金额
Integer totalFee = needPayMoneyFormatCent.intValue();
//Integer totalFee = 1;
String nonce_str = WxPayOperate.getRandomStringByLength(32); //生成的随机字符串
String body = "求助支付"; //商品名称
String out_trade_no = DateTimeOper.getStrForDate(new Date()) + inviteAnswerId;//充值订单号
Map<String, String> packageParams = new HashMap<String, String>(); //组装参数,用户生成统一下单接口的签名
packageParams.put("appid", WxPayConfig.appid);
packageParams.put("mch_id", WxPayConfig.mch_id);
packageParams.put("nonce_str", nonce_str);
packageParams.put("body", body);
packageParams.put("out_trade_no", out_trade_no);//商户订单号
packageParams.put("total_fee", String.valueOf(totalFee));//支付金额,这边需要转成字符串类型,否则后面的签名会失败
packageParams.put("ip", ip);
packageParams.put("notify_url", WxPayConfig.notify_url);//支付成功后的回调地址
packageParams.put("trade_type", WxPayConfig.TRADETYPE);//支付方式
packageParams.put("openid", user.openId);
String prestr = PayUtil.createLinkString(packageParams); // 把数组所有元素,按照“参数=参数值”的模式用“&”字符拼接成字符串
String mysign = PayUtil.sign(prestr, WxPayConfig.key, "utf-8").toUpperCase();//MD5运算生成签名,这里是第一次签名,用于调用统一下单接口
String xml = "<xml>" + "<appid>" + WxPayConfig.appid + "</appid>" //拼接统一下单接口使用的xml数据,要将上一步生成的签名一起拼接进去
+ "<body><![CDATA[" + body + "]]></body>"
+ "<mch_id>" + WxPayConfig.mch_id + "</mch_id>"
+ "<nonce_str>" + nonce_str + "</nonce_str>"
+ "<notify_url>" + WxPayConfig.notify_url + "</notify_url>"
+ "<openid>" + user.openId + "</openid>"
+ "<out_trade_no>" + out_trade_no + "</out_trade_no>"
+ "<ip>" + ip+ "</ip>"
+ "<total_fee>" + String.valueOf(totalFee) + "</total_fee>"
+ "<trade_type>" + WxPayConfig.TRADETYPE + "</trade_type>"
+ "<sign>" + mysign + "</sign>"
+ "</xml>";
String result = PayUtil.httpRequest(WxPayConfig.pay_url, "POST", xml);//调用统一下单接口,并接受返回的结果
Map<?, ?> map = PayUtil.doXMLParse(result);// 将解析结果存储在HashMap中
String return_code = (String) map.get("return_code");//返回状态码
Map<String, Object> resultMap = new HashMap<String, Object>();//返回给小程序端需要的参数
if(return_code.equals("SUCCESS"))
{
String result_code = (String)map.get("result_code");
if(result_code.equals("SUCCESS"))
{
String prepay_id = (String) map.get("prepay_id");//返回的预付单信息
resultMap.put("nonceStr", nonce_str);
resultMap.put("package", "prepay_id=" + prepay_id);
Long timeStamp = System.currentTimeMillis() / 1000;
resultMap.put("timeStamp", timeStamp + "");//这边要将返回的时间戳转化成字符串,不然小程序端调用wx.requestPayment方法会报签名错误
String stringSignTemp = "appId=" + WxPayConfig.appid + "&nonceStr=" + nonce_str + "&package=prepay_id=" + prepay_id+ "&signType=MD5&timeStamp=" + timeStamp; //拼接签名需要的参数
String paySign = PayUtil.sign(stringSignTemp, WxPayConfig.key, "utf-8").toUpperCase(); //再次签名,这个签名用于小程序端调用wx.requesetPayment方法
resultMap.put("paySign", paySign);
}else{
return_code = "FAIL";//result_code决定最终请求结果,result_code为FAIL,则表示请求支付失败,return_code也置为FAIL
String err_code = (String)map.get("err_code");
String err_code_des = (String) map.get("err_code_des");
order.err_code = err_code;
order.err_code_des = err_code_des;
}
}
resultMap.put("appid", WxPayConfig.appid);
resultMap.put("flag", return_code);
resultMap.put("tradeNo", out_trade_no);
return resultMap;
}不好的习惯,代码的注释写的很少。大致的流程就是就官方要求的参加添加到Map中,然后将元素转换成“参数=参数值”的模式用“&”字符拼接成字符串,使用PayUtil.sign方法与商户秘钥key进行参数第一次签名,后面统一下单接口调用需要使用。
拼接统一下单接口使用的xml数据,post请求统一下单接口,https://api.mch.weixin.qq.com/pay/unifiedorder,获取统一下单接口返回的xml格式数据,解析返回的xml数据,保存在map中,根据返回的状态码判断下单是否成功。如果成功,将成功的信息返回给小程序端准备调用微信app的支付功能。
这部分多看看官方的文档,会有比较详细的流程,下单请求需要的参数,以及返回的数据字段等等。
- 元素转换成“参数=参数值”的模式用“&”字符拼接成字符串
/**
     * 把数组所有元素排序,并按照“参数=参数值”的模式用“&”字符拼接成字符串
     * @param params 需要排序并参与字符拼接的参数组
     * @return 拼接后字符串
     */
    public static String createLinkString(Map<String, String> params) {
        List<String> keys = new ArrayList<String>(params.keySet());
        Collections.sort(keys);
        String prestr = "";
        for (int i = 0; i < keys.size(); i++) {
            String key = keys.get(i);
            String value = params.get(key);
            if(value != null && (!key.equals("sign")))
            {
            	if (i == keys.size() - 1) {// 拼接时,不包括最后一个&字符
                    prestr = prestr + key + "=" + value;
                } else {
                    prestr = prestr + key + "=" + value + "&";
                }
            }

        }
        return prestr;
} - MD5运算签名
    /**
     * 签名字符串
     * @param text需要签名的字符串
     * @param key 密钥
     * @param input_charset编码格式
     * @return 签名结果
	 * @throws Exception
     */
    public static String sign(String text, String key, String input_charset) throws Exception {
        text = text + "&key=" + key;
        return MD5(text).toUpperCase();
    }
/**
* 生成 MD5
*
* @param data 待处理数据
* @return MD5结果
*/
public static String MD5(String data) throws Exception {
java.security.MessageDigest md = MessageDigest.getInstance("MD5");
byte[] array = md.digest(data.getBytes("UTF-8"));
StringBuilder sb = new StringBuilder();
for (byte item : array) {
sb.append(Integer.toHexString((item & 0xFF) | 0x100).substring(1, 3));
}
return sb.toString().toUpperCase();
}- 拼接xml格式数据
- post请求统一下单地址
使用了最基本的HttpURLConnection方式,这里可以自己更好的实现,目的是获取返回的结果
    /**
     *
     * @param requestUrl请求地址
     * @param requestMethod请求方法
     * @param outputStr参数
     */
    public static String httpRequest(String requestUrl,String requestMethod,String outputStr){
        StringBuffer buffer = null;
        try{
            URL url = new URL(requestUrl);
            HttpURLConnection conn = (HttpURLConnection) url.openConnection();
            conn.setRequestMethod(requestMethod);
            conn.setDoOutput(true);
            conn.setDoInput(true);
            conn.connect();
            //往服务器端写内容
            if(null !=outputStr){
                OutputStream os=conn.getOutputStream();
                os.write(outputStr.getBytes("utf-8"));
                os.close();
            }
            // 读取服务器端返回的内容
            InputStream is = conn.getInputStream();
            InputStreamReader isr = new InputStreamReader(is, "utf-8");
            BufferedReader br = new BufferedReader(isr);
            buffer = new StringBuffer();
            String line = null;
            while ((line = br.readLine()) != null) {
                buffer.append(line);
            }
        }catch(Exception e){
            e.printStackTrace();
        }
        return buffer.toString();
- 解析xml数据
    /**
     * 解析xml,返回第一级元素键值对。如果第一级元素有子节点,则此节点的值是子节点的xml数据。
     * @param strxml
     * @return
     * @throws JDOMException
     * @throws IOException
     */
    public static Map<String, String> doXMLParse(String strxml) throws Exception {
        if(null == strxml || "".equals(strxml)) {
            return null;
        }

        Map<String, String> m = new HashMap<String, String>();
        InputStream in = String2Inputstream(strxml);
        SAXBuilder builder = new SAXBuilder();
        Document doc = builder.build(in);
        Element root = doc.getRootElement();
        List<?> list = root.getChildren();
        Iterator<?> it = list.iterator();
        while(it.hasNext()) {
            Element e = (Element) it.next();
            String k = e.getName();
            String v = "";
            List<?> children = e.getChildren();
            if(children.isEmpty()) {
                v = e.getTextNormalize();
            } else {
                v = getChildrenText(children);
            }

            m.put(k, v);
        }

        //关闭流
        in.close();

        return m;
    }
    /**
     * 获取子结点的xml
     * @param children
     * @return String
     */
    public static String getChildrenText(List<?> children) {
        StringBuffer sb = new StringBuffer();
        if(!children.isEmpty()) {
            Iterator<?> it = children.iterator();
            while(it.hasNext()) {
                Element e = (Element) it.next();
                String name = e.getName();
                String value = e.getTextNormalize();
                List<?> list = e.getChildren();
                sb.append("<" + name + ">");
                if(!list.isEmpty()) {
                    sb.append(getChildrenText(list));
                }
                sb.append(value);
                sb.append("</" + name + ">");
            }
        }

        return sb.toString();
    }
    public static InputStream String2Inputstream(String str) throws UnsupportedEncodingException {
        return new ByteArrayInputStream(str.getBytes("UTF-8"));
}- 重要的地方,二次签名
//拼接签名需要的参数
String stringSignTemp = "appId=" + WxPayConfig.appid + "&nonceStr=" + nonce_str + "&package=prepay_id=" + prepay_id+ "&signType=MD5&timeStamp=" + timeStamp;

//再次签名,这个签名用于小程序端调用wx.requesetPayment方法
String paySign = PayUtil.sign(stringSignTemp, WxPayConfig.key, "utf-8").toUpperCase();
3.小程序端获取预支付订单数据,调用支付组件
/**
 * 充值并支付成功回调
 */
function rechargeAndPaySuc(data) {
  if (data.flag === "SUCCESS") {
    var timeStamp = data.timeStamp;
    var nonceStr = data.nonceStr;
    var pack = data.package;
    var paySign = data.paySign;
    tradeNo = data.tradeNo;
    wx.requestPayment({
      timeStamp: timeStamp,
      nonceStr: nonceStr,
      package: pack,
      signType: 'MD5',
      paySign: paySign,
      success: function (re) {
        //支付成功

      },
      fail: function (re) {

      //  cancalPay();
      },
      complete: function (re) {

        if (re.errMsg == "requestPayment:fail cancel") {
         cancalPay();
        } else if (re.errMsg == "requestPayment:ok") {
         //进行一些页面逻辑的处理
        } else {
          cancalPay();
        }

      }
    })
  } else {
    //调用微信支付接口生成预付订单失败
    cancalPay();
  }
}
这里选择在complete回调函数进行页面的处理,但是真正的业务逻辑确认需要在微信通知结果获取后进行处理,这里的返回结果并不一定准确。
4.微信通知支付结果,根据设置的结果回调url进行处理
    /**
	* @Title: wxPayNotify
	* @Description: 支付回调通知  微信异步通知
	* 订单待确认状态
	*
	* 如果订单确认,则进行账户金额的划转
	*
	* 如果订单没有支付成功,则返回给失败状态给客户端
	*
	* @param @param request
	* @param @param response
	* @param @throws Exception
	* @return String
	* @throws
	*/
	@RequestMapping("/wxPayNotify")
	@ResponseBody
	public String wxPayNotify(HttpServletRequest request, HttpServletResponse response) throws Exception
	{
		InputStream inputStream = null;

		inputStream = request.getInputStream();

		StringBuffer sb = new StringBuffer();

		BufferedReader in = new BufferedReader(new InputStreamReader(inputStream,"UTF-8"));

		String line = null;

		while((line = in.readLine()) != null)
		{
			sb.append(line);
		}

		in.close();

		inputStream.close();

		String result = seekHelpPayService.processWxPayNotifyInfoToDB(sb.toString());

		String xml = null;

		if(result.equals("success"))
		{
			xml = "<xml>" + "<return_code><![CDATA[" + "SUCCESS" + "]]></return_code>"
	                + "<return_msg><![CDATA[" + "OK" + "]]></return_msg>"
	                + "</xml>";
		}

		return xml;
	}
这里就是对获取的微信支付通知结果进行的处理。
整个单机系统的微信支付流程就完成了,首先最重要的还是要看微信的官方文档,明白开发的流程,理解了流程,剩下就是业务逻辑的处理了,对于开发人员并没有太大的难度。
H5页面与小程序端对比,前端调用有所不同,这里的H5支付是在微信环境中的H5
H5页面js:
        $.ajax({
    		url:urlHeader + "/xxx/xxxx",
    		type:"post",
    		dataType:"json",
    		data:{
    			xxxxxx
    		},
    		success:function(data){
    			console.log("预支付订单请求成功:");
    			if(data.flag == "SUCCESS"){
        			appId = data.appid;
        			timeStamp = data.timeStamp;
        			nonceStr = data.nonceStr;
        			packageStr = data.packageStr;
        			signType = data.signType;
        			paySign = data.paySign;
        			out_trade_no = data.tradeNo;
    			}

    			callPay();
    		},
    		error:function(data){
    			console.log(data);
    			alert("支付失败");
    		}
    	})
下面的两个js方法是官方提供的,大致意思是调用微信内置的js
function onBridgeReady(){
	console.log("申请支付页面");

	WeixinJSBridge.invoke(
		      'getBrandWCPayRequest', {
		    	  "appId":appId,
		    	  "timeStamp":timeStamp,
		    	  "nonceStr":nonceStr,
		    	  "package":packageStr,
		    	  "signType":signType,
		    	  "paySign":paySign
		      },
		      function(res){
		    	  console.log("支付请求返回结果");
		    	  console.log(res);
		      if(res.err_msg == "get_brand_wcpay_request:ok" ){
		      // 使用以上方式判断前端返回,微信团队郑重提示:
		      //res.err_msg将在用户支付成功后返回ok,但并不保证它绝对可靠。
		    	  //执行成功后的页面逻辑

		      }else if(res.err_msg == "get_brand_wcpay_request:fail"){
		    	  alert("支付失败");
		      }
		   });
}

function callPay(){
	if (typeof WeixinJSBridge == "undefined"){
		   if( document.addEventListener ){
		       document.addEventListener('WeixinJSBridgeReady', onBridgeReady, false);
		   }else if (document.attachEvent){
		       document.attachEvent('WeixinJSBridgeReady', onBridgeReady);
		       document.attachEvent('onWeixinJSBridgeReady', onBridgeReady);
		   }
		}else{
		   onBridgeReady();
		}
}
基本的流程就是这样了,代码写的比较差,持续努力中。
如有问题,欢迎添加我的微信:llbbaa

一起交流,共同学习。。。