首先这是说明一下这是Tiny熊老师的教程https://www.cnblogs.com/tinyxiong
另外还要说明一下,暑假指导老师让我们做一些关于区块链的应用。这里只是涉及极其简单的模拟,主要是记录这些天自己学习的知识。
什么是区块链?
下面简单说一下区块链是什么,做个比喻,区块就像一个人,区块链好比一群人。怎么才能让一群人联系起来哪,就必须让他们之间有一定的关系和联系。比如,第一个人有100块钱,存入银行。银行给了他一张“凭证”,但是这张凭证被第二个人拿走了,第三个人的凭证被第四个。。。。
如此一来这么多人就被联系起来。咱们这次实现的简单的区块链就是本区块带有上一区块的哈希。
先简单定义一下区块的内容:
# {
#     "index": 1,           区块的块号
#     "timestamp": "",      时间戳
#     "transactions": [     交易内容
#         {
#           "sender": "",
#           "recipient": "",
#           "amount": 5,
#         }
#     ],
#     "proof": "",          工作量证明
#     "previous_hash":""    上一个区块的hash
#
# }
本次才用的是Python Flask框架,使用云端MongoDB ,https://cloud.mongodb.com/注册申请这里就不详细说了。
简单说一下需要准备的有,PyCharm , pip , Python 3.7。
使用PyCharm 创建一个PyThon虚拟环境 。点击Create New Project 。选择文件夹,默认选项就是在本文件夹安装虚拟环境。
然后就是各种包
import hashlib  # hash 算法
import json     # josn
from time import time #  时间戳
from uuid import uuid4  # uuid为本机生成ID
from flask import Flask, jsonify, request
import pymongo
我们设想一下,数据要保存在什么地方才能在下次启动程序的时候继续按照上一次结束的数据进行下一次的运算。因此我们需要使用数据库保存我们需要保存的数据。所以我们要先连接数据库。
#  **User**:**password** 这是你创建集群的用户和密码
client = pymongo.MongoClient('mongodb+srv://**User**:**password**@iec-pj8qn.mongodb.net/MainSite')
db = client.MainSite #
collection = db.blockchain
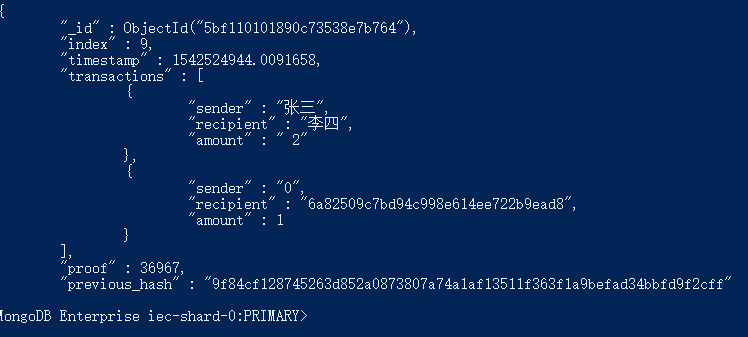
现在数据库已经连接上了,但是问题来了。我们怎么取出最底层的文档哪?下面我们需要一个循环遍历集合的最大值,回想一下我们定义的区块结构。里面定义的 index:1 。 每次新增一个区块,第二个区块的index = 2 . 一次增加下去。这样遍历的最大值,也可以说是遍历的次数就是我们需要寻找的index:last
,也就是最后一次被插入的数据。MongoDB 在没有给定特定的_id 字段时,自己会生成一个类似与时间戳的字段。这不是我们需要的,我们在取出数据的时候要把他剔除。
class value:
    # 取出文档的数据再次组合并存储在current[] 列表里
    def value(self, index1, hash1, proof, transactions1, timestamp) -> list:
        current = []
        json_value = {
            'index': index1,
            'previous_hash': hash1,
            'proof': proof,
            'transactions': transactions1,
            'timestamp': timestamp
        }
        current.append(json_value)
        return current
class counting:       # 循环遍历集合最大值
    def count(self):
        last_count = 0
        for x in collection.find():  # collection.find() 集合的所有文档
            last_count = last_count + 1
        return last_count


last1 = counting() # 调用counting类
last = last1.count()
print(last)
result = collection.find_one({"index": last})  # 搜索到最后一个文档
value = value()  # 创建value对象
chain0 = value.value(result['index'],
                     result['previous_hash'],
                     result['proof'],
                     result['transactions'],
                     result['timestamp'])      # dict 转 list
print(chain0)
print(type(chain0))

client.close() # 连接断开
现在我们已经获取都最近一次插入的数据。我们现在就可以插入创始区块了:
{
      "index": 1,
      "previous_hash": 1,
      "proof": 100,
      "timestamp": 1541940889.5927348,
      "transactions": []
    }
把这段josn插入MongoDB , 或许你可以在网页插入或者在本地下载一个 MongoDB Shell 这个云端MongoDB 有提示怎么下载,这里我就不多说了。如果不明白MongoDB 的用法请去 菜鸟教程
把创始区块插入集合,启动一下。出现你插入的数据,说明你已经成功的连接数据库。
下面我们来看一大段代码:
class Blockchain:

    def __init__(self):  # 构造函数,初始区块链,当前交易,生成创始区块
        self.chain = []  # 真正的区块链
        self.chain.append(chain0[0])     # 每次连接取最后一个集合文档作为本次的启动创世区块
        self.current_transactions = []
        #  self.new_block(proof=100, previous_hash=1) # 如果没有用到数据库,调用构造函数,自行创建一个创世区块

    def new_block(self, proof, previous_hash=None, last_index=None):  # 新建区块 工作量证明,前一个区块Hash
        #  定义交易区块实体
        block = {
            'index': last_index + 1,
            'timestamp': time(),
            'transactions': self.current_transactions,  # 当前交易
            'proof': proof,
            'previous_hash': previous_hash or self.hash(self.last_block)
        }
        self.current_transactions = []  # 清空当前交易
        self.chain.append(block)  # 区块链添加新区块
        return block

    def new_transactions(self, sender, recipient, amount) -> int:  # 新的交易
        self.current_transactions.append(  # 当前交易添加数据
            {
                'sender': sender,
                'recipient': recipient,
                'amount': amount
            }
        )

        return self.last_block['index'] + 1  # 最后一个区块的 index+1

    @staticmethod
    def hash(block):  # 区块hash算法
        block_string = json.dumps(block, sort_keys=True).encode()
        return hashlib.sha256(block_string).hexdigest()

    @property
    def last_block(self):  # 最后一个区块# 取出的最后一个区块类型总是 list
        long = len(self.chain)
        print(long)
        if long > 1:
            last_block = self.chain[-1]
            print('++++++++++++++++++++++++')
            print(last_block)
            print(type(last_block))
            print(last_block['index'])
            temp_json = {
                'index': last_block['index'],
                'previous_hash': last_block['previous_hash'],
                'proof': last_block['proof'],
                'transactions': last_block['transactions'],
                'timestamp': last_block['timestamp']
            }
            print(temp_json)
            self.chain.append(temp_json)
        print(self.chain)
        print(type(self.chain[-1]))
        return self.chain[-1]

    def proof_of_work(self, last_proof: int) -> int:  # 工作量证明
        proof = 0
        while self.valid_proof(last_proof, proof) is False:  # 循环检测合格hash
            proof += 1
        # print(proof)
        return proof

    def valid_proof(self, last_proof: int, proof: int) -> bool:  # 有效工作量证明
        guess = f'{last_proof}{proof}'.encode()
        guess_hash = hashlib.sha256(guess).hexdigest()  # 哈希后得到摘要
        # print(guess_hash)
        if guess_hash[0:4] == "0000":  # 工作量证明条件
            return True
        else:
            return False
上面的类,基本上都有注释,并且时我测试时的断点也有保留,更清晰的了解数据的类型和数值。我就不一一口述了。简单的说一下就是 交易方法def new_transactions, 和 新建块的打包计算def new_block
计算hash def hash(block): 有效工作量证明def hash(block) 。
本地文件夹创建static 文件夹 加入index.html
<!DOCTYPE html>
<html lang="en">
<head>
    <meta charset="UTF-8">
    <title>index</title>
</head>
<body>
<p>Hello BlockChain</p>
<form action="transactions" method="post">
    sender:<input type="text" name="sender">
    recipient:<input type="text" name="recipient">
    amount:<input type="text" name="amount">
    <input type="submit" value="submit">
</form>

</body>
</html>
下面开始使用我们的Flask框架
app = Flask(__name__, static_url_path='') # 参数的意思是为静态html文件,添加路径
Flask框架
app = Flask(__name__, static_url_path='') # 参数的意思是为静态html文件,添加路径
blockchain = Blockchain()  # 创建对象

node_identifier = str(uuid4()).replace('-', '') # 使用uuid生成本结点ID,replace()替换'-'
@app.route('/', methods=['GET'])
def index():
    return app.send_static_file('index.html')


@app.route('/transactions', methods=['POST'])
def new_transaction():  # 新的交易
    print(request)
    sender = request.form['sender']    #  取出 Form 里的值
    print(sender)
    recipient = request.form['recipient']
    print(recipient)
    amount = request.form['amount']
    print(amount)

    values = [sender, recipient, amount]
    index = blockchain.new_transactions(values[0],   #  调用函数
                                        values[1],
                                        values[2])
    response = {"message": f'Transaction will be added to Block {index}'}
    return jsonify(response), 201


@app.route('/mine', methods=['GET'])
def mine():  # 交易打包,挖矿
    last_block = blockchain.last_block
    print("=======================")
    print(type(last_block))
    print(last_block)
    last_proof = last_block['proof']
    print(last_proof)
    last_index = last_block['index']
    print(last_index)

    proof = blockchain.proof_of_work(last_proof) # 工作量证明 也就是挖矿

    blockchain.new_transactions(sender="0",       # 给本结点的奖励
                                recipient=node_identifier,
                                amount=1)

    block = blockchain.new_block(proof, None, last_index)  # 打包区块
    client = pymongo.MongoClient('mongodb+srv://**user**:**password**@iec-pj8qn.mongodb.net/MainSite')
    db = client.MainSite
    collection = db.blockchain
    collection.insert_one(block)  #  把打包好的区块添加到数据库。
    client.close()
    response = {
        "message": "New Block Forged",
        "index": block['index'],
        "transactions": block['transactions'],
        "proof": block['proof'],
        "previous_hash": block['previous_hash']
    }

    return jsonify(response), 200


@app.route('/chain', methods=['GET'])
def full_chain():  # 返回区块链
    response = {
        'chain': blockchain.chain,
        'length': len(blockchain.chain)
    }
    return jsonify(response), 200


if __name__ == '__main__':  # 当 block chain.py 作为模块时不执行下面函数
    app.run(host='127.0.0.1', port=3000)
把所有的代码块合在一起就是本次区块链模拟器的全部内容了,这只是单节点,单保存的链,只是更好的去理解区块链的结构,还有比如共识机制和选择链我们还没有去完成。
对了 说一下用法:

提交后: http://127.0.0.1:3000/mine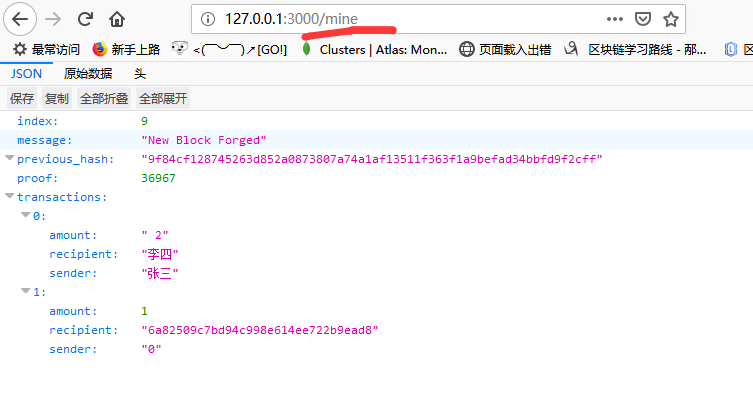
之后打开 PowerShell

结束。