koa路由层封装
最近做了一个koa的例子,封装了一些controller层和services层
技术栈采用的是koa2 + koa-router + mysql
controller : 负责直接和数据库进行连接(写sql, 对参数进行处理)
services: 负责传输数据
route: 负责定义路面的路由
简单看一下项目的目录结构
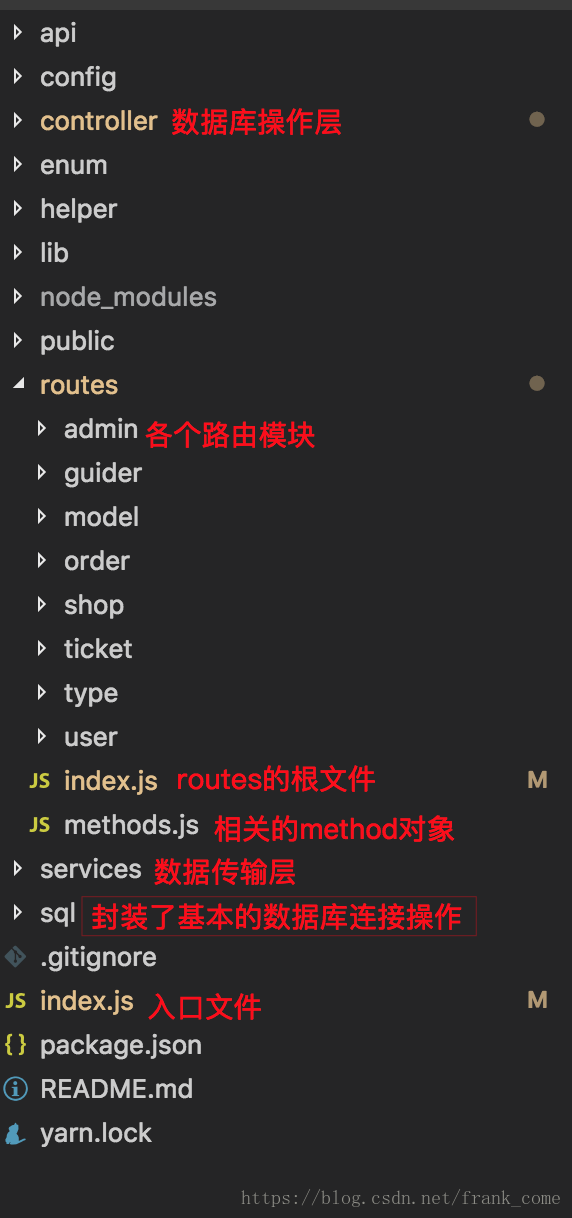
这便是其中最重要的三层结构
入口文件是index.js,我们简单来看一下源码
var Koa=require('koa');
var path=require('path')
var bodyParser = require('koa-bodyparser');
var session = require('koa-session-minimal');
var MysqlStore = require('koa-mysql-session');
var config = require('./config/default.js');
var koaStatic = require('koa-static')
var app=new Koa()
const routers = require('./routes/index')
// session存储配置
const sessionMysqlConfig= {
user: config.database.USERNAME,
password: config.database.PASSWORD,
database: config.database.DATABASE,
host: config.database.HOST,
}
// 配置session中间件
app.use(session({
key: 'USER_SID',
store: new MysqlStore(sessionMysqlConfig)
}))
// 配置跨域
app.use(async (ctx, next) => {
ctx.set('Access-Control-Allow-Headers', 'Content-Type, Access-Control-Allow-Headers, Authorization, X-Requested-With')
ctx.set('Access-Control-Allow-Origin', 'http://localhost:9000');
ctx.set('Access-Control-Allow-Methods', 'PUT,DELETE,POST,GET');
ctx.set('Access-Control-Allow-Credentials', true);
ctx.set('Access-Control-Max-Age', 3600 * 24);
await next();
});
// 配置静态资源加载中间件
app.use(koaStatic(
path.join(__dirname , './public')
))
// 使用表单解析中间件
app.use(bodyParser())
// 使用新建的路由文件
app.use(routers.routes()).use(routers.allowedMethods())
// 监听在1200
app.listen(config.port)
console.log(`listening on port ${config.port}`)
中间读取了数据库配置和进行跨域的设置以及表单解析,其中路由定义是在引用router
我们来看一下router的定义
const router = require('koa-router')()
// 配置所有的routes文件
const routes = (config => {
return config.reduce((copy, name) => {
// 这里是请求对应的路由模块,获得对应的对象
const obj = require(`./${name}`)
const newArr = Object.keys(obj).reduce((total, each) => {
let item = { path: `/api/${name}/${each}`, method: obj[each].method, action: each, service: name }
total.push(item)
return total
}, [])
copy = copy.concat(newArr)
return copy
}, [])
})([
'admin',
'user',
'guider',
'order',
])
/**
* 整合所有子路由
*/
// 配置最终的路由,形式为
// router.get(url, service.action)
routes.forEach(item => {
const service = require(`../services/${item.service}`)
router[item.method](item.path, service[item.action])
})
module.exports = router
这是对应的routes的输出
[ { path: '/api/admin/list',
    method: 'get',
    action: 'list',
    service: 'admin' },
  { path: '/api/admin/add',
    method: 'post',
    action: 'add',
    service: 'admin' },
  { path: '/api/admin/update',
    method: 'post',
    action: 'update',
    service: 'admin' },
  { path: '/api/admin/del',
    method: 'post',
    action: 'del',
    service: 'admin' },
  { path: '/api/admin/login',
    method: 'post',
    action: 'login',
    service: 'admin' },
  { path: '/api/admin/single',
    method: 'post',
    action: 'single',
    service: 'admin' },
  { path: '/api/user/list',
    method: 'get',
    action: 'list',
    service: 'user' },
  { path: '/api/user/add',
    method: 'post',
    action: 'add',
    service: 'user' },
  { path: '/api/user/update',
    method: 'post',
    action: 'update',
    service: 'user' },
  { path: '/api/user/del',
    method: 'post',
    action: 'del',
    service: 'user' },
  { path: '/api/user/single',
    method: 'post',
    action: 'single',
    service: 'user' },
  { path: '/api/guider/list',
    method: 'get',
    action: 'list',
    service: 'guider' },
  { path: '/api/guider/add',
    method: 'post',
    action: 'add',
    service: 'guider' },
  { path: '/api/guider/update',
    method: 'post',
    action: 'update',
    service: 'guider' },
  { path: '/api/guider/del',
    method: 'post',
    action: 'del',
    service: 'guider' },
  { path: '/api/guider/single',
    method: 'post',
    action: 'single',
    service: 'guider' },
  { path: '/api/order/list',
    method: 'get',
    action: 'list',
    service: 'order' },
  { path: '/api/order/add',
    method: 'post',
    action: 'add',
    service: 'order' },
  { path: '/api/order/update',
    method: 'post',
    action: 'update',
    service: 'order' },
  { path: '/api/order/del',
    method: 'post',
    action: 'del',
    service: 'order' },
  { path: '/api/order/listu',
    method: 'post',
    action: 'listu',
    service: 'order' },
  { path: '/api/order/listb',
    method: 'post',
    action: 'listb',
    service: 'order' },
  { path: '/api/order/single',
    method: 'post',
    action: 'single',
    service: 'order' } ]
接下来我们看一下单个route模块的定义
admin为例:
// 封装好的模版对象,里面有一些最基本的方法定义
// add,list,delete,update
const model = require('../model')
// 方法对象
const methods = require('../methods')
module.exports = {
  ...model,
  'login': { method: methods.post },
  'single': { method: methods.post },
}
model对象如下:
const methods = require('../methods')
module.exports = {
'list': { method: methods.get },
'add': { method: methods.post },
'update': { method: methods.post },
'del': { method: methods.post },
}
methods对象如下:
module.exports = {
  get: 'get',
  post: 'post',
}
到这里,我们的route封装已经完成,其实就是把一堆路由的定义化整为零变成了一个个文件夹下的js文件,变成了一个个对象
然后通过在route/index.js里面的定义对相应的service层进行调用对应的方法,其中名字的命名需要一致
我们来看一下services下的各个模块
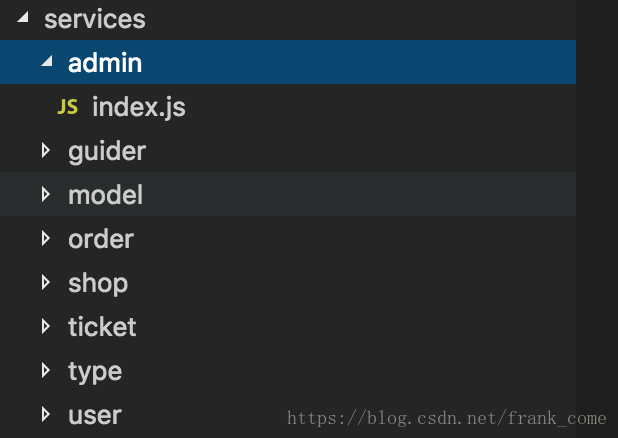
以admin为例:
services的执行逻辑为
拿到参数
调用controller对应的方法
处理结果
返回结果
// 请求对应的controller模块
const controller = require('../../controller/admin')
// 请求对应的模版对象
const model = require('../model')
// 封装的pojo消息集,对返回数据的处理
const pojo = require('../../helper/pojo')
// success: 成功返回
// failed: 失败返回
// filterUnderLine: 处理驼峰和下划线的区别
const { success, failed, filterUnderLine } = pojo
const m = model([
'list',
'add',
'update',
'del',
], 'admin')
// 查询单个对象
const single = async ctx => {
let res;
try {
// 获取的到参数
const val = ctx.request.body
// 调用对应的controller层
await controller.single(val).then(result => {
// 对返回结果进行处理
if(result.length === 0 || result === null || result === undefined)
// 等于0或者null | undefined 返回失败的对象
res = failed('操作失败')
else
// 其他返回成功的对象,处理一下从数据库拿到的数据
res = success(filterUnderLine(result[0]))
})
} catch(err) {
// 出错返回失败的对象
res = failed(err)
}
// 数据返回给前台
ctx.body = res
}
const login = async ctx => {
let res;
try {
const val = ctx.request.body
await controller.login(val).then(result => {
if(result.length === 0 || result === null || result === undefined)
res = failed('用户名或密码不对')
else
res = success(filterUnderLine(result[0]))
})
} catch(err) {
res = failed(err)
}
ctx.body = res
}
// 模块的对应导出
module.exports = {
...m,
login,
single,
}services的model对象
const pojo = require('../../helper/pojo')
const { success, failed, successWithCode, filterUnderLine } = pojo
const list = [
'del',
'add',
'update',
]
/**
*
* @param {*} config 对应的方法,要定义的哪几个方法模块,单个services层传入
* @param {*} file 对应的controller文件名称
* @return 返回一个对应好的对象
*/
module.exports = (config, file) => {
const controller = require(`../../controller/${file}`)
return config.reduce((copy, name) => {
copy[name] = async ctx => {
let res;
try {
const val = ctx.request.body
await controller[name](val).then(result => {
// 没有数据返回的接口直接返回msg和code
if (list.indexOf(name) !== -1) {
res = successWithCode('操作成功')
return
}
// 其他模块方法直接过滤数据下划线
const arr = result.map(item => filterUnderLine(item))
res = success(arr)
})
} catch(err) {
res = failed(err)
}
ctx.body = res
}
return copy
}, {})
}
到了这里,就剩下对controller层的调用,也就是对数据库的真正操作

以admin为例:
一个controller的方法逻辑为
接受参数
编写sql
调用数据库连接池执行
返回结果
const pool = require('../../lib/mysql')
const { NtNUpdate } = require('../../helper')
const { STATUS } = require('../../enum')
const { query } = pool
// 新添管理员
const add = (val) => {
const { account, phone, password, name, creator, type } = val
// 写好的sql语句
const _sql = 'insert into tour_admin(account,phone,password,create_time,creator,name,type,status) values(?,?,?,now(),?,?,?,?);'
// 执行数据库并且返回结果
return query( _sql, [ account, phone, password, creator, name, type, STATUS.NORMAL,])
}
const login = (val) => {
const { account, password } = val
const _sql = 'select * from tour_admin where account = ? and password = ? and status = ?'
return query( _sql, [ account, password, STATUS.NORMAL ] )
}
// 更改管理员
const update = (val) => {
const { account, phone, password, name, type, id } = val
let _sql = 'update tour_admin set '
const { sql, args } = NtNUpdate({ account, phone, password, name, type }, _sql)
_sql = sql + 'where id = ?'
const arr = [ ...args, id]
return query( _sql, arr )
}
// 查询管理员
const list = val => {
const sql = 'select * from tour_admin where status != ?'
return query(sql, [ STATUS.DELED ])
}
// 查询单个管理员byId
const single = val => {
const { id } = val
const sql = 'select * from tour_admin where status != ? and id = ?'
return query(sql, [ STATUS.DELED, id ])
}
// 删除管理员
const del = val => {
const { id } = val
const sql = 'update tour_admin set status = ? where id = ?'
return query(sql, [ STATUS.DELED, id ])
}
module.exports = {
add,
list,
update,
del,
login,
single,
}helper如下
/**
*
* @param {*} params 参数对象
* @param {*} sql sql语句
* @description 根据参数对象去改变sql语句,最后返回对应的sql语句
* @return 返回处理后的sql语句
*/
const update = (params, sql) => {
let keys = Object.keys(params)
let arr = []
keys.forEach((key) => {
if (key) {
sql = sql + `${key} = ? ,`
arr.push(params[key])
}
})
sql = sql.substring(0, sql.length - 1)
return {
args: arr,
sql,
}
}
module.exports = {
NtNUpdate: update,
}
enum如下
const status = require('./status')
const type = require('./status')
module.exports = {
STATUS: status,
TYPES: type,
}
Status如下
module.exports = {
  DELED: 404,
  ABA: 111,
  NORMAL: 0,
}
lib/mysql如下
const mysql = require('mysql');
const config = require('../config/default.js')
const pool = mysql.createPool({
host : config.database.HOST,
user : config.database.USERNAME,
password : config.database.PASSWORD,
database : config.database.DATABASE
});
/**
*
* @param sql 接收的sql语句
* @param values 接受的参数: 为数组
*/
const query = function( sql, values ) {
return new Promise(( resolve, reject ) => {
pool.getConnection(function(err, connection) {
if (err) {
console.log(err)
resolve( err )
} else {
connection.query(sql, values, ( err, rows) => {
if ( err ) {
reject( err )
} else {
resolve( rows )
}
connection.release()
})
}
})
})
}
module.exports={
query,
}
到这里,我们就实现了koa的相关操作了。
最后,这是项目地址,欢迎star,