笔记在知了课堂-Django开发的基础上更改
memcached
什么是memcached
memcached之前是danga的一个项目,最早是为LiveJournal服务的,当初设计师为了加速LiveJournal访问速度而开发的,后来被很多大型项目采用。官网是www.danga.com或者是memcached.org。Memcached是一个高性能的分布式的内存对象缓存系统,全世界有不少公司采用这个缓存项目来构建大负载的网站,来分担数据库的压力。Memcached是通过在内存里维护一个统一的巨大的hash表,memcached能存储各种各样的数据,包括图像、视频、文件、以及数据库检索的结果等。简单的说就是将数据调用到内存中,然后从内存中读取,从而大大提高读取速度。- 哪些情况下适合使用
Memcached:存储验证码(图形验证码、短信验证码)、登录session等所有不是至关重要的数据。
安装和启动memcached(<1.4.5版本)
-
windows:
- 安装:
memcached.exe -d install。 - 启动:
memcached.exe -d start。
- 安装:
-
linux(ubuntu):
-
安装:
sudo apt install memcached -
启动:
cd /usr/local/memcached/bin
./memcached -d start
-
-
可能出现的问题:
- 提示你没有权限:在打开cmd的时候,右键使用管理员身份运行。
win+x选择命令提示符(管理员)!!! - 提示缺少
pthreadGC2.dll文件:将pthreadGC2.dll文件拷贝到windows/System32. - 不要放在含有中文的路径下面。
- 提示你没有权限:在打开cmd的时候,右键使用管理员身份运行。
-
启动
memcached:-d:这个参数是让memcached在后台运行。-m:指定占用多少内存。以M为单位,默认为64M。-p:指定占用的端口。默认端口是11211。-l:别的机器可以通过哪个ip地址连接到我这台服务器。如果是通过service memcached start的方式,那么只能通过本机连接。如果想要让别的机器连接,就必须设置-l 0.0.0.0。
如果想要使用以上参数来指定一些配置信息,那么不能使用
service memcached start,而应该使用/usr/bin/memcached的方式来运行。比如/usr/bin/memcached -u memcache -m 1024 -p 11222 start。
telnet操作memcached
telnet ip地址 [11211]
-
添加数据
set:-
语法:
set key flas(是否压缩) timeout(超时时间) value_length(值长度) value -
示例:
  set name 0 60 4
  jack
-
-
add:-
语法:
add key flas(0) timeout value_length value -
示例:
add name 0 60 5 jackset和add的区别:add是只负责添加数据,不会去修改数据。如果添加的数据的key已经存在了,则添加失败,如果添加的key不存在,则添加成功。而set不同,如果memcached中不存在相同的key,则进行添加,如果存在,则替换。
-
-
获取数据:
-
语法:
get key_name -
示例:
get name
-
-
删除数据:
-
语法:
delete key_name -
示例:
delete name -
flush_all:删除memcached中的所有数据。
-
-
查看
memcached的当前状态:- 语法:
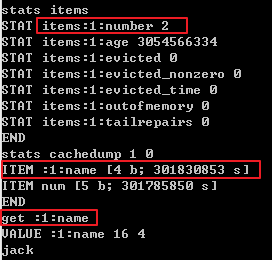
statsget_hists: get命令命中了多少次get_misses: get命令get空了几次curr_items: 当前memcached中的键值对的个数total_connections:从memcached开启到现在总共的连接数curr_connections: 当前memcached的连接数stats items查看所有的keystats cachedump [item_id] 0查看item_id对应的key
memcached默认最大的连接数是1024
- 语法:
通过python操作memcached
-
安装:
python-memcached:pip install python-memcached。 -
建立连接:
import memcache mc = memcache.Client(['127.0.0.1:11211','192.168.174.130:11211'],debug=True) -
设置数据:
mc.set('username','hello world',time=60) mc.set_multi({'email':'[email protected]','telphone':'111111'},time=60) -
获取数据:
mc.get('telphone') -
删除数据:
mc.delete('email') -
自增长:
mc.incr('read_count') -
mc.decr('read_count')
memcached的安全性
memcached的操作不需要任何用户名和密码,只需要知道memcached服务器的ip地址和端口号即可。因此memcached使用的时候尤其要注意他的安全性。这里提供两种安全的解决方案。分别来进行讲解:
- 使用
-l参数设置为只有本地可以连接:这种方式,就只能通过本机才能连接,别的机器都不能访问,可以达到最好的安全性。 - 使用防火墙,关闭
11211端口,外面也不能访问。
  ufw enable # 开启防火墙
  ufw disable # 关闭防火墙
  ufw default deny # 防火墙以禁止的方式打开,默认是关闭那些没有开启的端口
  ufw deny 端口号 # 关闭某个端口
  ufw allow 端口号 # 开启某个端口
在Django中使用memcached
首先需要在settings.py中配置好缓存:
CACHES = {
    'default': {
        'BACKEND': 'django.core.cache.backends.memcached.MemcachedCache',
        'LOCATION': '127.0.0.1:11211',
    }
}
如果想要使用多台机器,那么可以在LOCATION指定多个连接,示例代码如下:
CACHES = {
    'default': {
        'BACKEND': 'django.core.cache.backends.memcached.MemcachedCache',
        'LOCATION': [
            'xxx.xxx.xxx.xxx:11211',
            'xxx.xxx.xxx.xxx:11211',
        ]
    }
}
配置好memcached的缓存后,以后在代码中就可以使用以下代码来操作memcached了:
from django.core.cache import cache

def index(request):
    cache.set('name','jack',60)  # 键 值 timeout,不用限制字符长度
    print(cache.get('name'))
    response = HttpResponse('OK')
    return response
需要注意的是,django在存储数据到memcached中的时候,不会将指定的key存储进去,而是会对key进行一些处理。会加一个前缀+加一个版本号+key_name。
- 运行

如果想要自己加前缀,那么可以在settings.CACHES中添加KEY_FUNCTION参数:
CACHES = {
    'default': {
        'BACKEND': 'django.core.cache.backends.memcached.MemcachedCache',
        'LOCATION': '127.0.0.1:11211',
        'KEY_FUNCTION': lambda key,prefix_key,version:"django:{}".format(key), #使用自定义的格式对key进行处理
    }
}
-
运行

这里的KEY_FUNCTION对应的函数要对应下面中的self.key_func(key,key_prefix,version)的参数
def make_key(self, key, version=None):
    """
    Construct the key used by all other methods. By default, use the
    key_func to generate a key (which, by default, prepends the
    `key_prefix' and 'version'). A different key function can be provided
    at the time of cache construction; alternatively, you can subclass the
    cache backend to provide custom key making behavior.
    """
    if version is None:
        version = self.version

    new_key = self.key_func(key, self.key_prefix, version) #key是键,key_prefix是前缀(默认''),version是版本号(默认1), 所以组合才会变成 :1:name 这种键名
    return new_key
上面的函数如何查找?
from django.core.cache import cache # cache中查看
cache = DefaultCacheProxy() # cache是一个空壳代理类,继续进入DefaultCacheProxy查看
def __setattr__(self, name, value):
    return setattr(caches[DEFAULT_CACHE_ALIAS], name, value)  # cache.set会执行该魔方函数,这里需要DEFAULT_CACHE_ALIAS,说明是设置的默认CACHE名
from django.core.cache.backends.memcached import MemcachedCache # 导入MemcachedCache
lass MemcachedCache(BaseMemcachedCache):  # 类中没有关于set的方法,进入父类查看
    ...
def set(self, key, value, timeout=DEFAULT_TIMEOUT, version=None):
    key = self.make_key(key, version=version)  # 找到make_key
    if not self._cache.set(key, value, self.get_backend_timeout(timeout)):
        # make sure the key doesn't keep its old value in case of failure to set (memcached's 1MB limit)
        self._cache.delete(key)