版权声明:原创文章,转载请说明出处 https://blog.csdn.net/Destiny_strive/article/details/84073704
设计开发过程中,导航栏都会有所不同,这时候使用RN就需要自定义一个想要的导航栏了,RN中文网有讲专门ios的导航栏(NavigatorIOS),可以不用自定义。
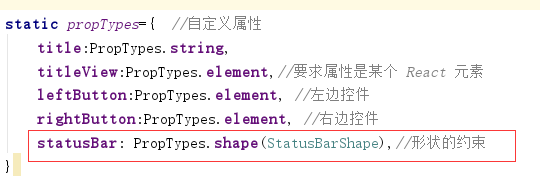
首先定义自定义导航栏的一些属性的约束,记得npm install --save prop-types然后引入import PropTypes from 'prop-types';
static propTypes={  //自定义属性
        title:PropTypes.string,
        titleView:PropTypes.element,//要求属性是某个 React 元素
        leftButton:PropTypes.element, //左边控件
        rightButton:PropTypes.element, //右边控件
    }

    constructor(props){
        super(props);
        this.state={
            title:''
        }
    }
然后设置逻辑,组装出一个导航栏的模样,下面这样就是组装好了左边一个组件,中间一个标题或者组件,右边一个组件的样子,最后return:
 render(){
        //如果有给出titleView的值就用这个值,反之就使用title的值为标题
        let titleView = this.props.titleView?this.props.titleView:<Text>{this.props.title}</Text>
        let content = <View style={styles.navBar}>
            {this.props.leftButton}
            <View style={styles.titleViewContainer}>
                {titleView}
            </View>
            {this.props.rightButton}
             </View>
        return(
            <View>
                {content}
            </View>
        )
    }
这是上面自定义导航栏的样式,还有两个常量用于在不同系统显示不同的高:
const styles = StyleSheet.create({
    navBar:{
        justifyContent: 'space-between',
        alignItems:'center',
        height:Platform.OS==='IOS'?NAV_BAR_HEIGHT_IOS:NAV_BAR_HEIGHT_ANDROID,
        backgroundColor:'#ff7888',
        flexDirection: 'row' //组件水平显示
    },
    titleViewContainer:{
        justifyContent: 'center',
        alignItems: 'center',//水平
        position: 'absolute',
        left:40,
        right:40,
        top:0,
        bottom:0
    }
})
const NAV_BAR_HEIGHT_ANDROID=50;
const NAV_BAR_HEIGHT_IOS=44;接下来只需要调用,并设置想要的属性就行了:
import React, {Component} from 'react';
import {StyleSheet, View, TouchableOpacity, Image} from 'react-native';
import MyNavigationBar from './myNavigationBar';
export default class supermarket extends Component<Props> {
renderButton(image){
return (
<TouchableOpacity>
<Image source={image} style={styles.myImage}/>
</TouchableOpacity>
)
}
render() {
return (
<View style={styles.container}>
<MyNavigationBar
title='我是标题'
leftButton={ //导航栏左方
this.renderButton(require("../../images/jiantou.png"))
}
rightButton={
this.renderButton(require("../../images/star.png"))
}
/>
</View>
);
}
}
const styles = StyleSheet.create({
container: {
flex: 1,
backgroundColor: '#F5FCFF',
},
myImage:{
width:22,
height:22,
margin:5
}
});效果如下 :
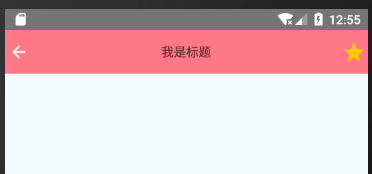
发现状态栏背景和导航栏不一样,接下来改变状态栏背景,使其一致:
创建一个常量,添加状态栏的属性设置,然后加入到propTypes中:
const StatusBarShape={ //设置状态栏
backgroundColor:PropTypes.string, //设置状态栏的背景色
barStyle:PropTypes.oneOf(['default', 'light-content', 'dark-content']), //状态栏样式 default 默认的样式(IOS为白底黑字、Android为黑底白字)light-content 黑底白字 dark-content 白底黑字(需要Android API>=23)
hidden:PropTypes.bool, //状态栏是否隐藏
translucent:PropTypes.bool,////指定状态栏是否透明。设置为true时,应用会在状态栏之下绘制(即所谓“沉浸式”——被状态栏遮住一部分)。常和带有半透明背景色的状态栏搭配使用
}
设置一些状态栏的默认值:
static defaultProps={ //statusBar设置一些没有设置时候的默认值
statusBar:{
hidden:false,
barStyle: 'light-content'
}
}在render中加入状态栏:

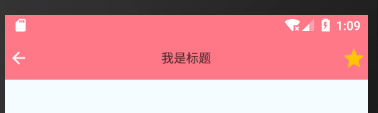
在调用的地方设置状态栏参数:

最终运行效果:
全部代码:
import React, {Component} from 'react';
import {StyleSheet, View, Text, Platform, StatusBar} from 'react-native';
import PropTypes from 'prop-types';
const NAV_BAR_HEIGHT_ANDROID=50;
const NAV_BAR_HEIGHT_IOS=44;
const StatusBarShape={ //设置状态栏
    backgroundColor:PropTypes.string, //设置状态栏的背景色
    barStyle:PropTypes.oneOf(['default', 'light-content', 'dark-content']), //状态栏样式 default	默认的样式(IOS为白底黑字、Android为黑底白字)light-content	黑底白字 dark-content	白底黑字(需要Android API>=23)
    hidden:PropTypes.bool,   //状态栏是否隐藏
    translucent:PropTypes.bool,////指定状态栏是否透明。设置为true时,应用会在状态栏之下绘制(即所谓“沉浸式”——被状态栏遮住一部分)。常和带有半透明背景色的状态栏搭配使用
}
export default class myNavigationBar extends Component<props>{
static propTypes={ //自定义属性
title:PropTypes.string,
titleView:PropTypes.element,//要求属性是某个 React 元素
leftButton:PropTypes.element, //左边控件
rightButton:PropTypes.element, //右边控件
statusBar: PropTypes.shape(StatusBarShape),//形状的约束
}
 static defaultProps={  //statusBar设置一些没有设置时候的默认值
        statusBar:{
            hidden:false,
            barStyle: 'light-content'
        }
    }
constructor(props){
super(props);
this.state={
title:'',
}
}
render(){
let statusBar = <View style={styles.statusBarStyle}>
<StatusBar {...this.props.statusBar} />
</View>
//如果有给出titleView的值就用这个值,反之就使用title的值为标题
let titleView = this.props.titleView?this.props.titleView:<Text>{this.props.title}</Text>
let content = <View style={styles.navBar}>
{this.props.leftButton}
<View style={styles.titleViewContainer}>
{titleView}
</View>
{this.props.rightButton}
</View>
return(
<View>
{statusBar}
{content}
</View>
)
}
}
const styles = StyleSheet.create({
navBar:{
justifyContent: 'space-between',
alignItems:'center',
height:Platform.OS==='IOS'?NAV_BAR_HEIGHT_IOS:NAV_BAR_HEIGHT_ANDROID,
backgroundColor:'#ff7888',
flexDirection: 'row' //组件水平显示
},
titleViewContainer:{
justifyContent: 'center',
alignItems: 'center',//水平
position: 'absolute',
left:40,
right:40,
top:0,
bottom:0
}
})import React, {Component} from 'react';
import {StyleSheet, View, TouchableOpacity, Image} from 'react-native';
import MyNavigationBar from './myNavigationBar';
export default class supermarket extends Component<Props> {
renderButton(image){
return (
<TouchableOpacity>
<Image source={image} style={styles.myImage}/>
</TouchableOpacity>
)
}
render() {
return (
<View style={styles.container}>
<MyNavigationBar
title='我是标题'
statusBar={{ //设置状态栏参数
backgroundColor:'#ff7888',
hidden:false,
translucent:false,
}}
leftButton={ //导航栏左方
this.renderButton(require("../../images/jiantou.png"))
}
rightButton={
this.renderButton(require("../../images/star.png"))
}
/>
</View>
);
}
}
const styles = StyleSheet.create({
container: {
flex: 1,
backgroundColor: '#F5FCFF',
},
myImage:{
width:22,
height:22,
margin:5
}
});