1. 什么是SonarQube?
SonarQube 官网:https://www.sonarqube.org/
SonarQube®是一种自动代码审查工具,用于检测代码中的错误,漏洞和代码异味。它可以与您现有的工作流程集成,以便在项目分支和拉取请求之间进行连续的代码检查。

2. 使用前提条件
当前版本 SonarQube 7.4
运行SonarQube的唯一先决条件是在您的计算机上安装Java(Oracle JRE 8或OpenJDK 8)。
注意: 在Mac OS X上,强烈建议安装Oracle JDK 8而不是相应的Oracle JRE,因为JRE安装未正确完全设置Java环境。
2.1 硬件要求
- SonarQube服务器的小型(个人或小团队)实例需要至少2GB的RAM才能有效运行,并且1GB的可用RAM用于操作系统。如果要为大型团队或Enterprise安装实例,请考虑以下其他建议。
- 您需要的磁盘空间量取决于您使用SonarQube分析的代码量。例如,SonarClube的公共实例SonarCloud拥有超过3.5亿行代码,有5年的历史。SonarCloud目前在集群Amazon EC2 m5.large实例上运行,每个节点分配50 Gb的驱动器空间。它处理19,000多个项目,大约有1400万个未解决的问题。SonarCloud在PostgreSQL 9.5上运行,它为数据库使用了大约250Gb的磁盘空间。
- SonarQube必须安装在具有出色读写性能的硬盘上。最重要的是,“data”文件夹包含Elasticsearch索引,当服务器启动并运行时,将在其上完成大量I / O. 因此,良好的读写硬盘性能将对整个SonarQube服务器性能产生很大影响。
2.2 企业硬件建议
对于SonarQube的大型团队或企业级安装,需要额外的硬件。在企业级别,监控SonarQube实例/实例管理/ java-process-memory是必不可少的,并且应该随着实例的增长引导进一步的硬件升级。起始配置应至少包括:
- 8个核心,允许主SonarQube平台与多个计算引擎工作者一起运行
- 16GB RAM有关数据库和ElasticSearch的其他要求和建议,请参阅硬件建议/要求/硬件建议。
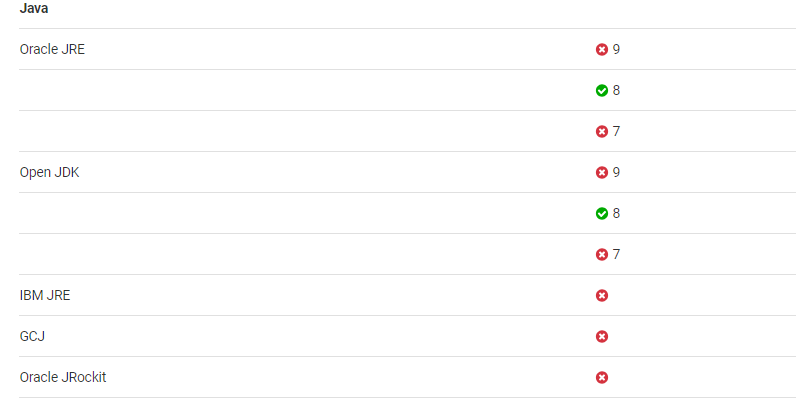
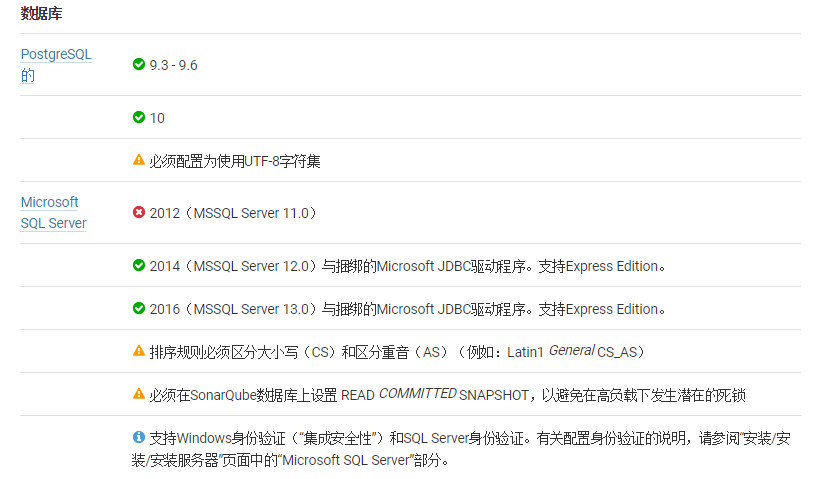
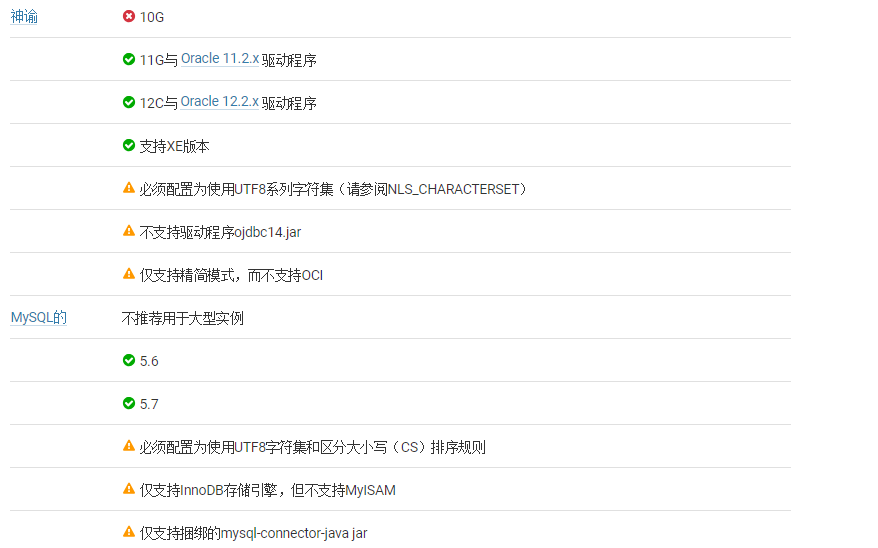
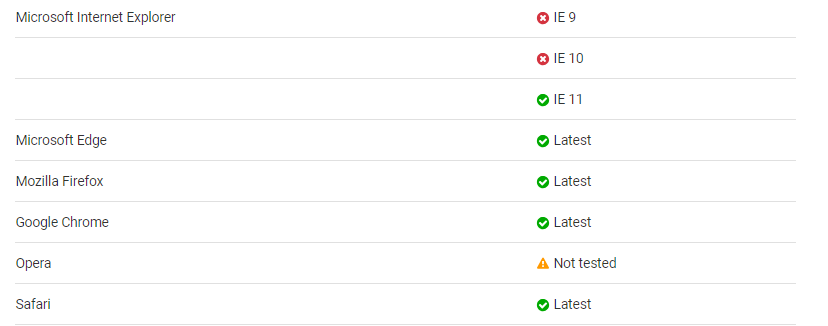
2.3 支持的平台
SonarQube Java分析器能够分析任何类型的Java源文件,无论它们遵循的Java版本如何。
但SonarQube分析和SonarQube服务器需要特定版本的JVM。
网页浏览器
要获得SonarQube提供的完整体验,您必须在浏览器中启用JavaScript。
参考资料:https://docs.sonarqube.org/latest/requirements/requirements/
3. SonarQube 如何下载安装配置?
参考资料:https://docs.sonarqube.org/latest/setup/get-started-2-minutes/
收费价格标准如下:

SonarQube 的社区版是免费的,其他版本是收费的
3.1 下载社区版
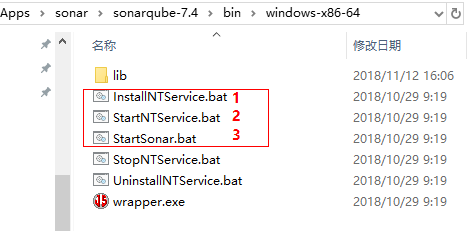
3.1.1 比如我们解压缩到这个目录 C:\Apps\sonar\sonarqube-7.4\bin\windows-x86-64\
3.1.2 以管理员身份按照上图顺序依次运行这三个文件
3.1.3 登录 http://localhost:9000/ 可以看到这个
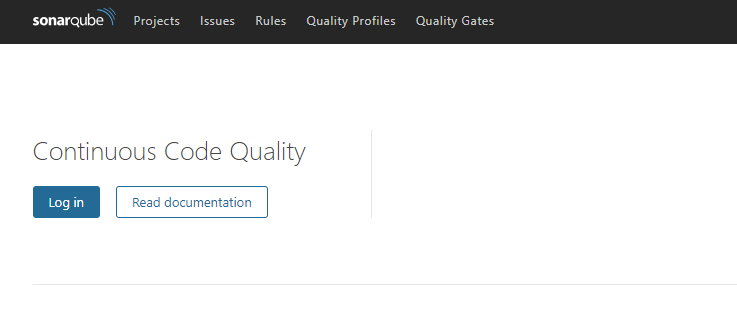
3.1.4 使用系统默认的管理员凭据(admin / admin)登陆成功。
更详细内容移步:https://docs.sonarqube.org/display/SCAN/Analyzing+with+SonarQube+Scanner+for+Maven
4. 使用SonarQube扫描仪分析Maven

Tips:
Sonar 版本7.4
Maven 版本不可小于 3.x
能访问之前那个登陆页面并登陆成功,说明SonarQube已经安装好了。
初始设置
全局设置
1. 打开位于$ MAVEN_HOME / conf或〜/ .m2中的 settings.xml文件,
2. 找到<pluginGroups>节点,追加 org.sonarsource.scanner.maven 这个插件
3. 找到以设置插件前缀和可选的SonarQube服务器URL。
Settings.xml 内容示例如下:
<settings>
    <pluginGroups>
        <pluginGroup>org.sonarsource.scanner.maven</pluginGroup>
    </pluginGroups>
    <profiles>
        <profile>
            <id>sonar</id>
            <activation>
                <activeByDefault>true</activeByDefault>
            </activation>
            <properties>
                <!-- Optional URL to server. Default value is http://localhost:9000 -->
                <sonar.host.url>
                  http://myserver:9000
                </sonar.host.url>
            </properties>
        </profile>
     </profiles>
</settings>
局部设置
如果只是对单个项目需要配置,也可以采取局部设置服务器地址,即在自己项目的POM.xml 中配置如下:
<project xmlns="http://maven.apache.org/POM/4.0.0"
    xmlns:xsi="http://www.w3.org/2001/XMLSchema-instance"
    xsi:schemaLocation="http://maven.apache.org/POM/4.0.0 http://maven.apache.org/xsd/maven-4.0.0.xsd">
    <modelVersion>4.0.0</modelVersion>
    <groupId>com.xingyun</groupId>
    <artifactId>SpringStaticFactoryPatternSample</artifactId>
    <version>0.0.1-SNAPSHOT</version>

    <!-- 非必须中间的可删除 -->
    <dependencies>
        <!-- https://mvnrepository.com/artifact/commons-logging/commons-logging -->
        <dependency>
            <groupId>commons-logging</groupId>
            <artifactId>commons-logging</artifactId>
            <version>1.2</version>
        </dependency>
        <!-- https://mvnrepository.com/artifact/org.springframework/spring-context -->
        <dependency>
            <groupId>org.springframework</groupId>
            <artifactId>spring-context</artifactId>
            <version>5.1.2.RELEASE</version>
        </dependency>
        <!-- https://mvnrepository.com/artifact/org.springframework/spring-core -->
        <dependency>
            <groupId>org.springframework</groupId>
            <artifactId>spring-core</artifactId>
            <version>5.1.2.RELEASE</version>
        </dependency>
        <!-- https://mvnrepository.com/artifact/org.springframework/spring-beans -->
        <dependency>
            <groupId>org.springframework</groupId>
            <artifactId>spring-beans</artifactId>
            <version>5.1.2.RELEASE</version>
        </dependency>
    </dependencies>
    <!-- 非必须中间的可删除 -->

    <profiles>
        <profile>
            <id>sonar</id>
            <activation>
                <activeByDefault>true</activeByDefault>
            </activation>
            <properties>
                <!-- Optional URL to server. Default value is http://localhost:9000 -->
                <sonar.host.url>
                    http://localhost:9000
                </sonar.host.url>
            </properties>
        </profile>
    </profiles>

    <build>
        <pluginManagement>
            <plugins>
                <!-- 配置编译插件 -->
                <plugin>
                    <groupId>org.apache.maven.plugins</groupId>
                    <artifactId>maven-compiler-plugin</artifactId>
                    <version>3.8.0</version>
                    <configuration>
                        <source>1.8</source>
                        <target>1.8</target>
                    </configuration>
                </plugin>
            </plugins>
        </pluginManagement>
    </build>
</project>
分析Maven项目
方法一:
使用Sonar 最新插件
配置好后就可以开始分析Maven项目了,在pom.xml文件所在的目录中运行Maven命令
mvn clean verify sonar:sonar

# In some situation you may want to run sonar:sonar goal as a dedicated step. Be sure to use install as first step for multi-module projects
mvn clean install
mvn sonar:sonar
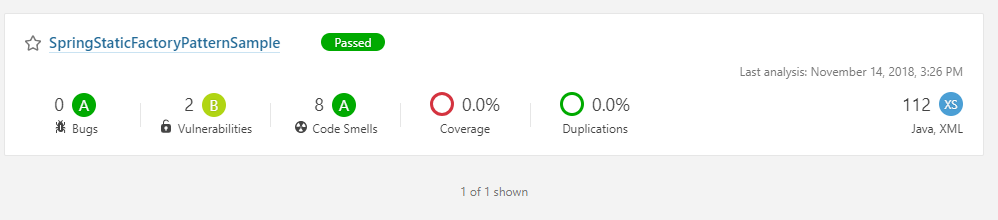
这样当命令执行完毕后就可以在刚才的web 控制台看到刚才测试的项目了
打开网址:http://localhost:9000/projects
方法二:
指定Sonar 插件版本
如果需要指定sonar-maven-plugin的版本而不是使用最新版本
那么需要在项目的POM.xml 中指定版本如下:
<project xmlns="http://maven.apache.org/POM/4.0.0"
    xmlns:xsi="http://www.w3.org/2001/XMLSchema-instance"
    xsi:schemaLocation="http://maven.apache.org/POM/4.0.0 http://maven.apache.org/xsd/maven-4.0.0.xsd">
    <modelVersion>4.0.0</modelVersion>
    <groupId>com.xingyun</groupId>
    <artifactId>TestSample</artifactId>
    <version>0.0.1-SNAPSHOT</version>

    <profiles>
        <profile>
            <id>sonar</id>
            <activation>
                <activeByDefault>true</activeByDefault>
            </activation>
            <properties>
                <!-- Optional URL to server. Default value is http://localhost:9000 -->
                <sonar.host.url>
                    http://localhost:9000
                </sonar.host.url>
            </properties>
        </profile>
    </profiles>

    <build>
        <pluginManagement>
            <plugins>
                <!-- 配置编译插件 -->
                <plugin>
                    <groupId>org.apache.maven.plugins</groupId>
                    <artifactId>maven-compiler-plugin</artifactId>
                    <version>3.8.0</version>
                    <configuration>
                        <source>1.8</source>
                        <target>1.8</target>
                    </configuration>
                </plugin>
                <!-- 配置分析扫描插件 -->
                <plugin>
                    <groupId>org.sonarsource.scanner.maven</groupId>
                    <artifactId>sonar-maven-plugin</artifactId>
                    <version>3.5.0.1254</version>
                </plugin>
            </plugins>
        </pluginManagement>
    </build>
</project>
然后执行如下命令:
# Specify the version of sonar-maven-plugin instead of using the latest. See also 'How to Fix Version of Maven Plugin' below.
mvn org.sonarsource.scanner.maven:sonar-maven-plugin:3.5.0.1254:sonar
这样当命令执行完毕后就可以在刚才的web 控制台看到刚才测试的项目了
打开网址:http://localhost:9000/projects
方法三:
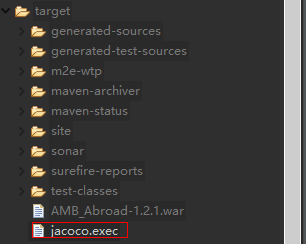
要将JaCoCo作为Maven构建的一部分执行以生成JaCoCo 的二进制格式,即在target 目录下生成jacoco.exec 文件
请使用以下命令:
mvn clean org.jacoco:jacoco-maven-plugin:prepare-agent install sonar:sonar
如果需要忽略测试失败
mvn clean org.jacoco:jacoco-maven-plugin:prepare-agent install -Dmaven.test.failure.ignore=false sonar:sonar
然后执行如下命令:
# Specify the version of sonar-maven-plugin instead of using the latest. See also 'How to Fix Version of Maven Plugin' below.
mvn org.sonarsource.scanner.maven:sonar-maven-plugin:3.5.0.1254:sonar
这样当命令执行完毕后就可以在刚才的web 控制台看到刚才测试的项目了
打开网址:http://localhost:9000/projects
开启身份认证
不知道你有没有发现,我们直接执行命令后便将分析报告提交到web控制台了,没有加任何权限验证,这样是非常不安全的。
还记得之前我们登陆web控制台么?http://localhost:9000/
默认管理员凭据
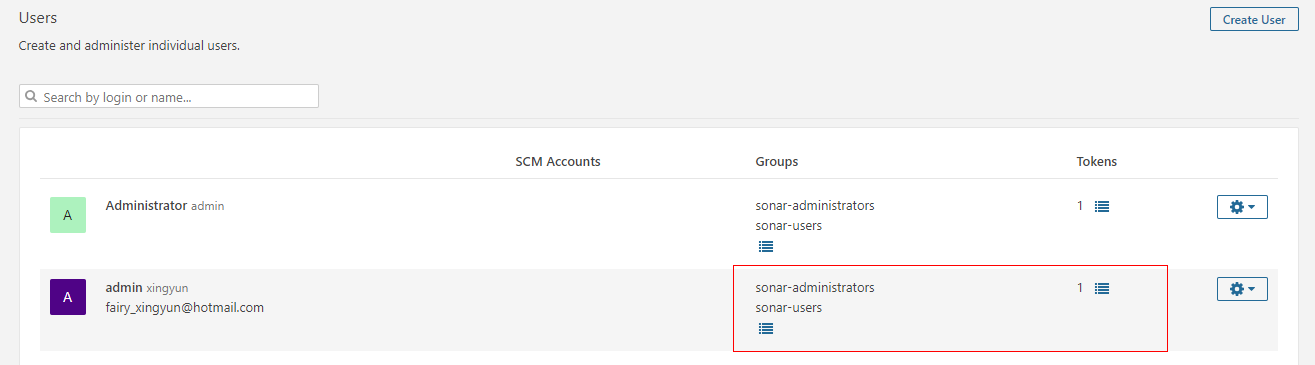
安装SonarQube时,会自动创建具有“管理系统”权限的默认用户:
- 登录:admin
- 密码:admin
我们可以在项目中通过配置账号和密码方式来实现身份认证,但是这样仍然不是很安全,登陆密码容易泄露。
开启Token 身份认证
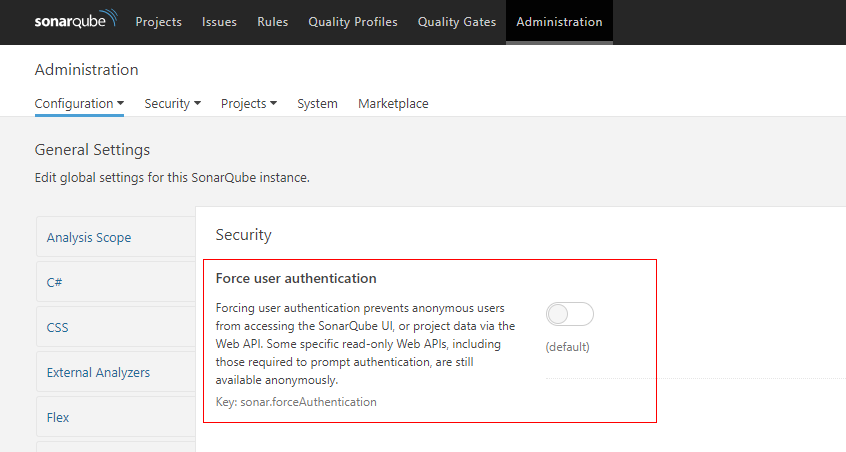
1. 打开身份认证开关
Administration > Configuration > General Settings > Security, 然后设置 Force user authentication 属性为true
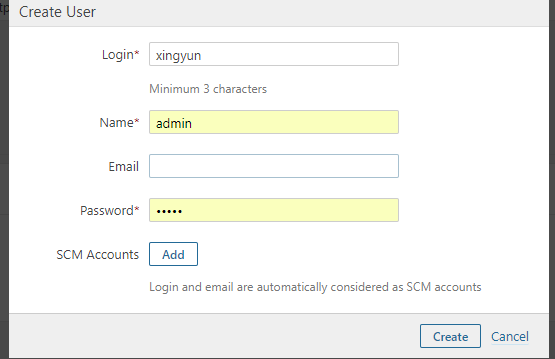
2. 创建一个用户
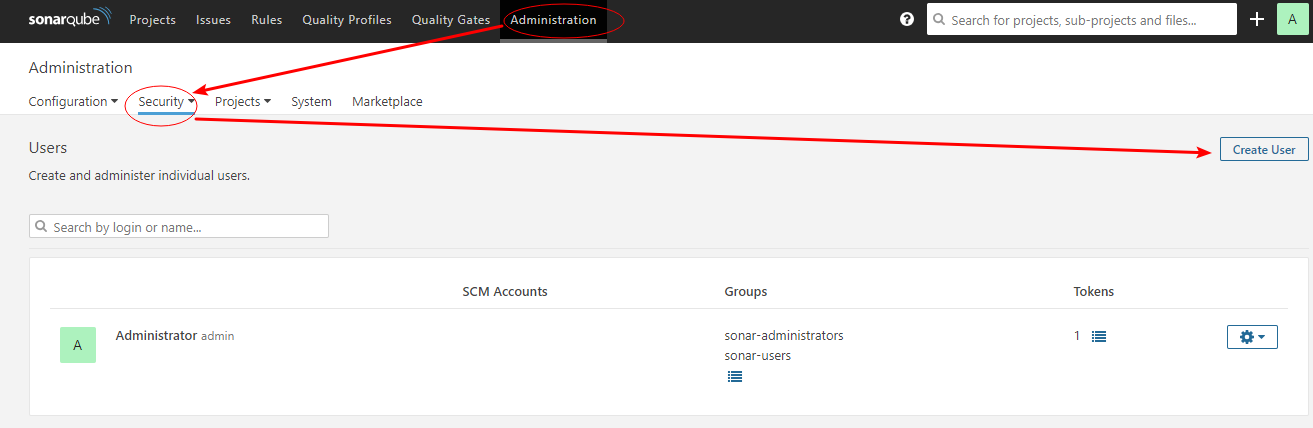
点击创建后输入账号和密码,输入Email , 然后点击create 即可
3. 点击下图位置

弹出如下对话框
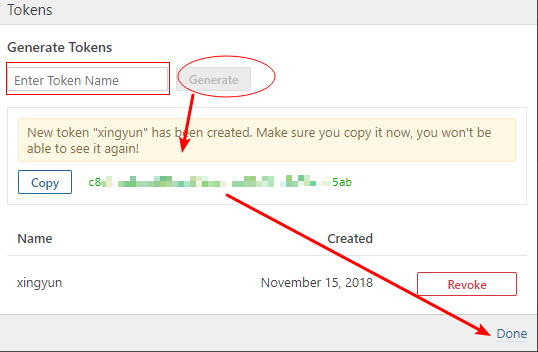
执行成功后如下所示:

点击sonar-users 下的图标,弹出如下图所示
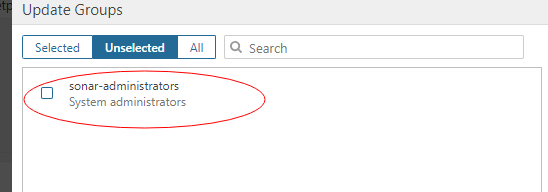
勾选后点击done 完成
将Execute Analysis 下对勾勾选,即可为该用户组添加分析执行权限

由于我们创建的用户属于这两个用户组,所以给这个组赋予权限,那么我们的用户便也有权限了。
参考资料:https://docs.sonarqube.org/latest/instance-administration/security/
恢复管理员访问权限
如果您更改了admin密码然后丢失了密码,则可以使用以下查询重置密码:
update users set crypted_password = '$2a$12$uCkkXmhW5ThVK8mpBvnXOOJRLd64LJeHTeCkSuB3lfaR2N0AYBaSi', salt=null, hash_method='BCRYPT' where login = 'admin'
如果您已删除admin并随后锁定具有全局管理权限的其他用户,则需要admin使用以下查询重新授予用户:
INSERT INTO user_roles(user_id, role) VALUES ((select id from users where login='mylogin'), 'admin');
参考模板示例一:
pom.xml
<project>
<!-- 代码扫描步骤 --> <profiles> <profile> <id>sonar</id> <activation> <activeByDefault>true</activeByDefault> </activation> <properties> <sonar.jdbc.url>jdbc:mysql://******:3306/sonar?useUnicode=true&characterEncoding=utf8&rewriteBatchedStatements=true&useConfigs=maxPerformance</sonar.jdbc.url> <sonar.jdbc.driver>com.mysql.jdbc.Driver</sonar.jdbc.driver> <sonar.jdbc.username>sonar</sonar.jdbc.username> <sonar.jdbc.password>sonar</sonar.jdbc.password> <sonar.host.url>http://172.*.*.*:9000</sonar.host.url> <sonar.login>ce57e****************4a8969</sonar.login> <sonar.sourceEncoding>UTF-8</sonar.sourceEncoding> <sonar.sonar.test.inclusions>.</sonar.sonar.test.inclusions> <sonar.exclusions>src/test/java/**</sonar.exclusions> </properties> </profile> <profile> <id>sonar-coverage</id> <activation> <activeByDefault>true</activeByDefault> </activation> <build> <pluginManagement> <plugins> <plugin> <groupId>org.jacoco</groupId> <artifactId>jacoco-maven-plugin</artifactId> <version>0.7.9</version> </plugin> </plugins> </pluginManagement> <plugins> <plugin> <groupId>org.jacoco</groupId> <artifactId>jacoco-maven-plugin</artifactId> <configuration> <append>true</append> </configuration> <executions> <execution> <id>agent-for-ut</id> <goals> <goal>prepare-agent</goal> </goals> </execution> <execution> <id>jacoco-site</id> <phase>verify</phase> <goals> <goal>report</goal> </goals> </execution> </executions> </plugin> </plugins> </build> </profile> </profiles>
</project>
参考模板示例二:
pom.xml<project xmlns="http://maven.apache.org/POM/4.0.0" xmlns:xsi="http://www.w3.org/2001/XMLSchema-instance" xsi:schemaLocation="http://maven.apache.org/POM/4.0.0 http://maven.apache.org/xsd/maven-4.0.0.xsd"> <modelVersion>4.0.0</modelVersion> <groupId>com.xingyun</groupId> <artifactId>SpringStaticFactoryPatternSample</artifactId> <version>0.0.1-SNAPSHOT</version> <!-- 非必须中间的可删除 --> <dependencies> <!-- https://mvnrepository.com/artifact/commons-logging/commons-logging --> <dependency> <groupId>commons-logging</groupId> <artifactId>commons-logging</artifactId> <version>1.2</version> </dependency> <!-- https://mvnrepository.com/artifact/org.springframework/spring-context --> <dependency> <groupId>org.springframework</groupId> <artifactId>spring-context</artifactId> <version>5.1.2.RELEASE</version> </dependency> <!-- https://mvnrepository.com/artifact/org.springframework/spring-core --> <dependency> <groupId>org.springframework</groupId> <artifactId>spring-core</artifactId> <version>5.1.2.RELEASE</version> </dependency> <!-- https://mvnrepository.com/artifact/org.springframework/spring-beans --> <dependency> <groupId>org.springframework</groupId> <artifactId>spring-beans</artifactId> <version>5.1.2.RELEASE</version> </dependency> </dependencies> <!-- 非必须中间的可删除 --> <profiles> <profile> <id>sonar</id> <activation> <activeByDefault>true</activeByDefault> </activation> <properties> <!-- Optional URL to server. Default value is http://localhost:9000 --> <sonar.host.url>http://localhost:9000</sonar.host.url> <!-- 配置字符编码 --> <sonar.sourceEncoding>UTF-8</sonar.sourceEncoding> <!-- 该项目的独特关键。允许的字符是:字母,数字 - , _ , . 和 : ,与至少一个非数字字符。 --> <sonar.projectKey>:</sonar.projectKey> <!-- 包含源文件的目录的逗号分隔路径。 --> <sonar.sources></sonar.sources> <!-- 将在Web界面上显示的项目的名称。 --> <sonar.projectName>Custom Project</sonar.projectName> <!-- 项目版本 --> <sonar.projectVersion>V0.0.1</sonar.projectVersion> <sonar.coverage.jacoco.xmlReportPaths>target/site/jacoco/jacoco.xml</sonar.coverage.jacoco.xmlReportPaths> </properties> </profile> </profiles> <build> <pluginManagement> <plugins> <!-- 配置编译插件 --> <plugin> <groupId>org.apache.maven.plugins</groupId> <artifactId>maven-compiler-plugin</artifactId> <version>3.8.0</version> <configuration> <source>1.8</source> <target>1.8</target> </configuration> </plugin> </plugins> </pluginManagement> </build> </project>