概述
Android SDK 为我们提供了一套完整的组件库,数量多、功能强,涉及到方方面面,但是,我们依然看到软件市场上的每个 App 都有自己独特的东西,绝不是千遍一律的,而且也会和 IOS相互借鉴,这就需要我们对组件进行定制,实现自己独树一帜的用户体验和界面风格。自定义组件到底难不难呢?如果前面五章的内容掌握好了,其实并不难。不管是普通的组件还是容器,开发时都有章可循的,找到其中的规律,根据实际的用户需求,一步步慢慢就能实现。学习要从简单的开始,不要想着一口吃成胖子,眼高手低,而是慢慢加大难度,循序渐进,方可成佛。另外,建议多阅读优秀源码,学习别人的思维模式和编程技巧,可能会有豁然开朗的功效。当然,最好的源码自然是 Google 提供的官方 Android API Demos 了,里面包含了开发的方方面面,这是一份最权威的 Demo 源码。
通常来说,自定义组件有三种定义方式:
Ø 从 0 开始定义自定义组件,组件类继承自 View;
Ø 从已有组件扩展,比如,从 ImageView 类扩展出功能更强或者更有个性化的组件;
Ø 将多个已有组件合成一个新的组件,比如,侧边带字母索引的 ListView。
本书将向大家介绍这三种组件的创建方式。技术永远说不完,最重要的是大家在学习过程中要触类旁通,举一反三,将技术学“活”。还是那句话,实践是通往真理的唯一通道。
自定义组件的基本结构
组件主要由两部分构成:组件类和属性定义。我们从第一种定义方式说起。
创建自定义组件类最基本的做法就是继承自类 View,其中,有三个构造方法和两个重写的
方法又是重中之重。下面是自定义组件类的基本结构:
public class FirstView extends View {
    public FirstView(Context context) {
        super(context);
    }

    public FirstView(Context context, @Nullable AttributeSet attrs) {
        super(context, attrs);
    }


    @Override
    protected void onDraw(Canvas canvas) {
        super.onDraw(canvas);
    }

    @Override
    protected void onMeasure(int widthMeasureSpec, int heightMeasureSpec) {
        super.onMeasure(widthMeasureSpec, heightMeasureSpec);
    }
}
上述代码中,我们定义了一个名为 FirstView 的类,该类继承自 View,同时,为该类定义了三个构造方法并重写了另外两个方法:
Ø 构造方法
public FirstView(Context context)
public FirstView(Context context, AttributeSet attrs)
public FirstView(Context context, AttributeSet attrs, int defStyleAttr)
这三个构造方法的调用场景其实并不一样,第一个只有一个参数,在代码中创建组件
时会调用该构造方法,比如创建一个按钮:Button btnOK = new Button(this),this 是指
当前的 Activity,Activity 是 Context 的子类。第二个方法在 layout 布局文件中使用时调
用,参数 attrs 表示当前配置中的属性集合,例如在要 layout.xml 中定义一个按钮:
<Button android:layout_width = "match_parent" android:layout_height = "wrap_co-ntent"android:text = "OK"/>Android 会调用第二个构造方法 Inflate 出 Button 对象。而第三
个构造方法是不会自动调用的,当我们在 Theme 中定义了 Style 属性时通常在第二个
构造方法中手动调用。
Ø 绘图
protected void onDraw(Canvas canvas)
该方法我们再熟悉不过了,前面 5 个章节一直重写了该方法,用于显示组件的外观。
最终的显示结果需要通过 canvas 绘制出来。在 View 类中,该方法并没有任何的默认
实现。
Ø 测量尺寸
protected void onMeasure(int widthMeasureSpec, int heightMeasureSpec)
这是一个 protected 方法,意味着该方法主要用于子类的重写和扩展,如果不重写该方
法,父类 View 有自己的默认实现。在 Android 中,自定义组件的大小都由自身通过
onMeasure()进行测量,不管界面布局有多么复杂,每个组件都负责计算自己的大小。
重写 onMeasure 方法
View 类对于 onMeasure()方法有自己的默认实现。
protected void onMeasure(int widthMeasureSpec, int heightMeasureSpec) {
setMeasuredDimension(getDefaultSize(
getSuggestedMinimumWidth(), widthMeasureSpec),
getDefaultSize(getSuggestedMinimumHeight(), heightMeasureSpec));
}
在该方法中,调用了 protected final void setMeasuredDimension(int measured-Width, int
measuredHeight)方法应用测量后的高度和宽度,这是必须调用的,以后我们可以调用
getMeasuredWidth()和 getMeasuredHeight()方法获取这个宽度和高度值。大部分情况下,protected void onMeasure(int widthMeasureSpec, int heightMeasureSpec)方法都要重写,用于计算组件的宽度值和高度值。定义组件时,必须指定 android:layout_width 和android:layout_height 属性,属性值有三种情况:match_parent、wrap_content 和具体值。match_parent 表示组件的大小跟随父容器,所在的容器有多大,组件就有多大;wrap_content 表示组件的大小则内容决定,比如 TextView 组件的大小由文字的多少决定,ImageView 组件的大小由图片的大小决定;如果是一个具体值,相对就简单了,直接指定即可,单位为 dp。
总结来说,不管是宽度还是高度,都包含了两个信息:模式和大小。模式可能是match_parent、wrap_content 和具体值的任意一种,大小则要根据不同的模式进行计算。其实 match_parent 也是一个确定了的具体值,为什么这样说呢?因为 match_parent 的大小跟随父容器,而容器本身也是一个组件,他会算出自己的大小,所以我们根本不需要去重复计算了,父容器多大,组件就有多大,View 的绘制流程会自动将父容器计算好的大小通过参数传过来。
模式使用三个不同的常量来区别:
Ø MeasureSpec.EXACTLY
当组件的尺寸指定为 match_parent 或具体值时用该常量代表这种尺寸模式,很显然,处于该模式的组件尺寸已经是测量过的值,不需要进行计算。
Ø MeasureSpec.AT_MOST
当组件的尺寸指定为wrap_content时用该常量表示,因为尺寸大小和内容有关,所以,我们要根据组件内的内容来测量组件的宽度和高度。比如 TextView 中的 text 属性字符串越长,宽度和高度就可能越大。
Ø MeasureSpec.UNSPECIFIED
未指定尺寸,这种情况不多,一般情况下,父控件为 AdapterView 时,通过 measure 方
法传入。
最后,我们来考虑最关键的问题,如何获得当前组件的尺寸模式和尺寸大小?秘密隐藏在
protected void onMeasure(int widthMeasureSpec, int heightMeasure-Spec)方法的参数中,参数widthMeasureSpec 和 heightMeasureSpec 看起来只是两个整数,其实每个参数都包含了两个值:模式和尺寸。我们知道,int 类型占用 4 个字节,一共 32 位,参数 widthMeasureSpec 和heightMeasureSpec 的前两位代表模式,后 30 位则表示大小。

真相大白,接下来继续思考如何获取 widthMeasureSpec 和 heightMeasureSpec 参数的前 2 位与后 30 位,其实通过位运算即可得到,我们以 widthMeasureSpec 为例:
获取尺寸模式:widthMeasureSpec & 0x3 << 30
获取尺寸大小:widthMeasureSpec << 2 >> 2
上面的写法不一而足,显然,这样会给开发人员带来难度,所以,提供了一个名为MeasureSpec 的类用于计算模式和大小:
int mode = MeasureSpec.getMode(widthMeasureSpec);
int size = MeasureSpec.getSize(widthMeasureSpec);
现在,我们来看看 onMeasure()的基本写法吧,因为要同时考虑宽度和高度,往往会定义两个方法分别计算,这样显然有更清晰的思路和逻辑。
public class FirstView extends View {
    public FirstView(Context context) {
        super(context);
    }

    public FirstView(Context context, AttributeSet attrs) {
        super(context, attrs);
    }

    public FirstView(Context context, AttributeSet attrs, int defStyleAttr) {
        super(context, attrs, defStyleAttr);
    }

    @Override
    protected void onDraw(Canvas canvas) {
        super.onDraw(canvas);
    }

    @Override
    protected void onMeasure(int widthMeasureSpec, int heightMeasureSpec) {
        int width = measureWidth(widthMeasureSpec);
        int height = measureHeight(heightMeasureSpec);
        setMeasuredDimension(width, height);
    }

    private int measureWidth(int widthMeasureSpec) {
        int mode = MeasureSpec.getMode(widthMeasureSpec);
        int size = MeasureSpec.getSize(widthMeasureSpec);
        int width = 0;
        if (mode == MeasureSpec.EXACTLY) {
            //宽度为 match_parent 和具体值时,直接将 size 作为组件的宽度
            width = size;
        } else if (mode == MeasureSpec.AT_MOST) {
            //宽度为 wrap_content,宽度需要计算
        }
        return width;
    }

    private int measureHeight(int heightMeasureSpec) {
        int mode = MeasureSpec.getMode(heightMeasureSpec);
        int size = MeasureSpec.getSize(heightMeasureSpec);
        int height = 0;
        if (mode == MeasureSpec.EXACTLY) {
            //宽度为 match_parent 和具体值时,直接将 size 作为组件的高度
            height = size;
        } else if (mode == MeasureSpec.AT_MOST) {
            //高度为 wrap_content,高度需要计算
        }
        return height;
    }
}
上面的代码依然什么事也干不了,表达的是一种基本思路。我们定义了一个组件类FirstView,从 View 类派生;定义了三个构造方法(虽然什么都没干),重写了 onDraw()方法用于绘制组件外的外观(这里啥都没干);重写的 onMeasure()方法用于计算组件的高度和宽度(嗯,measure 的意思是测量,我们直接理解成计算好了),在该方法中,定义了两个方法,其中 measureWidth()方法用于计算组件的宽度,如果组件的 layout_width 属性为 match_parent 或指定了具体值,则直接从参数 widthMeasureSpec 获取,如果为 wrap_content,则要通过计算才能得到(因为没有设定具体的功能,所以我们也不知道该干什么)。另一个方法 measureHeight()则用于计算组件的高度,代码实现和 measureWidth()类似,不再赘述。
那么,为了充分说明 onMeasure()方法的作用,我们将 FirstView 模拟 TextView 的功能,也就是在组件中绘制文字,为了简单起见,我们只考虑一行文字(多行文字会让代码变得十分复杂)。
在本案例中,比较麻烦的是绘制文字时,public void drawText(String text, float x, float y, Paint paint)方法中参数 y 的确定,这要从字体的基本结构说起。
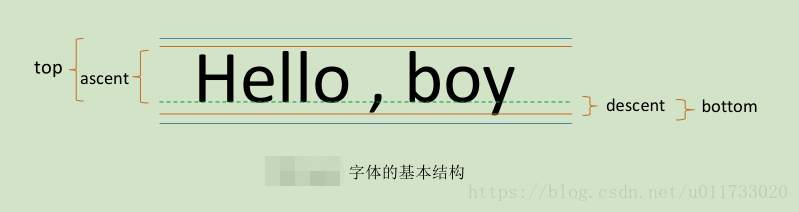
如图 所示,从技术层面上来说,字符由下面几个部分构成,从文字上理解可能比较晦涩,
通过所示的示意图也许很容易找到答案。简单来说,常用字符的高度是 ascent 和 descent 的和,但是,一些特殊字符比如拼音的音调等则会延伸到 top 的位置。
Ø baseline:基准点;
Ø ascent:baseline 之上至字符最高处的距离;
Ø descent:baseline 之下至字符最低处的距离;
Ø top:字符可达最高处到 baseline 的值,即 ascent 的最大值;
Ø bottom:字符可达最低处到 baseline 的值,即 descent 的最大值。
在 Android 中,字体的信息使用 Paint.FontMetrics 类来表示,该类源码如下:
public static class FontMetrics {
public float top;
public float ascent;
public float descent;
public float bottom;
public float leading;
}
FontMetrics 类作为 Paint 的内部类,定义了 5 个属性,除了 leading 在上面没有说明外,其他都有图示与说明。leading 是指上一行字符的 descent 到下一行的 ascent 之间的距离,因为案例中只显示单行字符,所以我们并不打算关注。
要获取 FontMetrics 对象,调用 Paint 类的 getFontMetrics()即可,而在 drawText()方法中,参数 y 就是 baseline 的值,因为 FontMetrics 类并没有声明 baseline 属性,所以,我们需要通过下面的公式计算出来:int baseline = height / 2 + (fontMetrics.descent - fontMetrics.ascent) / 2 - fontMetrics.descent
其中,height 是文字所在区域的高度。
下面是 FirstView 类的完整实现,我们定义了一个方法 private Rect getTextRect()用于获取文字所占的区域大小,measureWidth()和 measureHeight()方法也作了修改。
public class FirstView extends View {
    private static final String TEXT = "FirstView  绘制文字";
    private Paint paint;
    public FirstView(Context context) {
        super(context);
    }
    public FirstView(Context context, AttributeSet attrs) {
        super(context, attrs);
        paint = new Paint(Paint.ANTI_ALIAS_FLAG);
        paint.setTextSize(100);
        paint.setColor(Color.RED);
    }
    public FirstView(Context context, AttributeSet attrs, int defStyleAttr) {
        super(context, attrs, defStyleAttr);
    }
    @Override
    protected void onDraw(Canvas canvas) {
        super.onDraw(canvas);
        //将文字放在正中间
        Rect textRect = this.getTextRect();
        int viewWidth = getMeasuredWidth();
        int viewHeight = getMeasuredHeight();
        Paint.FontMetrics fontMetrics = paint.getFontMetrics();
        int x = (viewWidth - textRect.width()) / 2;
        int y = (int) (viewHeight / 2 +
                (fontMetrics.descent- fontMetrics.ascent) / 2
                - fontMetrics.descent);
        canvas.drawText(TEXT, x, y, paint);
    }
    @Override
    protected void onMeasure(int widthMeasureSpec, int heightMeasureSpec) {
        Rect rect = getTextRect();
        int textWidth = rect.width();
        int textHeight = rect.height();
        int width = measureWidth(widthMeasureSpec, textWidth);
        int height = measureHeight(heightMeasureSpec, textHeight);
        setMeasuredDimension(width, height);
    }
    /**
     * 获取文字所占的尺寸
     * @return
     */
    private Rect getTextRect(){
        //根据 Paint 设置的绘制参数计算文字所占的宽度
        Rect rect = new Rect();
        //文字所占的区域大小保存在 rect 中
        paint.getTextBounds(TEXT, 0, TEXT.length(), rect);
        return rect;
    }
    /**
     * 测量组件宽度
     * @param widthMeasureSpec
     * @param textWidth 文字所占宽度
     * @return
     */
    private int measureWidth(int widthMeasureSpec, int textWidth){
        int mode = MeasureSpec.getMode(widthMeasureSpec);
        int size = MeasureSpec.getSize(widthMeasureSpec);
        int width = 0;
        if(mode == MeasureSpec.EXACTLY){
            //宽度为 match_parent 和具体值时,直接将 size 作为组件的宽度
            width = size;
        }else if(mode == MeasureSpec.AT_MOST){
            //宽度为 wrap_content,宽度需要计算,此处为文字宽度
            width = textWidth;
        }
        return width;
    }
    /**
     * 测量组件高度
     * @param heightMeasureSpec
     * @param textHeight 文字所占高度
     * @return
     */
    private int measureHeight(int heightMeasureSpec, int textHeight){
        int mode = MeasureSpec.getMode(heightMeasureSpec);
        int size = MeasureSpec.getSize(heightMeasureSpec);
        int height = 0;
        if(mode == MeasureSpec.EXACTLY){
            //宽度为 match_parent 和具体值时,直接将 size 作为组件的高度
            height = size;
        }else if(mode == MeasureSpec.AT_MOST){
            //高度为 wrap_content,高度需要计算,此处为文字高度
            height = textHeight;
        }
        return height;
    }
}
上述代码中,测试组件宽度时,定义了 private int measureWidth(int widthMeasureSpec, int textWidth)方法,如果尺寸模式为 MeasureSpec.EXACTLY,表示宽度可能为 match_parent 或精确值,直接将获取的尺寸大小返回。如果尺寸模式为 MeasureSpec.AT_MOST,表示宽度为wrap_content,则需要计算组件的宽度,因为组件内容为文字,所以文字占用的宽度是多少组件的宽度也是多少,此时,组件的宽度就是 textWidth。测量高度也是同样的道理。
重写 onDraw()方法绘制组件外观时,需要将文字在指定的位置上绘制出来,x 方向比较简单,其值为组件宽度减去文字所占宽度除以 2;而 y 的大小则是字体的 baseline 值,其大小为viewHeight / 2 + (fontMetrics.descent- fontMetrics.ascent) / 2 - fontMetrics.descent,viewHeight 是组件测量后的高度。
最后,我们比较一下 layout_width 和 layout_height 两个属性的值在不同情况下的运行结果。
组件属性
在 FirstView 组件类中,要显示的文字定义成了常量——private static final String TEXT = “FirstView 绘制文字”,显然,这并不可取,我们应该可以随意定义文字,这需要用到组件的属性。
从 View 继承后,View 已经具备了若干默认属性,比如 layout_width、layout_height,所以,在 FirstView 类中,指定该类的宽度和高度时,我们并没有特别定义和编程。大家找到
sdk/platforms/android-21/data/res/values/attrs.xml 文 件 , 打 开 后 , 定 位 到
<declare-styleablename="View">这一行,接下来的 500 多行都是与 View 的默认属性有关的,常用的属性比如layout_width、layout_height、background、alpha 等属性都是默认的属性。您可以打开上述文件进行更详细的了解。下面我们将向您介绍自定义属性的定义。
属性的基本定义
除了 View 类中定义的默认属性外,我们也能自定义属性。自定义属性主要有以下几个步骤:
Ø 在 res/values/attrs.xml 文件中为指定组件定义 declare-styleable 标记,并将所有的属性
都定义在该标记中;
Ø 在 layout 文件中使用自定义属性;
Ø 在组件类的构造方法中读取属性值。
在 res/values 目录下,创建 attrs.xml 文件,内容大概如下:
<declare-styleable name="FirstView">
<attr name="attr" format="string"/>
</declare-styleable>
组件的属性都应该定义在 declare-styleable 标记中,该标记的 name 属性值一般来说都是组件类的名称(此处为 FirstView),虽然也可以取别的名称,但和组件名相同可以提高代码的可读性。组件的属性都定义在 declare-styleable 标记内,成为 declare-styleable 标记的子标记,每个属性由两部分组成——属性名和属性类型。属性通过 attr 来标识,属性名为 name,属性类型为format,可选的属性类型如图 所示。
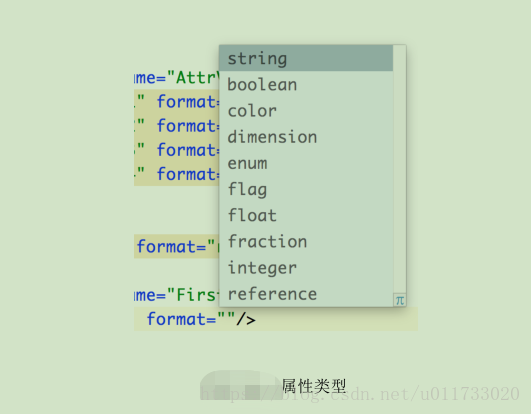
Ø string:字符串
Ø boolean:布尔
Ø color:颜色
Ø dimension:尺寸,可以带单位,比如长度通常为 dp,字体大小通常为 sp
Ø enum:枚举,需要在 attr 标记中使用标记定义枚举值,例如 sex 作为性别,有
两个枚举值:MALE 和 FEMALE。
<attr name="sex" format="enum">
<enum name="MALE" value="0"/>
<enum name="FEMALE" value="1"/>
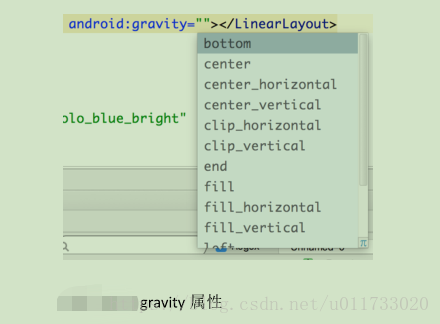
</attr>Ø flag:标识位,常见的 gravity 属性就是属性该类型,如图 所示。
flag 类型的属性也有一个子标记,语法形如:
<attr name="x" format="flag">
<flag name="f1" value="0"/>
<flag name="f2" value="1"/>
</attr>
Ø float:浮点数
Ø fraction:百分数,在动画资源<scale>、<rotate>等标记中,fromX、fromY 等属性就是
fraction 类型的属性
Ø integer:整数
Ø reference : 引 用 , 引 用 另 一 个 资 源 , 比 如 android:paddingRight=-
“@dimen/activity_horizontal_margin”就是引用了一个尺寸资源。
在 FirstView 组件中,text 应该作为属性来定义,并且为 string 类型,我们在 attrs.xml 中定义如下的 xml 内容:
<?xml version="1.0" encoding="utf-8"?>

<resources>
    <declare-styleable name="FirstView">
        <attr name="text" format="string" />
    </declare-styleable>
</resources>
上述的属性配置好之后,会在工程的 R.java 文件中自动生成形如下面的索引,读取属性时将会使用这些索引名称来进行访问。
public static final int[] FirstView = {
0x7f01002d
};
public static final int FirstView_text = 0;
定义好属性的名称和类型后,属性就可以使用了,在布局文件 layout.xml 中,首先要定义好属性的命名空间(namespace),默认情况下,xml 文件中的根元素按如下定义:
<?xml version="1.0" encoding="utf-8"?>

<RelativeLayout xmlns:android="http://schemas.android.com/apk/res/android"
    xmlns:tools="http://schemas.android.com/tools" android:layout_width="match_parent"
    android:layout_height="match_parent"
    android:paddingLeft="@dimen/activity_horizontal_margin"
    android:paddingRight="@dimen/activity_horizontal_margin"
    android:paddingTop="@dimen/activity_vertical_margin"
    android:paddingBottom="@dimen/activity_vertical_margin" tools:context=".MainActivity">
</RelativeLayout>
默 认 的 命 名 空 间 为 “android” , 是 由 语 句 xmlns:android=
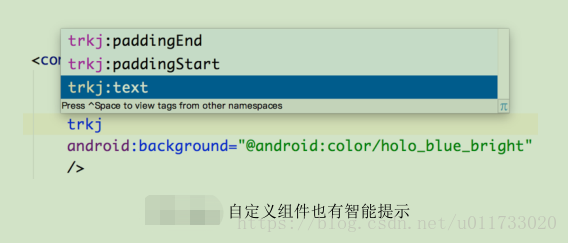
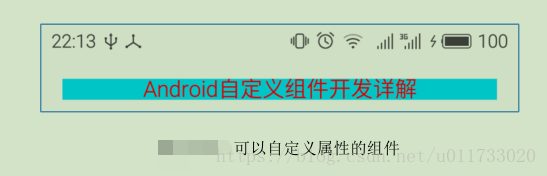
“http://schemas.android.com/apk/res/android 决定的,对于自定义属性来说,必须定义其他的命名空间,且必须按下面的要求定义:xmlns:trkj=”http://schemas.android.com/apk/res-auto”其中 , trkj 是自定义的命名空间 , 也可以使用其他代替 , 后面的http://schemas.android.com/apk/res-auto 则是固定的,有了这个命名空间后,访问前面的 text 属性则应该这样赋值:trkj:text=”Android 自定义组件开发详解”。事实上,IDE 也有相应的提示(Android Studio 的智能提示功能比 eclipse ADT 要强大得多,在 attrs.xml 文件中后者没有提示),如图所示。
完整的 xml 配置如下(请注意下划线部分):
<?xml version="1.0" encoding="utf-8"?>
<RelativeLayout xmlns:android="http://schemas.android.com/apk/res/android"
xmlns:trkj="http://schemas.android.com/apk/res-auto"
xmlns:tools="http://schemas.android.com/tools"
android:layout_width="match_parent"
android:layout_height="match_parent"
android:paddingLeft="@dimen/activity_horizontal_margin"
android:paddingRight="@dimen/activity_horizontal_margin"
android:paddingTop="@dimen/activity_vertical_margin"
android:paddingBottom="@dimen/activity_vertical_margin" tools:context=".MainActivity">
<bczm.graphics.view.FirstView
android:layout_width="match_parent"
android:layout_height="wrap_content"
trkj:text="Android 自定义组件开发详解"
android:background="@android:color/holo_blue_bright"/>
</RelativeLayout>
接下来我们需要在 FirstView 类中读取 trkj:text 属性,组件运行后,所有属性都将保存在
AttributeSet 集合中并通过构造方法传入,我们通过 TypedArray 可以读取出指定的属性值。
public FirstView(Context context, AttributeSet attrs) {
super(context, attrs);
……
//读取属性值
TypedArray a = context.obtainStyledAttributes(attrs, R.styleable.FirstView);
text = a.getString(R.styleable.FirstView_text);
a.recycle();
}
语 句 TypedArray a = context.obtainStyledAttributes(attrs, R.styleable.FirstView) 中 参 数
R.styleable.FirstView 是<declare-styleable name="FirstView">配置中的 name 值,TypedArray 对象的getString()方法用于读取特定属性的值(R.styleable.FirstView_text 是指 text 属性),TypedArray 类中定义了很多 getXXX()方法,“XXX”代表对应属性的类型,有些 get 方法有两个参数,第二个参数通常是指默认值。最后,需要调用 TypedArray 的 recycle()方法释放资源。
至此,FirstView 已经修改完成了,因为改动并不大,限于篇幅,这里我们把改动的代码列出来,并用下划线标识。
改动 1:
public class FirstView extends View {
private static final String TEXT = "FirstView  绘制文字";
private String text;
改动 2:
public FirstView(Context context, AttributeSet attrs) {
……
//读取属性值
TypedArray a = context.obtainStyledAttributes(attrs, R.styleable.FirstView);
text = a.getString(R.styleable.FirstView_text);
a.recycle();
}
改动 3:
private Rect getTextRect(){
//根据 Paint 设置的绘制参数计算文字所点的宽度
Rect rect = new Rect();
//文字所占的区域大小保存在 rect 中
paint.getTextBounds(this.text, 0, this.text.length(), rect);
return rect;
}
改动 4:
protected void onDraw(Canvas canvas) {
……
canvas.drawText(this.text, x, y, paint);
}
运行效果图如图所示。
读取来自 style 和 theme 中的属性
组件的属性可以在下面 4 个地方定义:
Ø 组件
Ø 组件的 style 属性
Ø theme
Ø theme 的 style 属性
这个问题说起来可能有点儿绕,所以我们索性通过一个案例来进行学习和讲解。假如我们有一个组件类 AttrView,从 View 类派生,AttrView 类有 4 个属性:attr1、attr2、attr3、attr4。另外,定义了一个属性 myStyle,该属性定义在 declare-styleable 标记之外,类型为 reference,用于theme 的 style 属性。这些属性在 res/values/attrs.xml 文件中定义如下:
<?xml version="1.0" encoding="utf-8"?>
<resources>
<declare-styleable name="AttrView">
<attr name="attr1" format="string"></attr>
<attr name="attr2" format="string"></attr>
<attr name="attr3" format="string"></attr>
<attr name="attr4" format="string"></attr>
</declare-styleable>
<attr name="myStyle" format="reference"></attr>
</resources>
我们将这 4 个属性应用在不同的场合,分别为组件、组件的 style 属性、theme 和 theme 的style 属性。
attr_layout.xml:
<?xml version="1.0" encoding="utf-8"?>
<LinearLayout xmlns:android="http://schemas.android.com/apk/res/android"
xmlns:trkj="http://schemas.android.com/apk/res-auto"
android:orientation="vertical" android:layout_width="match_parent"
android:layout_height="match_parent">
<com.trkj.lizanhong.chapter6.AttrView
android:layout_width="match_parent"
android:layout_height="match_parent"
trkj:attr1="attr1"
style="@style/viewStyle"/>
</LinearLayout>
trkj:attr1=”attr1” 应 用 了 属 性 attr1 , style=”@style/viewStyle” 应 用 了 属 性 attr2 , 其 中@style/viewStyle 定义在 res/values/style.xml 文件中,当然,该文件还定义了整个 App 工程的主题(theme),配置如下:
style.xml:
<resources>
<!-- Base application theme. -->
<style name="AppTheme" parent="Theme.AppCompat.Light.DarkActionBar">
<item name="attr3">attr3</item>
<item name="myStyle">@style/ myDefaultStyle</item>
</style>
<style name=" myDefaultStyle">
<item name="attr4">attr4</item>
</style>
<style name="viewStyle">
<item name="attr2">attr2</item>
</style>
</resources>
在工程的主题(theme) AppTheme 中,应用了属性 attr3,同时应用了 style 属性 myStyle,该 style 属性又引用了@style/ myDefaultStyle,@style/ myDefaultStyle 中应用了属性 attr4。总结起来,attr1 是组件的直接属性,attr2 是组件的 style 属性引用的属性,attr3 是工程主题(theme)属性,attr4 是工程主题(theme)的 style 属性。现在,我们在 AttrView 构造方法中读取这 4 个属性值。
public class AttrView extends View {
private static final String TAG = "AttrView";
public AttrView(Context context) {
super(context);
}
public AttrView(Context context, AttributeSet attrs) {
this(context, attrs, R.attr.myStyle);
}
public AttrView(Context context, AttributeSet attrs, int defStyleAttr) {
super(context, attrs, defStyleAttr);
TypedArray a = context.obtainStyledAttributes(attrs, R.styleable.AttrView,
defStyleAttr, R.style. myDefaultStyle);
String attr1 = a.getString(R.styleable.AttrView_attr1);
String attr2 = a.getString(R.styleable.AttrView_attr2);
String attr3 = a.getString(R.styleable.AttrView_attr3);
String attr4 = a.getString(R.styleable.AttrView_attr4);
Log.i(TAG, attr1 + "");
Log.i(TAG, attr2 + "");
Log.i(TAG, attr3 + "");
Log.i(TAG, attr4 + "");
}
}
我们在 AttrView(Context context, AttributeSet attrs)构造方法中,调用了 AttrView(Context
context, AttributeSet attrs, int defStyleAttr)构造方法,与上一个案例相比,我们调用了另一个重载的 obtainStyledAttributes()方法,该方法的原型为:
public TypedArray obtainStyledAttributes (AttributeSet set, int[] attrs, int defStyleAttr, int
defStyleRes),我们来了解一下该方法参数作用:
set:属性值的集合。
attrs:我们要获取的属性的资源 ID 的一个数组,我们定义了 attr1、attr2、attr3 和 attr4,这
4 个属性自动生成的索引会存储到 R.styleable.AttrView 数组中,该数组就是 attrs 参数。
public static final int[] AttrView = {
0x7f010020, 0x7f010021, 0x7f010022, 0x7f010023
};
defStyleAttr:当前 Theme 中 style 属性,如果组件和组件的 style 属性都没有为 View 指定属性时,将从 Theme 的 Style 中查找相应的属性值。
defStyleRes:指向一个 Style 的资源 ID,但是仅在 defStyleAttr 为 0 或 defStyleAttr 不为 0 但Theme 中没有为 defStyleAttr 属性赋值时起作用。
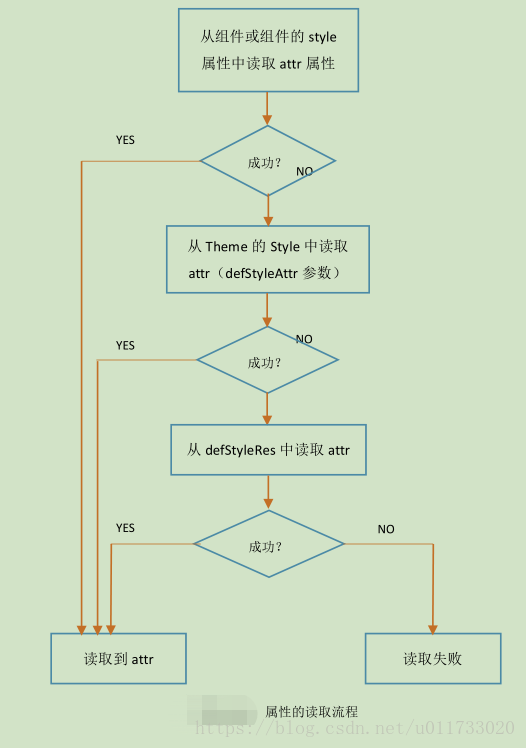
我们通过如图所示的流程图来了解 View 是如何读取属性的。图中我们试图读取 attr 属
性,从流程图中也可以看出各个环节的优先级顺序。
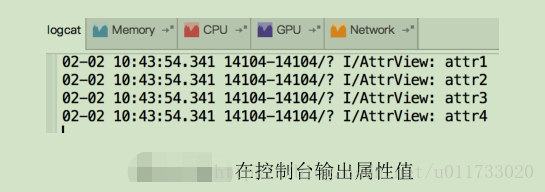
如图是最后的运行结果,在控制台输出了每一个属性的值。大家也可以思考一下如果
同一个属性在不同的地方都出现,根据优先级关系判断最后输出的属性值是多少。
案例 1 : 圆形 ImageView 组件
ImageView 是我们常用的组件之一,但该组件存在一定的局限性,比如只能显示矩形的图片,现在很多 App 在显示头像时都支持圆形或其他形状,所以,我们将向大家介绍如何定制支持圆形图片的 ImageView 组件。
因为是显示图片,我们自然想到组件类应该继承自 ImageView,ImageView 已经帮我们做了大部分工作,比如已经重写了 onMeasure()方法,不再需要重新计算尺寸,设置图片也已经实现了。我们还要添加一些功能,比如显示出来的图片是圆的,支持添加圆形框线,为圆形框线指定颜色和大小等等。另外,还要删除 ImageView 与本需求冲突的功能,ImageView 支持 scaleType,用于定指图片的缩放类型,但我们打算把这个功能删除(别问为什么,任性!^_^)。要提醒的是,其实我们最终显示的图片是一个椭圆,如果要显示成圆形,请将组件的宽度和高度设成一致。
首先,我们事先定义两个属性:圆形框线的粗细与颜色,定义粗细时使用 dimension 类型,而颜色则使用 color 类型。
attrs.xml:
<declare-styleable name="CircleImageView">
<attr name="circle_border" format="dimension"></attr>
<attr name="circle_border_color" format="color"></attr>
</declare-styleable>
其次,定义 CircleImageView 组件类,该类继承自 ImageView 类。
public class CircleImageView extends ImageView {
    private static final String TAG = "CircleImageView";
    private Paint paint;
    private Xfermode xfermode ;
    private Path path = new Path();
    private int border;
    private int borderColor;
    public CircleImageView(Context context) {
        super(context);
    }
    public CircleImageView(Context context, AttributeSet attrs) {
        this(context, attrs, 0);
    }
    public CircleImageView(Context context, AttributeSet attrs, int defStyleAttr) {
        super(context, attrs, defStyleAttr);
        paint = new Paint(Paint.ANTI_ALIAS_FLAG);
        paint.setColor(Color.BLACK);
        xfermode = new PorterDuffXfermode(PorterDuff.Mode.DST_IN);
        path = new Path();
        TypedArray a = context.obtainStyledAttributes(attrs,
                R.styleable.CircleImageView);
        border = a.getDimensionPixelSize(
                R.styleable.CircleImageView_circle_border, 0);
        borderColor = a.getColor(R.styleable.CircleImageView_circle_border_color,
                Color.GRAY);
        a.recycle();
    }

    @Override
    protected void onDraw(Canvas canvas) {
        Drawable mDrawable = getDrawable();
        if (mDrawable == null) {
            super.onDraw(canvas);
        }
        int width = getMeasuredWidth();
        int height = getMeasuredHeight();
        RectF ovalRect = new RectF(0, 0, width, height);
        int layerId = canvas.saveLayer(getPaddingLeft(), getPaddingTop(), width,
                height, null, Canvas.ALL_SAVE_FLAG);
        Bitmap bitmap = ((BitmapDrawable) mDrawable).getBitmap();
        canvas.drawBitmap(bitmap, new Rect(0, 0, mDrawable.getIntrinsicWidth(),
                mDrawable.getIntrinsicHeight()), ovalRect, null);
        paint.setXfermode(xfermode);
        paint.setStyle(Paint.Style.FILL);
        paint.setColor(Color.BLACK);
        path.reset();
        path.addOval(ovalRect, Path.Direction.CCW);
        canvas.drawPath(path, paint);
        paint.setXfermode(null);
        canvas.restoreToCount(layerId);
//画空心圆
        if(border != 0) {
            paint.setStyle(Paint.Style.STROKE);
            paint.setColor(borderColor);
            paint.setStrokeWidth(border);
            ovalRect.inset(border / 2, border / 2);
            canvas.drawOval(ovalRect, paint);
        }
    }
}
上述代码中,主要重写了 onDraw()方法,ImageView 作为父类,可以通过 src 属性或
setImageResource()、setImageBitmap()等方法设置图片,getDrawable()方法用于获取设置的图片,得到图片后,需要在图片上画一个实心椭圆作为遮罩层,该椭圆是组件的内切椭圆,通过语句RectF ovalRect = new RectF(0, 0, width, height)指定。画椭圆图片时,先创建一个 Layer,调用canvas.drawBitmap(bitmap, new Rect(0, 0, mDrawable.getIntrinsicWidth(),mDrawable.getIntrinsicHeight()), ovalRect, null)语句将图片绘制到 canvas 画布上并进行缩放,然后为 Paint 指定 PorterDuff.Mode.DST_IN 位图模式,在 Path 对象中添加一个椭圆,并与图片进行DST_IN 位图运算(只有 Path 对象才能进行位图运算,不能直接调用 drawOval()方法),于是就得到圆形图片了。
为图片绘制边框线就是一件相对简单的工作了,但也有几个地方需要交待。调用 border =
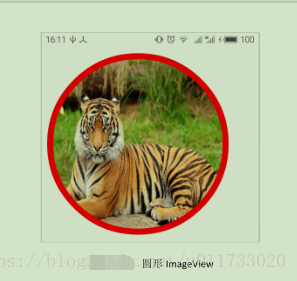
a.getDimensionPixelSize(R.styleable.CircleImageView_circle_border, 0)语句获取边框线的大小后,得到的数据单位始终为像素(px),这样不管使用 dp 还是 sp 都可以得到一致的数值。画边框线时,仅仅只有 border 还是不够的,因为 border 本身占用了一定的宽度,必须调用 ovalRect.inset(border/ 2, border / 2)语句将圆形边框缩小(注意要除以 2)。定义布局文件 circle_imageview.xml,其中 border 为 10dp,颜色为红色。最终的运行效果如图 所示。
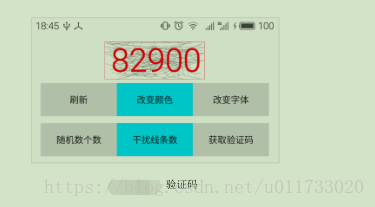
案例 2: 验证码组件
验证码在 Web 开发中非常常见,用于防止非法暴力破解,随着图形识别技术的发展,验证码也越来越复杂化和多样化,以适应当前破解技术的不断提高。本小节将定义一个验证码组件,并为用户提供定制功能,在运行过程中与组件交互。
我们将验证码组件命名为 CodeView,默认情况下,随机生成 4 个数字和 50 条干扰线,如果用户测试次数过多,可以动态加大验证码的难度,比如增加验证码的个数、增加干扰线条数、改变验证码颜色等等。提供的主要功能有:
Ø 刷新验证码
Ø 改变验证码个数
Ø 改变干扰线条数
Ø 改变验证码字体大小
Ø 改变验证码字体颜色
Ø 获取当前验证码
先来看看效果图,如图所示:
本组件的属性主要包括验证码个数、干扰线条数、字体大小和字体颜色,在 attrs.xml 文件中定义如下属性,其中 font_size 表示字体大小,类型为 dimension,到时将使用 sp 作为字体单位。
组件类 CodeView 从 View 中派生,这是一个从 0 开始开发的自定义组件,其实从TextView继承也是一个不错的主意。在 CodeView 类中,定义了如下的成员变量和常量,常量主要是用于定义各属性的缺省值。
  private static final String TAG = "CodeView";
    private int count;//验证码的数字个数
    private int lineCount; //干扰线的条数
    private int fontSize; //字体大小
    private int color;//字体颜色

    private String code;//验证码
    private Random rnd;
    private Paint paint;

    private static final int DEFAULT_COUNT = 4;
    private static final int DEFAULT_LINE_COUNT = 50;
    private static final int DEFAULT_FONT_SIZE = 12;//sp
    private static final int DEFAULT_COLOR = Color.BLACK;
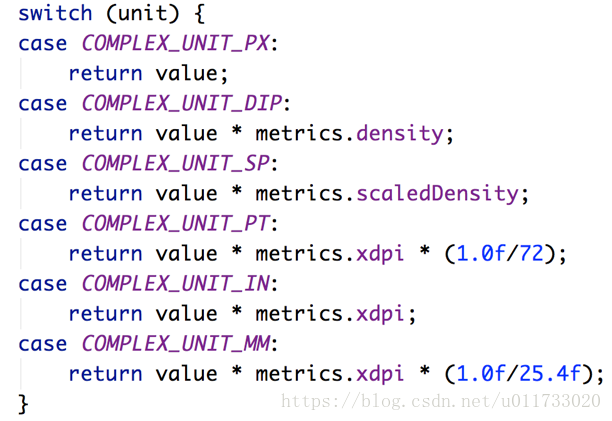
在构造方法 public CodeView(Context context, AttributeSet attrs, int defStyleAttr)中读取出各属性的值,重点强调一下字体大小的读取方法。字体大小涉及单位的问题,一般使用 sp 作为字体单位,而我们使用 TypedValue 类的 getDimensionPixelSize()方法读取的值是像素,所以需要进行单位转换,该工作交给 TypedValue 类的静态方法 applyDimension()完成,applyDimension()的作用是 进 行 单 位 换 算 , 其 方 法 原 型 为 : public static float applyDimension(int unit, float value,DisplayMetrics metrics),其中 unit 是目标单位,可选值如图所示,value 是要换算的值,metrics 通过 getResources().getDisplayMetrics()即可得到。
    public CodeView(Context context, @Nullable AttributeSet attrs, int defStyleAttr) {
        super(context, attrs, defStyleAttr);
        TypedArray typedArray = context.obtainStyledAttributes(attrs,R.styleable.CodeView);
        count = typedArray.getInt(R.styleable.CodeView_count,DEFAULT_COUNT);
        lineCount = typedArray.getInt(R.styleable.CodeView_line_count,DEFAULT_LINE_COUNT);
        fontSize = typedArray.getDimensionPixelSize(R.styleable.CodeView_font_size,DEFAULT_FONT_SIZE);
        TypedValue.applyDimension(TypedValue.COMPLEX_UNIT_SP,DEFAULT_FONT_SIZE,getResources().getDisplayMetrics());
        color = typedArray.getColor(R.styleable.CodeView_code_color,DEFAULT_COLOR);
        typedArray.recycle();

        rnd = new Random();
        paint = new Paint();
        initPaint();
        code = getCode();
    }
上述代码中,构造方法一旦调用,即生成验证码,验证码由 0~9 之间的数字构造,长度取决于属性 count 的值,默认长度为 4。
private String getCode(){
String str = "";
for(int i = 0; i < count; i ++){
str += rnd.nextInt(10);
}
return str;
}
测量组件尺寸时,考虑了从 View 类继承下来的 padding 属性,该属性我们用于定义验证码与边框线的距离,增强视觉观感,getPaddingLeft()、getPaddingTop()、getPaddingRight()和getPaddingBottom()四个方法分别用于获取离左、上、右、下四个方向的距离,计算组件的宽度和高度时,需要加上各方向的 padding 值。
/**
     * 计算组件宽度
     * @param widthMeasureSpec
     * @param textRect
     * @return
     */
    private int measureWidth(int widthMeasureSpec, Rect textRect){
        int mode = MeasureSpec.getMode(widthMeasureSpec);
        int size = MeasureSpec.getSize(widthMeasureSpec);
        int width = 0;

        if (mode == MeasureSpec.EXACTLY){
            width = size;
        }else if(mode == MeasureSpec.AT_MOST){
            width = getPaddingLeft() + textRect.width() + getPaddingRight();
        }
        return width;
    }
    /**
     * 计算组件的高度
     * @param heightMeasureSpec
     * @param textRect
     * @return
     */
    private int measureHeight(int heightMeasureSpec, Rect textRect){
        int mode = MeasureSpec.getMode(heightMeasureSpec);
        int size = MeasureSpec.getSize(heightMeasureSpec);
        int height = 0;
        if(mode == MeasureSpec.EXACTLY){
            height = size;
        }else if(mode == MeasureSpec.AT_MOST){
            height = getPaddingTop() + textRect.height() + getPaddingBottom();
        }
        return height;
    }

    private Rect getTextRect(){
       //根据 Paint 设置的绘制参数计算文字所点的宽度
        Rect rect = new Rect();
         //文字所占的区域大小保存在 rect 中
        paint.getTextBounds(this.text, 0, this.text.length(), rect);
        return rect;
    }
绘制验证码时,首先要初始化 Paint 对象,包括设置画笔的初始颜色、初始字体大小等。
private void initPaint(){
paint.reset();
paint.setAntiAlias(true);
paint.setColor(color);
paint.setTextSize(fontSize);
}
绘图分为三个部分:外边框、干扰线和验证码。外边框的颜色和验证码颜色相同,为了显示得更加完整,在组件矩形区域大小的基础上向内收缩 2 个距离,边框线是空心矩形,所以将 Style定义为 Style.STROKE,完成后又还原成 Style.FILL,因为后面绘制文字时必须是实心样式。干扰线是若干条随机生成的直线,直线的两个点都是随机的,x 坐标在 0~width(组件宽度)之间,y 坐标在 0~height(组件高度)之间。
   @Override
    protected void onDraw(Canvas canvas) {
        super.onDraw(canvas);
        Log.i(TAG, "code:" + code);
        int width = getMeasuredWidth();
        int height = getMeasuredHeight();
        Rect rect = new Rect(0, 0, width, height);
        //绘制外围矩形框
        paint.setStyle(Paint.Style.STROKE);
        paint.setStrokeWidth(1);
        Rect rect1 = new Rect(rect);
        rect1.inset(2, 2);//缩小一点
        canvas.drawRect(rect1, paint);
        paint.setStyle(Paint.Style.FILL);
        //绘制随机干扰线
        paint.setColor(Color.GRAY);
        for(int i = 0; i < lineCount; i ++){
            int x1 = rnd.nextInt(width);
            int y1 = rnd.nextInt(height);
            int x2 = rnd.nextInt(width);
            int y2 = rnd.nextInt(height);
            canvas.drawLine(x1, y1, x2, y2, paint);

        }
        paint.setColor(color);
        //绘制文字
        Rect textRect = getTextRect();
        Paint.FontMetrics fontMetrics = paint.getFontMetrics();
        int x = (width - textRect.width()) / 2;
        int y = (int) (height / 2 +
                (fontMetrics.descent- fontMetrics.ascent) / 2
                - fontMetrics.descent);
        canvas.drawText(code, x, y, paint);
    }
最后,是相关交互功能的实现,当通过外部改变绘制结果时,有两种情况:一种是只需要刷新即可,如改变颜色、增减干扰线、刷新等功能,这种情况需要调用 invalidate()方法进行重绘;另一种是组件尺寸的变化,需要重新测量组件的尺寸,如随机数个数变化、字体大小改变等功能,这种情况需要调用 requestLayout()方法,该方法依次调用 onMeasure()和 onDraw()两个方法,先重新测量组件的尺寸,再重绘组件。
 public int getCount() {
        return count;
    }
    public void setCount(int count) {
        this.count = count;
        code = getCode();
        requestLayout();//重新调整布局大小
    }
    public int getLineCount() {
        return lineCount;
    }
    public void setLineCount(int lineCount) {
        this.lineCount = lineCount;
        invalidate();//重绘
    }

    public int getFontSize() {
        return fontSize;
    }
    public void setFontSize(int fontSize) {
        this.fontSize = (int) TypedValue.applyDimension(
                TypedValue.COMPLEX_UNIT_SP, fontSize,
                getResources().getDisplayMetrics());
        initPaint();
        requestLayout();//重新调整布局大小
    }
    public int getColor() {
        return color;
    }
    public void setColor(int color) {
        this.color = color;
        initPaint();
        invalidate();//重绘
    }
    /**
     * 刷新验证码
     */
    public void refresh(){
        code = getCode();
        invalidate();
    }
    public String theCode(){
        return code;
    }
布局文件 code_layout.xml 定义了测试案例的 UI 界面,这是一个 LinearLayout 布局,垂直方向放置组件,第一行为验证码组件,第二行和第三行分别放置了三个按钮。每个按钮的单击事件都定义在 CodeActivity 类中。
code_layout.xml:
<?xml version="1.0" encoding="utf-8"?>
<LinearLayout xmlns:android="http://schemas.android.com/apk/res/android"
    xmlns:trkj="http://schemas.android.com/apk/res-auto"
    android:layout_width="match_parent"
    android:layout_height="match_parent"
    android:orientation="vertical"
    android:padding="10dp">

    <bczm.com.day0617.CodeView
        android:id="@+id/code"
        android:layout_width="wrap_content"
        android:layout_height="wrap_content"
        android:layout_gravity="center_horizontal"
        android:padding="10dp"
        trkj:code_color="#FF0000"
        trkj:font_size="50sp"
        trkj:line_count="100" />

    <LinearLayout
        android:layout_width="match_parent"
        android:layout_height="wrap_content"
        android:layout_margin="5dp"
        android:orientation="horizontal">

        <Button
            android:layout_width="0dp"
            android:layout_height="wrap_content"
            android:layout_weight="1"

            android:onClick="refresh"
            android:text="刷新" />

        <Button
            android:layout_width="0dp"
            android:layout_height="wrap_content"
            android:layout_weight="1"
            android:background="@android:color/holo_blue_bright"
            android:onClick="changeColor"
            android:text="改变颜色" />

        <Button
            android:layout_width="0dp"
            android:layout_height="wrap_content"
            android:layout_weight="1"
            android:onClick="changeFont"
            android:text="改变字体" />
    </LinearLayout>

    <LinearLayout
        android:layout_width="match_parent"
        android:layout_height="wrap_content"
        android:layout_margin="5dp"
        android:orientation="horizontal">

        <Button
            android:layout_width="0dp"
            android:layout_height="wrap_content"
            android:layout_weight="1"
            android:onClick="textCount"
            android:text="随机数个数" />

        <Button
            android:layout_width="0dp"
            android:layout_height="wrap_content"

            android:layout_weight="1"
            android:background="@android:color/holo_blue_bright"
            android:onClick="lineCount"
            android:text="干扰线条数" />

        <Button
            android:layout_width="0dp"
            android:layout_height="wrap_content"
            android:layout_weight="1"
            android:onClick="get"
            android:text="获取验证码" />
    </LinearLayout>
</LinearLayout>
public class CodeActivity extends Activity {
private CodeView codeView;
@Override
protected void onCreate(Bundle savedInstanceState) {
super.onCreate(savedInstanceState);
setContentView(R.layout.activity_code);
codeView = (CodeView) findViewById(R.id.code);
}
/**
* 刷新
* @param view
Android 自定义组件开发详解 株洲新程 IT 教育 李赞红
邮箱:[email protected] 欢迎捐助,支持我分享更多技术! - 201 -
*/
public void refresh(View view){
codeView.refresh();
}
/**
* 改变颜色
* @param view
*/
public void changeColor(View view){
codeView.setColor(Color.BLUE);
}
/**
* 改变字体大小
* @param view
*/
public void changeFont(View view){
codeView.setFontSize(100);
}
/**
* 改变随机数个数
* @param view
*/
public void textCount(View view){
codeView.setCount(5);
}
/**
* 改变干扰线条数
* @param view
*/
public void lineCount(View view){
codeView.setLineCount(150);
}
/**
* 获取验证码
* @param view
*/
public void get(View view){
String code = codeView.theCode();
Toast.makeText(this, code, Toast.LENGTH_LONG).show();
}
}public class CodeView extends View {
private static final String TAG = "CodeView";
private int count;//验证码的数字个数
private int lineCount; //干扰线的条数
private int fontSize; //字体大小
private int color;//字体颜色
private String code ;//验证码
private Random rnd;
private Paint paint;
private static final int DEFAULT_COUNT = 4;
private static final int DEFAULT_LINE_COUNT = 50;
private static final int DEFAULT_FONT_SIZE = 12;//sp
private static final int DEFAULT_COLOR = Color.BLACK;
public CodeView(Context context) {
super(context);
}
public CodeView(Context context, @Nullable AttributeSet attrs) {
super(context, attrs);
init(context, attrs);
}
public CodeView(Context context, @Nullable AttributeSet attrs, int defStyleAttr) {
super(context, attrs, defStyleAttr);
init(context, attrs);
}
private void init(Context context, @Nullable AttributeSet attrs) {
TypedArray typedArray = context.obtainStyledAttributes(attrs, R.styleable.CodeView);
count = typedArray.getInt(R.styleable.CodeView_count,DEFAULT_COUNT);
lineCount = typedArray.getInt(R.styleable.CodeView_line_count,DEFAULT_LINE_COUNT);
fontSize = typedArray.getDimensionPixelSize(R.styleable.CodeView_font_size,DEFAULT_FONT_SIZE);
TypedValue.applyDimension(TypedValue.COMPLEX_UNIT_SP,DEFAULT_FONT_SIZE,getResources().getDisplayMetrics());
color = typedArray.getColor(R.styleable.CodeView_code_color,DEFAULT_COLOR);
typedArray.recycle();
rnd = new Random();
paint = new Paint();
initPaint();
code = getCode();
}
@Override
protected void onMeasure(int widthMeasureSpec, int heightMeasureSpec) {
Rect textRect = getTextRect();//getTextRect() 方法请参考上一章节实现
int width = this.measureWidth(widthMeasureSpec, textRect);
int height = this.measureHeight(heightMeasureSpec, textRect);
setMeasuredDimension(width, height);
}
private String getCode(){
String str = "";
for(int i = 0; i < count; i ++){
str += rnd.nextInt(10);
}
return str;
}
private void initPaint(){
paint.reset();
paint.setAntiAlias(true);
paint.setColor(color);
paint.setTextSize(fontSize);
}
/**
* 计算组件宽度
* @param widthMeasureSpec
* @param textRect
* @return
*/
private int measureWidth(int widthMeasureSpec, Rect textRect){
int mode = MeasureSpec.getMode(widthMeasureSpec);
int size = MeasureSpec.getSize(widthMeasureSpec);
int width = 0;
if (mode == MeasureSpec.EXACTLY){
width = size;
}else if(mode == MeasureSpec.AT_MOST){
width = getPaddingLeft() + textRect.width() + getPaddingRight();
}
return width;
}
/**
* 计算组件的高度
* @param heightMeasureSpec
* @param textRect
* @return
*/
private int measureHeight(int heightMeasureSpec, Rect textRect){
int mode = MeasureSpec.getMode(heightMeasureSpec);
int size = MeasureSpec.getSize(heightMeasureSpec);
int height = 0;
if(mode == MeasureSpec.EXACTLY){
height = size;
}else if(mode == MeasureSpec.AT_MOST){
height = getPaddingTop() + textRect.height() + getPaddingBottom();
}
return height;
}
private Rect getTextRect(){
//根据 Paint 设置的绘制参数计算文字所点的宽度
Rect rect = new Rect();
//文字所占的区域大小保存在 rect 中
paint.getTextBounds(this.code, 0, this.code.length(), rect);
return rect;
}
@Override
protected void onDraw(Canvas canvas) {
super.onDraw(canvas);
Log.i(TAG, "code:" + code);
int width = getMeasuredWidth();
int height = getMeasuredHeight();
Rect rect = new Rect(0, 0, width, height);
//绘制外围矩形框
paint.setStyle(Paint.Style.STROKE);
paint.setStrokeWidth(1);
Rect rect1 = new Rect(rect);
rect1.inset(2, 2);//缩小一点
canvas.drawRect(rect1, paint);
paint.setStyle(Paint.Style.FILL);
//绘制随机干扰线
paint.setColor(Color.GRAY);
for(int i = 0; i < lineCount; i ++){
int x1 = rnd.nextInt(width);
int y1 = rnd.nextInt(height);
int x2 = rnd.nextInt(width);
int y2 = rnd.nextInt(height);
canvas.drawLine(x1, y1, x2, y2, paint);
}
paint.setColor(color);
//绘制文字
Rect textRect = getTextRect();
Paint.FontMetrics fontMetrics = paint.getFontMetrics();
int x = (width - textRect.width()) / 2;
int y = (int) (height / 2 +
(fontMetrics.descent- fontMetrics.ascent) / 2
- fontMetrics.descent);
canvas.drawText(code, x, y, paint);
}
public int getCount() {
return count;
}
public void setCount(int count) {
this.count = count;
code = getCode();
requestLayout();//重新调整布局大小
}
public int getLineCount() {
return lineCount;
}
public void setLineCount(int lineCount) {
this.lineCount = lineCount;
invalidate();//重绘
}
public int getFontSize() {
return fontSize;
}
public void setFontSize(int fontSize) {
this.fontSize = (int) TypedValue.applyDimension(
TypedValue.COMPLEX_UNIT_SP, fontSize,
getResources().getDisplayMetrics());
initPaint();
requestLayout();//重新调整布局大小
}
public int getColor() {
return color;
}
public void setColor(int color) {
this.color = color;
initPaint();
invalidate();//重绘
}
/**
* 刷新验证码
*/
public void refresh(){
code = getCode();
invalidate();
}
public String theCode(){
return code;
}
}如图 所示是 layout_width 和 layout_height 属性在不同情况下的运行效果。

练习作业
1、请定义一个自定义组件,该组件派生自 ImageView,通过定义 water_image(水印图片)、water_text(水印文字)、water_position(水印的位置:左上角、右上角、左下角、右下角,枚举类型)三个属性将水印绘制在指定位置。
提示:如图 所示的效果图中,在图片的右上角添加了包含一个小图片和“韬睿科技”4 个字的水印。

谢谢认真观读本文的每一位小伙伴,衷心欢迎小伙伴给我指出文中的错误,也欢迎小伙伴与我交流学习。
欢迎爱学习的小伙伴加群一起进步:230274309