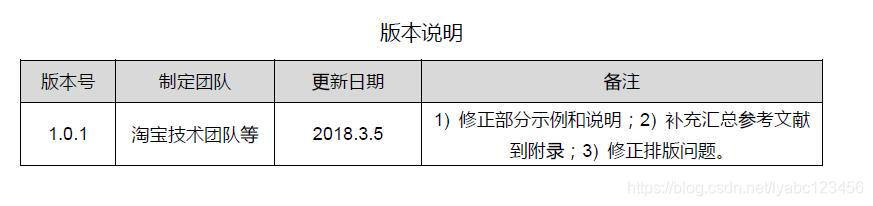
阿里巴巴Android开发手册已经出了有段时间了,官方是pdf版的手册,但我还是习惯阅读网页,于是我基于该手册1.0.1版本整理了一个网页版本的,习惯网页阅读的道友可以拿去欣赏了。
另外,文中会有一些我的个人备注,算是读书笔记了,介意的可以忽略掉。
文章目录
- 【强制】 必须遵守,违反本约定或将会引起严重的后果;
- 【推荐】 尽量遵守,长期遵守有助于系统稳定性和合作效率的提升;
- 【参考】 充分理解,技术意识的引导,是个人学习、团队沟通、项目合作的方向。
- “说明”对内容做了适当扩展和解释;“正例”提倡什么样的编码和实现方式;“反例”说明需要提防的雷区,以及错误案例。"备注"这个是我自己加的,如有不同意见请忽略。
一、Java 语言规范
遵循《阿里巴巴Java 开发手册》
手册下载地址:https://yq.aliyun.com/articles/69327
二、Android 资源文件命名与使用
1. 【推荐】资源文件需带模块前缀。
2. 【推荐】layout 文件的命名方式。
Activity 的layout 以module_activity 开头
Fragment 的layout 以module_fragment 开头
Dialog 的layout 以module_dialog 开头
include 的layout 以module_include 开头
ListView 的行layout 以module_list_item 开头
RecyclerView 的item layout 以module_recycle_item 开头
GridView 的item layout 以module_grid_item 开头
备注:这里我个人习惯还是以组件类型开头: 组件类型_模块名_逻辑名, 例如activity_module_xxx, fragment_module_xxx, dialog_module_xxx,item_module_xxx等,感觉这样找起来会更清晰明确一些,不过阿里这个也只是推荐的规则,你可以参考。
3. 【推荐】drawable 资源名称以小写单词+下划线的方式命名,根据分辨率不同存放在不同的drawable 目录下,如果介意包大小建议只使用一套,系统去进行缩放。
采用规则如下:
模块名_业务功能描述_控件描述_控件状态限定词
如:module_login_btn_pressed, module_tabs_icon_home_normal
备注:这里我个人的习惯是图标均以ic_开头,背景图以bg_开头, ic_模块名_辑名_用途_状态, 例如ic_user_share, ic_user_download, ic_login_btn_pressed, bg_user_guide, bg_user_blog等。
4. 【推荐】anim 资源名称以小写单词+下划线的方式命名,采用以下规则:
模块名_逻辑名称_[方向|序号]
Tween 动画(使用简单图像变换的动画,例如缩放、平移)资源:尽可能以通用的动画名称命名,如module_fade_in , module_fade_out , module_push_down_in (动画+方向)。
Frame 动画(按帧顺序播放图像的动画)资源:尽可能以模块+功能命名+序号。如module_loading_grey_001。
5. 【推荐】color 资源使用 #AARRGGBB 格式,写入module_colors.xml 文件中,命名
格式采用以下规则:
模块名_逻辑名称_颜色
如:<color name="module_btn_bg_color">#33b5e5e5</color>
备注:通常我会引用@color/white, @color/black, @color/red等这样的名字,但是有些color值实在不知道叫什么名字了,就只能以color+颜色值的命名方式了。这样的好处是能减少colors.xml中同一颜色值重复定义的次数,因为你再去尝试定义这个颜色值时会发现它已经存在。如果是多处控件的引用相同颜色的话考虑到将来有可能修改,最好在style中作一层统一引用。
6. 【推荐】dimen 资源以小写单词+下划线方式命名,写入module_dimens.xml 文件中,
采用以下规则:
模块名_描述信息
如:<dimen name="module_horizontal_line_height">1dp</dimen>
备注:跟color的命名一样, 我个人习惯的做法是直接定义宽/高/间距/大小后缀+dp值后缀,如width_100_dp,height_45_dp, margin_15_dp, text_size_16_sp, 这样的好处是已经定义过这个颜色值了你再去引用时就绝对不会重复,减少dimen.xml中的资源数量。如果是多个控件的引用相同的dp值的话最好在style中作一层统一引用。
7. 【推荐】style 资源采用 “父style 名称.当前style 名称” 方式命名,写入module_styles.xml 文件中,首字母大写。如:
<style name="ParentTheme.ThisActivityTheme">
…
</style>
8. 【推荐】string资源文件或者文本用到字符需要全部写入module_strings.xml 文件中,字符串以小写单词+下划线的方式命名,采用以下规则:
模块名_逻辑名称
如:moudule_login_tips,module_homepage_notice_desc
备注:个人习惯: 有明显用途的,会加统一的前缀, 例如用于提示/提醒用的会定义成remind_xxx或tips_xxx或toast_xxx, 用于标题的会定义成title_xxx, 用于输入框hint值的会定义成hint_xxx等。
9. 【推荐】Id 资源原则上以驼峰法命名,View 组件的资源id 建议以View 的缩写作为前缀。常用缩写表如下:
| 控件 | 缩写 |
|---|---|
| LinearLayout | ll |
| RelativeLayout | rl |
| ConstraintLayout | cl |
| ListView | lv |
| ScollView | sv |
| TextView | tv |
| Button | btn |
| ImageView | iv |
| CheckBox | cb |
| RadioButton | rb |
| EditText | et |
其它控件的缩写推荐使用小写字母并用下划线进行分割,例如:ProgressBar 对应的缩写为progress_bar;DatePicker 对应的缩写为date_picker。
备注:id的命名一般习惯是:控件缩写+下划线+逻辑名,如 @+id/tv_user_name, 而代码中则会反过来定义,逻辑名+控件后缀,如 mUserNameText。
10.【推荐】图片根据其分辨率,放在不同屏幕密度的drawable 目录下管理,否则可能在低密度设备上导致内存占用增加,又可能在高密度设备上导致图片显示不够清晰。
说明:
为了支持多种屏幕尺寸和密度,Android 提供了多种通用屏幕密度来适配。常用的如下。
ldpi - 120dpi
mdpi - 160dpi
hdpi - 240dpi
xhdpi - 320dpi
xxhdpi - 480dpi
xxxhdpi - 640dpi
Android 的屏幕分辨率和密度并不存在严格的对应关系,应尽量避免直接基于分辨率来开发,而是通过适配不同的屏幕密度来保证控件和图片的显示效果。不同密度drawable 目录中的图片分辨率设置,参考不同密度的dpi 比例关系。
正例:
为显示某个图标,将48 x 48 的图标文件放在drawable-mdpi 目录(160dpi)下;将72 x 72 的图标文件放在drawable-hdpi 目录(240dpi)下;将96 x 96 的图标文件放在drawable-xhdpi 目录(320dpi)下;将144 x 144 的图标文件放在drawable-xxhdpi 目录(480dpi)下。
反例:
上述图标,只有一个144 x 144 的图标文件放在drawable 目录下。
备注:ldpi 的这个现在已经绝迹了,mdpi的也几乎没有了,现在新出的手机基本都在hdpi以上,然后记住一个比例,mdpi :hdpi:xhdpi:xxhdpi:xxxhdpi = 2:3:4:6:8,然后你就知道哪个文件夹下该放多大比例的图片资源了。
三、Android 基本组件
Android 基本组件指Activity 、Fragment 、Service 、BroadcastReceiver 、ContentProvider 等等。
1. 【强制】Activity 间的数据通信,对于数据量比较大的,避免使用Intent + Parcelable的方式,可以考虑EventBus 等替代方案,以免造成TransactionTooLargeException。
2. 【推荐】Activity#onSaveInstanceState()方法不是Activity 生命周期方法,也不保证一定会被调用。它是用来在Activity 被意外销毁时保存UI 状态的,只能用于保存临时性数据,例如UI 控件的属性等,不能跟数据的持久化存储混为一谈。持久化存储应该在Activity#onPause()/onStop() 中实行。
3. 【强制】Activity 间通过隐式Intent 的跳转,在发出Intent 之前必须通过resolveActivity检查,避免找不到合适的调用组件,造成ActivityNotFoundException 的异常。
正例:
public void viewUrl(String url, String mimeType) {
	Intent intent = new Intent(Intent.ACTION_VIEW);
	intent.setDataAndType(Uri.parse(url), mimeType);
	if (getPackageManager().resolveActivity(intent, PackageManager.MATCH_DEFAULT_ONLY) != null) {
		startActivity(intent);
	}else {
		// 找不到指定的Activity
	}
}
反例:
Intent intent = new Intent();
intent.setAction("com.example.DemoIntent ");
try {
	startActivity(intent);
} catch (ActivityNotFoundException e) {
	e.printStackTrace();
}
4. 【强制】避免在Service#onStartCommand()/onBind() 方法中执行耗时操作,如果确实有需求,应改用IntentService 或采用其他异步机制完成。
正例:
public class MainActivity extends Activity {
	@Override
	public void onCreate(Bundle savedInstanceState) {
		super.onCreate(savedInstanceState);
		setContentView(R.layout.main);
	}

	public void startIntentService(View source) {
		Intent intent = new Intent(this, MyIntentService.class);
		startService(intent);
	}
}

public class MyIntentService extends IntentService {

	public MyIntentService() {
		super("MyIntentService");
	}

	@Override
	protected void onHandleIntent(Intent intent) {
		synchronized (this) {
			try {
				......
			} catch (Exception e) {
			}
		}
	}
}
备注:Service的生命周期都是运行在主线程中的。
5. 【强制】避免在BroadcastReceiver#onReceive() 中执行耗时操作,如果有耗时工作,应该创建 IntentService 完成,而不应该在BroadcastReceiver 内创建子线程去做。
说明:
由于该方法是在主线程执行,如果执行耗时操作会导致UI 不流畅。可以使用IntentService 、创建HandlerThread 或者调用Context#registerReceiver(BroadcastReceiver, IntentFilter, String, Handler) 方法等方式,在其他Wroker 线程执行onReceive 方法。BroadcastReceiver#onReceive() 方法耗时超过10 秒钟,可能会被系统杀死。
正例:
IntentFilter filter = new IntentFilter();
filter.addAction(LOGIN_SUCCESS);
this.registerReceiver(mBroadcastReceiver, filter);

mBroadcastReceiver = new BroadcastReceiver() {
	@Override
	public void onReceive(Context context, Intent intent) {
		Intent userHomeIntent = new Intent();
		userHomeIntent.setClass(this, UserHomeService.class);
		this.startService(userHomeIntent);
	}
};
反例:
mBroadcastReceiver = new BroadcastReceiver() {
	@Override
	public void onReceive(Context context, Intent intent) {
		MyDatabaseHelper myDB = new MyDatabaseHelper(context);
		myDB.initData();
		// have more database operation here
	}
};
备注:这里有个问题他没有解释,既然是耗时的,那我们为什么不能在BroadcastReceiver 内创建子线程去执行呢?
6. 【强制】避免使用隐式Intent 广播敏感信息,信息可能被其他注册了对应BroadcastReceiver 的App 接收。
说明:
通过Context#sendBroadcast() 发送的隐式广播会被所有感兴趣的receiver 接收,恶意应用注册监听该广播的receiver 可能会获取到Intent 中传递的敏感信息,并进行其他危险操作。如果发送的广播为使用Context#sendOrderedBroadcast() 方法发送的有序广播,优先级较高的恶意receiver 可能直接丢弃该广播,造成服务不可用,或者向广播结果塞入恶意数据。
如果广播仅限于应用内,则可以使用LocalBroadcastManager#sendBroadcast() 实现,避免敏感信息外泄和Intent 拦截的风险。
正例:
Intent intent = new Intent("my-sensitive-event");
intent.putExtra("event", "this is a test event");
LocalBroadcastManager.getInstance(this).sendBroadcast(intent);
反例:
Intent intent = new Intent();
v1.setAction("com.sample.action.server_running");
v1.putExtra("local_ip", v0.h);
v1.putExtra("port", v0.i);
v1.putExtra("code", v0.g);
v1.putExtra("connected", v0.s);
v1.putExtra("pwd_predefined", v0.r);
if (!TextUtils.isEmpty(v0.t)) {
	v1.putExtra("connected_usr", v0.t);
}
context.sendBroadcast(v1);
以上广播可能被其他应用的如下receiver 接收导致敏感信息泄漏
final class MyReceiver extends BroadcastReceiver {
	public final void onReceive(Context context, Intent intent) {
		if (intent != null && intent.getAction() != null) {
			String s = intent.getAction();
			if (s.equals("com.sample.action.server_running") {
				String ip = intent.getStringExtra("local_ip");
				String pwd = intent.getStringExtra("code");
				String port = intent.getIntExtra("port", 8888);
				boolean status = intent.getBooleanExtra("connected", false);
			}
		}
	}
}
7. 【推荐】添加Fragment 时, 确保FragmentTransaction#commit() 在Activity#onPostResume() 或者FragmentActivity#onResumeFragments() 内调用。不要随意使用FragmentTransaction#commitAllowingStateLoss() 来代替,任何commitAllowingStateLoss() 的使用必须经过code review,确保无负面影响。
说明:
Activity 可能因为各种原因被销毁, Android 支持页面被销毁前通过Activity#onSaveInstanceState() 保存自己的状态。但如果FragmentTransaction.commit() 发生在Activity 状态保存之后,就会导致Activity 重建、恢复状态时无法还原页面状态,从而可能出错。为了避免给用户造成不好的体验,系统会抛出IllegalStateExceptionStateLoss 异常。推荐的做法是在Activity 的onPostResume() 或onResumeFragments() ( 对FragmentActivity ) 里执行FragmentTransaction.commit(),如有必要也可在onCreate() 里执行。不要随意改用FragmentTransaction.commitAllowingStateLoss() 或者直接使用try-catch 避免crash,这不是问题的根本解决之道,当且仅当你确认Activity 重建、恢复状态时,本次commit 丢失不会造成影响时才可这么做。
正例:
public class MainActivity extends FragmentActivity {
	FragmentManager fragmentManager;
	@Override
	protected void onCreate(Bundle savedInstanceState) {
		super.onCreate(savedInstanceState);
		setContentView(R.layout.activity_main2);
		fragmentManager = getSupportFragmentManager();
		FragmentTransaction ft = fragmentManager.beginTransaction();
		MyFragment fragment = new MyFragment();
		ft.replace(R.id.fragment_container, fragment);
		ft.commit();
	}
}
反例:
public class MainActivity extends FragmentActivity {
	FragmentManager fragmentManager;
	@Override
	public void onSaveInstanceState(Bundle outState, PersistableBundle outPersistentState) {
		super.onSaveInstanceState(outState, outPersistentState);
		fragmentManager = getSupportFragmentManager();
		FragmentTransaction ft = fragmentManager.beginTransaction();
		MyFragment fragment = new MyFragment();
		ft.replace(R.id.fragment_container, fragment);
		ft.commit();
	}
}
备注:不太清楚这一条描述的是在什么场景下有用,我也没有遇到过这里说明的问题,一般Fragment的使用要么是在Activity创建onCreate的时候就添加了,要么是后期点击某个按钮新增/替换某个Fragment。
8. 【推荐】不要在 Activity#onDestroy() 内执行释放资源的工作,例如一些工作线程的销毁和停止,因为 onDestroy() 执行的时机可能较晚。可根据实际需要,在Activity#onPause()/onStop() 中结合 isFinishing() 的判断来执行。
9. 【推荐】如非必须,避免使用嵌套的Fragment。
说明:
嵌套Fragment 是在Android API 17添加到SDK以及Support 库中的功能,Fragment 嵌套使用会有一些坑,容易出现bug,比较常见的问题有如下几种:
1) onActivityResult() 方法的处理错乱,内嵌的Fragment 可能收不到该方法的回调,需要由宿主Fragment 进行转发处理;
2) 突变动画效果;
3) 被继承的setRetainInstance(),导致在Fragment 重建时多次触发不必要的逻辑。
非必须的场景尽可能避免使用嵌套Fragment,如需使用请注意上述问题。
正例:
FragmentManager fragmentManager = getFragmentManager();
Fragment fragment = fragmentManager.findFragmentByTag(FragmentB.TAG);
if (null == fragment) {
	FragmentB fragmentB = new FragmentB();
	FragmentTransaction fragmentTransaction = fragmentManager.beginTransaction();
	fragmentTransaction.add(R.id.fragment_container, fragmentB, FragmentB.TAG).commit();
}
反例:
Fragment videoFragment = new VideoPlayerFragment();
FragmentTransaction transaction = currentFragment.getChildFragmentManager().
beginTransaction();
transaction.add(R.id.video_fragment, videoFragment).commit();
备注:我只在ViewPage当中的某一页fragment中嵌套使用过包含fragment的ViewPage。
10. 【推荐】总是使用显式Intent 启动或者绑定Service,且不要为服务声明Intent Filter,保证应用的安全性。如果确实需要使用隐式调用,则可为Service 提供Intent Filter并从Intent 中排除相应的组件名称,但必须搭配使用 Intent#setPackage() 方法设置Intent 的指定包名,这样可以充分消除目标服务的不确定性。
11.【推荐】Service 需要以多线程来并发处理多个启动请求,建议使用IntentService,可避免各种复杂的设置。
说明:
Service 组件一般运行主线程,应当避免耗时操作,如果有耗时操作应该在Worker线程执行。可以使用IntentService 执行后台任务。
正例:
public class SingleIntentService extends IntentService {
	public SingleIntentService() {
		super("single-service thread");
	}

	@Override
	protected void onHandleIntent(Intent intent) {
		try {
			......
		} catch (InterruptedException e) {
			e.printStackTrace();
		}
	}
}
反例:
public class HelloService extends Service {
	...
	@Override
	public int onStartCommand(Intent intent, int flags, int startId) {
		Toast.makeText(this, "service starting", Toast.LENGTH_SHORT).show();
		new Thread(new Runnable() {
			@Override
			public void run() {
				//操作语句
			}
		}).start();
		...
	}
}
12.【推荐】对于只用于应用内的广播,优先使用LocalBroadcastManager 来进行注册和发送,LocalBroadcastManager 安全性更好,同时拥有更高的运行效率。
说明:
对于使用Context#sendBroadcast() 等方法发送全局广播的代码进行提示。如果该广播仅用于应用内,则可以使用 LocalBroadcastManager 来避免广播泄漏以及广播被拦截等安全问题,同时相对全局广播本地广播的更高效。
正例:
public class MainActivity extends ActionBarActivity {
	private MyReceiver receiver;
	private IntentFilter filter;
	private Context context;
	private static final String MY_BROADCAST_TAG = "com.example.localbroadcast";

	@Override
	protected void onCreate(Bundle savedInstanceState) {
		super.onCreate(savedInstsanceState);
		context = this;
		setContentView(R.layout.activity_main);
		receiver = new MyReceiver();
		filter = new IntentFilter();
		filter.addAction(MY_BROADCAST_TAG);
		Button button = (Button) findViewById(R.id.button);
		button.setOnClickListener(new View.OnClickListener() {
			@Override
			public void onClick(View view) {
				Intent intent = new Intent();
				intent.setAction(MY_BROADCAST_TAG);
				LocalBroadcastManager.getInstance(context).sendBroadcast(intent);
			}
		});
	}

	@Override
	protected void onResume() {
		super.onResume();
		LocalBroadcastManager.getInstance(context).registerReceiver(receiver, filter);
	}

	@Override
	protected void onPause() {
		super.onPause();
		LocalBroadcastManager.getInstance(context).unregisterReceiver(receiver);
	}

	class MyReceiver extends BroadcastReceiver {
		@Override
		public void onReceive(Context arg0, Intent arg1) {
			// message received
		}
	}

}
反例:
所有广播都使用全局广播
//In activity, sending broadcast
Intent intent = new Intent("com.example.broadcastreceiver.SOME_ACTION");
sendBroadcast(intent);
13.【推荐】当前Activity 的onPause 方法执行结束后才会创建(onCreate)或恢复(onRestart)别的Activity,所以在onPause 方法中不适合做耗时较长的工作,这会影响到页面之间的跳转效率。
备注:Activity启动另一个Activity并返回的完整生命周期
14. 【强制】Activity 或者Fragment 中动态注册BroadCastReceiver 时,registerReceiver() 和 unregisterReceiver() 要成对出现。
说明:
如果registerReceiver() 和 unregisterReceiver() 不成对出现,则可能导致已经注册的receiver 没有在合适的时机注销,导致内存泄漏,占用内存空间,加重SystemService负担。部分华为的机型会对receiver 进行资源管控,单个应用注册过多receiver 会触发管控模块抛出异常,应用直接崩溃。
正例:
public class MainActivity extends AppCompatActivity {

	private static MyReceiver myReceiver = new MyReceiver();
	...
	@Override
	protected void onResume() {
		super.onResume();
		IntentFilter filter = new IntentFilter("com.example.myservice");
		registerReceiver(myReceiver, filter);
	}

	@Override
	protected void onPause() {
		super.onPause();
		unregisterReceiver(myReceiver);
	}
	...
}
反例:
public class MainActivity extends AppCompatActivity {
	private static MyReceiver myReceiver;

	@Override
	protected void onResume() {
		super.onResume();
		myReceiver = new MyReceiver();
		IntentFilter filter = new IntentFilter("com.example.myservice");
		registerReceiver(myReceiver, filter);
	}

	@Override
	protected void onDestroy() {
		super.onDestroy();
		unregisterReceiver(myReceiver);
	}
}
Activity 的生命周期不对应,可能出现多次onResume 造成receiver 注册多个,但最终只注销一个,其余receiver 产生内存泄漏。
15.【强制】Android 基础组件如果使用隐式调用,应在 AndroidManifest.xml 中使用 <intent-filter> 或在代码中使用 IntentFilter 增加过滤。
说明:
如果浏览器支持Intent Scheme Uri 语法,如果过滤不当,那么恶意用户可能通过浏览器js 代码进行一些恶意行为,比如盗取cookie 等。如果使用了Intent.parseUri函数,获取的intent 必须严格过滤。
正例:
// 将intent scheme URL 转换为intent 对象
Intent intent = Intent.parseUri(uri);
// 禁止没有BROWSABLE category 的情况下启动activity
intent.addCategory("android.intent.category.BROWSABLE");
intent.setComponent(null);
intent.setSelector(null);
// 使用intent 启动activity
context.startActivityIfNeeded(intent, -1)
反例:
Intent intent = Intent.parseUri(uri.toString().trim().substring(15), 0);
intent.addCategory("android.intent.category.BROWSABLE");
context.startActivity(intent);
四、UI 与布局
1. 【强制】布局中不得不使用ViewGroup 多重嵌套时,不要使用LinearLayout 嵌套,改用RelativeLayout,可以有效降低嵌套数。
说明:
Android 应用页面上任何一个View 都需要经过 measure、layout、draw 三个步骤才能被正确的渲染。从xml layout 的顶部节点开始进行measure,每个子节点都需要向自己的父节点提供自己的尺寸来决定展示的位置,在此过程中可能还会重新measure(由此可能导致measure 的时间消耗为原来的2-3 倍)。节点所处位置越深,嵌套带来的measure 越多,计算就会越费时。这就是为什么扁平的View 结构会性能更好。
同时,页面拥上的View 越多,measure、layout、draw 所花费的时间就越久。要缩短这个时间,关键是保持View 的树形结构尽量扁平,而且要移除所有不需要渲染的View。理想情况下,总共的measure,layout,draw 时间应该被很好的控制在16ms以内,以保证滑动屏幕时UI 的流畅。
要找到那些多余的View(增加渲染延迟的view),可以用Android Studio Monitor里的Hierarchy Viewer 工具,可视化的查看所有的view。
2. 【推荐】在Activity 中显示对话框或弹出浮层时,尽量使用DialogFragment,而非Dialog/AlertDialog,这样便于随Activity生命周期管理对话框/弹出浮层的生命周期。
正例:
public void showPromptDialog(String text) {
	DialogFragment promptDialog = new DialogFragment() {
		@Override
		public View onCreateView(LayoutInflater inflater, ViewGroup container, Bundle savedInstanceState) {
			getDialog().requestWindowFeature(Window.FEATURE_NO_TITLE);
			View view = inflater.inflate(R.layout.fragment_prompt, container);
			return view;
		}
	};
	promptDialog.show(getFragmentManager(), text);
}
3. 【推荐】源文件统一采用UTF-8 的形式进行编码。
4. 【强制】禁止在非UI 线程进行View 相关操作。
5. 【推荐】文本大小使用单位dp,View 大小使用单位dp。对于TextView,如果在文字大小确定的情况下推荐使用wrap_content 布局避免出现文字显示不全的适配问题。
说明:
之所以文本大小也推荐使用dp 而非sp,因为sp 是Android 早期推荐使用的,但其实sp 不仅和dp 一样受屏幕密度的影响,还受到系统设置里字体大小的影响,所以使用dp 对于应用开发会更加保证UI 的一致性和还原度。
备注:这里文本大小建议还是使用sp作为单位,这也是Android官方推荐的,但这也要看你的需求,一般使用dp的话,就不能够通过手机的系统设置调整字体大小了,这样如果你的用户如果是眼神不太好的(如年纪大的)他就想放大一点字体查看的话就不友好了,但是如果你的app更加追求UI的一致性,那么可以使用dp作单位。
6. 【强制】禁止在设计布局时多次为子View 和父View 设置同样背景进而造成页面过度绘制,推荐将不需要显示的布局进行及时隐藏。
正例:
<?xml version="1.0" encoding="utf-8"?>
<LinearLayout xmlns:android="http://schemas.android.com/apk/res/android"
	android:layout_width="match_parent"
	android:layout_height="match_parent"
	android:orientation="vertical" >
	<TextView
		android:layout_width="match_parent"
		android:layout_height="wrap_content"
		android:text="@string/hello" />
	<Button
		android:id="@+id/btn_mybuttom"
		android:layout_width="match_parent"
		android:layout_height="wrap_content"
		android:text="click it !" />
	<ImageView
		android:id="@+id/img"
		android:layout_width="match_parent"
		android:layout_height="wrap_content"
		android:visibility="gone"
		android:src="@drawable/youtube" />
	<TextView
		android:text="it is an example!"
		android:layout_width="match_parent"
		android:layout_height="wrap_content" />
</LinearLayout>
反例:
@Override
protected void onDraw(Canvas canvas) {
	super.onDraw(canvas);
	int width = getWidth();
	int height = getHeight();
	mPaint.setColor(Color.GRAY);
	canvas.drawRect(0, 0, width, height, mPaint);
	mPaint.setColor(Color.CYAN);
	canvas.drawRect(0, height/4, width, height, mPaint);
	mPaint.setColor(Color.DKGRAY);
	canvas.drawRect(0, height/3, width, height, mPaint);
	mPaint.setColor(Color.LTGRAY);
	canvas.drawRect(0, height/2, width, height, mPaint);
}
7. 【推荐】灵活使用布局,推荐merge、ViewStub 来优化布局,尽可能多的减少UI布局层级,推荐使用FrameLayout,LinearLayout、RelativeLayout 次之。
8. 【推荐】在需要时刻刷新某一区域的组件时,建议通过以下方式避免引发全局layout刷新:
1) 设置固定的View 大小的宽高,如倒计时组件等;
2) 调用View 的layout 方法修改位置,如弹幕组件等;
3) 通过修改Canvas 位置并且调用invalidate(int l, int t, int r, int b) 等方式限定刷新区域;
4) 通过设置一个是否允许requestLayout 的变量,然后重写控件的requestlayout、onSizeChanged 方法, 判断控件的大小没有改变的情况下, 当进入requestLayout 的时候,直接返回而不调用super 的requestLayout 方法。
9. 【推荐】不能在Activity 没有完全显示时显示PopupWindow 和Dialog。
说明:
Android Activity 创建时的生命周期,按照 onCreate() -> onStart() -> onResume() ->onAttachedToWindow() -> onWindowFocusChanged() 的顺序, 其中在Activity#onAttachedToWindow() 时,Activity 会与它的 Window 关联,这时 UI 才会开始绘制,在 Activity#onWindowFocusChanged() 时, UI 才变成可交互状态,可以提示用户使用。如果在 Window 未关联时就创建对话框,UI 可能显示异常。
推荐的做法是在 Activity#onAttachedToWindow() 之后( 其实最好是Activity#onWindowFocusChanged() 之后)才创建对话框。
备注:实测在Activity的onCreate()和onResume()中直接show Dialog也是可以的,并没有发现什么异常,实际开发中也会经常这样做,目前还没发现这样会有什么问题。
10.【推荐】尽量不要使用AnimationDrawable,它在初始化的时候就将所有图片加载到内存中,特别占内存,并且还不能释放,释放之后下次进入再次加载时会报错。
说明:
Android 的帧动画可以使用AnimationDrawable 实现,但是如果你的帧动画中如果包含过多帧图片,一次性加载所有帧图片所导致的内存消耗会使低端机发生 OOM 异常。帧动画所使用的图片要注意降低内存消耗,当图片比较大时,容易出现 OOM。
正例:
图片数量较少的AnimationDrawable 还是可以接受的。
<?xml version="1.0" encoding="utf-8"?>
<animation-list xmlns:android="http://schemas.android.com/apk/res/android"
	android:oneshot="true">
	<item android:duration="500" android:drawable="@drawable/ic_heart_100"/>
	<item android:duration="500" android:drawable="@drawable/ic_heart_75"/>
	<item android:duration="500" android:drawable="@drawable/ic_heart_50"/>
	<item android:duration="500" android:drawable="@drawable/ic_heart_25"/>
	<item android:duration="500" android:drawable="@drawable/ic_heart_0"/>
</animation-list>
反例:
<animation-list xmlns:android="http://schemas.android.com/apk/res/android"
	android:oneshot="false">
	<item android:drawable="@drawable/soundwave_new_1_40" android:duration="100" />
	<item android:drawable="@drawable/soundwave_new_1_41" android:duration="100" />
	<item android:drawable="@drawable/soundwave_new_1_42" android:duration="100" />
	<item android:drawable="@drawable/soundwave_new_1_43" android:duration="100" />
	<item android:drawable="@drawable/soundwave_new_1_44" android:duration="100" />
	<item android:drawable="@drawable/soundwave_new_1_45" android:duration="100" />
	<item android:drawable="@drawable/soundwave_new_1_46" android:duration="100" />
	<item android:drawable="@drawable/soundwave_new_1_47" android:duration="100" />
	<item android:drawable="@drawable/soundwave_new_1_48" android:duration="100" />
	<item android:drawable="@drawable/soundwave_new_1_49" android:duration="100" />
	<item android:drawable="@drawable/soundwave_new_1_50" android:duration="100" />
	<item android:drawable="@drawable/soundwave_new_1_51" android:duration="100" />
	<item android:drawable="@drawable/soundwave_new_1_52" android:duration="100" />
	<item android:drawable="@drawable/soundwave_new_1_53" android:duration="100" />
	<item android:drawable="@drawable/soundwave_new_1_54" android:duration="100" />
	<item android:drawable="@drawable/soundwave_new_1_55" android:duration="100" />
	<item android:drawable="@drawable/soundwave_new_1_56" android:duration="100" />
	<item android:drawable="@drawable/soundwave_new_1_57" android:duration="100" />
	<item android:drawable="@drawable/soundwave_new_1_58" android:duration="100" />
	<item android:drawable="@drawable/soundwave_new_1_59" android:duration="100" />
	<item android:drawable="@drawable/soundwave_new_1_60" android:duration="100" />
</animation-list>
上述如此多图片的动画就不建议使用AnimationDrawable 了。
11.【强制】不能使用ScrollView 包裹 ListView/GridView/ExpandableListVIew; 因为这样会把ListView 的所有Item 都加载到内存中,要消耗巨大的内存和cpu 去绘制图面。
说明:
ScrollView 中嵌套List 或RecyclerView 的做法官方明确禁止。除了开发过程中遇到的各种视觉和交互问题,这种做法对性能也有较大损耗。ListView 等UI 组件自身有垂直滚动功能,也没有必要在嵌套一层ScrollView。目前为了较好的UI 体验,更贴近Material Design 的设计,推荐使用NestedScrollView。
正例:
<?xml version="1.0" encoding="utf-8"?>
<LinearLayout>
	<android.support.v4.widget.NestedScrollView>
		<LinearLayout>
			<ImageView/>
			...
			<android.support.v7.widget.RecyclerView/>
		</LinearLayout>
	</android.support.v4.widget.NestedScrollView>
</LinearLayout>
反例:
<ScrollView>
	<LinearLayout>
		<TextView/>
		...
		<ListView/>
		<TextView />
	</LinearLayout>
</ScrollView>
12.【强制】不要在Android 的Application 对象中缓存数据。基础组件之间的数据共享请使用Intent 等机制,也可使用SharedPreferences 等数据持久化机制。
反例:
class MyApplication extends Application {
	String username;
	String getUsername() {
		return username;
	}
	void setUsername(String username) {
		this.username = username;
	}
}
class SetUsernameActivity extends Activity {

	void onCreate(Bundle savedInstanceState) {
		super.onCreate(savedInstanceState);
		setContentView(R.layout.set_username);
		MyApplication app = (MyApplication) getApplication();
		app.setUsername("tester1");
		startActivity(new Intent(this, GetUsernameActivity.class));
	}
}
class GetUsernameActivity extends Activity {
	TextView tv;
	@Override
	void onCreate(Bundle savedInstanceState) {
		super.onCreate(savedInstanceState);
		setContentView(R.layout.get_username);
		tv = (TextView)findViewById(R.id.username);
	}
	@Override
	void onResume() {
		super.onResume();
		MyApplication app = (MyApplication) getApplication();
		tv.setText("Welcome back ! " + app.getUsername().toUpperCase());
	}
}
13.【推荐】使用Toast 时,建议定义一个全局的Toast 对象,这样可以避免连续显示Toast 时不能取消上一次Toast 消息的情况。即使需要连续弹出Toast,也应避免直接调用Toast#makeText。
14.【强制】使用Adapter 的时候,如果你使用了ViewHolder 做缓存,在 getView() 的方法中无论这项convertView 的每个子控件是否需要设置属性(比如某个TextView 设置的文本可能为null,某个按钮的背景色为透明,某控件的颜色为透明等),都需要为其显式设置属性(Textview 的文本为空也需要设置 setText(""),背景透明也需要设置),否则在滑动的过程中,因为adapter item 复用的原因,会出现内容的显示错乱。
正例:
 @Override
 public View getView(int position, View convertView, ViewGroup parent) {
	ViewHolder myViews;
	if (convertView == null) {
		myViews = new ViewHolder();
		convertView = mInflater.inflate(R.layout.list_item, null);
		myViews.mUsername = (TextView)convertView.findViewById(R.id.username);
		convertView.setTag(myViews);
	} else {
		myViews = (ViewHolder)convertView.getTag();
	}

	Info p = infoList.get(position);
	String dn = p.getDisplayName;
	myViews.mUsername.setText(StringUtils.isEmpty(dn) ? "" : dn);
	return convertView;
 }

 static class ViewHolder {
	private TextView mUsername;
 }
五、进程、线程与消息通信
1. 【强制】不要通过Intent 在Android 基础组件之间传递大数据(binder transaction 缓存为1MB),可能导致 OOM。
2. 【强制】在Application 的业务初始化代码加入进程判断,确保只在自己需要的进程初始化。特别是后台进程减少不必要的业务初始化。
正例:
public class MyApplication extends Application {
	@Override
	public void onCreate() {
		//在所有进程中初始化
		....
		//仅在主进程中初始化
		if (mainProcess) {
		    ...
		}
		//仅在后台进程中初始化
		if (bgProcess) {
		    ...
		}
	}
}
3. 【强制】新建线程时,必须通过线程池提供(AsyncTask 或者ThreadPoolExecutor 或者其他形式自定义的线程池),不允许在应用中自行显式创建线程。
说明:
使用线程池的好处是减少在创建和销毁线程上所花的时间以及系统资源的开销,解决资源不足的问题。如果不使用线程池,有可能造成系统创建大量同类线程而导致消耗完内存或者“过度切换”的问题。另外创建匿名线程不便于后续的资源使用分析,对性能分析等会造成困扰。
正例:
	int NUMBER_OF_CORES = Runtime.getRuntime().availableProcessors();
	int KEEP_ALIVE_TIME = 1;
	TimeUnit KEEP_ALIVE_TIME_UNIT = TimeUnit.SECONDS;
	BlockingQueue<Runnable> taskQueue = new LinkedBlockingQueue<Runnable>();
	ExecutorService executorService = new ThreadPoolExecutor(NUMBER_OF_CORES, NUMBER_OF_CORES*2,
	    KEEP_ALIVE_TIME, KEEP_ALIVE_TIME_UNIT, taskQueue, new BackgroundThreadFactory(),
	    new DefaultRejectedExecutionHandler());
	//执行任务
	executorService.execute(new Runnnable() {
	...
	});
反例:
new Thread(new Runnable() {
	@Override
	public void run() {
		//操作语句
		...
	}
}).start();
5. 【强制】子线程中不能更新界面,更新界面必须在主线程中进行,网络操作不能在主线程中调用。
6. 【推荐】尽量减少不同APP 之间的进程间通信及拉起行为。拉起导致占用系统资源,影响用户体验。
7. 【推荐】新建线程时,定义能识别自己业务的线程名称,便于性能优化和问题排查。
正例:
public class MyThread extends Thread {
	public MyThread(){
		super.setName("ThreadName");
		…
	}
}
8. 【推荐】ThreadPoolExecutor 设置线程存活时间(setKeepAliveTime),确保空闲时线程能被释放。
9. 【推荐】禁止在多进程之间用SharedPreferences 共享数据, 虽然可以(MODE_MULTI_PROCESS),但官方已不推荐。
10.【推荐】谨慎使用Android 的多进程,多进程虽然能够降低主进程的内存压力,但会遇到如下问题:
1) 首次进入新启动进程的页面时会有延时的现象(有可能黑屏、白屏几秒,是白屏还是黑屏和新Activity 的主题有关);
2) 应用内多进程时,Application 实例化多次,需要考虑各个模块是否都需要在所有进程中初始化。
六、文件与数据库
1. 【强制】任何时候不要硬编码文件路径,请使用Android 文件系统API 访问。
说明:
Android 应用提供内部和外部存储,分别用于存放应用自身数据以及应用产生的用户数据。可以通过相关API 接口获取对应的目录,进行文件操作。
 android.os.Environment#getExternalStorageDirectory()
 android.os.Environment#getExternalStoragePublicDirectory()
 android.content.Context#getFilesDir()
 android.content.Context#getCacheDir
正例:
public File getDir(String alName) {
	File file = new File(Environment.getExternalStoragePublicDirectory(Environment.DIRECTORY_PICTURES), alName);
	if (!file.mkdirs()) {
		Log.e(LOG_TAG, "Directory not created");
	}
	return file;
}
反例:
public File getDir(String alName) {
	// 任何时候都不要硬编码文件路径,这不仅存在安全隐患,也让app 更容易出现适配问题
	File file = new File("/mnt/sdcard/Download/Album", alName);
	if (!file.mkdirs()) {
		Log.e(LOG_TAG, "Directory not created");
	}
	return file;
}
2. 【强制】当使用外部存储时,必须检查外部存储的可用性。
正例:
// 读/写检查
public boolean isExternalStorageWritable() {
	String state = Environment.getExternalStorageState();
	if (Environment.MEDIA_MOUNTED.equals(state)) {
		return true;
	}
	return false;
}

// 只读检查
public boolean isExternalStorageReadable() {
	String state = Environment.getExternalStorageState();
	if (Environment.MEDIA_MOUNTED_READ_ONLY.equals(state)) {
		return true;
	}
	return false;
}
3. 【强制】应用间共享文件时,不要通过放宽文件系统权限的方式去实现,而应使用FileProvider。
正例:
<!-- AndroidManifest.xml -->
<manifest>
	...
	<application>
		...
		<provider
			android:name="android.support.v4.content.FileProvider"
			android:authorities="com.example.fileprovider"
			android:exported="false"
			android:grantUriPermissions="true">
			  <meta-data
				  android:name="android.support.FILE_PROVIDER_PATHS"
				  android:resource="@xml/provider_paths" />
		</provider>
		...
	</application>
</manifest>
<!-- res/xml/provider_paths.xml-->
<paths>
    <files-path path="album/" name="myimages" />
</paths>
void getAlbumImage(String imagePath) {
	File image = new File(imagePath);
	Intent getAlbumImageIntent = new Intent(MediaStore.ACTION_IMAGE_CAPTURE);
	Uri imageUri = FileProvider.getUriForFile(this,"com.example.provider", image);
	getAlbumImageIntent.putExtra(MediaStore.EXTRA_OUTPUT, imageUri);
	startActivityForResult(takePhotoIntent, REQUEST_GET_ALBUMIMAGE);
}
反例:
void getAlbumImage(String imagePath) {
	File image = new File(imagePath);
	Intent getAlbumImageIntent = new Intent(MediaStore.ACTION_IMAGE_CAPTURE);
	//不要使用file://的URI 分享文件给别的应用,包括但不限于Intent
	getAlbumImageIntent.putExtra(MediaStore.EXTRA_OUTPUT, Uri.fromFile(image));
	startActivityForResult(takePhotoIntent, REQUEST_GET_ALBUMIMAGE);
}
4. 【推荐】SharedPreference 中只能存储简单数据类型(int、boolean、String 等),复杂数据类型建议使用文件、数据库等其他方式存储。
正例:
public void updateSettings() {
	SharedPreferences mySharedPreferences = getSharedPreferences("settings", Activity.MODE_PRIVATE);
	SharedPreferences.Editor editor = mySharedPreferences.edit();
	editor.putString("id", "foo");
	editor.putString("nick", "bar");
	//不要把复杂数据类型转成String 存储
	editor.apply();
}
5. 【推荐】SharedPreference 提交数据时, 尽量使用Editor#apply() , 而非Editor#commit()。一般来讲,仅当需要确定提交结果,并据此有后续操作时,才使用Editor#commit()。
说明:
SharedPreference 相关修改使用apply 方法进行提交会先写入内存,然后异步写入磁盘, commit 方法是直接写入磁盘。如果频繁操作的话apply 的性能会优于commit,apply 会将最后修改内容写入磁盘。但是如果希望立刻获取存储操作的结果,并据此做相应的其他操作,应当使用commit。
正例:
public void updateSettingsAsync() {
	SharedPreferences mySharedPreferences = getSharedPreferences("settings", Activity.MODE_PRIVATE);
	SharedPreferences.Editor editor = mySharedPreferences.edit();
	editor.putString("id", "foo");
	editor.apply();
}

public void updateSettings() {
	SharedPreferences mySharedPreferences = getSharedPreferences("settings", Activity.MODE_PRIVATE);
	SharedPreferences.Editor editor = mySharedPreferences.edit();
	editor.putString("id", "foo");
	if (!editor.commit()) {
		Log.e(LOG_TAG, "Failed to commit setting changes");
	}
}
反例:
editor.putLong("key_name", "long value");
editor.commit();
6. 【强制】数据库Cursor 必须确保使用完后关闭,以免内存泄漏。
说明:
Cursor 是对数据库查询结果集管理的一个类,当查询的结果集较小时,消耗内存不易察觉。但是当结果集较大,长时间重复操作会导致内存消耗过大,需要开发者在操作完成后手动关闭Cursor。
数据库Cursor 在创建及使用时,可能发生各种异常,无论程序是否正常结束,必须在最后确保Cursor 正确关闭,以避免内存泄漏。同时,如果Cursor 的使用还牵涉多线程场景,那么需要自行保证操作同步。
正例:
public void handlePhotos(SQLiteDatabase db, String userId) {
	Cursor cursor;
	try {
		cursor = db.query(TUserPhoto, new String[] { "userId", "content" }, "userId=?", new String[] { userId }, null, null, null);
		while (cursor.moveToNext()) {
			// TODO
		}
	} catch (Exception e) {
		// TODO
	} finally {
		if (cursor != null) {
			cursor.close();
		}
	}
}
反例:
public void handlePhotos(SQLiteDatabase db, String userId) {
	Cursor cursor = db.query(TUserPhoto, new String[] { "userId", "content" }, "userId=?", new String[] { userId }, null, null, null);
	while (cursor.moveToNext()) {
		// TODO
	}
	// 不能放任cursor 不关闭
}
7. 【强制】多线程操作写入数据库时,需要使用事务,以免出现同步问题。
说明:
通过SQLiteOpenHelper 获取数据库SQLiteDatabase 实例,Helper 中会自动缓存已经打开的SQLiteDatabase 实例,单个App 中应使用SQLiteOpenHelper 的单例模式确保数据库连接唯一。由于SQLite 自身是数据库级锁,单个数据库操作是保证线程安全的(不能同时写入),transaction 是一次原子操作,因此处于事务中的操作是线程安全的。
若同时打开多个数据库连接,并通过多线程写入数据库,会导致数据库异常,提示数据库已被锁住。
正例:
public void insertUserPhoto(SQLiteDatabase db, String userId, String content) {
	ContentValues cv = new ContentValues();
	cv.put("userId", userId);
	cv.put("content", content);
	db.beginTransaction();
	try {
		db.insert(TUserPhoto, null, cv);
		// 其他操作
		db.setTransactionSuccessful();
	} catch (Exception e) {
		// TODO
	} finally {
		db.endTransaction();
	}
}
反例:
public void insertUserPhoto(SQLiteDatabase db, String userId, String content) {
	ContentValues cv = new ContentValues();
	cv.put("userId", userId);
	cv.put("content", content);
	db.insert(TUserPhoto, null, cv);
}
8. 【推荐】大数据写入数据库时,请使用事务或其他能够提高 I/O 效率的机制,保证执行速度。
正例:
public void insertBulk(SQLiteDatabase db, ArrayList<UserInfo> users) {
	db.beginTransaction();
	try {
		for (int i = 0; i < users.size; i++) {
			ContentValues cv = new ContentValues();
			cv.put("userId", users[i].userId);
			cv.put("content", users[i].content);
			db.insert(TUserPhoto, null, cv);
		}
		// 其他操作
		db.setTransactionSuccessful();
	} catch (Exception e) {
		// TODO
	} finally {
		db.endTransaction();
	}
}
9. 【强制】执行SQL 语句时,应使用SQLiteDatabase#insert()、update()、delete(),不要使用SQLiteDatabase#execSQL(),以免SQL 注入风险。
正例:
public int updateUserPhoto(SQLiteDatabase db, String userId, String content) {
	ContentValues cv = new ContentValues();
	cv.put("content", content);
	String[] args = {String.valueOf(userId)};
	return db.update(TUserPhoto, cv, "userId=?", args);
}
反例:
public void updateUserPhoto(SQLiteDatabase db, String userId, String content) {
	String sqlStmt = String.format("UPDATE %s SET content=%s WHERE userId=%s",
	TUserPhoto, userId, content);
	//请提高安全意识,不要直接执行字符串作为SQL 语句
	db.execSQL(sqlStmt);
}
10.【强制】如果ContentProvider 管理的数据存储在 SQL 数据库中,应该避免将不受信任的外部数据直接拼接在原始 SQL 语句中。
正例:
	// 使用一个可替换参数
	String mSelectionClause = "var = ?";
	String[] selectionArgs = {""};
	selectionArgs[0] = mUserInput;
反例:
	// 拼接用户输入内容和列名
	String mSelectionClause = "var = " + mUserInput;
七、Bitmap、Drawable 与动画
1. 【强制】加载大图片或者一次性加载多张图片,应该在异步线程中进行。图片的加载,涉及到 IO 操作,以及CPU 密集操作,很可能引起卡顿。
正例:
class BitmapWorkerTask extends AsyncTask<Integer, Void, Bitmap> {
	...
	// 在后台进行图片解码
	@Override
	protected Bitmap doInBackground(Integer... params) {
		final Bitmap bitmap = BitmapFactory.decodeFile("some path");
		return bitmap;
	}
	...
}
反例:
Button btnLoadImage = (Button) findViewById(R.id.btn);
btnLoadImage.setOnClickListener(new OnClickListener(){
	public void onClick(View v) {
		Bitmap bitmap = BitmapFactory.decodeFile("some path");
	}
});
2. 【强制】在ListView,ViewPager,RecyclerView,GirdView 等组件中使用图片时,应做好图片的缓存,避免始终持有图片导致内存溢出,也避免重复创建图片,引起性能问题。建议使用Fresco、Glide等图片库。
正例:
例如使用系统LruCache 缓存,参考:
https://developer.android.com/topic/performance/graphics/cache-bitmap.html
private LruCache<String, Bitmap> mMemoryCache;

@Override
protected void onCreate(Bundle savedInstanceState) {
	...
	// 获取可用内存的最大值,使用内存超出这个值将抛出OutOfMemory 异常。LruCache 通
	过构造函数传入缓存值,以KB 为单位。
	final int maxMemory = (int) (Runtime.getRuntime().maxMemory() / 1024);
	// 把最大可用内存的1/8 作为缓存空间
	final int cacheSize = maxMemory / 8;
	mMemoryCache = new LruCache<String, Bitmap>(cacheSize) {
		@Override
		protected int sizeOf(String key, Bitmap bitmap) {
			return bitmap.getByteCount() / 1024;
		}
	};
	...
}

public void addBitmapToMemoryCache(String key, Bitmap bitmap) {
	if (getBitmapFromMemCache(key) == null) {
		mMemoryCache.put(key, bitmap);
	}
}

public Bitmap getBitmapFromMemCache(String key) {
	return mMemoryCache.get(key);
}

public void loadBitmap(int resId, ImageView imageView) {
	final String imageKey = String.valueOf(resId);
	final Bitmap bitmap = getBitmapFromMemCache(imageKey);
	if (bitmap != null) {
		mImageView.setImageBitmap(bitmap);
	} else {
		mImageView.setImageResource(R.drawable.image_placeholder);
		BitmapWorkerTask task = new BitmapWorkerTask(mImageView);
		task.execute(resId);
	}
}

class BitmapWorkerTask extends AsyncTask<Integer, Void, Bitmap> {
	...
	// 在后台进行图片解码
	@Override
	protected Bitmap doInBackground(Integer... params) {
		final Bitmap bitmap = decodeSampledBitmapFromResource(getResources(), params[0], 100, 100));
		addBitmapToMemoryCache(String.valueOf(params[0]), bitmap);
		return bitmap;
	}
	...
}
反例:
没有存储,每次都需要解码,或者有缓存但是没有合适的淘汰机制,导致缓存效果很差,依然经常需要重新解码。
3. 【强制】png 图片使用TinyPNG 或者类似工具压缩处理,减少包体积。
4. 【推荐】应根据实际展示需要,压缩图片,而不是直接显示原图。手机屏幕比较小,直接显示原图,并不会增加视觉上的收益,但是却会耗费大量宝贵的内存。
正例:
public static Bitmap decodeSampledBitmapFromResource(Resources res, int resId, int reqWidth, int reqHeight) {
	// 首先通过inJustDecodeBounds=true 获得图片的尺寸
	final BitmapFactory.Options options = new BitmapFactory.Options();
	options.inJustDecodeBounds = true;
	BitmapFactory.decodeResource(res, resId, options);
	// 然后根据图片分辨率以及我们实际需要展示的大小,计算压缩率
	options.inSampleSize = calculateInSampleSize(options, reqWidth, reqHeight);
	// 设置压缩率,并解码
	options.inJustDecodeBounds = false;
	return BitmapFactory.decodeResource(res, resId, options);
}
反例:
不经压缩显示原图。
5. 【强制】使用完毕的图片,应该及时回收,释放宝贵的内存。
正例:
	Bitmap bitmap = null;
	loadBitmapAsync(new OnResult(result){
		bitmap = result;
	});
	//...使用该bitmap...
	// 使用结束,在2.3.3 及以下需要调用recycle()函数,在2.3.3 以上GC 会自动管理,除非你明确不需要再用。
	if (Build.VERSION.SDK_INT <= Build.VERSION_CODES.GINGERBREAD_MR1) {
		bitmap.recycle();
	}
	bitmap = null;
反例:
使用完成图片,始终不释放资源。
6. 【强制】在 Activity#onPause() 或 Activity#onStop() 回调中,关闭当前 activity 正在执行的的动画。
正例:
public class MyActivity extends Activity {
	ImageView mImageView;
	Animation mAnimation;
	Button mBtn;

	@Override
	public void onCreate(Bundle savedInstanceState) {
		super.onCreate(savedInstanceState);
		setContentView(R.layout.main);
		mImageView = (ImageView)findViewById(R.id.ImageView01);
		mAnimation = AnimationUtils.loadAnimation(this, R.anim.anim);
		mBtn= (Button)findViewById(R.id.Button01);
		mBtn.setOnClickListener(new View.OnClickListener() {
			@Override
			public void onClick(View v) {
				mImageView.startAnimation(mAnimation);
			}
		});
	}

	@Override
	public void onPause() {
		//页面退出,及时清理动画资源
		mImageView.clearAnimation()
	}
}
反例:
页面退出时,不关闭该页面相关的动画。
7. 【推荐】在动画或者其他异步任务结束时,应该考虑回调时刻的环境是否还支持业务处理。例如Activity 的 onStop() 函数已经执行,且在该函数中主动释放了资源,此时回调中如果不做判断就会空指针崩溃。
正例:
public class MyActivity extends Activity {
	private ImageView mImageView;
	private Animation mAnimation;

	@Override
	public void onCreate(Bundle savedInstanceState) {
		super.onCreate(savedInstanceState);
		setContentView(R.layout.main);
		mImageView = (ImageView)findViewById(R.id.ImageView01);
		mAnimation = AnimationUtils.loadAnimation(this, R.anim.anim);
		mAnimation.setAnimationListener(new AnimationListener() {
			@Override
			public void onAnimationEnd(Animation arg0) {
				//判断一下资源是否被释放了
				if (mImageView != null) {
					mImageView.clearAnimation();
				}
			}
		});
		mImageView.startAnimation(mAnimation);
	}
}
反例:
动画结束回调中,直接使用资源不加判断,导致异常。
8. 【推荐】使用 inBitmap 重复利用内存空间,避免重复开辟新内存。
正例:
public static Bitmap decodeSampledBitmapFromFile(String filename, int reqWidth, int reqHeight, ImageCache cache) {
	final BitmapFactory.Options options = new BitmapFactory.Options();
	...
	BitmapFactory.decodeFile(filename, options);
	...
	// 如果在Honeycomb 或更新版本系统中运行,尝试使用inBitmap
	if (Utils.hasHoneycomb()) {
		addInBitmapOptions(options, cache);
	}
	...
	return BitmapFactory.decodeFile(filename, options);
}

private static void addInBitmapOptions(BitmapFactory.Options options, ImageCache cache) {
	// inBitmap 只处理可变的位图,所以强制返回可变的位图
	options.inMutable = true;
	if (cache != null) {
		Bitmap inBitmap = cache.getBitmapFromReusableSet(options);
		if (inBitmap != null) {
			options.inBitmap = inBitmap;
		}
	}
}
9.【推荐】使用 RGB_565 代替 RGB_888,在不怎么降低视觉效果的前提下,减少内存占用。
说明:
android.graphics.Bitmap.Config 类中关于图片颜色的存储方式定义:
1) ALPHA_8 代表8 位Alpha 位图;
2) ARGB_4444 代表16 位ARGB 位图;
3) ARGB_8888 代表32 位ARGB 位图;
4) RGB_565 代表8 位RGB 位图。
位图位数越高,存储的颜色信息越多,图像也就越逼真。大多数场景使用的是ARGB_8888 和RGB_565,RGB_565 能够在保证图片质量的情况下大大减少内存的开销,是解决 OOM 的一种方法。
但是一定要注意RGB_565 是没有透明度的,如果图片本身需要保留透明度,那么就不能使用RGB_565。
正例:
	Config config = drawableSave.getOpacity() != PixelFormat.OPAQUE ? Config.ARGB_8565 : Config.RGB_565;
	Bitmap bitmap = Bitmap.createBitmap(w, h, config);
反例:
Bitmap newb = Bitmap.createBitmap(width, height, Config.ARGB_8888);
备注:一张1920x1080的ARGB_8888格式的图片在Android设备中占用的内存约为 1920x1080x4 = 8294400 Byte = 8100 Kb = 7.91 M, 可以看出图片非常吃内存,所以在使用高分辨率图片时一定要进行尺寸压缩!
10.【. 推荐】尽量减少 Bitmap(BitmapDrawable) 的使用,尽量使用纯色(ColorDrawable)、渐变色(GradientDrawable)、StateSelector(StateListDrawable)等与Shape 结合的形式构建绘图。
11.【推荐】谨慎使用 gif 图片,注意限制每个页面允许同时播放的 gif 图片,以及单个 gif 图片的大小。
12.【参考】大图片资源不要直接打包到 apk,可以考虑通过文件仓库远程下载,减小包体积。
13.【推荐】根据设备性能,选择性开启复杂动画,以实现一个整体较优的性能和体验;
14.【推荐】在有强依赖 onAnimationEnd 回调的交互时,如动画播放完毕才能操作页面, onAnimationEnd 可能会因各种异常没被回调( 参考:https://stackoverflow.com/questions/5474923/onanimationend-is-not-getting-called-onanimationstart-works-fine ), 建议加上超时保护或通过 postDelay 替代 onAnimationEnd。
正例:
	View v = findViewById(R.id.xxxViewID);
	final FadeUpAnimation anim = new FadeUpAnimation(v);
	anim.setInterpolator(new AccelerateInterpolator());
	anim.setDuration(1000);
	anim.setFillAfter(true);
	new Handler().postDelayed(new Runnable() {
		public void run() {
			if (v != null) {
				v.clearAnimation();
			}
		}
	}, anim.getDuration());
	v.startAnimation(anim);
15.【推荐】当View Animation 执行结束时,调用 View.clearAnimation() 释放相关资源。
正例:
	View v = findViewById(R.id.xxxViewID);
	final FadeUpAnimation anim = new FadeUpAnimation(v);
	anim.setInterpolator(new AccelerateInterpolator());
	anim.setDuration(1000);
	anim.setFillAfter(true);
	anim.setAnimationListener(new AnimationListener() {
		@Override
		public void onAnimationEnd(Animation arg0) {
			//判断一下资源是否被释放了
			if (v != null) {
				v.clearAnimation();
			}
		}
	});
	v.startAnimation(anim);
八、安全
1. 【强制】禁止使用常量初始化矢量参数构建IvParameterSpec,建议 IV 通过随机方式产生。
说明:
使用常量初始化向量,密码文本的可预测性会高得多,容易受到字典式攻击。iv 的作用主要是用于产生密文的第一个block,以使最终生成的密文产生差异(明文相同的情况下),使密码攻击变得更为困难。
正例:
	byte[] rand = new byte[16];
	SecureRandom r = new SecureRandom();
	r.nextBytes(rand);
	IvParameterSpec iv = new IvParameterSpec(rand);
反例:
	IvParameterSpec iv_ = new IvParameterSpec("1234567890".getBytes());
	System.out.println(iv.getIV());
2. 【强制】将 android:allowbackup 属性必须设置为false,阻止应用数据被导出。
说明:
android:allowBackup 原本是 Android 提供的 adb 调试功能,如果设置为 true,可以导出应用数据备份并在任意设备上恢复。这对应用安全性和用户数据隐私构成极大威胁,所以必须设置为 false,防止数据泄露。
正例:
<application
	android:allowBackup="false"
	android:largeHeap="true"
	android:icon="@drawable/test_launcher"
	android:label="@string/app_name"
	android:theme="@style/AppTheme" >
3. 【强制】如果使用自定义HostnameVerifier 实现类,必须在 verify() 方法中校验服务器主机名的合法性,否则可能受到中间人攻击。
说明:
在与服务器建立 https 连接时,如果 URL 的主机名和服务器的主机名不匹配,则可通过该回调接口来判断是否应该允许建立连接。如果回调内实现不恰当,没有有效校验主机名,甚至默认接受所有主机名,会大大增加安全风险。
反例:
HostnameVerifier hnv = new HostnameVerifier() {
	@Override
	public boolean verify(String hostname, SSLSession session) {
		// 不做校验,接受任意域名服务器
		return true;
	}
};
HttpsURLConnection.setDefaultHostnameVerifier(hnv);
4. 【强制】如果使用自定义X509TrustManager 实现类,必须在 checkServerTrusted() 方法中校验服务端证书的合法性,否则可能受到中间人攻击。
说明:
常见误区是 checkServerTrusted() 方法根本没有实现,这将导致 X509TrustManager 形同虚设。该方法中需要实现完备的校验逻辑, 对于证书错误抛出 CertificateException 。
正例:
HostnameVerifier hnv = new HostnameVerifier() {
	@Override
	public boolean verify(String hostname, SSLSession session) {
		if("yourhostname".equals(hostname)){
			return true;
		} else {
			HostnameVerifier hv = HttpsURLConnection.getDefaultHostnameVerifier();
			return hv.verify(hostname, session);
		}
	}
};
反例:
TrustManager tm = new X509TrustManager() {
	public void checkClientTrusted(X509Certificate[] chain, String authType) throws CertificateException {
		//do nothing,接受任意客户端证书
	}

	public void checkServerTrusted(X509Certificate[] chain, String authType) throws CertificateException {
		//do nothing,接受任意服务端证书
	}

	public X509Certificate[] getAcceptedIssuers() {
		return null;
	}
};
sslContext.init(null, new TrustManager[] { tm }, null);
5. 【强制】在SDK 支持的情况下,Android 应用必须使用 V2 签名,这将对 APK 文件的修改做更多的保护。
6. 【强制】所有的 Android 基本组件(Activity、Service、BroadcastReceiver、ContentProvider 等)都不应在没有严格权限控制的情况下,将 android:exported 设置为 true。
7. 【强制】WebView 应设置 WebView#getSettings()#setAllowFileAccess(false)、
WebView#getSettings()#setAllowFileAccessFromFileURLs(false) 、
WebView#getSettings()#setAllowUniversalAccessFromFileURLs(false),阻止 filescheme URL 的访问。
8.【强制】不要把敏感信息打印到 log 中。
说明:
在开发过程中,为了方便调试,通常会使用 log 函数输出一些关键流程的信息,这些信息中通常会包含敏感内容,让攻击者更加容易了解 APP 内部结构,方便破解和攻击,甚至直接获取到有价值的敏感信息。
反例:
	String username = "log_leak";
	String password = "log_leak_pwd";
	Log.d("MY_APP", "usesname" + username);
	Log.v("MY_APP", "send message to server ");
以上代码使用 Log.d Log.v 打印程序的执行过程的 username 等调试信息,日志没有关闭,攻击者可以直接从 Logcat 中读取这些敏感信息。所以在产品的线上版本中关闭调试接口,不要输出敏感信息。
9.【强制】确保应用发布版本的 android:debuggable 属性设置为 false。
10.【强制】本地加密秘钥不能硬编码在代码中,更不能使用 SharedPreferences 等本地持久化机制存储。应选择 Android 自身的秘钥库(KeyStore)机制或者其他安全性更高的安全解决方案保存。
说明:
应用程序在加解密时,使用硬编码在程序中的密钥,攻击者通过反编译拿到密钥可以轻易解密 APP 通信数据。
11.【推荐】addJavascriptInterface() 可以添加 JS 对本地 Java 方法的调用,但这本身会导致恶意代码的攻击。在 Android 4.2(API Level 17) 以下,不应再使用这样的调用方式。在 Android 4.2 及以上,需要对本地被远程调用的方法显式添加 @JavascriptInterface annotation。
12.【强制】使用Android 的 AES/DES/DESede 加密算法时,不要使用 ECB 加密模式,应使用 CBC 或 CFB 加密模式。
说明:
加密模式有 ECB、CBC、CFB、OFB 等,其中 ECB 的安全性较弱,如果使用固定的密钥,相同的明文将会生成相同的密文,容易受到字典攻击,建议使用 CBC、CFB 或 OFB 等模式。
1) ECB:Electronic codebook,电子密码本模式
2) CBC:Cipher-block chaining,密码分组链接模式
3) CFB:Cipher feedback,密文反馈模式
4) OFB:Output feedback,输出反馈模式
13.【强制】Android APP 在 HTTPS 通信中,验证策略需要改成严格模式。
说明:
Android APP 在 HTTPS 通信中,使用ALLOW_ALL_HOSTNAME_VERIFIER,表示允许和所有的 HOST 建立 SSL 通信,这会存在中间人攻击的风险,最终导致敏感信息可能会被劫持,以及其他形式的攻击。
反例:
	SSLSocketFactory sf = new MySSLSocketFactory(trustStore);
	sf.setHostnameVerifier(SSLSocketFactory.ALLOW_ALL_HOSTNAME_VERIFIER);
ALLOW_ALL_HOSTNAME_VERIFIER 关闭 host 验证,允许和所有的 host 建立 SSL 通信,BROWSER_COMPATIBLE_HOSTNAME_VERIFIER 和浏览器兼容的
验证策略,即通配符能够匹配所有子域名 ,STRICT_HOSTNAME_VERIFIER 严格匹配模式,hostname 必须匹配第一个 CN 或者任何一个 subject-alts,以上例子使用了ALLOW_ALL_HOSTNAME_VERIFIER,需要改成 STRICT_HOSTNAME_
VERIFIER。
14.【推荐】在 Android 4.2(API Level 17) 及以上,对安全性要求较高的应用可在Activity中,对 Activity 所关联的 Window 应用WindowManager.LayoutParams.FLAG_SECURE,防止被截屏、录屏。但要注意的是,一个 Activity 关联的 Window 可能不止一个,如果使用了 Dialog / DialogFragment 等控件弹出对话框,它们本身也会创建一个新的 Window,也一样需要保护。
15.【推荐】zip 中不要包含 …/…/file 这样的路径,可能被篡改目录结构,造成攻击。
说明:
当zip 压缩包中允许存在 “…/” 的字符串,攻击者可以利用多个 “…/” 在解压时改变 zip 文件存放的位置,当文件已经存在是就会进行覆盖,如果覆盖掉的文件是 so、dex 或者 odex 文件,就有可能造成严重的安全问题。
正例:
对路径进行判断,存在"…"时抛出异常。
	//对重要的Zip 压缩包文件进行数字签名校验,校验通过才进行解压
	String entryName = entry.getName();
	if (entryName.contains("..")){
	    throw new Exception("unsecurity zipfile!");
	}
反例:
BufferedOutputStream dest = null;
try {
	ZipInputStream zis = new ZipInputStream(new BufferedInputStream(new FileInputStream("/Users/yunmogong/Documents/test/test.zip")));
	ZipEntry entry;
	while ((entry = zis.getNextEntry()) != null){
		int count;
		byte data[] = new byte[BUFFER];
		String entryName = entry.getName();
		FileOutputStream fos = new FileOutputStream(entryName);
		//System.out.println("Extracting:" + entry);
		dest = new BufferedOutputStream(fos, BUFFER);
		while ((count=zis.read(data,0,BUFFER)) != -1){
			dest.write(data, 0, count);
		}
		dest.flush();
	}
} catch (IOException e) {
	e.printStackTrace();
} finally {
	try {
		dest.close();
	} catch (IOException e) {
		e.printStackTrace();
	}
}
16.【推荐】MD5 和 SHA-1、SHA-256 等常用算法是 Hash 算法,有一定的安全性,但不能代替加密算法。敏感信息的存储和传输,需要使用专业的加密机制。
九、其他
1. 【强制】不能使用 System.out.println 打印 log。
正例:
Log.d(TAG, "Some Android Debug info ...");
反例:
System.out.println("System out println ...");
2. 【强制】 Log 的 tag 不能是 " "。
说明:
日志的 tag 是空字符串没有任何意义,也不利于过滤日志。
正例:
    private static String TAG = "LoginActivity";
    Log.e(TAG, "Login failed!");
反例:
Log.e("", "Login failed!");