Java Reactive 异步与并发编程
【摘要】Reactive 编程在多数人眼中是异步、并发的“银弹/神器”。本文分析了Reactive 执行原理,说明 Reactive 编程是数据驱动的,而不是“事件”驱动的。Reactive 编程分为数据源准备、数据流建模、调度者分配三个基本设计步骤,才能实现异步并发执行。最后,我们给出基于数据流图的计算模型的设计与编程方案。
大数据和云计算(云服务)让 Reactive 编程成为新一代的编程神器。尽管 Reactive 编程模型大大简化了异步与并发编程的难度,但绝不是低门槛的。它首先需要你改变传统顺序处理的计算模式,建立面向数据流的计算模型;然后,需要有强大的线程、协程等并发知识,才能编写出 safe 的应用;再者还需要一些函数式编程的知识,如 Lambda、闭包等。本文努力描述响应式编程需要的最基础的知识,并用一些案例,让你体验 Reactive 编程的神奇与优雅。
1、准备知识
Java Reactive 编程使用 RxJava 库,虽然可以兼容 Java 5 编程,但你会失去 Java 8 给你带来的便利,如 Lambda 表达式,CompleteableFuture 等异步特性的支持。关键是没有 Lambda 函数,Reactive Java 程序几乎无法阅读!
1.1 编程环境配置
1. 项目文件配置
maven 配置文件 pom.xml 需要
    <build>
        <plugins>
            <plugin>
                <groupId>org.apache.maven.plugins</groupId>
                <artifactId>maven-compiler-plugin</artifactId>
                <version>3.1</version>
                <configuration>
                    <source>1.8</source>
                    <target>1.8</target>
                    <encoding>UTF8</encoding>
                </configuration>
            </plugin>
        </plugins>
</build>- 1
- 2
- 3
- 4
- 5
- 6
- 7
- 8
- 9
- 10
- 11
- 12
- 13
- 14
2. IDEA 设置
Intellij IDEA 要设置三处位置,且要求版本一致,否则就有出错提示,例如:“source Release 8 Requires Target Release 1.8…”
- File -> Project Structure -> Project
- File -> Project Structure -> Modules
- File -> Setting -> Build -> Compiler -> Java Compiler
1.2 Lambda 表达式
现在,不支持 Lambda 表达式的语言真不多。 在 Java 中,它主要作为单一方法的接口匿名实现。例如:
public class TestLambda {
    public static void main(String[] args) {

        System.out.println("=== RunnableTest ===");

        // Anonymous Runnable
        Runnable r1 = new Runnable() {
            @Override
            public void run() {
                System.out.println("Hello world one!");
            }
        };

        // Lambda Runnable
        Runnable r2 = () -> System.out.println("Hello world two!");

        // Run em!
        r1.run();
        r2.run();
    }
}- 1
- 2
- 3
- 4
- 5
- 6
- 7
- 8
- 9
- 10
- 11
- 12
- 13
- 14
- 15
- 16
- 17
- 18
- 19
- 20
- 21
Lambda 表达式 的语法,例如:
| Argument List | Arrow Token | Body |
|---|---|---|
| (int x, int y) | -> | x + y |
官方教程: Java SE 8: Lambda Quick Start
2、Future<V> 与多线程编程
Future<V> 是一个泛型接口,如果一个可运行的函数(实现 Callable 或 Runable 的类)在一个线程中运行,利用 Future<V> 可以用它的 get() 方法返回 V 类型的结果。 注意, get() 会阻塞当前线程。例如:
public class TestFuture {

    // https://docs.oracle.com/javase/8/docs/api/java/util/concurrent/Executor.html
    static ExecutorService executor = Executors.newCachedThreadPool();

    public void testTaskRunning(String name, Integer t) {
        System.out.println("Prepare for execution:" + name);
        long startTime = System.currentTimeMillis(); //获取开始时间

        // using lambda may cause 10X time then Callable
//        Future<String> fa = executor.submit(
//                new Callable<String>() {
//                    @Override
//                    public String call() throws Exception {
//                        try {
//                            Thread.sleep(t);
//                        } catch (Exception e) {
//                            e.printStackTrace();
//                        }
//                        return String.format("service exec time: %d", t);
//                    }
//                }
//        );

        Future<String> fa =  executor.submit(
                () -> {
                        try {
                            Thread.sleep(t);
                        } catch (Exception e) {
                            e.printStackTrace();
                        }
                        return String.format("service exec time: %d", t);
                });

        long endTime = System.currentTimeMillis();
        System.out.println("Start execute: " + (endTime - startTime) + "ms");

        try {
            String s = fa.get(); //Future to Blocked
            System.out.println(s);
        } catch (
                Exception e)
        {
            e.printStackTrace();
        }

        endTime = System.currentTimeMillis(); //
        System.out.println("End execute: " + (endTime - startTime) + "ms");

    }

    public void testAsyncTaskRunning() {
        System.out.println("Prepare for execution: composite task" );
        long startTime = System.currentTimeMillis(); //获取开始时间

        Future<String> fa = executor.submit(new TimeConsumingService("fa",200,new String[]{}));
        Future<String> fb = executor.submit(new TimeConsumingService("fb",400,new String[]{}));

        System.out.println("Start execute: " + (System.currentTimeMillis() - startTime) + "ms");

        try {
            // What will happen when change line fc and fd ?
            Future<String> fc = executor.submit(new TimeConsumingService("fc",400,new String[]{fa.get()}));
            Future<String> fd = executor.submit(new TimeConsumingService("fd",200,new String[]{fb.get()}));
            Future<String> fe = executor.submit(new TimeConsumingService("fe",200,new String[]{fb.get()}));
            fc.get(); fd.get(); fe.get();
        } catch (Exception e) {
            e.printStackTrace();
        }

        System.out.println("End execute: " + (System.currentTimeMillis() - startTime) + "ms");
    }

    public static void main(String[] args) {
        TestFuture test = new TestFuture();
        test.testTaskRunning("fa", 300);
        //test.testAsyncTaskRunning();
        System.out.println("sssssssssssssssssss");
    }
}- 1
- 2
- 3
- 4
- 5
- 6
- 7
- 8
- 9
- 10
- 11
- 12
- 13
- 14
- 15
- 16
- 17
- 18
- 19
- 20
- 21
- 22
- 23
- 24
- 25
- 26
- 27
- 28
- 29
- 30
- 31
- 32
- 33
- 34
- 35
- 36
- 37
- 38
- 39
- 40
- 41
- 42
- 43
- 44
- 45
- 46
- 47
- 48
- 49
- 50
- 51
- 52
- 53
- 54
- 55
- 56
- 57
- 58
- 59
- 60
- 61
- 62
- 63
- 64
- 65
- 66
- 67
- 68
- 69
- 70
- 71
- 72
- 73
- 74
- 75
- 76
- 77
- 78
- 79
- 80
static ExecutorService executor = Executors.newCachedThreadPool();
- Executors 返回一个线程模型,用于发射线程;
- newCachedThreadPool() 创建缓存线程池,常用于管理 IO 阻塞型线程
- newFixedThreadPool(int nThreads) 创建管理计算需求的线程池,n=cpu*2;
- newSingleThreadExecutor() 创建单个线程
- … …
- ExecutorService 管理发射(启动)、停止线程等操作
- submit 用于将实现 Callable 或 Runable 接口的对象,启动线程;
- 它返回
Future<V>接口,方便管理线程和获取结果
- Executors 返回一个线程模型,用于发射线程;
testTaskRunning()
- executor.submit 启动 Callable 接口实现,或 Lambda 函数为一个线程
- Lambda 准备需要远常于接口的时间
- executor.submit 启动 Callable 接口实现,或 Lambda 函数为一个线程
testAsyncTaskRunning()
- 在线程池中执行一群耗时的函数(实现 Callable的类)
- TimeConsumingService 是模拟服务对象,它有名字、计算时间。代码见后面
问题
- get() 顺序会影响出结果时间,关键 get 的阻塞;
- 如果能按这些线程出结果的时间序列,把数据结果交给后面的线程并行加工处理,CPU就不用阻塞在 get() 了。但编程无疑会很复杂。
3、Reactive(响应式)编程
大到大数据处理(如spark),小到 android界面事件流的处理,Reactive(响应式)编程以成为最流行的标配。然而它是如何工作的呢? 如何正确编写 Reactive 程序?
3.1 响应式编程基本原理
响应式编程是一种按流水线模式组织处理数据流的协程计算模型(实在找不到合适的定义)。一个流水线有输入源、工人(函数)、流水结构、调度员、输出构成。假设一个简单的线性(顺序处理)流水线,如图:
(s0--S1----s2-s3---|)  [alpha]  ...  [beta]  ...  [theta]  (o0---o2------o2o4-)
                      |                                   |
                      |                                   |
+------------scheduler--------------+- 1
- 2
- 3
- 4
其中 :
*(d0–d1—–d2–|)表示带终止标志的时序数据流;
* [worker] 表示一个操作函数,它只能从前道工序取数据,加工处理后交给下一个 worker;
* … 表示两个工人之间的存放数据的缓存队列(EndPoint);
* scheduler 是管理工人干活的调度员,一个调度员能仅能一次指挥一个工人,且工人一次只处理一个数据,要么成功,要么失败(异常)。
例如:
    public static void hello(Integer... integers) {
        Observable<Integer> workflow = Observable.from(integers)
                .filter( i -> (i < 10) && (i > 0))
                .map( i -> i *2);
        workflow.subscribe(i -> System.out.print(i + "! ") );
}- 1
- 2
- 3
- 4
- 5
- 6
这是典型的链式函数式处理计算模式。输入与输出分别是:
hello(-1,4,5,0,2,19,6);

8! 10! 4! 12! - 1
- 2
- 3
关键不是结果,而是处理过程。第一条语句仅是搭建了一个框架,声明了数据源和两个操作工人 filter,map,它们各自使用定义的函数干活。最重要的工人(subscribe)出场了,它开动了流水线, scheduler 开始指挥工人干活,注意工人轮流上场(不是并行),直到遇到结果符号且每个工人无活可干,流水线关闭。
这个程序是单线程程序(一个 scheduler),但是 filter,map,scheduler 干活的顺序是不可预知的,如果他们取数据的 EndPoint有数据,则可以被 scheduler 调度的。一个工人被调度一次,则是获得了CPU,直到函数操作完成,释放 CPU。这是标准的协程(Coroutine)概念。
响应式编程意思就是根据 EndPoint 中的数据启动对应数据处理函数,是函数之间异步执行(链式反应)的过程,这对于减少程序阻塞、减低线程开销,特别是不支持多线程的nodejs,javascript,python等具有特别的意义。
因此,Reactive 编程是数据驱动的编程,在数据驱动的模型上建立并发处理机制,需要引入多个调度者。
千万不要认为响应式编程是并发的,建议你有时间时, 务必仔细阅读 RxJava Threading Examples 。理论上,Reactive 是数据驱动的,而不是事件驱动的。
响应式编程不是真正意义上的并发,由于每个调度器是一个线程,它管理的操作函数之间一般都不需要对数据上锁,这些函数是按数据驱动,“并发运行”的。
Reactive 要点
- Reactive 编程开始是流程建模过程,而不是数据处理过程
- 工作流由 subscribe 启动,subscribe 多次就会导致多次启动流程。这与普通语言按顺序执行不一样
- scheduler 是一个单线程的调度器,每个scheduler中管理的函数都是顺序执行的,阻塞函数会阻塞流水线工作。
- 工作函数是响应式的,观察者模式仅是实现数据驱动的技术概念,每个数据流,就称为 “Observable” 的对象。所以,到了 2.x 就改称 “Flowable” 了
3.2 RxJava 入门
RxJava 是 Reactive eXtend for Java VM 的缩写。Reactive eXtend 支持许多语言,支持 Groovy, Clojure, JRuby, Kotlin 和 Scala 等现代语言。官方网站:
https://github.com/ReactiveX/RxJava/wiki
1. Maven 依赖
        <dependency>
            <groupId>io.reactivex</groupId>
            <artifactId>rxjava</artifactId>
            <version>1.2.9</version>
</dependency>- 1
- 2
- 3
- 4
- 5
个人认为 RxJava 1.x 比较合适入门,2.x 抽象程度高,较难入门。
2. Hello world
    public static void hello(String... names) {
        Observable.from(names).subscribe(new Subscriber<String>() {
            @Override
            public void onCompleted() {
                System.out.println("Completed!");
            }

            @Override
            public void onError(Throwable throwable) {
                throwable.printStackTrace();
            }

            @Override
            public void onNext(String strings) {
                System.out.println("same hello " + strings);
            }

        });
}- 1
- 2
- 3
- 4
- 5
- 6
- 7
- 8
- 9
- 10
- 11
- 12
- 13
- 14
- 15
- 16
- 17
- 18
- 19
编程步骤:
- 响应式编程第一步就是创建数据源。简单就是 Observable.from 从一个集合中取数,或者 Observable.just 直接取数,例如 Observable.just(1,2);
- 用操作函数搭建数据流处理流水线(workflow),即使用操作数据变换(transform) 定义工作流。官方有几百个操作或函数???,学习难度有点大!!!
- 最后操作 subscribe,启动流程,输出数据。
subscribe支持3个函数,onNext 收到一个结果,onError 收到一个错误,onCompleted 流程结束。
3.3 调度器与线程
- 调度器(Scheduler)对象:操作调度的线程。
- 调度器工作的线程模型:
- Scheduler.io() 创建调度器用于 IO 阻塞的工作,使用缓存线程池;
- Scheduler.computation() 创建调度器用于耗时计算,使用固定线程池;
- Scheduler.from(java.util.concurrent.Executor executor) 使用已有线程池;
官方案例是:
import io.reactivex.schedulers.Schedulers;

Flowable.fromCallable(() -> {
    Thread.sleep(1000); //  imitate expensive computation
    return "Done";
})
  .subscribeOn(Schedulers.io())
  .observeOn(Schedulers.single())
  .subscribe(System.out::println, Throwable::printStackTrace);

Thread.sleep(2000); // <--- wait for the flow to finish- 1
- 2
- 3
- 4
- 5
- 6
- 7
- 8
- 9
- 10
- 11
这是一个2.x的例子。
- Flowable.fromCallable 创建一个耗时的源。
- subscribeOn(Schedulers.io()) 源开始使用线程池中的这个调度器
- observeOn(Schedulers.single()) 下面的操作使用这个调度器
注:由于调度器在后台,没有最后一句,你将等不到任何输出主线程就结束了。在实际应用中,如android界面主线程、web服务异步线程一般不会结果,而是等你 subscribe 结果。
案例研究:假设你有100个URL,要从网站爬这些URL数据,这样编程可以吗
    Observable.from(Urls)
        .observeOn(Schedulers.io())
        .map(url -> readFileFromUrl(url))
        .observeOn(Schedulers.computation())
        .flatMap(doc -> process(doc))
        .observeOn(Schedulers.single())
.subscribe(out -> output(out));- 1
- 2
- 3
- 4
- 5
- 6
- 7
问题:
- 这里有几个 Scheduler 线程呢?
- 每个线程调度拥有那些计算函数呢?
Reactive 并发编程要点
- 在数据流中,设计与管理 Scheduler 的数量与管理范围,是 RxJava 并发的关键
- 在数据流中,有当前 任务调度(线程) 概念,尽管线程是隐式的
- subscribeOn(Scheduler) 定义最近数据源的调度者,因此一个源头一个就够了,多了也没有意义。
- observeOn(Schedule) 定义以后任务的调度者。
- 并行分为函数处理(单线程)级别的并发,和调度者(多线程)级别的并发。
3.4. RxJava 并发编程设计
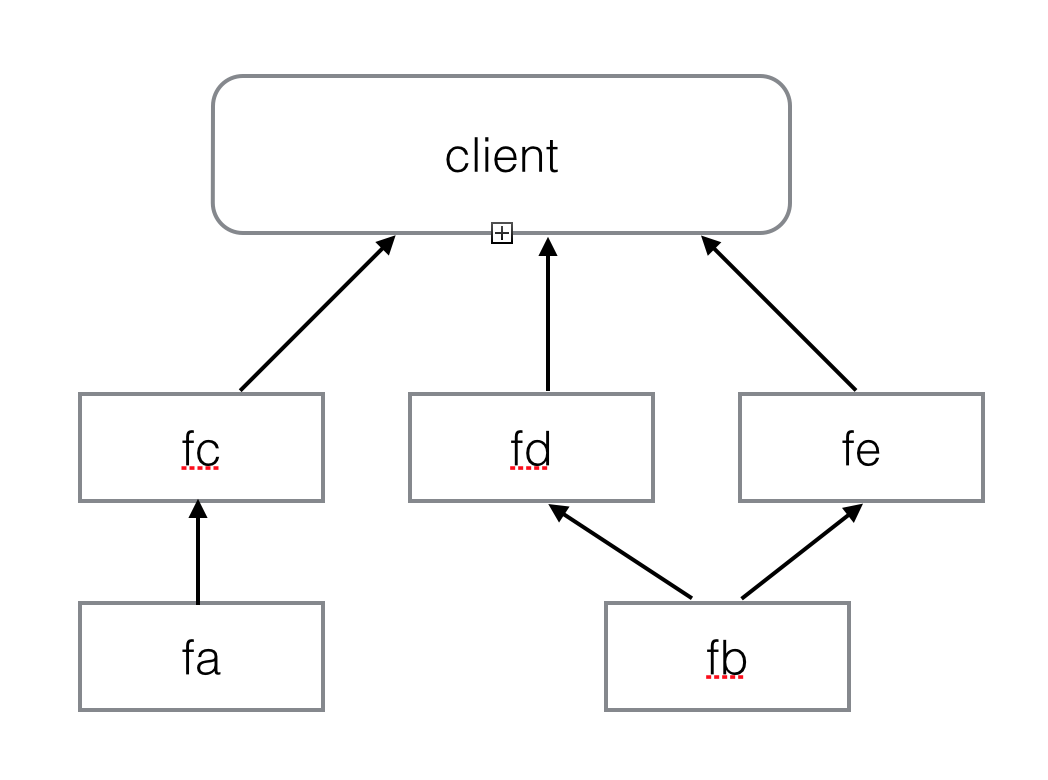
案例研究:异步任务的依赖
假设我们的程序需要五个 micro-service 协作完成计算任务,这些 micro-services 之间存在数据依赖关系:
为了实验方面,我们构造了实现 Callable 的类 TimeConsumingService:
public class TimeConsumingService implements Callable<String> {

    private String service_name;
    private int wait_ms;

    public TimeConsumingService(String name, Integer waiting, String[] depandencies) {
        this.service_name = name;
        this.wait_ms = waiting;
    }

    @Override
    public String call() throws Exception {
                Thread.sleep(wait_ms);
                return String.format("service %s exec time is: %d", service_name,wait_ms);
    }
}- 1
- 2
- 3
- 4
- 5
- 6
- 7
- 8
- 9
- 10
- 11
- 12
- 13
- 14
- 15
- 16
为了确保这些函数能并发执行,要点就是要构造足够线程,让没有依赖关系的服务在不同线程中执行。这里我们采用
join 设计方法
- 画出数据流图;
- 选择流程图上的流程归并节点;
- 为每条归并点的一条执行路径设计一个调度者(线程);
- 在归并点 merge 这些路径的流。
代码如下:
    public void testAsyncCompositeJoin() {
        System.out.println("Prepare for execution:Async Composite Join");
        long startTime = System.currentTimeMillis(); //获取开始时间

        // Tasks oa -> oc,  both in the same thread 1.
        Observable<String> oa = Observable.just("oa").observeOn(Schedulers.io()).flatMap(
                soa -> Observable.fromCallable(new TimeConsumingService("fa", 1000, new String[]{}))
        );
        Observable<String> oc = oa.flatMap(
                (String res) -> {
                    System.out.println(res);
                    System.out.println("Executed At: " + (System.currentTimeMillis() - startTime) + "ms");
                    return Observable.fromCallable(
                            new TimeConsumingService("fc", 2000, new String[]{res}));
                });

        // tasks ob -> (od,oe),  ob, od, oe have special thread 2,3,4.
        Observable<String> ob = Observable.just("ob").observeOn(Schedulers.io()).flatMap(
                sob -> Observable.fromCallable(new TimeConsumingService("fb", 2000, new String[]{}))
        );
        Observable<String> od_oe = ob.flatMap(
                (String res) -> {
                    System.out.println(res);
                    System.out.println("Executed At: " + (System.currentTimeMillis() - startTime) + "ms");
                    Observable<String> od = Observable.just("od").observeOn(Schedulers.io()).flatMap(
                            sod -> Observable.fromCallable(new TimeConsumingService("fd", 1000, new String[]{res}))
                    );
                    Observable<String> oe = Observable.just("oe").observeOn(Schedulers.io()).flatMap(
                            sod -> Observable.fromCallable(new TimeConsumingService("fe", 1000, new String[]{res}))
                    );
                    return Observable.merge(od, oe);
                });

        System.out.println("Observable build: " + (System.currentTimeMillis() - startTime) + "ms");

        // tasks join oc,(od_oe) and subscribe
        Observable.merge(oc, od_oe).toBlocking().subscribe(
                (res) -> {
                    System.out.println(res);
                    System.out.println("Executed At: " + (System.currentTimeMillis() - startTime) + "ms");
                });

        System.out.println("End executed: " + (System.currentTimeMillis() - startTime) + "ms");
}- 1
- 2
- 3
- 4
- 5
- 6
- 7
- 8
- 9
- 10
- 11
- 12
- 13
- 14
- 15
- 16
- 17
- 18
- 19
- 20
- 21
- 22
- 23
- 24
- 25
- 26
- 27
- 28
- 29
- 30
- 31
- 32
- 33
- 34
- 35
- 36
- 37
- 38
- 39
- 40
- 41
- 42
- 43
- 44
注意:上述程序中既有 lambda 函数,也有 lambda 表达式。区别是前者需要 return,而后者不需要。
启动程序:
        sample.testAsyncCompositeJoin();
sample.testAsyncCompositeJoin();- 1
- 2
执行结果:
Prepare for execution:Async Composite Join
Observable build: 204ms
service fa exec time is: 1000
Executed At: 1294ms
service fb exec time is: 2000
Executed At: 2278ms
service fe exec time is: 1000
Executed At: 3285ms
service fd exec time is: 1000
Executed At: 3285ms
service fc exec time is: 2000
Executed At: 3295ms
End executed: 3295ms
Prepare for execution:Async Composite Join
Observable build: 0ms
service fa exec time is: 1000
Executed At: 1001ms
service fb exec time is: 2000
Executed At: 2001ms
service fc exec time is: 2000
Executed At: 3003ms
service fd exec time is: 1000
Executed At: 3003ms
service fe exec time is: 1000
Executed At: 3003ms
End executed: 3005ms
- 1
- 2
- 3
- 4
- 5
- 6
- 7
- 8
- 9
- 10
- 11
- 12
- 13
- 14
- 15
- 16
- 17
- 18
- 19
- 20
- 21
- 22
- 23
- 24
- 25
- 26
- 27
这个结果很有趣,sample第一次加载,流程准备用了 204 ms。第二次执行,准备时间变为 0 ms
这段代码如果不算系统开销,应在 3 秒执行完毕。
要点
- join 方法合适解决数据流程多调度者的设计
- fromCallable 生成一个可调度的函数,该把函数的结果输出
- flatMap 和 map 是最常用的操作函数
- map 合适返回一个其他类型数据函数,但不能是 Observable 的
- flatMap 合适返回一个流的函数,并把这个流产生的数据合并输出到下一个 Endpoint
- flatMap – merge 构成 map-reduce 计算模型
- reduce 操作函数,用于聚合一个流的结果
4. 小结
本文用案例说明了 Reactive 数据流驱动计算的执行过程与编程。以前并发处理多个相关服务的无数行线程、信号灯与锁、管理的代码都不见了,变成了简单、优雅的计算模型。
网上也有无数教程,多数都是从简单应用角度的介绍性文章,其中,绝大多数程序是没有考虑异步与并发同时出现的情况。当然,也有许多精品文章,精品文章是难以读懂的,如同官方文档难以阅读一样。
Reactive 编程是数据驱动的,而不是“事件”驱动的。Reactive 编程分为数据源准备、数据流建模、调度者分配三个基本设计步骤,才能实现异步并发执行。数据源准备、数据流建模涉及几百个操作函数,异步数据处理绝不是简单的过程;调度者分配虽然只有几个函数,却是 bug 的根源。
Reactive 编程模型是“微服务架构” 必须掌握的基本设计思想与应用技术,服务编排与组合永远是SOA 的核心!!!